background image

Instruction Booklet

8-Series

Figure 10

Figure 10

Figure 11

Figure 11

(G)

(H)

10

Remove front basket (G) and lower tiller by pulling tiller adjustment (H) and push tiller
doun. (See Fig. 10)
When fintsh instruction from figure (4) to figure (10) , there are 5 main parts. (See Fig. 11)

Summary of Contents for HS-850

Page 1: ...C T M MOBILITY SCOOTER C T M MOBILITY SCOOTER C T M MOBILITY SCOOTER 8 Series Instruction Booklet HS 850 HS 890...

Page 2: ...NT PRECAUTIONS ELECTROMAGNETIC INTERFERENCE AND WARNINGS IDENTIFICATION OF PARTS OPERATING YOUR SCOOTER DISASSEMBLING YOUR SCOOTER ASSEMBLING YOUR SCOOTER CHARGING THE BATTERIES CARE AND MAINTENANCE T...

Page 3: ...n purchasing your new C T M Mobility Scooter It is designed to provide you with transportation ability indoors and outdoors We pride ourselves on providing safe and comfortable products Our goal is to...

Page 4: ...e extreme care when crossing roads Do not drive on slope exceeding 12 degree and take extreme care when turning on slope Do not use full power when turning to sharp corner Take great care and drive in...

Page 5: ...lease its brakes move by itself or move in unintended directions It can also permanently damage the motorized scooter control system The intensity of the interfering EM energy can be measured in volts...

Page 6: ...ings listed below should reduce the chance of unintended brake release or motorized scooter movement which could result in serious injury 1 Do not operate hand held transceivers transmitters receivers...

Page 7: ...ront View Figure 2 HS 890 Control Panel Figure 3 HS 890 Rear View IDENTIFICATION OF PARTS 5 Before attempting to drive this scooter on your own it is important that you familiarize yourself with the c...

Page 8: ...iller adjustment to adjust tiller angle and release to lock at comfortable position BELOW SEAT Seat Height Adjuster There are three holes on seat tube to adjust seat height Be sure the detent pin is f...

Page 9: ...ndlebars the thumb levers should be within easy reach The right lever moves scooter forward the left one moves it backward When you release both levers scooter will stop 4 Steer scooter by turning til...

Page 10: ...Other Operating Information Hill climbing You may need to use a higher speed Turn to lower speed before going downhill Down slopes proceed with downward slopes slowly and set speed control in proximit...

Page 11: ...eight style make it fit easily into trunk or back seat of most vehicle No tools are necessary to disassemble scooter Remove seat by releasing Seat Rotation Lever A and then lift seat off See Fig 4 Rem...

Page 12: ...gure 10 Figure 10 Figure 11 Figure 11 G H 10 Remove front basket G and lower tiller by pulling tiller adjustment H and push tiller doun See Fig 10 When fintsh instruction from figure 4 to figure 10 th...

Page 13: ...mbly directions in reverse Abbreviated directions are given below Refer to Figures on pages 9 11 to locate parts 1 Use the tiller adjustment to move tiller up and out of the way 2 Place front basket 3...

Page 14: ...ange light when it turns to green light that means well charged 5 LED indication LED POWER GREEN LIGHT ON Power On LED CHARGE ORANGE LIGHT ON Charging GREEN LIGHT ON Fully Charged 6 Charger Trouble Sh...

Page 15: ...ct electrical parts Polish with an automotive liquid polish Maintaining Your Scooter All maintenance and repair of scooter should be done by an authorized dealer The following areas required periodic...

Page 16: ...lems Other internal errors Battery voltage too high Here are some suggestions about solving problems you may have with your scooter There is a Self Diagnostic Warning Light on the Control Panel To che...

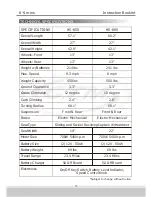
Page 17: ...l Range Battery Charger Electronics 57 1 27 42 9 13 13 214 lbs 9 3 mph 450 lbs 3 3 12 degree 2 4 68 1 Front Rear Electro Mechanical 19 700W 5400r p m 2 12V 50Ah 69 lbs 23 4 Miles 5A Off Board 60 2 27...

Reviews: