background image

CD PLAYER / USB SOUND SYSTEM CD5

14

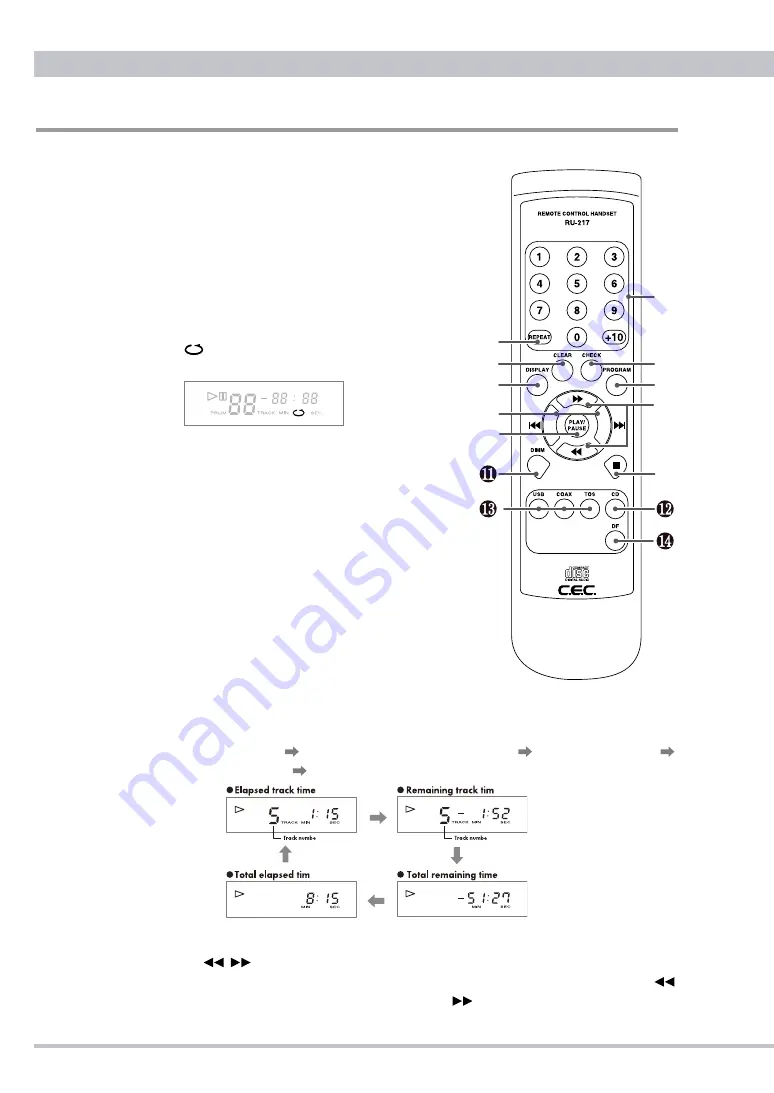
Remote Control unit

Key Functions

Numeric Keys

Press to select a track directly for play-
back or to enter a programmed playback 
order. To select ex. 4-track press +10 
twice and then 4. 

REPEAT button

Press  to  repeatedly  playback  all  the 
tracks  on  a  disc.  When  repeat  mode 
is on, the display will show the repeat

indicator. Press again to cancel the 

repeat mode.

CHECK button

Press to check the order of tracks in your 
current  programmed  setting.  Refer  to 
"PROGRAMMED  CD  PLAYBACK"  on 
page 19 for details.

CLEAR button

Press to clear the current programmed 
setting. Refer to "PROGRAMMED CD 
PLAYBACK" on page 19 for details.

PROGRAM button

Press to enable programmed playback.
Refer  to  "PROGRAMMED  CD  PLAY-
BACK" on page 19 for details.

DISPLAY button

Press to cycle the display through various mode. Each press of the DISPLAY 
button cycles the display in the following order: track number/elapsed track time 
(default display) track number/remaining track time total remaining time
total elapsed time back to track number/elapsed track time (default display).


Total remaining time and total elapsed time will not be displayed when program 
mode and/or repeat mode are active.

Search

/

button

Press and hold the button to quickly search through the track being played. 
searches through the track backwards, and 

searches forwards.

e

e

r

r

(default)

Summary of Contents for CD5

Page 1: ...OURCE POWER HEADPHONE VOLUME BELT DRIVE CD PLAYER CD5 Thank you for purchasing a CD5 Please read through and refer to this Owner s Manual to use your CD5 safely and adequately It is recommended to kee...

Page 2: ...rtia contributes to high precision music reproduction CEC s long history of belt drive system achieved the new standard where a user may replace the belt without consulting a specialist You are now fr...

Page 3: ...EVENT FIRE OR SHOCK HAZARD DO NOT EXPOSE THIS APPLIANCE TO RAIN OR MOISTURE 1 Read these instructions 2 Keep these instructions 3 Heed all warnings 4 Follow all instructions 5 Do not use this applianc...

Page 4: ...r extended periods of time 14 Refer all servicing to qualified service personnel Servicing is required when this appliance itself its power supply cord or plug has been damaged in any way when liquids...

Page 5: ...eakers themselves or other devices Turning power on Turn on this appliance before turning on the DA converter or amplifier connected to this appliance Turning power off Turn off the amplifier before t...

Page 6: ...signal reading It may also cause contact failure of the switches and or noise Otherwise avoid installing this appliance close to other transformers and electrical motors so as to prevent the pickup o...

Page 7: ...dry cloth Try to keep the discs clean at all times Never use chemicals such as record sprays anti static sprays benzene or thinner to clean a disc These may corrode the surface of a disc Do not place...

Page 8: ...le to playback CD R RW discs recorded in audio CD format and finalized Some CD R RW discs may be unplayable due to the quality of the CD R RW disc and or the quality of the recording Do not attach sti...

Page 9: ...ation needs The power cord is for use with the CD5 exclusively and should not be used for other devices PO WER SO URCE VO LU ME HEA DPH NE USB COAX TO S PC M FL AT PU LS E DSD BE LT DR IVE CD PL AY ER...

Page 10: ...he selected digital input signal is converted and transfered to the analog and headphones outputs Track Skip buttons Press the Skip forward or backward button to jump to the next or previous track fro...

Page 11: ...ayed and elapsed time are displayed A Playback indicator lights up during playback B Pause indicator blinks during pause mode C Time display indicates the elapsed time remaining time for the track bei...

Page 12: ...tabilizer on top of the disc The CD Stabilizer can be placed on the CD Turntable when not in use even when no disc is in place Rubber Belt Square rubber belt to drive a disc on the CD Turntable Period...

Page 13: ...d 128 files can be reproduced as well Those drivers and install manual are appeared at each download site in CEC home page Visit at www cec web co jp service download driver index_ex html for the driv...

Page 14: ...rammed setting Refer to PROGRAMMED CD PLAYBACK on page 19 for details PROGRAM button Press to enable programmed playback Refer to PROGRAMMED CD PLAY BACK on page 19 for details DISPLAY button Press to...

Page 15: ...for switching When you don t hear the click sound it is possible that selected music source could not be shown at display window or brightness of display is not even upon using DIMM function If this h...

Page 16: ...digital filter avoids the problems in the time domain and thus has a very good response in the time domain The frequency response of the PULSE digital filter shows a soft roll off at high frequencies...

Page 17: ...hould automatically start spinning the disc to read its information and the total number of tracks and the total playing time should appear on the display Leaving CD5 withtout pressing any button the...

Page 18: ...CD turntable to stop spinning Do not touch the CD Stabilizer or the disc until those stop completely Pressing the CD Stabilizer or the disc down exessively may damage the CD mechanism or the disc or c...

Page 19: ...disc is selected the last track may be added alternatively After the 1st playback track is added you can select an addition track by pressing skip buttons as well The selected track number blinks The...

Page 20: ...will be added to the end of the current playback order Repeat this process to add more tracks to the program Press the STOP button to complete the track adding phase Chang Tracks in the Program To ch...

Page 21: ...ng frequency of the locking input signal will appear on the display window Ex PCM 48kHz through USB connection in PULSE digital filter Adjust the volume at the CD5 headphones or the amplifier after mu...

Page 22: ...n after 5 years Replacement of a rubber belt No other rubber band than CEC original rubber belt can be used for replacement Require the CEC belt at the dealer that you have purchased Remove the old be...

Page 23: ...to use Belt Drive CD Handle the CD stablizer withe care The CD stabilizer is quite heavy Please handle it carefully not to drop to damage other equipment and or furniture And the distortion of the CD...

Page 24: ...Hum noise or distortion Check if the plugs are connected correctly Make sure correct cable is used in the specific direction Sound skipping Place the player on a stable rack to prevent the effects of...

Page 25: ...vice Contact Preparation In case you need to contact a service center please prepare the following information Model name and serial number Purchase date Dealer name and contact information Descriptio...

Page 26: ...ut Balanced XLR pin2 hot x 1 4Vrms Unbalanced RCA x 1 2Vrms Headphones output 6 3mm x 1 Frequency response 20Hz to 20kHz 0 1dB CD playback S N ratio 105dB 1kHz 0dB Cross talk 105dB 1kHz 0dB THD 0 016...

Page 27: ...CD5 User s Manual 27 Memo...

Page 28: ...1501 A CEC Co Ltd Japan...

Reviews: