BYO Guitar BONGO Assembly Instructions Manual Download Page 27

Section 5 

– Setting Up Your Guitar


BONGO bass Section 5


- 2 -


5.1


Adjust the Guitar Neck: Truss Rod 

The first major procedure in the setup is adjusting the neck relief. Neck relief simply refers to how much 
the neck bows. The degree of bowing in the neck is a matter of personal preference and is correlated to 
your playing style.  

5.1.1


Check the Neck 

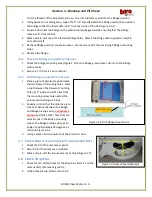
Get a ruler or straightedge that is at least as 
long as the neck, but not so long that it 
reaches all the way from the nut to the 
saddles.  If you can’t get one between these 
lengths, and are willing to sacrifice a ruler, get 
one that’s too long and cut it to length. 
Alternatively, you can just cut a little out of 
one edge so that you can still make full use of the other edge of the ruler.  Now lay the edge of the ruler 
along the frets (don’t rest it on top of the nut, saddles, pickups or pickup surrounds). 

Using a feeler gauge or high resolution metal ruler, measure the string height (the gap between the 
ruler/string and the top of the fret) at about the 8th fret. The string height should be approximately 1/8’ 
(0.012”) - simply slide the feeler gauge into the gap to see if it is too big/small. 

5.1.2


Adjusting the Truss Rod 

Tightening the truss rod adjustment bolt will cause the neck to warp backward (too much and the 
strings will buzz on the frets), and loosening it will cause it to bow forward (giving more relief.).  
CAUTION: If you find that the truss rod is very difficult to turn, then stop.   It may be that there is a 
problem with the neck or the truss rod and you may damage the guitar by forcing it.  

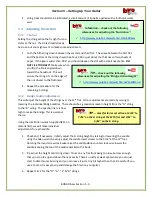
Sight down the edge of the fingerboard from 
behind the headstock, looking toward the body 
of the guitar.  

1.


If the neck is too concave (action too 
high), turn the truss rod nut clockwise to 
remove excess relief (only adjust ¼ turn 
at a time).  

2.


If the neck is too convex (strings too close to the fingerboard), turn the truss rod nut counter-
clockwise to allow the string tension to pull more relief into the neck.  

3.


Check the tuning, then re-check the gap with the feeler gauge and re-adjust as needed.   

5.2


String Lubrication 

Lubricate the contact points of a string's travel to ensure tuning stability and reduce string breakage.  
Lubricate: 

1.


string/saddle contact points with a light machine oil (…such as  3-in-1 oil because it contains 
anti-rust and anti-corrosive properties) every time you change strings.  

  reference:  

…check out the following

 references for adjusting the Truss rod: 


http://www.youtube.com/watch?v=PHHepmTX3So


http://www.youtube.com/watch?v=4j3QryKIXrc


TIP…


do the neck adjustment in a series of 

intermediate steps and re-tune your guitar before each 

step – different tension on the strings changes the 

adjustment of the neck


Summary of Contents for BONGO

Page 1: ...BONGO Bass Guitar Kit Assembly Instructions www byoguitar com...

Page 2: ...certain the safety glasses you wear meet the appropriate standards of the American National Standards Institute ANSI Because there are various ways to cut and join wood you can make substitutions for...

Page 3: ...2 6 1 Positioning and Alignment of the Bridge Figure 2 6 1 3 2 6 2 Check for Bridge Ground Wire Channel 4 2 6 3 Drill Bridge Ground Wire Channel 4 2 7 Check Rear Access Panel 9 on material list 4 2 8...

Page 4: ...alling the Bridge and Neck Pickups 3 4 4 3 Install Output Jack 4 4 4 4 Connecting the dots Soldering in the Components 4 4 5 Installing the Bridge 5 4 6 Install the Strings 5 4 7 Installing the Strap...

Page 5: ...nishing materials especially if they have to be ordered will allow expedite your guitar project We carry a full line of finishing products that give you the beautiful finish you are looking for whethe...

Page 6: ...ece parts are included If you customized your order ex different tuners ensure that these parts are accounted for Please contact BYOGuitar if there are any discrepancies BONGO bass Material List Item...

Page 7: ...uard Bridge Back Plate 5 1 harness w 4 potentiometers 4 knobs BONGO bass Wiring harness 6 1 Bridge Bridge assembly 7 4 top mount 1 bottom mount 5 tuner inserts Tuning Pegs 8 20 screws 3 8 Tuning Peg s...

Page 8: ...tro 7 9 1 plate Electronics cover 10 Jack w washer Output Jack 11 2 Holders 2 plastic washers 2 screws 1 Strap Holder materials 12 4 screws 1 4 washers Neck Mounting hardware 13 1 string T 1 screw Str...

Page 9: ...ditional tools materials required Drill drill bits 1 2 Phillips screwdriver Soldering iron solder Masking painters tape Finishing painting material Sand paper 220 320 grit Guitar strap Soap or candle...

Page 10: ...ish has been applied and completely dried In this section all of the components are installed internal wiring connected and strings attached your guitar will ready to go Section 5 Setup in this sectio...

Page 11: ...Bridge Ground Wire Channel 4 2 6 3 Drill Bridge Ground Wire Channel 4 2 7 Check Rear Access Panel 9 on material list 4 2 8 Check Strap Pins 4 2 9 Check Tuner Alignment 5 2 10 String Tee Position 5 2 1...

Page 12: ...pocket by hand a Carefully clamp the neck in place frets damage easily b Using the same drill bit you drilled the holes in the body place the bit in the hole through the body and tap it a few times to...

Page 13: ...pickguard and pickup cavity alignment to ensure proper positioning If incorrect repeat step 2 3 using another pickguard hole 5 Once confirmed mark and pre drill the remaining holes for the pickguard E...

Page 14: ...6 3 Drill Bridge Ground Wire Channel 1 Place a piece of painters tape between the two forward mounting holes Mark a spot between the forward mounting holes 1 4 inside and 1 8 back from the mounting s...

Page 15: ...As the Headstock is curved ensure that the Tuner shaft alignment follows the curvature Headstock Fig 2 9 4 Check alignment of set screw holes 4 and tuner base 5 If alignment is incorrect or holes are...

Page 16: ...etc This section will cover the application of several finish types including 1 Solid color 2 Pigmented translucent gel stain or alcohol dye 3 Penetrating stain or water based dye The guitar body was...

Page 17: ...he body and neck 2 Apply grain filler if desired 3 Apply 2 coats of sand and sealer 4 Sand to 320 grit 5 Apply stain or dye 6 Apply clear top coats 7 Buff finish 3 1 3 Penetrating Stain or water based...

Page 18: ...mmended We recommend using Behlen PORE O PAC grain filler For most finishes use natural colored filler The dyes used in darker fillers may over time find their way through the color coat Apply the fil...

Page 19: ...sh have been applied DO NOT sand through the finish be careful on the edges Use a tack cloth to remove sanding residue Apply more finish sanding between coats until the finish is the desired thickness...

Page 20: ...4 3 Install the Pickguard 2 4 4 Installation of the Electronic Components 2 4 4 1 Installing the Wiring Harness 3 4 4 2 Installing the Bridge and Neck Pickups 3 4 4 3 Install Output Jack 4 4 4 4 Conne...

Page 21: ...4 2 Installing the Tuners Figure 4 2 Each tuner consists of the tuner and collar The tuners are attached to the headstock with 3 8 wood screws refer to Section 2 9 1 Place a small amount of wood glue...

Page 22: ...4 1 Installing the Wiring Harness As noted the wiring harness comes assembled and only requires to be run through various tunnels prior to being connected to other components Before starting the insta...

Page 23: ...4 Insert the Bridge Pickup signal wire through the channel into the electrical cavity while placing the pickup into the Bridge cavity closest to the back of the Body Start each adjustment screw for 2...

Page 24: ...ng the supplied screws 4 6 Install the Strings Like most projects there often several tricks that will make the assembly easier and your guitar better Properly stringing your guitar is just one of tho...

Page 25: ...pe on the headstock approximately at the intersection of Figure 4 8 1 a Using a straight edge ruler establish the from the center A sting line notch in the nut to the lower side of the A tuner b Using...

Page 26: ...ght 3 Adjusting the Pickup heights 4 Adjusting the Intonation These adjustments will provide preliminary settings from which you can fine tune the sounds to your individual playing style As with previ...

Page 27: ...backward too much and the strings will buzz on the frets and loosening it will cause it to bow forward giving more relief CAUTION If you find that the truss rod is very difficult to turn then stop It...

Page 28: ...to the B string The question here is how high to make the bridge This is personal choice Using the small Allen wrench supplied 15 on material list we will make individual adjustments for each saddle 1...

Page 29: ...om of the 1st string note measurement 1 3 Repeat 1 1 1 2 on the B string note the measurement 2 Neck Pickup repeat steps 1 1 through 1 3 above on the neck pickup noting measured heights Using Table 5...

Page 30: ...racts when cool After you ve played a few riffs you can then do your final tuning 2 Wipe the strings neck and bridge with a lint free cloth after playing 3 When transporting or storing your guitar eve...

Reviews: