


Section 4
– Assembly
BONGO bass Section 4
- 3 -
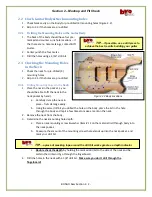
After ensuring that the gluing process in previous section is completely dry, you can install
the wiring harness, volume & tone controls, pickups, and output jack. The wiring harness and controls
come assembled reducing your task to making the final connections between the output jack & pickups.
Wire strippers, solder, soldering iron and small needle nose pliers are required for this section. Figure
4.2 illustrates the harness and configuration of other components, and should be used for reference for
this section.
4.4.1
Installing the Wiring Harness
As noted, the wiring harness comes assembled and only requires to be run through various tunnels prior
to being connected to other components. Before
starting the installation, check the harness connection
& solder joints to ensure the integrity of the wiring.
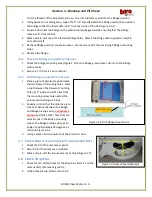
1.
Using Figure 4.2 as a reference, insert the
Volume & Tone controls and wiring harness
into the Body (as shown in Figure 4.4.1), hand
tightening the shaft nuts.
2.
Run the Bridge ground wire from the wiring
harness to the Bridge pickup cavity via the
channel (reference Figure 2.2).
4.4.2
Installing the Bridge and Neck Pickups
Figure 4.2 BONGO Bass Wiring Diagram, Reference
Figure 4.4.1 Component Locations
Note: the Tone controls have the Capacitor Soldered to the back