background image

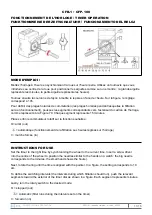
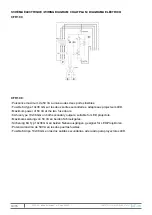
Position "Auto" : Filterbetrieb je nach Programmierung der Zeitschaltuhr
Position "Stop" : Filter ständig auf "Stop"

RECOMENDACIONES IMPORTANTES

• 

La instalación de la caja de mando debe ser realizada según las normas vigentes.

• 

La alimentación de la caja de mando debe ser protegida por un disyuntor de 30 mA encima de la línea.

• 

Antes de quitar la placa frontal asegurarse que la alimentación eléctrica ha sido cortada.

• 

La caja de mando debe ser equipada con un disyuntor ajustado a la potencia del motor alimentado por 

la caja de mando.

• 

Para sustituir el fusible ha de emplearse uno de las mísmas características.

• 

No utilizar la toma de 16A cuando la bomba de filtración está funcionando.

EMPLEO DEL CONMUTADOR "FILTRACIÓN"

Posición "Manual" : Operación contínua de la filtración
Posición "Auto" : Funcionamiento de la filtración según la programación del reloj.
Posición "Paro" : Paro permanete de la filtración

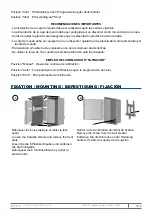
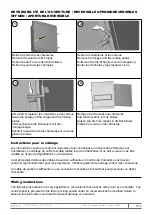
FIXATION / MOUNTING / BEFESTIGUNG / FIJACIÓN

1

2

Débloquer les 6 vis plastique et retirer la face 

avant

Loosen the 6 plastic screws and remove the front 

plate

Lösen Sie die 6 Plastikschrauben und entfernen 

Sie die Frontplatte

Debloquear los 6 tornillos plásticos y quitar la 

placa frontal

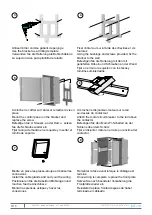
Retirer la vis de maintien de l’étrier de fixation

Remove the screw from the wall bracket

Entfernen Sie die Schraube an der Halterung

Quitar el tornillo de soporte de la sujeción

2021/01 - Indice de révision : k - Code : 32502

CONSTRUCTION & RÉNOVATION

3/16

Summary of Contents for SWIMLINE CFB-1

Page 1: ...e sich diese Anleitung sorgfältig durch und bewahren Sie sie auf INSTRUCCIONES DE MONTAJE Y EMPLEO Lea con atención estas instrucciones y guárdelas para futuras consultas FR EN DE ES SWIMLINE Coffret de commande pour filtration de piscines Electrical panels for swimming pool filtration systems Steuergeräte für Filteranlagen für Schwimmbecken Cajas de mando para filtración piscina 2021 01 Indice de...

Page 2: ... the control panel before any intervention requiring the removal of the front plate The control panel must be equipped with a circuit breaker rated for the electrical power of the motor being supplied Use of a circuit breaker that is too powerful can cause damage to the electrical motor If the fuse needs to be replaced use a fuse with the same rating Do not use the 16A connection while the filtrat...

Page 3: ...izar la toma de 16A cuando la bomba de filtración está funcionando EMPLEO DEL CONMUTADOR FILTRACIÓN Posición Manual Operación contínua de la filtración Posición Auto Funcionamiento de la filtración según la programación del reloj Posición Paro Paro permanete de la filtración FIXATION MOUNTING BEFESTIGUNG FIJACIÓN 1 2 Débloquer les 6 vis plastique et retirer la face avant Loosen the 6 plastic screw...

Page 4: ... caja de mando en el soporte y insertar el tornillo de soporte Accrocher le disjoncteur moteur sur le rail au dessus du contacteur Attach the motor circuit breaker to the rail above the contactor Befestigen Sie den Motor FI Schalterr an der Schiene über dem Schütz Fijar el disjuntor motor en el raile por encima del contactor 8 Mettre en place les presse étoupe et réaliser les connexions Install th...

Page 5: ...n las charnelas Instructions pour le câblage Les instructions ci après concernent uniquement les connexions qui doivent être effectuées par l installateur Le câblage du coffret est déjà réalisé lors de la fabrication et ne doit en aucun cas être modifié au risque de dégradations ou d accidents Il est primordial d utiliser des câbles de section suffisante en fonction de l intensité qu ils doivent v...

Page 6: ...l v a bei Scheinwerfern Achten Sie auf fest sitzende Verbindungen Wenn die Kabelquerschnitte falsch sind und die Verbindungen nicht fest sitzen können sie sich erhitzen und entzünden Instrucciones de cableado Las instrucciones siguientes se refieren solamente a conexiones realizadas por un instalador El cableado de la caja de mando ha sido realizado en fábrica y no debe ser modificado en ningún ca...

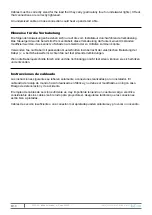
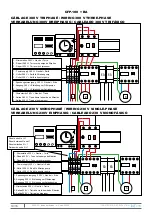
Page 7: ...la bomba de filtración 1 2 CÂBLAGE 230 V MONOPHASÉ WIRING 230 V SINGLE PHASE VERKABELUNG 230V EINPHASIG CABLEADO 230 V MONOFÁSICO I O N T L1 L2 L3 0 1 10 A 1 Alimentation 230 V Neutre Terre 2 Départ 230V Terre vers pompe de filtration 1 Power supply 230 V Neutral Earth 2 Outlet 230 V Earth to filtration pump 1 Spannungsversorgung 230 V Neutral Erde 2 Ausgang 230 V Erdleitung zur Filterpumpe 1 Alim...

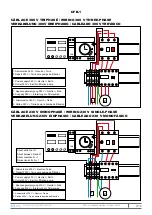
Page 8: ...230 V Tierra al sobrepresor CÂBLAGE 230 V MONOPHASÉ WIRING 230 V SINGLE PHASE VERKABELUNG 230V EINPHASIG CABLEADO 230 V MONOFÁSICO I O N T I O L1 L2 L3 0 1 0 1 6 3 A Shunt entre N et L1 Shunt between N and L1 Shunt zwischen N 1 Derivación entre N y 1 3 2 1 1 Alimentation 230 V Neutre Terre 2 Départ 230 V Terre vers pompe de filtration 3 Départ 230 V Terre vers surpresseur 1 Power supply 230 V Neut...

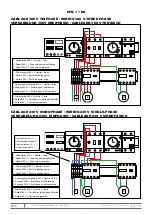
Page 9: ...cia la bomba de filtración CÂBLAGE 230 V MONOPHASÉ WIRING 230 V SINGLE PHASE VERKABELUNG 230V EINPHASIG CABLEADO 230 V MONOFÁSICO I O N T L1 L2 L3 0 1 I O N T L1 L2 L3 0 1 6A 6A 6A 6A Shunt entre N et L1 Shunt between N and L1 Shunt zwischen N 1 Derivación entre N y 1 2 1 1 Alimentation 230 V Neutre Terre 2 Départ 230 V Terre vers pompe de filtration 1 Power supply 230 V Neutral Earth 2 Outlet 230...

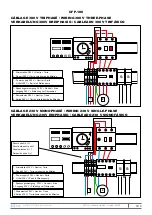
Page 10: ...230 V Tierra al sobrepresor CÂBLAGE 230 V MONOPHASÉ WIRING 230 V SINGLE PHASE VERKABELUNG 230V EINPHASIG CABLEADO 230 V MONOFÁSICO I O N T L1 L2 L3 0 1 I O N T L1 L2 L3 0 1 I O I O 6A 6A 6A 6A Shunt entre N et L1 Shunt between N and L1 Shunt zwischen N 1 Derivación entre N y 1 3 2 1 1 Alimentation 230 V Neutre Terre 2 Départ 230 V Terre vers pompe de filtration 3 Départ 230 V Terre vers surpresseu...

Page 11: ...5 minutes Placez enfin le commutateur rotatif sur la fonction souhaitée O arrêt out automatique fonctionnement de la filtration aux heures réglées sur l horloge I marche forcée in INSTRUCTIONS FOR USE Set the timer to the right time by synchronizing the wheel to the current time Insert a screw driver into the centre of the wheel to position the needles similar to the hands on a watch the big needl...

Page 12: ... auf der Uhr eingestellten Zeiten Ich Zwangsmarsch in MODO DE EMPLEO Ponga el reloj a la hora sincronizando la rueda con la hora actual Use un destornillador que inserte en el centro de la rueda para colocar las agujas como en un reloj la mano grande representa los minutos la mano pequeña representa las horas Luego gire la corona para que el marcador esté orientado hacia el tiempo En la figura el ...

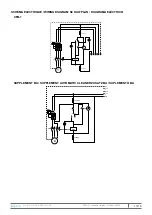
Page 13: ...1 A2 1 4 M A T KM 1 DISJ 1 5 1 3 5 2 4 6 2 3 4 6 M F1 6Amp F1 6Amp SUPPLEMENT BA SUPPLEMENT AUTOMATIC CLEANER ZUSATZ BA SUPLEMENTO BA 1 3 L3 L2 L1 N S1 KM2 H2 A1 A2 M A T KM 2 DISJ 2 1 1 13 14 3 5 2 4 2 4 4 6 M F1 2 Amp F1 2Amp 2021 01 Indice de révision k Code 32502 CONSTRUCTION RÉNOVATION 13 16 ...

Page 14: ...50 VA at the two fuse doors 6A fuse type 10x38 GG on both secondary outputs suitable for LED projectors Maximale Leistung von 50 VA an beiden Schmelzgates Sicherung 6A Typ 10x38 GG an beiden Nebenausgängen geeignet für LED Projektoren Potencia máxima de 50 VA en las dos puertas fusibles Fusible 6A tipo 10x38 GG en las dos salidas secundarias adecuado para proyectores LED 2021 01 Indice de révision...

Page 15: ...Notes 2021 01 Indice de révision k Code 32502 CONSTRUCTION RÉNOVATION 15 16 ...

Page 16: ...2021 01 Indice de révision k Code 32502 CONSTRUCTION RÉNOVATION 16 16 ...

Reviews: