BWT Domestic R.O. System RO300 Installation And Service Manual Download Page 5

1300 720 299

Ball Valve and Tubing Installation: 
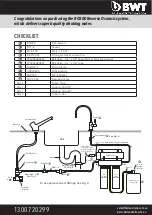
FIGURE C  

Final tubing connections and start up:

4

5

The grey inlet adaptor provides a simple, easy connection between the cold water shut-off and the cold water line.

1.

Shut-off the cold water supply by using the existing shut-off valve or stop cock, located under your sink. Leave the water 

supply off until installation is complete.

2.

After shutting off the valve, turn on kitchen tap on the cold water side, this will relieve any excess water and ensure water is 

off.

3.

Using an adjustable wrench, disconnect the 1/2” braided SS hose line from the cold water shut-off valve.

4.

Connect the grey inlet adaptor to the male thread on the cold water shut-off valve. Do not overtighten

5.

Reconnect the braided SS braided hose to male thread of the grey adaptor.

6.

Connect a length of the 1/4” white tubing between the grey adaptor and the inlet of the R.O. unit.

7.

Cut into this line the small quick connect ball valve (turned off) and the pressure limiting valve (PLV). 

1.

Tubing should follow contour of the cabinets. 

2.

Cut tubing to correct length using tube cutter provided.

3.

Make sure there are no crimps in the tubing. 

4.

Keep tubing from the R.O. unit to the tank and faucet as short as possible for good flow. 

5.

Connect blue tube from R.O. to tap connector (or point of use)

6.

Leave the yellow tube to flow to atmosphere into a small bucket – so all air is purged through the system.

The isolating valve or stop cock of the mains cold water line can be turned slowly on. The main faucet on the sink will 

flow and can now be turned off. The ball valve in the white plastic 1/4” tube should be turned on (tap to run in line with 

tube, this is the ON position).  Check for leaks. Water will now fill the RO300 and eventually water will slowly discharge 

from the yellow tube.  When water appears from the yellow tube, fit the yellow tube into the ball valve connected to the 

top of the pressure tank. The tank will take some time to fill. When the tank is full, water will stop discharging to the 

drain.  When the faucet is open – or point of use dispenser is used, the RO water will flow from the tank under pressure.

Grey adaptor

Water Flow

Cold water

Stop valve

Cold

water

Inlet

S.S. braided hose

Figure C

[email protected]     

www.bwtaustralia.com.au

Summary of Contents for Domestic R.O. System RO300

Page 1: ...0 720 299 Installation and Service Guide Domestic R O System RO300 N1UG05 N1IS35 1 2 RO300 Please read this manual carefully before attempting installation sales bwtaustralia com au www bwtaustralia com au ...

Page 2: ... superb quality drinking water Faucet Tap connector Bench top Sink Typical RO300 Installation and Checklist N1IS35 Cold water tap To use quick connect fittings See Fig D See Fig B See Fig C See Fig A 10 6 8 4 3 5 2 9 Drain 1 4 x 1 4 Ball Valve Speedfit Hydro Pneumatic Storage Tank Grey adaptor Water Flow Cold water Stop valve Cold water Inlet S S braided hose Drain Clamp Flow Restrictor Out In Whi...

Page 3: ... 1 Power drill and drill bits 2 Phillips head screwdriver 3 Adjustable wrench 4 Hammer and center punch Installing the Faucet 1 Ensure the faucet location is suitable for your kitchen A 2 diameter foot print is required 2 Mark the centre with centre punch for the 1 4 pilot hole 3 Drill the pilot hole 4 Continue to enlarge hole with larger size drill bit until it is 1 2 12mm 5 Clean up any sharp ed...

Page 4: ...ys be installed before above the p trap and on a vertical or horizontal drain Do not install the drain clamp near a garbage disposal to avoid clogging the drain line with debris 1 Position the drain clamp at selected location and mark for the opening 2 Drill 1 4 hole at mark through one side of pipe 3 Position the drain clamp on the drain pipe so the opening aligns with drilled hole Use a small dr...

Page 5: ...of the cabinets 2 Cut tubing to correct length using tube cutter provided 3 Make sure there are no crimps in the tubing 4 Keep tubing from the R O unit to the tank and faucet as short as possible for good flow 5 Connect blue tube from R O to tap connector or point of use 6 Leave the yellow tube to flow to atmosphere into a small bucket so all air is purged through the system The isolating valve or...

Page 6: ...nsert tube 1 Push up to tube stop 2 Pull to check secure 3 Disconnecting 4 1 Fitting grips before it seals Ensure tube is pushed into the tube stop Push the tube into the fitting to the tube stop The collet gripper has 2 stainless steel teeth which hold the tube firmly in position while the O ring provides a permanent leak proof seal 3 Pull on the tube to check that it is secure It is a good pract...

Reviews: