background image

2021/02 - Indice de révision : E - Code : 37791

BIEN-ÊTRE

49/64

We  recommend  that  a  thermal  magnetic  circuit  breaker  be  installed  at  the  head  of  the  line  to  protect 

against  over-voltages  and  short  circuits.  This  can  also  act  as  a  breaker  to  allow  interventions  on  the 

electrical components.

3.5 

Filling the spa

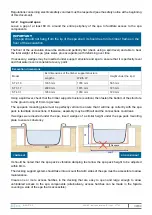
Before filling the spa make sure that all the diverting valves are closed to ensure that there will be no leaks. 

Vibrations during transport can cause the valves to open slightly.

Water quality: 

Water from the house mains is the most reliable source. Well water should not be used due to potentially 

high concentrations of phosphates, nitrates, iron, manganese and, possibly, bacteria. If using well water, 

regular testing will be required.
If a water softener is available, fill the spa partially or entirely with softened water to avoid the build up of 

calcium deposits on the walls.
If water is harder than usual (TH greater than 200 ppm), treat it immediately with a suitable chemical 

(AQUACAL). Exposure to hard water can lead to yellowing of plastic components (nozzles, skimmers, air 

controls, etc.) installed under the water line. Start treating the water as soon as the spa has been filled. 

(see paragraph 6 - Water Treatment).

Preparation: 

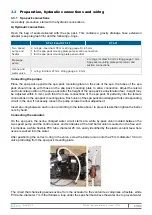
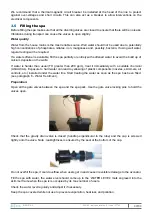
Open all the gate valves between the spa and the spa pack. Use the gate valve locking pins to hold the 

valves open.

Check that the gravity drain valve is closed (handle perpendicular to the tube) and the cap is screwed 

tightly onto the valve. Nota : leaktightness is ensured by the seal at the bottom of the cap.

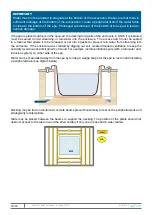
Do not overfill the spa, it could overflow when users get in and cause irreversible damage to the ozonator.
Fill the spa with water, the water elvel should come up to the ‘WATER LEVEL’ mark engraved into the 

skimmer frame when the spa is is occupied by its max number of users.
Check the water level regularly and adjust it if necessary.
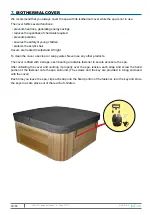
Keep the spa covered while not use to prevent evaporation, heat loss and pollution.

Summary of Contents for 31021000

Page 1: ...1 64 ST 2 18 2 positions ST 3 17 3 positions NOTICE D INSTALLATION ET CONSEILS D UTILISATION lire attentivement et conserver pour utilisation ult rieure Spas ST 2 18 ST 3 17 ST 4 31 Portables et encas...

Page 2: ...Pr paration et connexions hydrauliques et lectriques 9 3 3 1 Connexions des platines int gr es 9 3 3 2 Pr paration et connexion de la platine d port e option 12 3 4 Alimentation triphas 16 3 4 1 Modif...

Page 3: ...ement autoris s les quipements autoris s dans le volume 1 socles non aliment s en TBTS s ils sont de type DCL et s ils sont prot g s par un dispositif diff rentiel r siduel DDR de courant assign au pl...

Page 4: ...trer dans le spa ne pas entrer brusquement dans un spa notamment si son eau est chauff e une temp rature sup rieure 37 C ou si la temp rature de l eau est inf rieure 28 C Nous vous recommandons de ne...

Page 5: ...uniquement Longueur x Largeur x Hauteur en cm 106 x 55 x 42 122 x 55 x 42 122 x 55 x 42 Alimentation lectrique phase tension V Fr quence Hz 1 220 240 50 3 380 420 50 Panneau de contr le TP 600 Puissan...

Page 6: ...ne pas emmurer le spa V rifier que le surplus d humidit que le spa va introduire dans la pi ce ne sera pas n faste aux l ments de d coration et de structure pr sents parquet boiseries tissus tableaux...

Page 7: ...90 mm 1615 mm 725 mm ST 4 31 1950 mm 1950 mm 720 mm V rifier la verticalit de la structure p riph rique l aide d un niveau bulle puis fixer la partie basse p riph rique dans le sol l aide de tire fond...

Page 8: ...s e par d caissement du sol naturel elle devra comporter une ventilation suffisante afin de limiter le taux d humidit et le d veloppement de moisissures Par exemple pr voir sur la plage de part et d a...

Page 9: ...orient s vers ceux de la contre platine en vue de leur liaison Ajuster exactement la position de la platine lat ralement et verticalement en agissant au besoin sur le r glage des pieds anti vibratile...

Page 10: ...protection de l ozonateur Raccordement du blower si option choisie Tirer le tuyau d air sortant de la contre platine du spa tuyau souple diam tre 32 mm comportant un collet et un crou visser positionn...

Page 11: ...offret Main Panel J35 Panneau de contr le Spa Light J15 Projecteur ou chromath rapie Connecteur attribu Produits d j branch s dans le coffret Pompe 1 J9 Pompe Bi vitesse Pompe circulation J21 Pas util...

Page 12: ...l emplacement de la platine et du cheminement des tuyauteries La distance maximum possible entre la platine d port e et le spa est de 7 5 m tres Il est impossible de mettre la platine plus de 1 5m en...

Page 13: ...our la rallonge de pompe bi vitesse 1 rallonge c ble du panneau de contr le 1 rallonge c ble pour le projecteur et la chromath rapie M mes accessoires que pour le ST 2 18 et 3 17 Avec en plus pour la...

Page 14: ...Serrer au tournevis plat les colliers Torro sur l extr mit cannel e des raccords Visser les crous des raccords sur les raccords filet s correspondants pompes coffret contre platine voir sch mas ci des...

Page 15: ...up rer la boucle de l ozonateur positionn e sous la cuve du spa en coupant le collier Rilsan Ensuite il convient d installer c t platine la boucle de protection contre les remont es d eau vers l ozona...

Page 16: ...J52 et J36 D faire au niveau de J53 le pont venant de J41 pour le repositionner en J54 D faire au niveau de J12 le pont venant de J60 pour le repositionner en J45 3 4 2 Configuration des micro switchs...

Page 17: ...s nitrates fer mangan se et d une qualit micro bact riologique non ma tris e Des analyses r guli res sont indispensables en cas de recours de l eau de forage Si l on dispose d un adoucisseur d eau il...

Page 18: ...s Votre spa est quip de pieds pour soutenir la cuve lorsqu il est en eau Pour le r glage des pieds Mettre le spa en eau comme recommand dans la notice D poser les panneaux d habillages R gler les pied...

Page 19: ...pompes avant d utiliser le spa 1 D salimenter lectriquement le spa 2 Il est conseill de retirer les cartouches filtrantes du skimmer afin de faciliter l amor age de la pompe bi vitesse voir paragraphe...

Page 20: ...s deux secteurs simultan ment Pour cela tourner la vanne d viatrice vers le secteur alimenter ou la laisser en position interm diaire pour alimenter simultan ment les deux secteurs En positions extr m...

Page 21: ...2021 02 Indice de r vision E Code 37791 BIEN TRE 21 64 Ci apr s les diff rents secteurs et leurs vannes d viatrices ainsi que les contr leurs d air qui leurs correspondent ST 2 18 ST 3 17...

Page 22: ...Contr leur d air pour m langer de l air l eau en proportion variable Compartiment Aromath rapie comprim qui parfume l air inject par le blower Vanne d viatrice dirige le flux de la pompe vers un secte...

Page 23: ...ode d clairage parmi plusieurs couleurs fixes ou des fondu encha n s entre les diff rentes couleurs avec des transitions plus ou moins rapides voir notice des panneaux de contr le pour plus de pr cisi...

Page 24: ...ier en le coulissant horizontalement vers l int rieur du spa La les cartouches sont maintenant visibles D visser et retirer la les cartouches Reprendre les op rations dans l ordre inverse pour reposer...

Page 25: ...rs courants NON ABRASIFS pour la plupart des travaux de nettoyage Bien rincer et s cher avec un linge propre Ne JAMAIS utiliser de nettoyants abrasifs Ne pas laisser le spa entrer en contact avec des...

Page 26: ...voir observer les particularit s suivantes une variation de la hauteur du rebord du spa de 6 mm de l g res ondulations sur la partie sup rieure dues au retrait de la mati re du renfort 5 5 Habillage c...

Page 27: ...90 67 44 7 8 80 60 39 7 7 70 52 34 7 6 60 45 29 7 5 50 37 24 7 4 40 30 20 7 3 30 22 15 7 2 20 15 10 7 1 10 7 5 pH souhait 7 0 0 0 0 Aquaplus 6 9 10 7 5 6 8 20 15 10 6 7 30 22 15 6 6 40 30 20 6 5 50 37...

Page 28: ...pa afin d liminer tout r sidu microbien qui pourrait s adapter au traitement courant et se nicher dans les parties inaccessibles circuits d eau et d air Produit AQUACHOC 60 granul s Dose 20 grammes pa...

Page 29: ...rtures sont trait es anti U V Pour le nettoyage utiliser de l eau seule ou savonneuse Ne pas utiliser d autres produits La couverture est livr e quip e de 4 sangles chacune comportant des attaches ser...

Page 30: ...ties Une l g re d coloration peut se produire dans le temps si le spa est l ext rieur sur les faces expos es au soleil Limitation de la garantie La responsabilit pour toute r paration effectu e par un...

Page 31: ...Notes 2021 02 Indice de r vision E Code 37791 BIEN TRE 31 64...

Page 32: ...Notes 2021 02 Indice de r vision E Code 37791 BIEN TRE 32 64...

Page 33: ...ST 2 18 2 massage stations ST 3 17 3 massage stations INSTALLATION AND OPERATING INSTRUCTIONS to be read carefully and kept for future reference ST 2 18 ST 3 17 ST 4 31 SPAS Portable and in ground ve...

Page 34: ...ation hydraulic connections and wiring 41 3 3 1 Spa pack connections 41 3 3 2 Preparation and connection of the remote installed spa pack option 44 3 4 Three phase power supply 48 3 4 1 Modifying conn...

Page 35: ...umes 0 1 and 2 Volume 2 only those items permitted in volume 1 along with non SELV sockets if they are DCL type and are protected by a 30 mA residual circuit device class II non SELV switches and ligh...

Page 36: ...ing their body temperature Test the water temperature before entering the spa never enter the spa quickly particularly if the water temperature is above 37 C or below 28 C We recommend that spa sessio...

Page 37: ...step dimensions portable spas only length x width x height in cm 106 x 42 x 55 122 x 55 x 42 122 x 55 x 42 Power supply phase voltage V frequency Hz 1 220 240 50 3 380 420 50 Control panel TP 600 Max...

Page 38: ...Make sure that the humidity that the spa will generate in the room will not damage decorative elements or any structures in the room wooden floors wood materials paintings etc Install a dehumidificati...

Page 39: ...Width W ST 2 18 1935 mm 1355 mm 585 mm ST 3 17 2090 mm 1615 mm 725 mm ST 4 31 1950 mm 1950 mm 720 mm Using a spirit level check that the timber support structure is vertical then fasten the bottom of...

Page 40: ...e released or set into a gasket to prevent rain water from streaming into the enclosure If the enclosure was created by digging out soil create adequate ventilation to keep the humidity level down and...

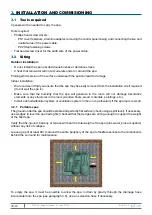
Page 41: ...e spa pack alter the height of the spa pack s anti vibration feet height may be adjusted within 8 mm such that the male connections of the spa pack fit perfectly into the female connections on the spa...

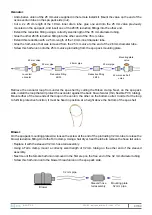
Page 42: ...r 32 mm equipped with a collar and barrel union position the 49 mm diameter o ring on the end of blower s threaded outlet and screw the barrel union onto it B Wiring For safety reasons start by connec...

Page 43: ...nnected in the panel Main Panel J35 Control pad Spa Light J15 UV light or chromatherapy Connector allocated Item already connected in the electrical panel Pump 1 J9 Two speed pump Circulation pump J21...

Page 44: ...the installation site and running the lines The spa pack may be installed at a distance of up to 7 5 m from the spa The spa pack must not be installed at a height lower than 1 5 m below the water leve...

Page 45: ...xtension line 1 control panel extension cable 1 extension cable for the underwater light and chromatherapy Same accessories as for ST2 18 and ST 3 17 with the following additional items for the massag...

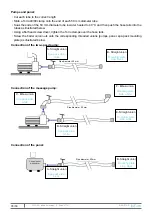
Page 46: ...union nuts onto the corresponding threaded unions pumps panel spa pack mounting plate as illustrated below Connection of the two speed pump Connection of the massage pump Connection of the panel Pipe...

Page 47: ...valve 25 mm pipe 25 mm pipe 25 mm pipe Mounting plate valve Retrieve the ozonator loop from under the spa shell by cutting the Rilsan clamp Next on the spa pack side install the loop that will protec...

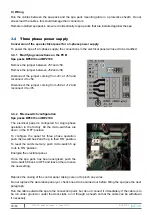
Page 48: ...rom J60 at J12 and reconnect it to J45 3 4 2 Micro switch configuration Spa packs BP6013 and BP2100 The electrical panel is configured for single phase operation in the factory All the micro switches...

Page 49: ...alls If water is harder than usual TH greater than 200 ppm treat it immediately with a suitable chemical AQUACAL Exposure to hard water can lead to yellowing of plastic components nozzles skimmers air...

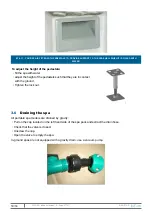
Page 50: ...pour soutenir la cuve lorsqu il est en eau Pour le r glage des pieds Mettre le spa en eau comme recommand dans la notice D poser les panneaux d habillages R gler les pieds de fa on tre en contact ave...

Page 51: ...ped with one or two pumps depending on the model Prime the pumps before using the spa 1 Cut the power supply to the spa 2 We recommend that you remove the filter cartridge from the skimmer to facilita...

Page 52: ...one zone or another or simultaneously to both zones depending on the valve position Turn the valve to the zone to be supplied or leave it in an intermediate position to supply both zones simultaneous...

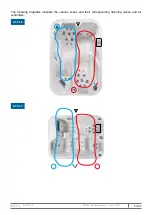
Page 53: ...2021 02 Indice de r vision E Code 37791 BIEN TRE 53 64 The following diagrams illustrate the various zones and their corresponding diverting valves and air controllers ST 2 18 ST 3 17...

Page 54: ...4 ST 4 31 Air controller to mix water and air in variable proportions Aromatherapy compartment tablet that perfumes the air injected by the blower Diverting valve to direct the flow to one zone or ano...

Page 55: ...on of the lighting mode from the available options fixed colour cross fades between the various colour with transitions of carious lengths see the instruction manual provided with the control pad for...

Page 56: ...of the spa The cartridge s will now be visible Unscrew and remove the cartridge s Perform these steps in the reverse order to replace the clean cartridges Cleaning the filter cartridges Steep the cart...

Page 57: ...Use standard NON ABRASIVE household cleaning products for most cleaning Rinse well and dry with a clean cloth NEVER use abrasive cleaning products Do not allow contact with solvents or chemicals cont...

Page 58: ...een 7 0 and 7 6 in order to ensure effective disinfection of the water and avoid skin irritation Measure the pH regularly and use AQUAPLUS and AQUAMINUS granules to raise or lower the pH as necessary...

Page 59: ...ygen is particularly suitable for disinfection of spas Dose 20 g pellet per 1000 litres of water Place a pellet in the skimmer basket one or two times a week depending on the bather load while filtrat...

Page 60: ...ers are treated to withstand UV light To clean the cover use clear or soapy water Never use any other products The cover is fitted with 4 straps each bearing a lockable fastener to secure access to th...

Page 61: ...installed outdoors surfaces exposed to sunlight may become slightly discoloured over time Guarantee limitations The owner of the spa will be held entirely responsible for any repairs to the spa carrie...

Page 62: ...Notes 2021 02 Indice de r vision E Code 37791 BIEN TRE 62 64...

Page 63: ...Notes 2021 02 Indice de r vision E Code 37791 BIEN TRE 63 64...

Page 64: ...2021 02 Indice de r vision E Code 37791 BIEN TRE 64 64...

Reviews: