Quality since 1946
9049 Tyler Blvd. • Mentor, Ohio 44060
Phone (440) 974-8888 • Fax (440) 974-0165
Toll-Free Fax 800-841-8003 • buyersproducts.com
ATVS15
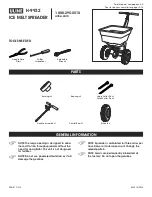
ATV Spreader
—continued on back
A multipurpose spreader designed to distribute
feed, seed and fertilizer while mounted on an
ATV. The quick mount/detach brackets allow
for easy installation and removal for “Use-on-
Demand” availability.
Mounting Instructions
1.
Remove the two hitch pins allowing the
Mounting Bracket to separate from the spreader
body.
2.
Attach the Mounting Bracket to the rear of
the ATV rack by using the U-bolts, washers and
nuts (supplied). Be sure that the hole for the Gate
Control Arm (in the bracket) is at the top when
attaching it to the ATV. The multiple mounting
holes are used for attaching the bracket to various
models of ATV racks.
3.
Position the Hopper Body into place on the
Mounting Bracket. Position the main support
spline on the Hopper into the Mounting Bracket,
aligning the two sets of pinholes. Place the
two mounting pins into each set of holes. The
Spreader Body should now be held into place on
the Mounting Bracket. Install the hairpin cotters
to secure the spreader in place.
4.
Remove the finger nut from the long end of the
Gate Control Arm, slide the Arm through the hole
in the top end of the Mounting Bracket and replace
the finger nut. Remove the finger nut from the
short end of the Gate Control Arm, slide it through
the Gate Control and replace the finger nut.
5.
Connect wire harness to motor and then plug
the accessory adapter into the ATV’s accessory
plug.
6.
A “push/pull” action on the Gate Control Arm
will allow you to control the opening size in the
bottom of the Hopper. Enlarging the opening size
will allow for more material to be spread. Adjust
the opening to accommodate the size and quantity
of material you wish to spread.
Operating Instructions
1.
Set the Flow Control Collar at the base of the
Hopper to the desired maximum position. Close
the Shut-Off Gate completely. Load material into
the Hopper; be sure to secure the Hopper Cover in
place. Turn the “on/off” switch to the “on” posi-
tion. While moving, open the Shut-Off Gate to
begin spreading material.
2.
Adjust the Shut-Off Gate by using the Flow
Control Arm to increase or decrease the size of the
opening. This will allow you increase or decrease
the amount of material being spread.
Installation Instructions
1. Take precautions to operate the ATV in a safe
manner. Follow precautions and guidelines as out-
lined in the ATV Owner’s Manual.
2. In the event the Spreader Motor is not operating,
check fuse in accessory adaptor and replace if blown.
3. Clean the Hopper and brackets after use. Some
material can cause corrosion to metal parts, thus
reducing the life of the Spreader Assembly.
PLEASE NOTE