Bushnell HOLOsight 510023 Instruction Manual Download Page 6

4

3. Brightness Adjustment


  Push-button switches vary the brightness intensity of the holographic reticle pattern. Depressing 

and releasing the push-button switches moves the brightness level UP or DOWN one (1) step 

from  the  previous  setting.  Depressing  and  holding  the  up  arrow  or  down  arrow  switch  will 

change  brightness  level  up  or  down  continuously  in  steps. There  are  twenty  (20)  brightness 

settings providing a dynamic range of 20,000:1 from the lowest setting to the highest setting. 

When the sight is turned ON, the brightness intensity level is automatically returned to the last 

level used.

4. Auto Shutdown

  The BUSHNELL HOLOsight is equipped with auto shutdown capability and will automatically 

shut itself OFF 8 hours after the last push-button control is used. 
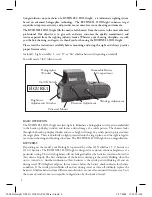
MOUNTING 

The BUSHNELL HOLOsight is equipped with mounting hardware to attach to a standard 1" dovetail 

or Weaver® style rail. To achieve the best results and accuracy, the BUSHNELL HOLOsight must be 

mounted properly. The 1" dovetail rail needs to be as parallel as possible to the bore to achieve the best 

accuracy. We strongly recommend you have the dovetail rail installed by a qualified gunsmith. Should 

you decide to install the mount and sight yourself, please follow these steps: 
1.  Use a high-quality 1" steel dovetail rail mount designed to fit your particular firearm. 
2.  Carefully  follow  the  instructions  packed  with  the  dovetail  rail  mount  you  have  selected.  Pay 

careful attention to aligning the dovetail base parallel to the bore of the firearm.

3.  The dovetail base should be mounted as low as possible. 
4.  Locate the post and dovetail clamp on the underside of the sight. Loosen the hex nut retainer 

screw and the dovetail clamp with an Allen wrench (7/64). 

5.  Place the post within a groove on the top of the 1" dovetail base. Individual preference and the 

specific firearm determines the optimal positioning to any specific groove on the dovetail base. 

6.  Make sure the post is inserted fully into the mount’s groove and push the sight as far forward as 

possible. Tighten hex nut and retainer screw.

NOTE:  Loosen  screw  just  enough  to  mount  and  dis-mount  the  sight.  Do  not  back  screw  out 

completely to avoid losing the Weaver lock hardware.

BORE SIGHTING AND ZEROING


Bore sighting is a good preliminary procedure in achieving proper alignment of your sight to the 

firearm. If the 1" dovetail rail is not mounted parallel to the barrel, major elevation adjustments may 

be accomplished by shimming the dovetail base. It is important not to use the elevation adjustment 

of the sight for major adjustments. Your sight’s internal elevation and windage adjustments should 

be reserved for fine-tuning to achieve zero at the called for distance. Final zeroing of your firearm 

and sight should be done with live ammunition and based on your expected shooting distance. If 

you anticipate most of your shooting at short range, zero in at 50 yards. Groups of three shots will 

be useful for averaging the point of impact.

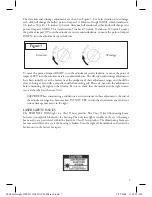
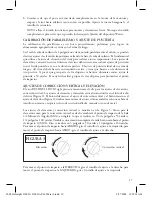
WINDAGE AND ELEVATION ADJUSTMENTS 

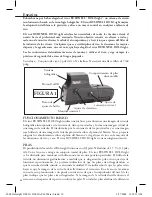
Your BUSHNELL HOLOsight features click mechanisms for elevation and windage adjustments. 

The elevation and windage adjustment are located on the right-hand side of the sight (Figure 1). The 

knob towards the front is your windage adjustment and the knob towards the rear is your elevation 

adjustment (Figure 1). Both of these adjustment mechanisms are grooved with a slotted screw head 

and require the use of a screwdriver, coin, or spent brass to turn. 

2008 Holosight 510023AP 6LIM rev3.indd   6

2/27/2008   11:07:21 AM

Summary of Contents for HOLOsight 510023

Page 1: ...IONS MANUAL DE INSTRUCCIONES BEDIENUNGSANLEITUNG MANUALE DI ISTRUZIONI MANUAL DE INSTRU ES LIT 98 1157 02 08 MODEL S 510023 510023AP AND 520022 510023 520022 510023AP 2008 Holosight 510023 510023AP 6L...

Page 2: ...NOTES 2008 Holosight 510023 510023AP 6LIM rev3 indd 2 2 27 2008 11 07 18 AM...

Page 3: ...ENGLISH 2 7 FRAN AIS 8 13 ESPA OL 14 19 DEUTSCH 20 25 ITALIANO 26 31 PORTUGU S 32 37 1 LANGUAGES INDEX 2008 Holosight 510023 510023AP 6LIM rev3 indd 3 2 27 2008 11 07 18 AM...

Page 4: ...reticle pattern projected onto the target plane There is absolutely no light projected onto the target plane and the sight is legal to use in most shooting and hunting situations The BUSHNELL HOLOsigh...

Page 5: ...ttery orientation To re install the battery compartment point the sight towards the ground and slide battery compartment onto base Make sure there is enough clearance between the contact and the batte...

Page 6: ...t retainer screw and the dovetail clamp with an Allen wrench 7 64 5 Place the post within a groove on the top of the 1 dovetail base Individual preference and the specific firearm determines the optim...

Page 7: ...be close to being at zero with a properly installed mounting rail Please do not turn the adjustments before mounting the sight on the firearm Be sure to check that the mount and the sight remain secu...

Page 8: ...embly will void the warranty FCC COMPLIANCE The BUSHNELL HOLOsight has been tested and found to comply with the limits for a Class B digital device pursuant to Part 15 of the FCC Rules These limits ar...

Page 9: ...defect 4 Proof of Date Purchased 5 Product should be well packed in a sturdy outside shipping carton to prevent damage in transit with return postage prepaid to the address listed below IN U S A SEND...

Page 10: ...ge virtuelle de r ticule Lorsque le tireur regarde dans la fen tre d affichage t te haute il voit l image lumineuse d un r ticule projet e sur la cible Aucune lumi re n est projet e sur la cible et le...

Page 11: ...est impr cis avec les piles au lithium Il est recommand de changer les piles avant une partie de charge ou un concours de tir de longue dur e REMPLACEMENT DES PILES Retirer le compartiment piles Pour...

Page 12: ...r BUSHNELL HOLOsight est fourni avec la quincaillerie de montage n cessaire pour l installer sur un rail queue d aronde standard de 1 po 25 mm ou de type Weaver Pour assurer des r sultats et une pr ci...

Page 13: ...Un tour complet de l un ou l autre des boutons change le point d impact de 10 minutes d angle Ceci repr sente 13 cm 50 m tres et 25 cm 100 m tres Pour LEVER le point d impact tourner la vis de r glage...

Page 14: ...s et de lubrifiants peuvent tre nettoy es avec un chiffon lunettes ou une serviette en coton imbib e de liquide pour nettoyage de lentilles et surfaces en verre en vente dans tous les magasins d appar...

Page 15: ...u d faut constat 4 la preuve de la date d achat 5 Le produit doit tre emball soigneusement dans un carton d exp dition solide pour viter qu il ne soit endommag durant le transport envoyez le en port p...

Page 16: ...a brillante de una imagen de ret cula proyectada sobre el plano del blanco No se proyecta ninguna luz absolutamente sobre el plano del blanco y es legal usar el visor en la mayor a de las situaciones...

Page 17: ...as pilas levantando la palanca de leva de cierre y deslizando con cuidado el compartimiento hacia afuera y hacia arriba de la caja del visor Figura 2 Despu s de sacar el compartimiento de las pilas sa...

Page 18: ...espu s de haber usado el ltimo bot n pulsador de control MONTAJE El visor BUSHNELL HOLOsight est equipado con herrajes de montaje para acoplarse a un ra l de cola de milano est ndar de 1 pulgada o est...

Page 19: ...s disparos para promediar el punto de impactos AJUSTES DE CORRECCI N VERTICAL Y ELEVACI N El visor BUSHNELL HOLOsight presenta mecanismos de clic para los ajustes de elevaci n y correcci n vertical Lo...

Page 20: ...interferencias perturbadoras y 2 este dispositivo debe aceptar cualquier interferencia recibida incluidas las interferencias que podr an causar un funcionamiento no deseado CUIDADO Y MANTENIMIENTO El...

Page 21: ...xplicaci n del defecto 4 Prueba de fecha de compra 5 El producto debe empaquetarse bien en una caja resistente para evitar que se da e durante el transporte y enviarse con portes pagados a la direcci...

Page 22: ...f ausgestrahlt sodass der Einsatz des Zielger tes in den meisten Schie und Jagdsituationen legal ist Das BUSHNELL HOLOsight hat keine Vergr erung BATTERIEN Je nach Modell wird Ihr HOLOsight entweder d...

Page 23: ...Nehmen Sie das Batteriefach heraus indem Sie den Feststellhebel umlegen und das Batteriefach vorsichtig aus dem Ger tgeh use schieben Abbildung 2 Nach Entfernen des Batteriefachs die Batterien herausn...

Page 24: ...iner Taste aus MONTAGE Das BUSHNELL HOLOsight ist mit Vorrichtungen ausgestattet die eine Befestigung an einer Standard 1 Zoll Prismenschiene oder einer Schiene des Typs Weaver erm glichen Die korrekt...

Page 25: ...s Zielger ts Abbildung 1 Der vorn liegende Knopf ist f r die Seitenverstellung der nach hinten gerichtete Knopf ist f r die H henverstellung gedacht Abbildung 1 Beide Einstellungsmechanismen sind mit...

Page 26: ...HNELL HOLOsight ist ein Pr zisionsinstrument das vorsichtig behandelt werden muss Bitte beachten Sie folgende Hinweise damit Sie Ihr Ger t lange Zeit verwenden k nnen 1 Die Optik und das Fenster sind...

Page 27: ...des Mangels 4 Nachweis des Kaufdatums 5 Das Produkt sollte zurVermeidung vonTransportsch den gut verpackt in einem stabilen Versandkarton an die nachstehend aufgef hrte Adresse geschickt werden wobei...

Page 28: ...ossa luminosa del reticolo proiettata sul piano del bersaglio Su tale piano non viene proiettata alcuna luce e l utilizzo del cannocchiale legale nella maggior parte delle situazioni di tiro e di cacc...

Page 29: ...Figura 2 Estraete le pile e inserite due pile nuove Le etichette sul fondo del vano indicano il giusto orientamento Per riposizionare il vano portapile inclinate il cannocchiale verso il basso e fate...

Page 30: ...di rondine in acciaio da 1 di alta qualit che si adatti perfettamente all arma 2 Seguite scrupolosamente le istruzioni allegate alla guida a coda di rondine prestando particolare attenzione ad allinea...

Page 31: ...spostare il punto di impatto a DESTRA o a SINISTRA girate la vite micrometrica della derivazione rispettivamente in senso orario o in senso antiorario L elevazione e la derivazione sono state prefissa...

Page 32: ...salvietta per lenti o un panno di cotone morbido inumiditi con un detergente per lenti o per superfici in vetro reperibile presso i negozi di articoli fotografici Non pulite mai le superfici in vetro...

Page 33: ...riportante la data di acquisto 5 Il prodotto deve essere imballato in una scatola robusta per prevenire danni durante il trasporto e va spedito franco destinatario a uno dei seguenti indirizzi Recapi...

Page 34: ...o alvo e a mira pode ser usada legalmente na maioria das situa es de tiros e ca a O BUSHNELL HOLOsight n o possui amplia o PILHAS Dependendo do modelo o Holosight energizado por duas pilhas alcalinas...

Page 35: ...vido retire as pilhas e substitua por um conjunto novo As etiquetas no fundo do compartimento das pilhas indicam sua orienta o correta Para reinstalar o compartimento de pilhas aponte a mira para o ch...

Page 36: ...can ar a maior precis o Por este motivo recomenda se que ele seja instalado por um armeiro qualificado Caso decida instalar o suporte e a mira por conta pr pria siga as etapas a seguir 1 Use um suport...

Page 37: ...uer bot o mudar o ponto de impacto em 10 MOA ou seja 5 polegadas a 50 jardas 10 polegadas a 100 jardas A fim de mover o ponto de impacto PARA CIMA gire o parafuso de ajuste no sentido anti hor rio par...

Page 38: ...Marcas deixadas pelos dedos e lubrificantes podem ser limpas com um pano para lentes ou um tecido macio de algod o umedecidos com fluido de limpeza para lentes o qual pode ser adquirido em qualquer l...

Page 39: ...Data de Aquisi o 5 O produto deve ser cuidadosamente embalado numa caixa de papel o resistente para prevenir danos enquanto em tr nsito e enviado para os endere os indicados a seguir com porte de devo...

Page 40: ...2008 Bushnell Outdoor Products www bushnell com 2008 Holosight 510023 510023AP 6LIM rev3 indd 40 2 27 2008 11 07 43 AM...

Reviews: