background image

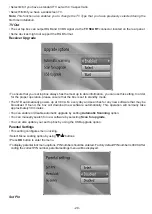
- 27 -

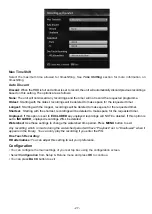
Max Time Shift

Select the maximum time allowed for timeshifting. See 

Time Shifting

 section for more information on 

timeshifting

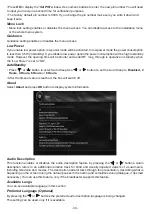
Auto Discard

D

iscard:

:''LVIXOODQGDWLPHULVVHWWRUHFRUGWKHXQLWZLOODXWRPDWLFDOO\GLVFDUGSUHYLRXVUHFRUGLQJV

based on this setting. The options are as follows:

None:

 The unit will not discard any recordings and the timer will not record the requested programme.

Oldest: 

6WDUWLQJZLWKWKHROGHVWUHFRUGLQJVZLOOEHGHOHWHGWRPDNHVSDFHIRUWKHUHTXHVWHGWLPHU

Longest: 

6WDUWLQJZLWKWKHORQJHVWUHFRUGLQJVZLOOEHGHOHWHGWRPDNHVSDFHIRUWKHUHTXHVWHGWLPHU

Shortest:

6WDUWLQJZLWKWKHVKRUWHVWUHFRUGLQJVZLOOEHGHOHWHGWRPDNHVSDFHIRUWKHUHTXHVWHGWLPHU

Unplayed:

 If this option is set to 

EXCLUDED

 any unplayed recordings will NOT be deleted. If this option is 

set to 

INCLUDED

XQSOD\HGUHFRUGLQJV:,//EHGHOHWHG

Watershed:

 Use these settings to change the watershed time period. Press 

MENU

 button to exit.

$Q\UHFRUGLQJZKLFKLVPDGHGXULQJWKHZDWHUVKHGSHULRGZLOOKDYH³3OD\EDFN´VHWWR³'LVDOORZHG´ZKHQLW
DSSHDUVLQWKHOLEUDU\<RXFDQRQO\SOD\WKHUHFRUGLQJLI\RXHQWHUWKH3,1

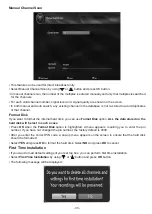
One Touch Recording : 
HD alternatives :

You can adjust this setting to suit your preference. 

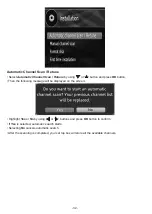
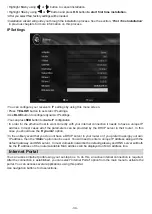
&RQ¿JXUDWLRQ

‡<RXFDQFRQ¿JXUHWKHPDLQVHWWLQJVRI\RXUVHWWRSER[XVLQJWKHFRQ¿JXUDWLRQVFUHHQ
‡6HOHFW

&RQ¿JXUDWLRQ

IURP6HWXS 5HWXQHPHQXDQGSUHVV

OK

 to continue. 

‡<RXFDQSUHVV

BACK

 button to exit

Summary of Contents for DVB-T2 PVR MPEG4

Page 1: ...p you get the best from your television and ensure safe and correct installation and operation For any help concerning set up and use of your TV please call the Customer Helpline 0345 600 3021 Lines o...

Page 2: ...14 Menu System 14 Viewing the Main Menu 14 Operating the Channel List 15 6HOHFWLQJ D 6SHFL F KDQQHO 15 Deleting Channels 15 Deleting Multiple Channels 15 Adding Locks to Channels 16 Locking Multiple C...

Page 3: ...H 79 UHHYLHZ FRPSDWLEOH Introduction 7KDQN RX IRU FKRRVLQJ WKLV SURGXFW 7KLV PDQXDO will guide you through the proper operation of your set top box HIRUH RSHUDWLQJ WKH VHW WRS ER SOHDVH UHDG WKLV manu...

Page 4: ...OHFWHG ORFDWLRQ VKRXOG QRW KDYH D KLJK KXPLGLW RQGHQVDWLRQ WKDW PD DULVH LQ D NLWFKHQ IRU H DPSOH PD FDXVH D PDOIXQFWLRQ RU GDPDJH the device HDWLQJ RU RWKHU WKHUPDO UDGLDWLRQ XQGHU WKH VHW also may c...

Page 5: ...OLTXLGV VXFK DV YDVHV WR EH SODFHG RQ WKH HTXLSPHQW 21 7 SODFH KRW REMHFWV RU QDNHG DPH VRXUFHV VXFK DV OLJKWHG FDQGOHV RU QLJKWOLJKWV RQ RU FORVH WR equipment High temperatures can melt plastic and...

Page 6: ...5 Overview of the Remote Control Colour ed buttons Options...

Page 7: ...erial input 4 ANTENNA OUT To watch channels on the TV 5 HDMI IN HDMI connection 6 LAN Ethernet Input 7 SCART OUT I RXU 79 KDV D VFDUW FRQQHFWRU RX FDQ FRQQHFW WKH ER WR RXU 79 XVLQJ D VFDUW FDEOH 8 PO...

Page 8: ...7m 23ft I RXU UHFHLYHU QR ORQJHU UHVSRQGV WR WKH UHPRWH FRQWURO LW LV probable that the batteries are exhausted If so you can still use the local buttons of the receiver You can replace batteries afte...

Page 9: ...gives 12 V voltage Connect this adaptor to a system that supplies 220 240V AC 50Hz IWHU XQSDFNLQJ DOORZ WKH VHW WRS ER WR UHDFK WKH DPELHQW URRP WHPSHUDWXUH EHIRUH RX FRQQHFW WKH VHW to the mains Ant...

Page 10: ...WDQGE PRGH OWKRXJK LW LV QRW UHFRPPHQGHG IRU HQYLURPHQWDO UHDVRQV RX PD GLVDEOH ORZ SRZHU PRGH LQ RXU SURGXFW DW VHWXS FRQILJXUDWLRQ PHQX I ORZ SRZHU PRGH LV GLVDEOHG RQO FORFN LV GLVSOD HG LQ VWDQGE...

Page 11: ...OD LQGLFDWHV WKDW WKH UHPDLQLQJ DPRXQW RI VSDFH LV ORZ UVW GHOHWH XQQHFHVVDU SURJUDPPHV DQG WKHQ UHFRUG ZLWK DQ H WUD PDUJLQ in the amount of remaining space There is an option LQ WKH FRQ JXUDWLRQ PHQ...

Page 12: ...Type selection on screen menu will be displayed By pressing the EXWWRQV VHOHFW WKH 7Y W SH RX ZDQW WR VHW DQG SUHVV 2 EXWWRQ IWHUZDUGV 6HOHFW 0 resolution OSD will appear on the screen Select your des...

Page 13: ...WRQV consecutively to enter two or more digits 3UHVV WKH P P buttons to move up or down to the next available channel 1RWH RX FDQ SUHVV 2 EXWWRQ WR GLVSOD WKH FKDQQHO OLVW Adjusting the Volume Volume...

Page 14: ...FXUUHQW HYHQW QDPH QH W HYHQW QDPH VWDUWLQJ DQG HQGLQJ WLPH GXUDWLRQ EDU SURJUDPPH PRGH DQG WKH FKDQQHO QXPEHU DQG QDPH Instant Recording 3UHVV RECORD button to start recording an event instantly whil...

Page 15: ...speeds by means of or keys To cease the timeshifting press STOP button Menu System Viewing the Main Menu 3UHVV WKH MENU button to view main menu RX FDQ PRYH EHWZHHQ PHQXV E XVLQJ WKH QDYLJDWLRQ button...

Page 16: ...SDVVZRUG SURWHFWHG WKH SDUHQWDO ORFN SDVVZRUG ZLOO EH UHTXLUHG Deleting Channels 6HOHFW WKH FKDQQHO WKDW RX ZDQW WR GHOHWH DQG VHOHFW HOHWH RSWLRQ XVLQJ buttons Press OK button to continue PHVVDJH ZL...

Page 17: ...HQWDO FRQWURO 3 1 FRGH QWHU WKH 3 1 QXPEHU 3UHVV OK button to lock unlock the channel Lock symbol will be displayed next to the selected channel You can repeat the same action to cancel the lock Note...

Page 18: ...uide from the main menu by using buttons Press OK to continue HINT RX FDQ DOVR SUHVV WKH GUIDE EXWWRQ WR YLHZ WKH EPG PHQX 3UHVV buttons to navigate through channels 3UHVV buttons to navigate through...

Page 19: ...Q 8 days The information belonging to the selected programme will be saved from the software and following parts of the selected programme ZKLFK DUH QRW LQFOXGHG LQ WKH SHULRG RI GD V ZLOO EH DXWRPDWL...

Page 20: ...UDPPH LQIRUPDWLRQ VKRXOG EH EURDGFDVWHG E WKH EURDGFDVWHU RQ JXULQJ 7LPHUV Select Timers from the main menu and press OK button 7R DGG D WLPHU SUHVV WKH YELLOW button on the remote control Then Add Ti...

Page 21: ...ntrol Change Delete SHUPLWV RU SURKLELWV DQ PRGL FDWLRQV IRU RWKHU XVHUV You can save the adjustments by pressing the GREEN key or cancel the process by pressing the RED button You can edit the timers...

Page 22: ...utton Sort Changes the order of the recordings You can select from a wide range of sorting options OK button Displays playing options Resume Resumes the playback 1RWH 9LHZLQJ PDLQ PHQX DQG PHQX LWHPV...

Page 23: ...tart archiving Edit Recordings Press OK button when Edit Recordings is highlighted Then select the recordings that are to be archived KHQ QLVKHG SUHVV OK button and the following menu will be displaye...

Page 24: ...Options menu will be displayed Create New Chapter Mark You can set a chapter mark anywhere you want Forwards to Next Chapter Goes to the next chapter if there is more than one chapter available Back t...

Page 25: ...rom the main media browser screen and press OK button Select the folder if DYDLODEOH OO PHGLD OHV ZLOO EH GLVSOD HG 6HOHFW D PXVLF OH DQG SUHVV OK to play Playing Video Files Select USB Drive option f...

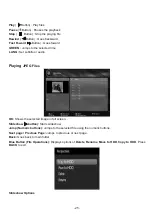
Page 26: ...btitle or audio Playing JPEG Files OK Shows the selected image in full screen Slideshow button Starts slideshow Jump Numeric buttons XPSV WR WKH VHOHFWHG OH XVLQJ WKH QXPHULF EXWWRQV Next page Previou...

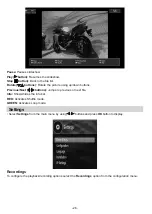
Page 27: ...buttons Previous Next buttons XPSV WR SUHYLRXV RU QH W OH Info Shows hides the info bar RED FWLYDWHV 6KXI H PRGH GREEN Activates Loop mode Settings 6HOHFW Settings from the main menu by using buttons...

Page 28: ...Shortest 6WDUWLQJ ZLWK WKH VKRUWHVW UHFRUGLQJV ZLOO EH GHOHWHG WR PDNH VSDFH IRU WKH UHTXHVWHG WLPHU Unplayed If this option is set to EXCLUDED any unplayed recordings will NOT be deleted If this opt...

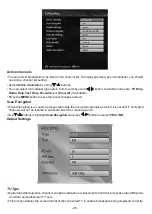
Page 29: ...save the recent changes and exit Scan Encrypted KHQ WKLV VHWWLQJ LV RQ VHDUFK SURFHVV ZLOO ORFDWH WKH HQFU SWHG FKDQQHOV DV ZHOO I LW LV VHW DV 2II HQFU SWHG channels will not be located in automatic...

Page 30: ...WR VWDQGE PRGH The STB automatically powers up at 3 00 A M every day and searches for any new software that may be EURDGFDVW I IRXQG WKH ER ZLOO GRZQORDG QHZ VRIWZDUH DXWRPDWLFDOO 7KLV RSHUDWLRQ ZLOO...

Page 31: ...set to NO Auto Standby 3UHVV or button to select Auto Sleep Use or button to set the Auto Sleep to Disabled 2 Hours 4 Hours 6 Hours or 8 Hours IWHU WKH WLPHRXW YDOXH LV UHDFKHG WKH ER ZLOO VZLWFK RII...

Page 32: ...s the preferred audio language Subtitle Sets the subtitle language Selected language will be seen in subtitles Guide Sets guide language Current 7KHVH VHWWLQJV FDQ EH FKDQJHG LI RQO WKH EURDGFDVWHU VX...

Page 33: ...K button 7KHQ WKH IROORZLQJ PHVVDJH ZLOO EH GLVSOD HG RQ WKH VFUHHQ LJKOLJKW Yes or No by using or buttons and press OK EXWWRQ WR FRQ UP I Yes LV VHOHFWHG DXWRPDWLF VHDUFK VWDUWV 6HOHFWLQJ No cancels...

Page 34: ...QWHUQDO KDUG GLVN RX FDQ XVH Format Disk option ALL the data stored on the hard disk will be lost in such a case 3UHVV OK when the Format Disk RSWLRQ LV KLJKOLJKWHG PHQX DSSHDUV UHTXLULQJ RX WR HQWHU...

Page 35: ...QLTXH 3 address In most cases all of the parameters can be provided by the DHCP server in their router In this case you should use the Dynamic option Q WKH XQOLNHO HYHQW WKDW RX GRX QRW KDYH D 3 VHUYH...

Page 36: ...LR SLFWXUH VKDSH ZKHQ ZDWFKLQJ D FKDQQHO ZLWK MXVW GLJLWDO WHOHWH W EURDGFDVWLQJ LV WKH VDPH DV the aspect ratio of the picture viewed previously KHQ RX SUHVV WKH TEXT EXWWRQ DJDLQ WKH GLJLWDO WHOHWH...

Page 37: ...nnels Have Been Added Yet KHQ WKHUH DUH QR FKDQQHOV VWRUHG LQ WKH ER KDQQHO LVW PHQX ZLOO QRW EH GLVSOD HG DQG FKDQQHO navigation will not be available Q VXFK FDVHV WKH IROORZLQJ HUURU PHVVDJH ZLOO EH...

Page 38: ...nges in the settings have not taken effect The set top box was unplugged ZLWKRXW UVW VZLWFKLQJ WR VWDQGE mode Make sure that the box is in standby mode before unplugging it from the mains The remote c...

Page 39: ...ds 03 03 9 7 Frequency Band UHF DEMODULATION COFDM with 2K 8K FFT mode FEC for all DVB Modes Automatically found 4 0 4 0 4 0 ZLWK N N N N N N 7 PRGH VIDEO ALL MPEG 4 part 10 MP ML Video Decoder VSHFW...

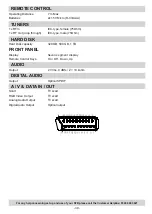
Page 40: ...Micro R 03 AAA TUNERS 5 Q W SH IHPDOH 2KP 5 2XW ORRS WKURXJK W SH PDOH 2KP HARD DISK DUG LVN FDSDFLW 7 FRONT PANEL Display Seven segment display 5HPRWH RQWURO H V 2Q 2II RZQ 8S AUDIO 2XWSXW 9UPV G IV...

Page 41: ...must be correctly installed and operated in accordance with the instructions contained in this manual W PXVW EH XVHG VROHO IRU GRPHVWLF SXUSRVH The guarantee will be rendered invalided if the product...

Page 42: ...Home Retail Group 489 499 Avebury Boulevard Saxon Gate West Central Milton Keynes MK9 2NW 50369061...

Reviews: