Initial Setup Wizard
Note:
Follow the on-screen instructions to complete
the initial setup process. Use the directional buttons and
the
Select
button on the remote to select, set, confirm
and proceed.
1. Choose Your Language
The language selection options will be listed on the
screen. Select the desired language from the list and press
Select
to continue.
2. Select TV Mode
In the following step of the initial setup, you can set the
TV’s operation mode.
Store Use
option will configure
your TV’s settings for store environment. This option is
intended only for store use. It is recommended to select
Continue
for home use.
3. Pair Your Remote with your TV
If your remote does pair with your TV automatically
or if you have paired your remote with your TV once
previously, this step will be skipped. If this is not the case, a
search for your remote will be performed. Follow the on-
screen instructions to pair your remote control (depends
on the model of the remote control).
4. Connect to your network
If you did connect your TV to internet via an Ethernet
cable before the initial setup begins this step will be
skipped. If you didn’t, your TV will search and list available
wireless networks at this point. Select your network and
press
Select
to connect to it. Refer to the
Connecting to
the Internet
section if you need further information. Press
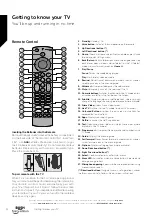
Fast Forward
button on your remote to skip.
After the internet connection is established, the TV will
check for the software updates and download the latest
software next, if any available. Please notice that this will
take some time.
5. Sign In with Your Amazon Account
You can sign in to your Amazon account on the next
screen. You need to be signed in to an Amazon account
in order to use Amazon services. This step will be skipped
if no internet connection has been established in the
previous step. If you don’t already have an Amazon
account you can set up an account by choosing ‘I am
new to Amazon’ option. You can press the
Fast Forward
button to skip this step. A dialogue will be displayed for
confirmation. Highlight
Do this later
and press
Select
to
continue. If you skip this step some of the following steps
may differ or be skipped as well.
Once the account has been registered, you will be asked
whether you want to use the account you signed in. You
can choose to change the account, read the terms and
conditions, which will be accepted if you continue, at this
point. Highlight the symbol with three dots next to the
texts at the bottom side of the screen and press
Select
to
read and learn more about the related subject. Highlight
Continue
and press
Select
button to proceed without
changing the account.
If you have connected your TV to internet via a WLAN
network a dialogue will be displayed at this point, asking
if you want to save your WLAN password to Amazon.
Highlight
Yes
and press
Select
to confirm and proceed.
Select
No
to proceed without confirmation.
6. Parental Controls
You can enable Parental Controls at this point or you
can do it later.
Note that, if you choose
No Parental Controls
, purchasing
and video playback without PIN will be allowed.
If you choose
Enable Parental Controls
option, you
will be asked to enter a PIN next. This is the Prime Video
PIN and it is related to your Amazon account. Use the
buttons on your remote as shown on the screen to enter
the PIN. You will have to enter it to access some menus,
services, content, etc. protected by this PIN. If you have
forgotten your PIN follow the link shown on the screen
to reset your PIN.
You will be informed about the feature on the next screen.
Press
Select
to continue.
You can review or change the parental control settings
later using the
Parental Controls
option in the
Settings
> Preferences
menu.
7. Prime Video
A brief information on the prime video services will be
displayed next. You can start your 30 day free trial at this
point. Highlight ‘No Thanks’ and press
Select
to skip.
8. Select Apps
In the next step you can select the apps you want to
download. Highlight
Choose Apps
and press
Select
to
proceed. The apps are free to download but some of
them may require payment for full access. Highlight
No
Thanks
and press
Select
to skip.
9. Scan for TV channels
You will be asked whether you want to scan for channels
in the next step. Highlight
Yes
and press
Select
button
to start the scan process. Highlight
No
and press
Select
button to scan later.
Connections
Bringing it all together
Connections
15
If you require any technical guidance or find that your TV is not operating as intended, a simple solution can often be found in the
Help Menu
,
or online at
www.bush-support.co.uk.
If you still require further assistance, call one of our experts on
0345 604 0105,
a Bush enquiry line.
Summary of Contents for DLED55UHDSFIRE
Page 1: ...Instruction manual DLED55UHDSFIRE ...
Page 2: ......
Page 4: ......
Page 5: ...Safety information 1 ...
Page 11: ...Getting to know your TV 2 ...
Page 15: ...Connections 3 ...
Page 19: ...Standard features 4 ...
Page 22: ......
Page 23: ...Advanced features 5 ...
Page 39: ...Other information 6 ...
Page 44: ......
Page 45: ...Product support 7 ...
Page 49: ......
Page 50: ......
Page 51: ......
Page 52: ...Contact www bush support com Helpline 0345 604 0105 50544336 ...

