background image

Ready? Let’s begin...

Please read these instructions carefully. They contain 
important information which will help you get the best 
from your TV and ensure safe and correct installation 
and operation.
If you require any further assistance, our technical experts 
are happy to help. For full details, refer to the product 
support section at the end of these instructions.

Accessories Included

• 

Remote Control

• 

Batteries: 2 x AAA

• 

Instruction Book

• 

Quick Start Guide

Features
Ultra HD (UHD)

TV supports Ultra HD (Ultra High Definition - also known 
as 4K) which provides resolution of 3840 x 2160 (4K:2K). 
It equals 4 times the resolution of Full HD TV by doubling 
the pixel count of the Full HD TV both horizontally and 
vertically. Ultra HD content is supported from HDMI, some 
of the Over-the-Top (OTT) services and USB inputs. 

High Dynamic Range (HDR) / Hybrid 
Log-Gamma (HLG)

Using this feature the TV can reproduce greater dynamic 
range of luminosity by capturing and then combining 
several different exposures. HDR/HLG promises better 
picture quality thanks to brighter, more realistic highlights, 
more realistic colour and other improvements. It delivers 
the look that filmmakers intended to achieve, showing 
the hidden areas of dark shadows and sunlight with full 
clarity, colour and detail. HDR/HLG content is supported 
via native and market applications, HDMI and USB inputs. 
When the input source is set to the related HDMI input, 
highlight the related HDMI option in the 

Home > Settings 

> Display & Sounds > Picture Settings 

menu and press 

Select

 to display setting options. Set the 

HDMI Input 

Mode

 option in the 

Advanced Settings

 menu as 

Mode 

2 (2.0) or Auto 

in order to watch HDR/HLG content, if 

the HDR/HLG content is received through an HDMI input. 
The source device should also be at least HDMI 2.0a 
compatible in this case.

Dolby Vision

Dolby Vision™ delivers a dramatic visual experience, 
astonishing brightness, exceptional contrast, and vivid 
colour, that brings entertainment to life. It achieves this 
stunning image quality by combining HDR and wide 
colour gamut imaging technologies. By increasing 
the brightness of the original signal and using a higher 
dynamic colour and contrast range, Dolby Vision presents 
amazing true-to-life images with stunning detail that 
other post-processing technologies in the TV aren’t 
able to produce. Dolby Vision is supported via native and 
market applications, HDMI and USB inputs. When the 
input source is set to the related HDMI input, highlight 
the related HDMI option in the 

Home > Settings > 

Display & Sounds > Picture Settings

 menu and press 

Select

 to display setting options. Set the 

HDMI Input 

Mode

 option in the 

Advanced Settings

 menu as

 Mode 

2 (2.0) or Auto 

in order to watch Dolby Vision  content, 

if the Dolby Vision content is received through an HDMI 
input. The source device should also be at least HDMI 
2.0a compatible in this case. In the 

Picture Mode

 menu 

two predefined picture modes will be available if Dolby 
Vision content is detected: 

Dolby Vision Bright

 and 

Dolby Vision Dark

. Both allow the user to experience 

the content in the way the creator originally intended 
with different ambient lighting conditions. To change the 

Picture Mode

 setting press and hold the 

Home

 button 

while watching the Dolby Vision content and go to 

Picture

 menu. While watching Dolby Vision content via 

an application, except YouTube, Netflix and Multi Media 
Player, you will not be able to access the 

Picture

 menu 

and set the

 Picture Mode

.

Features and specifications are subject to change without 
prior notice.

Licences

The terms HDMI, HDMI High-Definition Multimedia 
Interface, and the HDMI Logo are trademarks or registered 
trademarks of HDMI Licensing Administrator, Inc.

Dolby, Dolby Vision, Dolby Audio, and the double-D 
symbol are trademarks of Dolby Laboratories Licensing 
Corporation. Manufactured under licence from Dolby 
Laboratories. Confidential unpublished works. Copyright 
© 1992-2020 Dolby Laboratories. All rights reserved.

Getting to know your TV

You’ll be up and running in no time

Getting to know your TV

10

If you require any technical guidance or find that your TV is not operating as intended, a simple solution can often be found in the 

Help Menu

or online at 

www.bush-support.co.uk. 

If you still require further assistance, call one of our experts on 

0345 604 0105,


a Bush enquiry line.

Summary of Contents for DLED55UHDSFIRE

Page 1: ...Instruction manual DLED55UHDSFIRE ...

Page 2: ......

Page 3: ...ns 14 Initial Setup Wizard 15 4 Standard features TV Control Operation 18 Main Screen 18 Live TV 19 Channel List 19 5 Advanced features Customising TV Settings 22 To Program Your SKY Remote For Your TV 23 Channel Guide 24 Settings 24 Connecting to the Internet 35 6 Other information Specification 38 Stand Installation Wall Mounting 40 Product fiche 41 DVB T functionality information 41 Functionali...

Page 4: ......

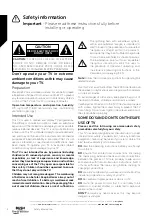
Page 5: ...Safety information 1 ...

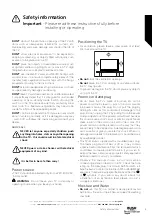
Page 6: ...ildren should be supervised to ensure that they do not play with the TV Children may not recognise dangers The swallowing of batteries can be fatal Keep batteries always out of reach of small children If a battery is swallowed seek immediate medical attention Keep the packaging films out of reach of children there is a risk of suffocation Use this TV at an altitude of less than 2000 metres above t...

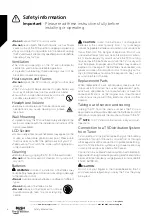
Page 7: ...sloping or unstable surfaces the TV may tip over To prevent damage to the TV do not place any objects on top of the TV Power cord and plug Do not place the TV a piece of furniture etc on the power cord mains lead or pinch the cord Handle the power cord by the plug Do not pull the plug by holding its neck as this could result in damage to the plug Do not unplug the TV by pulling from the power cord...

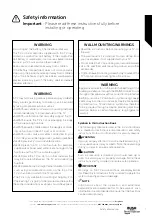
Page 8: ...no circumstances throw them into fire Danger of explosion Do not use unequal batteries old and new Alkaline and carbon etc simultaneously If you will not use the TV for a long time remove the batteries and store the TV in a dry and dust free place Improper use of batteries may cause an explosion or leakage If the batteries have leaked use gloves and clean the remote control thoroughly with a dry c...

Page 9: ...ptional You can obtain from your local dealer if not supplied with your TV Do not install the TV on a ceiling or on an inclined wall Use the specified wall mounting screws and other accessories Tighten the wall mounting screws firmly to prevent the TV from fall Do not over tighten the screws WARNING Apparatus connected to the protective earthing of the building installation through the MAINS conne...

Page 10: ...conditions of operation The illustrations and the OSD in this instruction manual are for explanation purposes and may vary slightly from the actual operations TV design and specifications may be changed without notice Hereby VESTEL Elektronik Sanayi ve Ticaret A Ş declares that the radio equipment type TFT IDTV is in compliance with Directive 2014 53 EU and Radio Equipment Regulations 2017 The ful...

Page 11: ...Getting to know your TV 2 ...

Page 12: ...chnologies By increasing the brightness of the original signal and using a higher dynamic colour and contrast range Dolby Vision presents amazing true to life images with stunning detail that other post processing technologies in the TV aren t able to produce Dolby Vision is supported via native and market applications HDMI and USB inputs When the input source is set to the related HDMI input high...

Page 13: ...ark and logos are registered trademarks owned by the Bluetooth SIG Inc and any use of such marks by Vestel Elektronik Sanayi ve Ticaret A S is under license Other trademarks and trade names are those of their respective owners Amazon Alexa Fire Prime Video and all related logos are trademarks of Amazon com Inc or its affiliates Antenna Connection Connect the aerial plug to the AERIAL INPUT ANT soc...

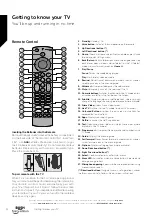
Page 14: ...letely turns off the volume of the TV 11 Numeric buttons Switches the channel in Live TV mode enters a number or a letter in the text box on the screen 12 Subtitle Displays audio and subtitle options where you can change the language size and style preference where available 13 Prime Video Opens Prime Video screen 14 Live TV Switches to Live TV mode to watch TV channels 15 Coloured Buttons Follow ...

Page 15: ...Connections 3 ...

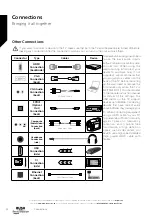
Page 16: ... plug all your cables into the back of the TV before mounting on the wall Insert or remove the CI module only when the TV is SWITCHED OFF You should refer to the module instruction manual for details of the settings The USB inputs on the TV support devices up to 500mA Connecting devices that have current value above 500mA may damage your TV When connecting equipment using a HDMI cable to your TV t...

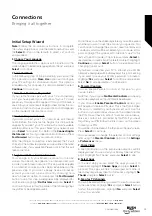
Page 17: ...r you want to use the account you signed in You can choose to change the account read the terms and conditions which will be accepted if you continue at this point Highlight the symbol with three dots next to the texts at the bottom side of the screen and press Select to read and learn more about the related subject Highlight Continue and press Select button to proceed without changing the account...

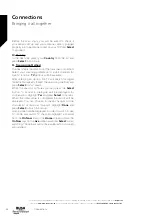
Page 18: ...be displayed for confirmation Highlight Yes and press Select to cancel When the initial setup is completed the results will be displayed You can choose to make changes on the channel list or rescan at this point Highlight Done and press Select to finish the setup Home screen will be displayed In order to switch to Live TV mode and watch TV channels highlight a channel from the On Now row on the Ho...

Page 19: ...Standard features 4 ...

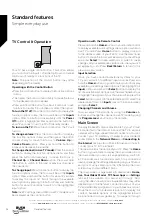
Page 20: ... changes set your preferences enter a sub menu launch an application etc Press Back Return to return to the previous menu screen Input Selection Once you have connected external systems to your TV you can switch to different input sources Press and hold the Home button on your remote control to display available quick settings menu options Then highlight the Inputs option and press the Select butt...

Page 21: ...f the channel installation is not completed On Now row will not be available and Live TV menu will be displayed when the Live TV button is pressed or Aerial input option is selected Channel List The TV stores and shows all channels in the channel list Press the Live TV button then the Down directional button to see the channel list in Live TV mode You can press the Left and Right directional butto...

Page 22: ......

Page 23: ...Advanced features 5 ...

Page 24: ...s Red Green and Blue gain can all be adjusted from 20 to 20 Picture Format The picture format can be set to Automatic Superzoom 4 3 Film Expand 14 9 Film Expand 16 9 Wide Screen and Full Advanced Picture Settings Hue Increases or decreases the picture hue from 50 reds to 50 greens Gamma Choose from Middle Bright standard or Dark film Highlight your desired setting then press Select Colour Tuner Co...

Page 25: ... accordingly Highlight your desired setting then press Select Sound Mode Sound Mode can only be accessed if you have switched off Dolby Audio Sound Mode has 6 different settings Standard Music Film Clear Voice Enhanced Bass Flat The default setting is Standard Highlight your desired setting then press Select Equaliser This setting can only be accessed once Dolby Audio has been switched off Equalis...

Page 26: ...all your channels create favourite channels or hide channels that you don t want to appear in the guide The channels will be listed in 3 tabs All Favourites and Hidden In the All tab highlight a channel in the list and press the Select button to add it to favourites Favourite channels will be listed in the Favourites tab If the channel is already in the favourites list it will be removed from the ...

Page 27: ...screen to indicate that you have new notifications A small number next to the notifications symbol indicates how many notification you have Reading Notifications Highlight Notifications in the Settings menu and press Select All the available notifications will be displayed Scroll across and highlight the notification that you want to read then press Select The notification message will be displaye...

Page 28: ...een mirroring screen saver setting and HDMI CEC device control Highlight Display Sound in the Settings menu and press Select Picture Settings Picture settings can be adjusted on each input so each input can be set to have its own picture settings For information on adjusting each setting refer to the Customising TV Settings section of this manual For adjusting picture setting while viewing your TV...

Page 29: ...EC enabled device connected to your TV via a HDMI cable this setting allows your TV remote control to also control selected functions of your connected device For example the Standby button on your TV remote will also switch on your CEC enabled device The default setting is ON Highlight HDMI CEC Device Control and press Select to switch on or off Applications The applications menu lets you manage ...

Page 30: ...nnected to your TV and here they can be setup so that your Fire TV remote and Alexa can control the connected device no matter how you connected it to your TV This process will take a while to setup so please be patient Adding a Soundbar or Receiver Highlight Add Equipment and press Select Highlight either Soundbar or Receiver depending on the product that you have connected then press Select Note...

Page 31: ...ng channels if you have installed channels previously using the same search option Highlight Yes and press Select All the previously tuned in channels will be deleted Highlight No keep existing and press Select to proceed without clearing existing channels While the search continues you can press the Select button to cancel When the initial setup is completed the results will be displayed You can ...

Page 32: ...IN Remotes Bluetooth Devices You can add an extra voice remote to your TV or you may also need to replace one if your old one broke Other bluetooth devices like speakers games controllers mice and keyboards can also be connected via bluetooth Highlight Remotes Bluetooth Devices and press Select Adding or Viewing Status of Voice Remotes with Alexa Check the status of your current voice remote with ...

Page 33: ...he Live TV Menu title for more information Privacy Settings You can manage all of your TV s privacy settings here Highlight Privacy Settings and press Select You will now see a list of all the settings that can be adjusted highlight the setting that you would like to adjust and press Select The possible settings are as follows Device Usage Data Allows use of personal data collected by the operatin...

Page 34: ...nc Recent Content You can include Prime Video titles watched on other devices in the Recent row on this device Highlight Sync Recent Content and press Select to switch this feature on or off Location Its handy that your TV knows where it is in the world so when you ask Alexa a question like Alexa what s the weather outside it can tell you the weather in your location Highlight Location and press S...

Page 35: ...ss Select ADB Debugging Press Select to turn on and off Turn on to enable ADB connections over the network Note that turning this feature on will allow anyone on your network to install applications from untrusted sources USB Debugging Press Select to turn on and off Turn on to enable ADB connections over USB for this power cycle This option will not be available if ADB Debugging is set to OFF Not...

Page 36: ...se your TV Note New helpful video will be added every time your TV updates so the amount of content here will change from time to time Quick Tips Your TV has a list of quick tips that you can read to understand how to use your TV or to solve a problem you may have encountered Contact Us If you feel you need more help with your TV select the related section where you will find details of how to get...

Page 37: ... wireless LAN modem router is required to connect the TV to the Internet via wireless LAN Highlight Wi Fi option in the Network menu and press Select to enable wireless connection Then disconnect the Ethernet cable if connected priorly Some of the available networks will be listed Highlight See All Networks and press Select to see the complete list If you prefer to connect your TV to your network ...

Page 38: ... and the products that you use The transmission may also be cut off or may get disconnected depending on the radio wave conditions DECT phones or any other WLAN 11b appliances The standard values of the transmission speed are the theoretical maximum values for the wireless standards They are not the actual speeds of data transmission The location where the transmission is most effective differs de...

Page 39: ...Other information 6 ...

Page 40: ...n W 2 Weight Kg 14 TV Dimensions DxLxH with foot mm 218 x 1242 x 763 TV Dimensions DxLxH without foot mm 53 82 x 1242 x 719 Display 55 Operation temperature and operation humidity 0ºC up to 40ºC 85 humidity max Other information Helpful technical information Other information 38 If you require any technical guidance or find that your TV is not operating as intended a simple solution can often be f...

Page 41: ...band Luxembourg General authorization required for network and service supply not for spectrum Norway Radio transmission is prohibited for the geographical area within a radius of 20 km from the centre of Ny Ålesund Russian Federation In door use only Israel 5 GHz band only for 5180 MHz 5320 MHz range The requirements for any country may change at any time It s recommended that user checks with lo...

Page 42: ...cking the TV Put the TV onto a work table with the screen panel down on a clean and soft cloth Leave the stand s protruding over the edge of the surface Unscrew the screws that fix the stand s Remove the stand s When using the wall mount bracket Your TV is also prepared for a VESA compliant wall mount bracket If it is not supplied with your TV contact your local dealer to purchase the recommended ...

Page 43: ...ontent please visit the service content provider s website If you have any questions concerning or problems with any content or services then please contact the relevant service content provider directly Bush is not responsible for providing customer service in relation to content or services and accepts no liability in this regard Product fiche Commercial Brand BUSH Product No 10130705 Model No D...

Page 44: ......

Page 45: ...Product support 7 ...

Page 46: ...ines open 8am 7pm Monday to Saturday and 10am 4pm Sunday Calls to Bush enquiry lines may attract a charge and set up fee from residential lines depending on your call plan tariff Mobile and other providers costs may vary Refer to your residential line provider mobile provider for pricing details For security and training purposes telephone calls to and from customer service centres may be recorded...

Page 47: ...ice your household waste disposal service or the shop where you purchased the TV Penalties may be applicable for incorrect disposal of this waste in accordance with national legislation Business users If you wish to dispose of this TV please contact your supplier and check the terms and conditions of the purchase contract Other Countries outside the European Union These symbols are only valid in t...

Page 48: ... damage arising from the breakdown of the product This guarantee is in addition to and does not diminish your statutory or legal rights Important Data Protection Information If you provide us with information about another person you confirm that they have appointed you to act for them to consent to the processing of their personal data including sensitive personal data and that you have informed ...

Page 49: ......

Page 50: ......

Page 51: ......

Page 52: ...Contact www bush support com Helpline 0345 604 0105 50544336 ...

Reviews: