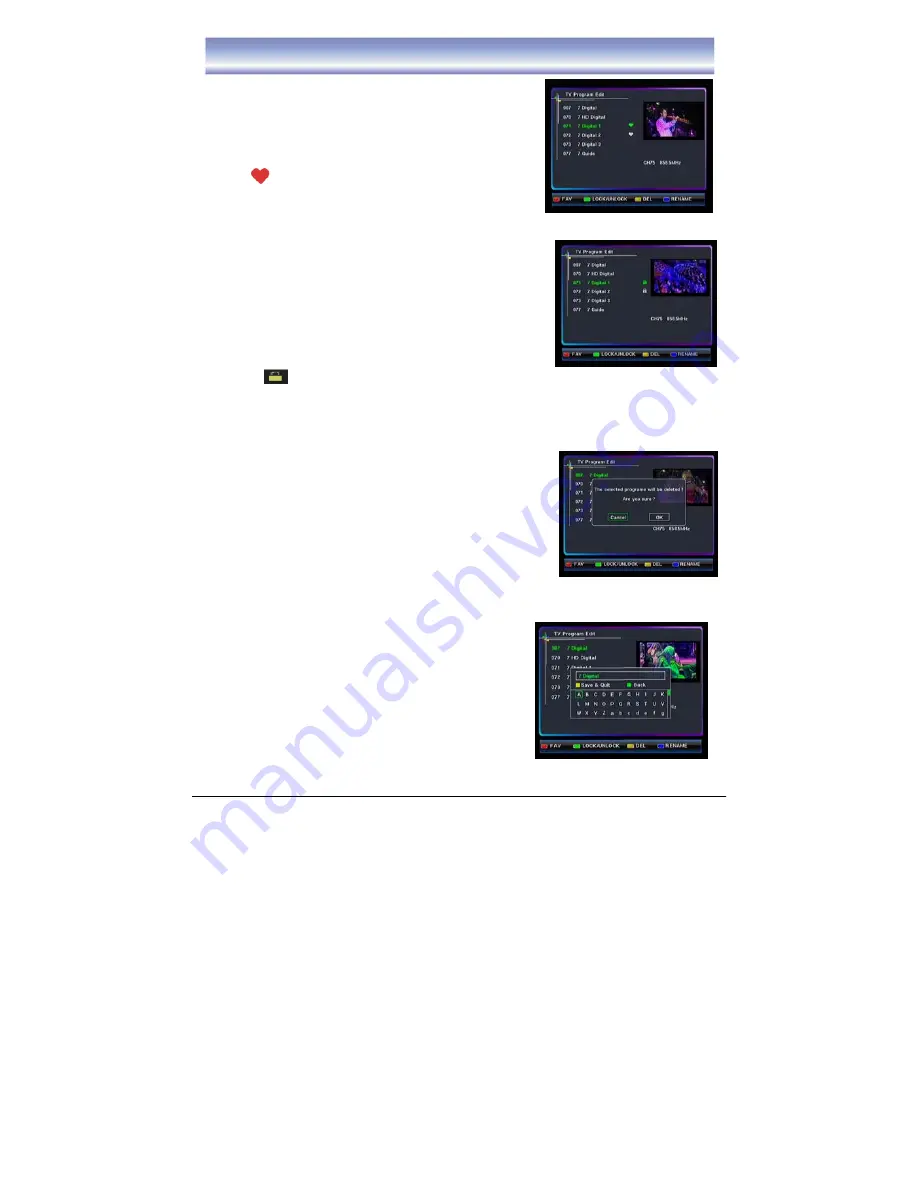
background image


16 

Program Edit 


TV Program Edit 

1. Press the 

MENU

 Button and then select the 

Setting 

Sub-Menu 

and select 

Program Edit

.  

2. Press the 

▲▼

  Buttons to scroll through the options. 

3. Press the 

RED


Button to add a program to your favorites list. The 

FAV icon     will appear next to the program.  
4. Press the 

RED

 Button again to cancel and the FAV icon will 

disappear. 
5. Press the 

EXIT

 Button to exit all menus or press the 

MENU

 Button to return to the previous menu. 


Lock Program 

1. Press the 

MENU

 Button and then select the 

Setting 

Sub-Menu 

and select 

Program Edit

2. Press the 

▲▼

  Buttons to select the lock function.   

3. Press the 

Green

 Button to enable the lock function.   

4. Press the 

▲▼

  Buttons to select the program you wish to lock 

and press the 

OK

 Button to lock.   

A lock icon          will appear next to the program. 
5.


Press the 

OK

 Button again and enter your PIN number or enter the default pin “0000” to cancel the 

operation. The lock icon will disappear. 
6. Press the 

EXIT

 Button to exit all menus or press the 

MENU

 to return to the previous menu. 


Delete Program 

1. Press the 

MENU

 Button and then select the 

Setting 

Sub-Menu 

and select 

Program Edit

2. Press the 

▲▼

  Buttons to select the program you dislike, and 

Press the 

Yellow


Button to delete this program. 

3. Press the 

OK

 Button to confirm.     

4. Press the 

EXIT

 Button to exit all menus.


Rename  

1. Press the 

MENU

 Button and then select the 

Setting 

Sub-Menu and select 

Program Edit

2. Press the 

,

  Buttons to select the program which want to 

rename.


3. Press the 

Blue 

Button to enable the Rename function. 

4. A Button board will be displayed on the screen. 
5. Press the 

 and 

  Buttons to select the letters 

and press the 

GREEN

 Button to delete any unwanted letters. 

6. Press the 

YELLOW

 Button to save and quit. 

7. Press the 

EXIT

 Button to exit all menus.


Summary of Contents for DFTA52DAB

Page 1: ...INSTRUCTION MANUAL High Definition Digital Set Top Box with DAB Receiver DFTA52DAB The Gold Technical Support Line 1902 215 259 Charges will apply at 2 95 per minute...

Page 2: ...se you with the unit s many features and to ensure you get the very best from your purchase Safety is important Your safety and the safety of others is important Please therefore ensure you read the S...

Page 3: ...stallation 12 Basic Operation of DVB 13 14 DVB Main Menu 15 Program Edit 16 Live TV Electronic Program Guide 17 Setting for DVB 18 Installation Auto Scan 18 Installation Manual Scan 18 System Setup fo...

Page 4: ...e of Contents User Preferences for DVB 22 Volume Bar Time Out 22 Parental Control 22 23 DAB Main Menu 24 Operation of DAB 25 26 Operatoin of FM 27 Trouble Shooting 28 Technical Specification 29 Warran...

Page 5: ...ventilation Do not place the Set Top Box in an unventilated cabinet or on top of any units which may emit heat Copyright Statement No part of this publication may be reproduced in any form by any mean...

Page 6: ...on Digital Free to Air Channels Integrated DAB and FM Tuner 7 Day Electronic Program Guide Teletext USB Input for Software Upgrades RF In Loop Through Component Composite Video Output Digital Audio vi...

Page 7: ...through your other home entertainment units 3 USB Input The USB Input enables you to upgrade the software when required 4 VGA Input The VGA Input allows you to connect your Set Top Box to your PC 5 H...

Page 8: ...udio settings 11 Wide Button Press the Wide Button to scroll through and select the picture size 12 Swap Button Press the Swap Button to return to the previous program you were watching 13 Mute Button...

Page 9: ...re 3 Always replace both batteries at the same time Never mix new and old batteries or batteries of a different type 4 If you don t intend to use the remote control for an extended period remove the b...

Page 10: ...a It s recommended that viewers use quad shielded cable from the antenna to the television Connecting to your TV There are several ways of connecting your Set Top Box to your TV and Hi Fi System For H...

Page 11: ...10 Connecting to Equipments Connect your Set Top Box via Component YPbPr Output and Audio Output Connect your Set Top Box via VGA Output and Audio Output...

Page 12: ...11 Connecting to Equipments Connect your Set Top Box via HDMI Output Connect your Set Top Box via Optical Mixed Audio L R Output...

Page 13: ...ayed to assist you in setting up your Set Top Box correctly Follow the prompts as requested The First Installation Guide will begin to conduct a station scan automatically When scanning has finished a...

Page 14: ...Audio Language or Audio Mode 1 Press the AUDIO Button on the remote control to select the Audio Control Menu 2 Press the and OK Buttons to select the audio language you wish to set 3 Press the EXIT B...

Page 15: ...exit this information menu Subtitles Press the SUB Button to turn on or off the subtitles Teletext Menu 1 Press the TXT Button to open the Teletext Menu 2 Press the EXIT Button to close the Teletext...

Page 16: ...the Main Menu The Main Menu is divided into 3 sections Main Menu 1 Press the MENU Button to bring up the Main Menu or return to previous Menu 2 Press the Buttons to move up down the sub menu 3 Press...

Page 17: ...the program 5 Press the OK Button again and enter your PIN number or enter the default pin 0000 to cancel the operation The lock icon will disappear 6 Press the EXIT Button to exit all menus or press...

Page 18: ...EPG Electronic Program Guide 1 Press the EPG Button to view the EPG information 2 Press the Buttons to view the event information such as event name and time 3 Press the OK Button to view brief infor...

Page 19: ...the Main Menu and then select Settings Installation and then DVB 2 Press the Buttons to select the channels you wish to scan for specifically Press the Buttons scroll through the channel list 3 Press...

Page 20: ...en select the Setting System Setup and then Local Time Setting 2 Press the Buttons to select the Time Zone and Daylight Savings setting 3 Press the EXIT Button to exit all menus or press the MENU Butt...

Page 21: ...ll appear Press the GREEN Button again to cancel this operation the icon will disappear 4 Press the YELLOW Button to delete the program 5 Press the EXIT Button to exit all menus or press the MENU Butt...

Page 22: ...e Setting User Preferences and then OSD Transparency 2 Press the Buttons to select the OSD Transparency option and press the OK Button to enter submenu 3 Press the Buttons to select the transparencyva...

Page 23: ...utton to enter the Main Menu and then select the Setting and then Parental Control 2 Press the OK Button and enter the correct PIN code to enter the submenu Parental Rating There are up to 8 Parental...

Page 24: ...enu In the parental control menu you are able to lock unlock the User Preference Menu 6 Change Password Select change password to modify the Set Top Boxes password Follow the prompts of the pop up men...

Page 25: ...B Main Menu The Main Menu is divided into 3 sections DAB Main Menu 1 Press the MENU Button to bring up the Main Menu or return to previous Menu 2 Press the Buttons to move up down the submenu 3 Press...

Page 26: ...tarting scanning the station Manual Scan 1 Press the Menu Button to enter the Main Menu and then select the Setting Installation and then DAB 2 Press the Buttons to select the station you want to scan...

Page 27: ...enus Program List 1 Press the TV DAB Button to select DAB mode 2 Press the OK Button and the DAB List will be displayed 3 Press the Buttons to select the program you desired 4 Press the Buttons to adj...

Page 28: ...s to manual tune frequency to obtain the optimum reception 3 Press the Buttons to auto search station and the strongest singal will automatically playback if found Note 1 EPG Electronic Program Guide...

Page 29: ...not be compatible Check aerial Scrambled channel message Channel is scrambled Conduct a factory reset and rescan for available channels Forgotten channle lock code Use the override code 7710 to unlock...

Page 30: ...Input Connector AC230V 50Hz Power supply Consumption 12W max Resolution 1920X1080i 1280X720p 720X576p Display Aspect Ratio 4 3 Letterbox full 16 9 Panscan Video MPEG2 Transport MP HL MP ML MPEG4 Port...

Page 31: ...259 New Zealand and have your receipt of purchase on hand This warranty is subject to the following provisions It is only valid within boundaries of the country of purchase The product must be correc...

Page 32: ......

Page 33: ...PO BOX 6287 Silverwater NSW 1811 www bushaustralia com au rev 1 30 June 2010...

Reviews: