Bush 529/9146 Installation & Operating Instructions Manual Download Page 22

For any help concerning set up and use of your TV please call the Customer Helpline: 0044 845 604 0105
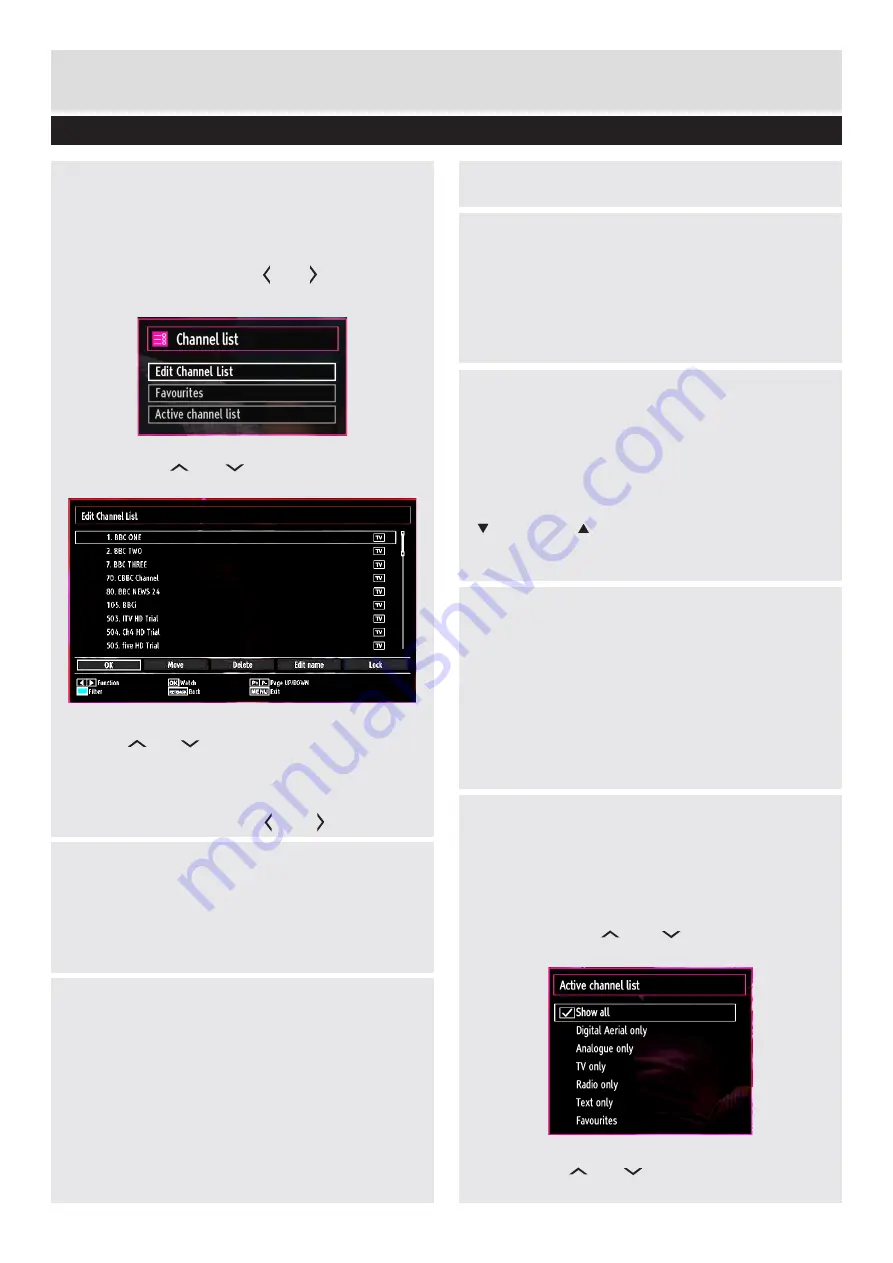
Channel management 

The TV sorts all stored stations in the Channel List. You 

can edit this channel list, set favourites or set active 

stations to be listed by using the Channel List options.
Press 

MENU

 button to view main menu. Select 

Channel List item by using “   ” or “  ” button. Press 

OK

 to view menu contents.

Select 

Edit Channel List

 to manage all stored 

channels. Use 

“ ” or “ ”

 and 

OK

 buttons to select 

Edit Channel List

”.

Navigating Channel List

1.

 Press 

“ ” or “ ”

  button to select previous or next 

channel. Press 

P+

 or 

P-

 button to move up or down 

the page.

2.

 To watch a specific channel, highlight the “

OK

” box 

on Channel List menu using 

“   ” or “   ”

 button. 

Basic Features

Filtering Options

Press 

BLUE

 button to view filtering options. You can 

filter channels by 

Digital Aerial/Analog, TV/Radio, 

Free/CAS*, A-Z

 or 

Sort

 from channel list filter menu


(*CAS=encrypted channels).

Moving a Channel
1.

 Select the desired channel. 

2.

 Select 

Move

 box in the channel list and press 

OK

 button.

3.


Edit Number

 screen will be displayed. Enter 

the desired channel number by using the numeric 

buttons on the remote control. 

Note

: If there is a previously stored channel on that 

number, a warning screen will be displayed. 

4.

 Select 

Yes

 if you want to move the channel and 

press 

OK

Deleting a Channel
1.

 Select the channel that you want to delete and 

select 

Delete

 box. 

2.

 Press 

OK

 button to continue. A warning screen 

will appear. Select 

YES 

to delete, select 

No

 to 

cancel. Press 

OK

 button to continue.

Renaming a Channel
1.

 Select the channel that you want to rename 

and select 

Edit Name

 box. Press 

OK

 button to 

continue.

2.

 Use navigation buttons to toggle between the 

current character, i.e., ‘b’ character becomes ‘a’ by 

“ ” and ‘c’ by “ ”.

3.

 When finished, press 

OK

 button to save. Press 

MENU

 to cancel.

Locking a Channel
1.

 Select the channel that you want to lock and 

select 

Lock

 option. Press 

OK

 button to continue.

2.

 You will be asked to enter parental control PIN. 

Default PIN is set as 

0000

. Enter the PIN number.

3.

 The desired channel is locked (Lock symbol 

is displayed next to the selected channel) or 

unlocked. 

Sorting Channel List

You can select broadcasts to be listed in the 

channel list. To display specific types of broadcast, 

you should use Active channel list setting.
Select Active channel list from the Channel list 

menu by using “ ” or “ ” button. Press 

OK


button to continue.

You can select a broadcast type option from the 

list by using “ ” or “ ” and

 OK

 buttons.

22

Summary of Contents for 529/9146

Page 1: ...ANT Please read these instructions fully before installing or operating These instructions contain important information which will help you get the best from your television and ensure safe and corre...

Page 2: ...ation Banner 14 Connections 15 Back connections explained 15 Left side connections explained 16 HDMI Connections 17 SCART Connections 17 VGA Connections 17 Side AV Connections 18 Using a Conditional A...

Page 3: ...laying Photos in Slideshow Mode 30 Playing Music via USB 30 Setting the channels 31 Accessing Installation Menu 31 Automatic Channel Scan Retune 31 Manual Channel Scan 31 Analogue Fine Tune 31 First T...

Page 4: ...ude to constitute a risk of electric shock of persons The exclamation point within an equilateral triangle is intended to alert the user to the presence of important operating and maintenance servicin...

Page 5: ...be securely attached to the wall in accordance with the installation instructions if the option is available LCD Screen Occasionally a few non active pixels may appear on the screen as a fixed blue g...

Page 6: ...d to a television distribution system using coaxial cable may in some circumstances create a fire hazard Connection to a cable distribution system has therefore to be provided through a device providi...

Page 7: ...rts including that lost remote control Any other technical issues you may need assistance with Call us today 0044 845 604 0105 Local call rates applies Lines open 9am 8pm Monday to Saturday and 10am 4...

Page 8: ...o set etc Stereo sound system German Nicam Teletext fastext TOP text Headphone connection Automatic programming system Forward or backward manual tuning Sleep timer Child lock Automatic sound mute whe...

Page 9: ...button 6 Numeric buttons 7 Teletext Mix in TXT mode 8 Cursor Left 9 Menu on off 10 AV Source selection 11 Favourite Mode Selection in DVB channels 12 Volume Up 13 Info Reveal in TXT mode 14 Mute 15 Vo...

Page 10: ...mer Helpline 0044 845 604 0105 Getting Started Attaching the Stand 1 Stand is placed on a flat surface fig 1 2 The product is held over the stand so that it coincides with the stand mounting point and...

Page 11: ...tton up or down To change source Press the middle of the button twice the source list will appear on screen Scroll through the available sources by pushing the button up or down To turn the TV off Pre...

Page 12: ...oad or Timer is active NOTE If you switch on your TV via P buttons on the remote control or on the TV set the programme that you were watching last will be reselected HDMI 1 HDMI 2 SPDIF Coax OUT HDMI...

Page 13: ...ources by pushing the button up or down To turn the TV off Press the middle of the button down and hold it down for a few seconds the TV will turn into standby mode Operation using Remote control butt...

Page 14: ...rranged automatically by the broadcaster This is called logical channel number LCN If the selected country has LCN support the channels will be enumerated one by one beginning from number 1 You cannot...

Page 15: ...I sockets or Component Socket No sound connection is needed for an HDMI to HDMI connection see page 00 3 PC Input VGA Connects a personal computer to the TV Connect the PC cable between the PC INPUT o...

Page 16: ...ards insert your video cable not supplied connector into the YELLOW input located on the side with several connectors of the supplied AV connection cable Colours of the connected jacks should match To...

Page 17: ...to the scart input of the TV First plug the SCART S Video adapter to the SCART connector on your TV set Then connect a S video cable to the SCART socket via the Scart S Video adapter to the S video o...

Page 18: ...ITCHED OFF In order to watch certain digital channels a conditional access module CAM can be necessary This module must be inserted in the CI slot of your TV 1 Obtain the Conditional Access Module CAM...

Page 19: ...ormatted disk type should be FAT32 CAUTION Quickly plugging and unplugging USB devices is a very hazardous operation Especially do not repeatedly quickly plug and unplug the drive This may cause physi...

Page 20: ...y means of the 7 DAY EPG All programmes on each channel will be displayed Info bar commands RED button Shrink reduces info boxes GREEN button Expand enlarges info boxes YELLOWbutton Prev day displaysp...

Page 21: ...long as the display of the screen format is displayed Using Main Menu Screen 1 Press MENU button to display main menu highlight the desired control icon using or or or button press OK button to displa...

Page 22: ...on the remote control Note If there is a previously stored channel on that number a warning screen will be displayed 4 Select Yes if you want to move the channel and press OK Deleting a Channel 1 Sele...

Page 23: ...in Power Save Mode When the TV is not in use please switch off or disconnect the TV from the mains plug This will also reduce energy consumption Disconnect power when going away for longer time Note t...

Page 24: ...settings can be changed if only the broadcaster supports Otherwise settings will not be available to be changed Audio Changes the audio language for the current channel Subtitle Sets the subtitle lang...

Page 25: ...using or button 4 Use or button to set The timer can be programmed between Off and 2 00 hours 120 minutes in steps of 30 minutes Setting Programme Timers You can set programme timers for a particular...

Page 26: ...Sets the picture size to Auto 16 9 Subtitle 14 9 14 9 Zoom 4 3 or Cinema HDMI True Black While watching from HDMI source this feature will be visible in the Picture Settings menu You can use this fea...

Page 27: ...tting is used for emphasizing left or right speaker balance Headphone Sets headphone volume Sound Mode You can select Mono Stereo Dual I or Dual II mode only if the selected channel supports that mode...

Page 28: ...of Hearing If the broadcaster enables any special signal concerning the audio you can set this setting as On to receive such signals Application version Displays the current application version Audio...

Page 29: ...nected USB memory stick Advanced Features Media Browser View Style Sets default browsing mode Sets default browsing mode as folder or flat Select Directory to display files in a folder or Normal to vi...

Page 30: ...reen will be displayed while playing a video file Advanced Features Media Browser continued Viewing Photos via USB 1 Select Photos from the Media Browser screen and press OK button 2 All photo files w...

Page 31: ...een will be displayed Select the desired SearchType using or button Manual search options will change accordingly 3 Enter the multiplex for digital manual search or frequency number for analogue manua...

Page 32: ...lock setting enables or disables the menu access You can disable access to the installation menu or the whole menu system Maturity Lock not available for the UK When set this option gets the maturity...

Page 33: ...for their index pages Coloured Buttons RED GREEN YELLOW BLUE Your TV supports both FASTEXT and TOP text systems When these systems are available the pages are divided into groups or topics When FASTE...

Page 34: ...Dimensions DxLxH without foot 35 x 530 x 4 25 VESA 75 x 75 mm M4 Display 16 9 display 55 cm 22 Screen Size 1920X1080 max resolution Digital Reception MPEG 4 MHEG 5 ENGINE compliant with ISO IEC 13522...

Page 35: ...tral N Brown Live L Green Yellow Earth E As the colours of the wires in the power cable may not correspond with the coloured markings identifying the terminals in your plug and proceed as follows The...

Page 36: ...re parts including that lost remote control Any other technical issues you may need assistance with Call us today 0044 845 604 0105 Local call rates applies Lines open 9am 8pm Monday to Saturday and 1...

Page 37: ...e devices No picture 1 No Picture means that your TV is not receiving a transmission Have you selected the correct button on the remote control Try once more Also make sure the correct input source ha...

Page 38: ...d of its service life separately from your household wastes There are separate collection systems for recycling in EU For more information please contact the local authority or the dealer where you pu...

Page 39: ...yed properly The problem may be an inconsistency with standards from the source equipment DVD Set top box etc If you do experience such a problem please contact your dealer and also the manufacturer o...

Page 40: ...pported mode a warning OSD will appear on the screen Index Resolution Frequency 1 640x350 85 Hz 2 640x400 70 Hz 3 640x480 60Hz 66Hz 72Hz 75Hz 85Hz 4 800x600 56Hz 60Hz 70Hz 72Hz 75Hz 85Hz 5 832x624 75...

Page 41: ...o for interconnection of components Component Video Inputs Y Pb Pr This video signal consist of colour differences and a luminance signal DTV Digital television broadcasts HDMI High Definition Multime...

Page 42: ...on 2 3 AM search and upgrade mode If Automatic scanning in Upgrade Options menu is enabled TV wakes up at 03 00 and searches broadcast channels for new software upgrade If new software is found and do...

Page 43: ...e correctly installed and operated in accordance with the instructions contained in this manual It must be used solely for domestic purpose The guarantee will be rendered invalided if the product is r...

Page 44: ...For any help concerning set up and use of your TV please call the Customer Helpline 0044 845 604 0105 50234889 44...

Reviews: