background image

15

 7. Operating with the touch screen 

The operation can be carried out via possibly existing arrow keys. With the 

red symbols

 you can cancel 

an action or go a step back. If you press long you will return to the main menu. With the 

green symbols


you can confirm actions. 

* Only if the voice commands (voice labels - Voicetags) are stored in the phone

Residues of sweat or hand cream on your fingertips can render the display dirty over time. Then 
the readability of the information on the display and its input functionality will deteriorate. There-
fore, please be sure to clean the display as necessary using a damp lint free cloth. Please do not 
use any detergent. 

 8.  Establishing a 

Bluetooth connection 

If you wish to establish a 

Bluetooth connection between your mobile and the HFCK for the first time, 

you have to activate the 

Bluetooth function of your mobile phone and search for Bluetooth devices.  

In this case, search for a device labelled „CC 9056…“. If several devices were identified, please select 
the HFCK and enter the 

PIN number „1234“

. The 

Bluetooth connection (pairing) will then be estab-

lished between your mobile phone and the HFCK. It is possible that you will also have to click on ‘con-
nect’ or ‘allow data transfer’ on your mobile phone if you want to be able to make a connection. 

With a connection which has successfully been made, the name of the coupled mobile telephone and 
of the provider will be shown and the data from the telephone book (SIM card) and the address book 
(storage of the telephone) are transmitted to the HFCK. Depending on the amount of stored data, this 
can take a few seconds. If the synchronisation of the phone book is interrupted, e.g. though an incom-
ing call, it is possible that all entries will not be transmitted. If this happens, the phone book should 
once again be manually synchronised. 

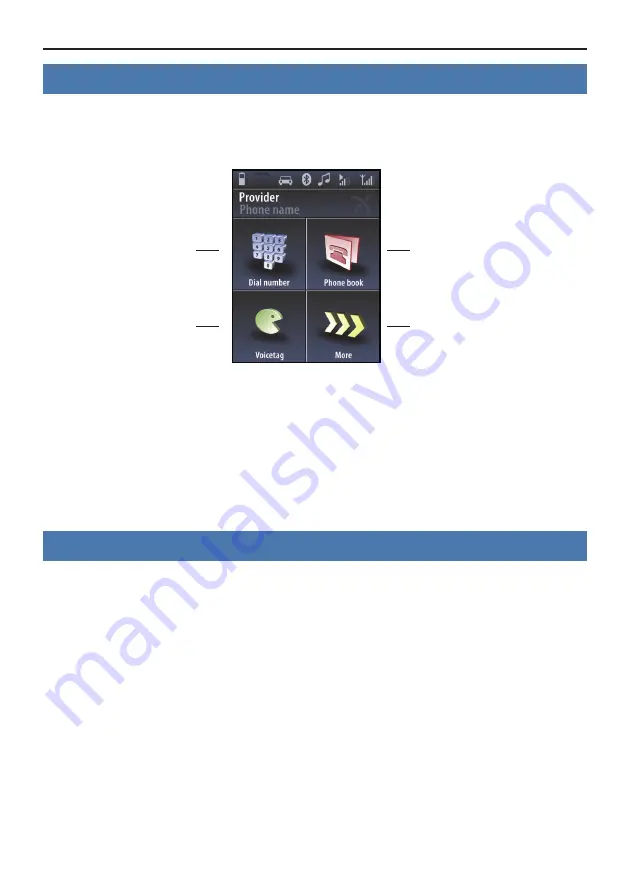
You can enter  

a telephone number here

You can activate 

Voicetags here

You can open the 

telephone book here 

You can flick through 

more functions here 

Headmenu with paired telephone 

Summary of Contents for CC 9056 Plus

Page 1: ...ctronic box 9 Operating guidelines 14 6 Using the hands free car kit for the first time 14 7 Operating with the touch screen 15 8 Establishing a Bluetooth connection 15 9 Menu navigation 17 10 Accepti...

Page 2: ...ts of the device in the vehicle so that your field of vision is not impaired and the components are not mounted in the im pact zone of the passenger compartment or in the airbag inflation zones The re...

Page 3: ...ults Do not commission the device if you detect or assume a defect In this case contact a Bury specialised dealer or our hotline Improper repair efforts can be dangerous for you Therefore only skilled...

Page 4: ...4 Installation of the hands free car kit 3 Scope of supply 8 9...

Page 5: ...nics box 2 Multifunction display with cradle and mount screws for the holder and rubber cover adhesive tape 3 Microphone 4 ISO cable harness 5 Extension cord 6 AUX In cable 7 Micro USB charging cable...

Page 6: ...suited for placing through small openings in the dashboard area This facilitates a practically invisible installation of the cable Take the length of the cable into account and make sure that it is of...

Page 7: ...7 Example of installation 1 1 2 3 4 5 6 1 2 3 4 5 6 Example of installation 2...

Page 8: ...of the insula tion can be caused by friction rubbing Step 4 Install the electronics box at a convenient place in the vehicle This can e g be behind the radio in the glove box or in the centre console...

Page 9: ...Universal isoptional 2 PWR LSP LINE OUT The hands free car kit in the vehicle is connected to the car radio with the ISO cable harness If the radio has ISO socket at its backside the installation can...

Page 10: ...o areas are inaccessible on the display Options 2 and 4 feeds music to the radio via the four LINE cables and voice signals are fed to the loudspeakers via the ISO jacks Additionally after switching o...

Page 11: ...his function is also supported by the radio The mute signal is then fed to the radio via the yellow cable of the ISO cable harness The cable is labelled with mute and must be connected to one of the t...

Page 12: ...r radio connection to the car radio 1 Mute 3 2 Mute 2 3 Mute 1 4 Ignition 5 Antenna 6 Illumination 7 Power 8 Ground 12V Power 12 24V Ignition Ground Line out 1 Line out 2 1 Line L Phone L 1 Line R Pho...

Page 13: ...here you plug in the microphone jack 4 LINE IN To connect external music players 5 MULTIFUNCTION DISPLAY Please plug the 5 pole plug of the monitor connection cable into this jack 6 RJ45 socket for po...

Page 14: ...essages Bluetooth profile Notice of activated Multipoint function Active Bluetooth connection Mobile telephone in the A2DP mode Volume Signal strength of the mobile telephone network After the power s...

Page 15: ...this case search for a device labelled CC 9056 If several devices were identified please select the HFCK and enter the PIN number 1234 The Bluetooth connection pairing will then be estab lished betwee...

Page 16: ...ons and operation of your mobile phone please refer to the operating guidelines of your mobile phone Depending on the manufacturer and type this can differ considerably between phones Note If the rech...

Page 17: ...used for instance when you access your mailbox or when entering special telephone numbers If you want to correct the telephone number please press field C In order to make the telephone call the gree...

Page 18: ...phone memory If categories are only partly sup ported the listing can subsequently be mixed Example Private 44 Mobile 44 Number 1 44 Number 2 44 SIM 44 Voicetag Voicetag feature enables the voice cont...

Page 19: ...ons for your mobile phone In your address book you can see which contacts you have already saved a voicetag for A symbol is shown behind the name This varies depending on your mobile phone but is usua...

Page 20: ...e with the phone music player play stop pause forward backward Volume adjustment can be controlled with the hands free car kit Through AUX IN cable Second option is music playback through AUX In cable...

Page 21: ...d subsequent to connecting the HFCK with your telephone in the menus New text messages or New emails The envelope symbol ap pears in the status bar of the main menu for your information If you want yo...

Page 22: ...l however you can turn off the suppression of back ground noise and echoes and leave the DSP devices activated without this function running Using the first selection you can also completely deactivat...

Page 23: ...osition 2 In addition to the first telephone that is connected you will then also be shown the second telephone in the main menu If a number of signatures from different mobile phones have been saved...

Page 24: ...le phones the suggested directions are only transferred via the Bluetooth A2DP profile If you have not connected a suitable cable to the LINE OUT output A2DP of the HFCK and to the radio however you a...

Page 25: ...in the course of time it can occur that the calibration of the display changes e g if touch screen commands are no longer carried out correctly Then you have the possibility of newly calibrating the...

Page 26: ...nd all of the contacts to the HFCK via Bluetooth The designations can differ depending on the mobile phone A message window appears on the display of the HFCK You are able to com pletely decline the r...

Page 27: ...ften the case that you don t have anything to write with at hand or the traffic situation prevents you from doing so With this function you are able to save information that is impor tant to you witho...

Page 28: ...he HFCK is switched off then after it is switched on a message appears via a pop up stating that a voice memo which has not yet been listened to is available If the Audio Feedback is activated this me...

Page 29: ...ersational partner over the car s loudspeakers Note Please comply with the country specific laws concerning in car telephone calls X X With the sub menu item Mute the microphone in your vehicle is mut...

Page 30: ...ive another call during an active telephone conversation you will be informed of it via an acoustic signal You now have the option of either rejecting the call the red symbol or accepting the call the...

Page 31: ...owing options 1 You can reject the active call the conference ends 2 You can activate the private mode 3 You can activate the mute 4 You can activate the keypad If you receive a further call during a...

Page 32: ...exercise your rights of purchase If subsequent to agreement with your contractual partner the product is to be sent directly to the manufacturer then please send it along with a detailed description...

Page 33: ...nd Quality Management Requirements according to the ISO TS 16949 Standard The BURY CC 9056 Plus has the CE approval pursuant to the R TTE 1999 5 EC regulation You can request a conformity declaration...

Page 34: ...and version Goods presented for repair may be replaced by refurbished goods of the same type rather than being repaired Refurbished parts may be used to repair the goods Upon validation of your warran...

Reviews: