background image

48

büS/CANopen-Design

6.17.2  “Hide function” via “Bürkert Communicator” 


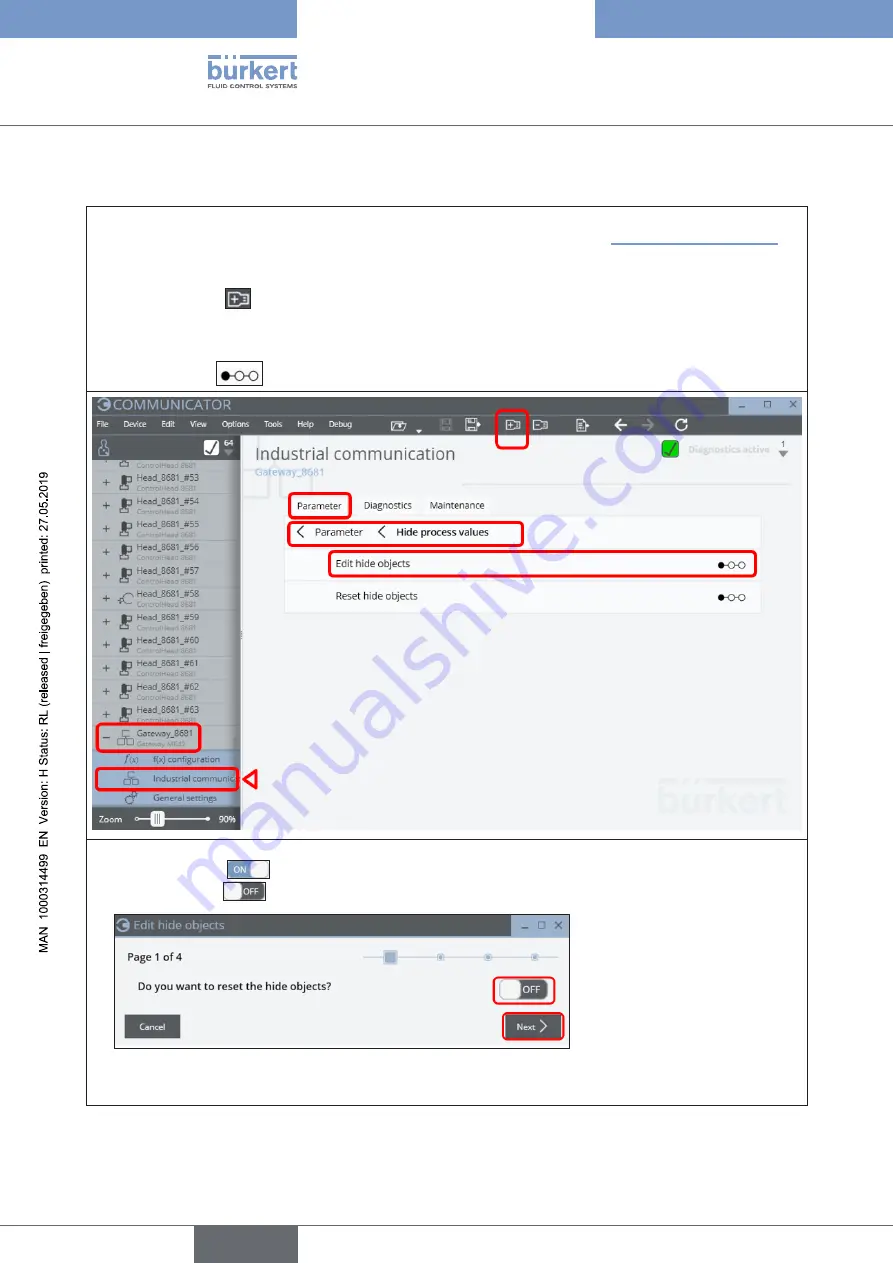
Connect the PC (with Bürkert Communicator Type 8920) via “büS stick” to the büS/CANopen data line (e.g. 
to a free connection of a CAN junction box in the same network - as shown in “Fig. 2: Network principle”)  


Start the Bürkert Communicator Type 8920


Click on the icon 

 to add an interface (e.g. “büS COM8”)


Open the desired gateway (e.g. “Gateway_8681”) and select 

“Industrial communication” 

and then the 

“Parameter” 

tab, search for

 “Hide process values”, 

then


select 

“Edit hide objects” 

and start the  

step sequence  

  with a click


“Page 1”

: Start the “hiding function”: 

set the switch to  

 (ON) in order to reset already hidden values  –  or  

set the switch to 

 (OFF) in order to NOT reset already hidden values. 


Click on 

“Next”

 (or cancel the “hiding process” via button “Cancel”).

english

Type 8681 büS/CANopen

Summary of Contents for 8681

Page 1: ...Additional Instructions for Type 8681 büS CANopen Type 8681 büS CANopen Control Head Design büS CANopen ...

Page 2: ...he right to make technical changes without notice Technische Änderungen vorbehalten Sous resérve de modification techniques Bürkert Werke GmbH Co KG 2017 2019 Operating Instructions 1905 07_EN_00810569 Original DE ...

Page 3: ...s 15 5 2 5 Valve mode Errors Warnings 15 5 2 6 Display mode Fixed colour 16 5 3 Blinking pattern fault signalling with reference to the Basic OI for Type 8681 17 5 3 1 Position feedback in normal operation 17 5 3 2 Feedback in case of Errors Warnings 17 5 3 3 Localisation function 19 5 4 Signal priorities with reference to the Basic OI for Type 8681 20 5 4 1 When several states overlap for one val...

Page 4: ... 33 6 13 1 Setting the baud rate 33 6 13 2 Setting the büS CANopen address Node ID 34 6 13 3 Factory settings of the control head regarding the gateway configuration 36 6 13 4 Central configuration management Configuration client 37 6 14 Changing the gateway IP address 37 6 14 1 Changing the gateway IP address using web server 37 6 14 2 Changing the gateway IP address using Bürkert Communicator 39...

Page 5: ...reading via Logix Designer 51 6 19 2 Parameters writing via Logix Designer 52 6 19 3 Access to parameters via Bürkert Communicator 53 6 19 4 Access to further parameters cyclic and acyclic 53 7 ACCESSORIES 54 8 CABLING EXAMPLES 56 english Type 8681 büS CANopen ...

Page 6: ...structions will result in death or serious injuries WARNING Warns of a potentially dangerous situation Failure to observe these instructions may result in serious injuries or death CAUTION Warns of a possible danger Failure to observe this warning may result in a moderate or minor injury NOTE Warns of material damage Failure to observe these instructions may result in damage to the device or the s...

Page 7: ...ons may only be carried out by authorized and suit ably qualified technicians using the appropriate tools Do not make any unauthorized internal or external changes to the device The process is restarted in a defined or controlled manner after an interruption in the power supply or pneu matic supply The device may be installed and operated only when in perfect condition and in consideration of the ...

Page 8: ...y the medium connections of the system with liquids or aggressive or flammable media Do not subject the housing to mechanical loads e g by placing objects on it or standing on it Do not make any unauthorised external changes to the housings of the device Do not paint housing parts or screws Only use compatible cleaning agents for cleaning the securely closed control head and always rinse thoroughl...

Page 9: ... the Bürkert Gateway PROFINET Modbus TPC PROFIBUS DPV1 EtherCAT CC Link corresponding configurations on request 3 1 Conformity Standards The Control Head Type 8681 büS CANopen complies with the EU directives according to the EU Declaration of Conformity The applied standards which are used to demonstrate compliance with the EU Directives are listed in the EU Prototype Examination Certificate and o...

Page 10: ...via Bürkert Communicator on site is required for commissioning each control head see also section 6 13 3 on page 36 Error free parameter access by the Logix Designer To ensure this the new addresses should be selected clearly arranged and in sequence starting with 1 and without gaps in the numerical series Any change of the device address requires a device restart 2 Setting the baud rate Set the b...

Page 11: ...une 6 This display for Autotune function active applies only to the display mode device specific LED mode 8681 Classic 0 15 see chapter 5 2 1 In the case of other display modes of the device status LED Top LED compare chapter 5 2 1 the colour and blinking pattern display differs for the Autotune function active See also NAMUR mode chapter 5 2 2 displayed in color orange as function check valve mod...

Page 12: ...s factory setting see chapter 5 2 5 Fixed colour see chapter 5 2 6 Top LED off there is no feedback via Top LED In the Bürkert Communicator the display modes can be found under General settings Parameters Status LED Mode PLEASE NOTE Hardware configured values that means set via DIP switches overwrite the software configured display mode 1 1 0 0 1 0 NAMUR mode The device status is displayed accordi...

Page 13: ...Classic 5 green red red yellow 0 1 1 0 8681 Classic 6 red green green yellow 1 1 1 0 8681 Classic 7 green yellow green green red 0 0 0 1 8681 Classic 8 yellow green yellow yellow red 1 0 0 1 8681 Classic 9 green red green green yellow 0 1 0 1 8681 Classic 10 red green red red yellow 1 1 0 1 8681 Classic 11 green yellow yellow yellow red 0 0 1 1 8681 Classic 12 yellow green green green red 1 0 1 1 ...

Page 14: ...he device status LED Top LED display the position feedback S1 S2 S3 of the process valve and the feedback S4IN from the external initiator The position feedback is displayed as shown below in Tab 4 There is no display of error and warning messages in this mode This display mode can be configured by software as of firmware revision B 02 00 00 DIP 1 to 6 111110 or can be fixed using DIP switches DIP...

Page 15: ... quickly 125 ms ON 125 ms OFF is lit red alternating with colour from S4IN If there is no position feedback S1 to S4IN i e the process valve is in intermediate positions of the defined teach points the Top LED is off Tab 5 Description of the colours and blinking patterns in valve mode errors display mode Factory settings other selectable colours for S1 to S4IN and also for the intermediate positio...

Page 16: ...inking patterns in valve mode errors warnings display mode Factory settings other selectable colours for S1 to S4IN and also for the intermediate positions white green blue yellow orange red Top LED off Factory settings other selectable blinking patterns continuously lit 125 ms ON 125 ms OFF 250 ms ON 250 ms OFF Error colour red internal error bus error error with teach or Autotune function positi...

Page 17: ...to some display modes compare chapter 5 2 5 3 2 Feedback in case of Errors Warnings If the position feedback in controlled normal operation and error warning displays occur at the same time these are not displayed at all for some display modes or alternately for other display modes see the following table Tab 8 and also the blinking patterns in Tab 9 see on the next pages Display mode Position fee...

Page 18: ...ch position is too close 0 5 mm to a previously defined teach position or if magnetic manual override is used even though manual override function was disabled by software x x x x x 3 in position colour 125 ms 125 ms Continuous flashing Signal from the external initiator S4 factory settings comp line 3 in Tab 7 x x x x 4 in position colour 250 ms 250 ms Continuous flashing Signal from position 3 f...

Page 19: ...tune function active x Tab 9 Display behaviour of the different display modes with regard to error warning status These abbreviations mean Classic device specific LED mode 8681 Classic Mode X NAMUR NAMUR mode NAMUR NE 107 VM valve mode VM E valve mode with error messages VM E W valve mode with error and warning messages 5 3 3 Localisation function This function can be used to localise a device in ...

Page 20: ... abbreviations mean see explanations below Tab 9 Page 19 5 4 Signal priorities with reference to the Basic OI for Type 8681 5 4 1 When several states overlap for one valve In this case the following priority list applies to the device specific display mode 8681 Classic X 1 Internal error error colour 450 ms ON 50 ms OFF 2 Manual operating mode is active e g by magnetic manual override see chapter ...

Page 21: ...ority over S1 and S2 active active S2 Position feedback of S2 has priority Tab 11 Display priorities when position feedback overlaps factory settings Factory settings S4 has the highest priority descending to S1 i e S4 S3 S2 S1 this corresponds to the PRIO 24 in the following table Tab 12 This display logic described in Tab 11 above can be changed via software using the sensor parameter PRIO prior...

Page 22: ...S4 S3 S2 S1 S1 1 0 0 1 S2 0 0 1 0 S3 1 1 0 0 S4 0 0 0 1 no display all other combinations Tab 13 Special case Display priorities when position feedback overlaps parameter PRIO 25 When the position feedback is from S4 external initiator note whether the external initiator is an Opener NC contact or a Closer NO contact The position feedback signal 0 always means S4 not active the 1 means S4 active T...

Page 23: ...en switched on connection of the network cable Status LED Colour of the LED Function test Blinking pattern Module red green 250 ms ON red 750 ms ON green Network green red 250 ms ON red 250 ms ON green 500 ms OFF If the function test has been completed successfully the status LEDs indicate the device status as described in the following tables Status of the device status LED Module LED Device stat...

Page 24: ...perating Instructions Type ME43 Fieldbus gateway büS to Industrial Ethernet For configuration and parameterisation using the Bürkert Communicator see also Software manual Type 8920 Bürkert Communicator Software manual Central configuration management Search for type ME43 Downloads User manual On the Bürkert website under Downloads Software also can be found for Type 8681 büS CANopen the Object Lis...

Page 25: ...cator can be connected to each free connection in the büS network for example to one of the distributors The control head can also be connected to the Bürkert Communicator for individual configuration This can be done depending on the variant via the M12 plug or via the connection terminal inside the device In doing so the control head must also be supplied with power Different connection cables a...

Page 26: ...s against moisture 0 6 Nm 0 1 Nm The CAN cable must be terminated at both ends connect a terminating resistor 120 ohms to the end of the CAN cable T connector or if the line ends with a CAN junction box connect the terminating resistor to the CAN OUT connection For service work and also when reading out CAN data a PC with Bürkert Communicator Type 8920 can be connected to any free connection at th...

Page 27: ...ck 3 discrete feedback signals from the position measuring system positions S1 to S3 1 discrete feedback signal from the external initiator S4 power supply via büS CANopen cable 11 25 V DC The acyclic analogue position signal of the target can be read out e g as parameter 8681_Current_Position_mm_DevXX resolution 0 1 mm see chapter 6 19 Access to parameters Read Write on page 50 Outputs 1 byte for...

Page 28: ...open contact PNP output Input current 1 signal ISensor 6 5 mA limited internally to 10 mA Input voltage 1 signal USensor 10 V Input current 0 signal ISensor 4 mA Input voltage 0 signal USensor 5 V Inputs from master perspective binary or analogue feedback signals The recovery of the 3 valve positions reported back in binary format or the analogue position signal is described in the Basic Operating...

Page 29: ...alculation examples Example 1 3 valves are activated one position is reported state for 200 ms the control head switches automatically one valve after another to keep the current consumption low i e max current consumption ITotal l max current consumption of 2 valves already activated 1 valve just switching PTotal PEl 2 x PValve 1 x PValve ON 1 x PLED 4 1 W 1 3 W 2 x 0 6 W 1 x 0 9 W 1 x 0 7 W or I...

Page 30: ...cribed in detail in the Basic OI 6 10 Gateway installation Mount the gateway s on a top hat rail in the control cabinet Connect the gateway s as described in the next chapter and as shown in chapter 6 2 Network principle Interfaces Connect gateway s to the master controller PLC via for example EtherNet IP 6 11 Electrical installation büS CANopen For the multipole connection variants No internal ca...

Page 31: ...address and baud rate Service interface DIP switches for colour coding the Top LED for more details see 5 2 Connection of the external initiator Power supply büS CANopen Bus signals Teach In buttons T1 3 Solenoid valve connec tions with status LED for Valves 2 3 Status LED for device Status LED for network Fig 6 Electronic module büS CANopen 6 11 2 Terminal strip configuration Designation Terminal...

Page 32: ...n installing a büS CANopen system ensure that the terminating circuit of the data lines is correct The circuit prevents the occurrence of interference caused by signal reflection in the data lines The trunk line must be terminated at both ends with 120 Ω resistors and 1 4 W power loss see Fig 7 Network topology büS CANopen Fig 7 illustrates a line with one trunk line and several drop lines Trunk l...

Page 33: ... and acyclic Please note The baud rate of all network participants control heads gateway possibly other products must correspond to each other To apply any changes to settings restart the device If the settings are changed by actuating the DIP switches these changes will not take effect until the device is restarted For a restart trigger a restart command via Bürkert Communicator or briefly discon...

Page 34: ...15 on on on on off off 47 on on on on off on 16 off off off off on off 48 off off off off on on 17 on off off off on off 49 on off off off on on 18 off on off off on off 50 off on off off on on 19 on on off off on off 51 on on off off on on 20 off off on off on off 52 off off on off on on 21 on off on off on off 53 on off on off on on 22 off on on off on off 54 off on on off on on 23 on on on off ...

Page 35: ...le If the device is to receive a fixed device address the Fixed CANopen address Static Node ID must be set to the appropriate value using the Bürkert Communicator To accept this value the device must be restarted If the device does not receive the target device address set as parameter Fixed CANopen address the solenoid valves remain in the configured safety position and an error status is display...

Page 36: ... DIP switch position was changed after the last device restart the control heads will be configured according to a preset rule at the next device restart This automatically configures the setpoint producer for the control ofthe solenoid valves The factory default setting is defined Presetting Rule 1 for systems with a preconfigured gateway Gateway_8681 This results in an automatic adaptation accor...

Page 37: ...e transferred automatically The new device must then be taught in Details and operating conditions are described in the software manual Central configuration management of Bürkert devices see chapter 5 6 For this configuration the Bürkert Communicator version 4 x or higher is required During a device reset factory reset of the configuration device control head as of firmware B 01 00 00 the configu...

Page 38: ...button Restart is clicked the new Static IP address is not saved only the device will be restarted Click the OK button to take over the new Static IP address by restarting the device if Cancel is selected the old Static IP address remains active and is only taken over at the next restart The following message appears To connect the gateway to its new IP address enter the new IP address shown in th...

Page 39: ...ommunicator Type 8920 Click on the icon to add a büS connection e g büS COM8 Open the desired gateway e g Gateway_8681 and select Industrial communication and then the Parameter tab then select Protocol settings The standard address Static IP address is displayed 192 168 1 100 Click the pencil to change the IP address Confirm the new Static IP address by clicking on the Apply button Restart the de...

Page 40: ...new window opens go to the Internet Protocol tab Mark Manually configure IP set tings in the area Internet Protocol Settings In the area IP Settings Con figuration overwrite the current Physical Module IP Address and if required also Subnet Mask and Gateway Address Click the Set button A warning then appears IP Address in physical module does not match address in general properties Click the OK bu...

Page 41: ...Ethernet Address Private Network with the new address Click the OK button Select Go Online again A new window opens Go to the Options tab Click the Download button to load the offline changes of the project into the controller PLC continued on next page english Type 8681 büS CANopen ...

Page 42: ...42 büS CAN open Design A new window with several warnings opens Click the Download button to continue the download process english Type 8681 büS CANopen ...

Page 43: ... and select Module Configuration A new window opens go to the Port Configuration tab In the area Network Configuration Type mark the Static option Enter the new IP Address and if required also the Subnet Mask and Gateway Address Confirm the configuration with OK A warning window opens Click Ja Yes button to continue the changing process Inaccessible IP addresses are crossed out english Type 8681 b...

Page 44: ...pens as shown in the figure on the right Select Register an EDS file s option and click the Next button A new window opens as shown in the figure on the right Select Register a single file option Browse your computer for the appropriate EDS file Gateway_EIP_8681_vXX_ YYMMDD_63Dev eds Click the Next button twice A new window opens Change Graphic Image If you want to change the icon graphic click th...

Page 45: ...go Offline Search for I O Configuration and Ethernet Right click on Ethernet Select New Module In the new window Select Module Type select the appropriate device from the Catalogue use the filter function for a faster search vendor Buerkert Werke After selecting the Gateway 8681 bueS click on the Create button continued on next page english Type 8681 büS CANopen ...

Page 46: ...opriate Private Network number for the Ethernet Address Click on OK button Close the old window Select Module Type in the new window DOWNLOAD the cor responding files see chapter 6 3 onto the PLC Then Go Online to connect the gateway and the master controller PLC EtherNet IP to each other english Type 8681 büS CANopen ...

Page 47: ...ide the inputs and outputs via software Logix Designer 6 17 1 or via the Bürkert Communicator Type 8920 6 17 2 6 17 1 Hide function via software Logix Designer Start the Logix Designer Open the project e g Logix Designer Gateway_Type8681 Open the desired gateway and select the Parameters tab Now select the line Hide Outputs 1 64 and hide each non existent control head by setting a 1 one in each fi...

Page 48: ...lick on the icon to add an interface e g büS COM8 Open the desired gateway e g Gateway_8681 and select Industrial communication and then the Parameter tab search for Hide process values then select Edit hide objects and start the step sequence with a click Page 1 Start the hiding function set the switch to ON in order to reset already hidden values or set the switch to OFF in order to NOT reset al...

Page 49: ... set the switch to OFF in order NOT to activate the hiding i e these inputs are NOT hidden Click on Next or cancel the hiding process via button Cancel Page 4 Finish the hiding function set the switch to ON newly hidden values will be confirmed and with Finish the device will be restarted immediately or set the switch to OFF newly hidden values will be confirmed but with Finish the device is NOT r...

Page 50: ...ay PLC Position 1 and External Initiator are active Example 2 process data from PLC gateway to the control head Valve 1 is active 6 19 Access to parameters Read Write Some relevant acyclic parameters have been defined for preconfigured gateways which can be read directly with the Logix Designer and partially overwritten described below in chapters 6 19 1 Parameter reading via Logix Designer and 6 ...

Page 51: ...eters all relevant predefined parameters are displayed for each control head scroll down to see the data of the other control heads NOTE EDS with other predefined parameters available on request But o n e parameter for all control heads can also be displayed using the Group function E g select the Parameter Group TP1 negative Feedback Field Teach Position 1 negative T h i s parameter is displayed ...

Page 52: ... for the reading function and in the Parameters tab select e g Group All Parameters In order to type in or change a value in a white field Type in a value in the white Value field considering the data type as specified under Style if no style is specified it is a string value in that case click the symbol to type in Press the button OK or Enter to accept the value english Type 8681 büS CANopen ...

Page 53: ...t is required after a factory reset and in order to activate changes of bus communication settings 6 19 4 Access to further parameters cyclic and acyclic In addition to the predefined relevant parameters further values can be read out and partially overwritten Access is via Bürkert Communicator or e g via Logix Designer The required fieldbus addresses as well as indices sub indices are shown in a ...

Page 54: ... Other pre configurations e g in conjunction with Control Heads Type 8691 Positioners Type 8692 or Process Con trollers Type 8693 on request 316696 gateway 774087 SD card Cables and connections büS CANopen developed for application in environments with hygienic requirements degree of protection IP65 67 materials Metal parts stainless steel cable sheath PVC U 24 V DC I max 4 A required tightening t...

Page 55: ...l plug in connections cables T pieces to ensure the required leak tightness against moisture 0 6 Nm 0 1 Nm Alternatively DeviceNet cabling components e g from Rockwell Automation can also be used However they must comply with the necessary requirements when used in the Hygenic area because not all of these parts have the required quality such as stainless steel or PP or PPE or PVC Service tool Ord...

Page 56: ...ING EXAMPLES Required tightening torque for all M12 connections cables T pieces to ensure the necessary tightness against moisture 0 6 Nm 0 1 Nm Close all open connections well with protective caps english Type 8681 büS CANopen ...

Page 57: ...les Required tightening torque for all M12 connections cables T pieces to ensure the necessary tightness against moisture 0 6 Nm 0 1 Nm Close all open connections well with protective caps english Type 8681 büS CANopen ...

Page 58: ...les Required tightening torque for all M12 connections cables T pieces to ensure the necessary tightness against moisture 0 6 Nm 0 1 Nm Close all open connections well with protective caps english Type 8681 büS CANopen ...

Page 59: ...59 english Type 8681 büS CANopen ...

Page 60: ...www burkert com ...

Reviews: