background image

19

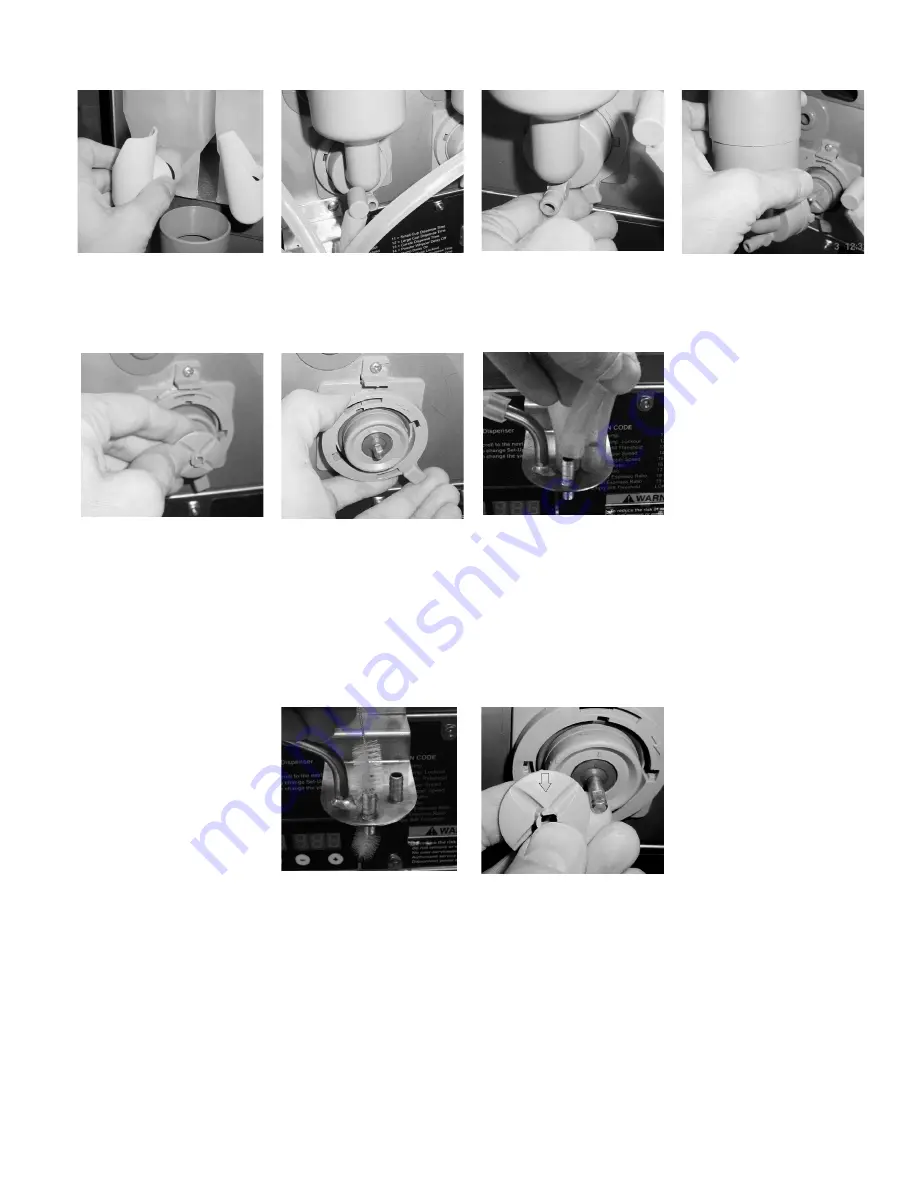
Weekly: Parts Washing and Sanitizing

11. When 

reassembling 

parts, be sure to align ar-

row on frother disk with 

flat  on  whipper  motor 

shaft, and rotate tab on 

whipper base clock wise 

to the vertical position to 

lock mixing chamber.

7.  Remove  dispense  hoses 

from dispense nozzle as-

sembly.

6.  Rotate  tab  on  mixing 

chamber  base  further 

counter  clock  wise,  and 

remover  from  shaft  by 

pulling straight out.

NOTE:

  Insure  O-ring  and 

shaft  seal  are  in  place  dur-

ing re-assembly.

5.  Remove frother disk from 

shaft  by  pulling  straight 

out.

4.  Remove mixing chamber 

and  steam  collector  by 

pulling straight out.

3.  Rotate  tab  at  bottom  of 

mixing  chamber  bases 

counter clock wise to re-

lease base.

2.  Remove  elbows  from 

mixing  chambers,  twist-

ing  slightly  to  help  re-

lease.

1.  Remove  elbows  from 

both hoppers.

39328 012607

8.  Clean all parts removed in 

warm soapy water.  Use 

Bunn  P/N  33685.0000 

cleaning  brush  provided 

to clean bores and orific-

es. Rinse in cold water.

9.  Prepare  one-gallon  (3.8 

liter)  of  sanitizing  solu-

tion  with  at  least  100 

ppm of available chlorine 

in 120°F (48.9°C) water.

Soak all cleaned parts in 

sanitizing  solution  for  5 

minutes, then rinse thor-

oughly in cold water, and 

dry.

10. Rinse  cleaning  brush, 

dip  in  sanitizing  solu-

tion, and brush the bore 

of each of four dispense 

nozzles.

NOTE:

  Repeat  this  proce-

dure  for  each  nozzle  sepa-

rately.

Summary of Contents for SLCC-6

Page 1: ...07 2007 Bunn O Matic Corporation www bunnomatic com SLCC 6 To obtain the Illustrated Parts Catalog visit the Bunn O Matic website at www bunn com This is absolutely FREE and the quickest way to obtain...

Page 2: ...REGOING WARRANTY IS EXCLUSIVE AND IS IN LIEU OF ANY OTHER WARRANTY WRITTEN OR ORAL EXPRESS OR IMPLIED INCLUDING BUT NOT LIMITED TO ANY IMPLIED WARRANTY OF EITHER MERCHANTABILITY OR FITNESS FOR A PARTI...

Page 3: ...ay Mode 10 Program Mode 13 Priming The Concentrate Lines 16 Draining The Hot Water Tank 17 Operating The Dispenser 17 Carafe Dispense Mode 17 Hot Water Mode 17 Cleaning And Preventive Maintenance 18 D...

Page 4: ...for 15 seconds then stop 4 Place top switch in NORMAL position 5 Discard rinse water and close door ALARMA DE ENJUAGUE Si destellan todos los LED del panel de control y en la pantalla de LED aparece...

Page 5: ...100 psi 138 and 690 kPa This water source must be capable of producing a minimum flow rate of 4 5 fl oz 133 1 ml per second A shut off valve should be installed in the line before the dispenser Insta...

Page 6: ...the user to select different dispensing functions Located behind the splash guard panel a Rinse Dispenses hot water only Flushes the powder and coffee mixing chambers and dispense lines and tips b Pr...

Page 7: ...13 14 11 12 8 4 1 5 2 6 3 6 7 9 OPERATING CONTROLS Continued 39328 012607...

Page 8: ...at the elbows end up parallel to the rotor face 6 Depress the tension screws and insert it in the notch in the pump body reapplying spring tension on the pump bands 7 Replace the tubing retainer plate...

Page 9: ...e of the refill error has been investigated and cured the system can be reset by both disconnecting for at least 5 seconds and then recon necting the power to the machine RINSE ALARM FEATURE Periodic...

Page 10: ...next display NOTE The display blanks out after two minutes of inactivity Press the MENU button to activate the display LCD DISPLAY DISPLAY MODE DESCRIPTION MENU 1 9 0 Home View Tank Temperature Set T...

Page 11: ...X 1 Displays Right Coffee Dispense Ra tion XXX 1 Displays Left Espresso Dispense Ra tion XXX 1 Displays Right Espresso Dispense Ration XXX 1 Displays Empty Product Threhold Displays Small Cup Dispense...

Page 12: ...tor De lay Off time Displays Powder Auger Motor Delay On time Displays hours for Rinse Required Displays Small Espresso Dispense time Displays Large Espresso Dispense time Displays enable disable sele...

Page 13: ...1 5 5 MENU 4 0 r un MENU 4 0 8 8 MENU 5 0 r un MENU 5 0 8 0 Tank Temperature Set Tank Ready Temperature Refill Threshold Left hopper motor Left hopper motor Right hopper motor Right hopper motor Defa...

Page 14: ...sso Ration Empty Product Threshold Small Cup Dispense Time Large Cup Dispense Time Decanter Dispense Time Set Decaf Coffee Ratio Default 38 1 Set Regular Coffee Ratio Default 38 1 Set Left Espresso Ra...

Page 15: ...ime Large Espresso Dispense time DBL SHOT disable Set Powder Whipper Motor Delay Off time Default 1 8 seconds Set Powder Auger Motor Delay On time Default 5 seconds Displays hours for Rinse Alarm Defa...

Page 16: ...dispense tip 5 Activate the appropriate dispense button DECAF or COFFEE until concentrate flows from the dispense nozzle Priming may take 10 to 20 seconds 6 Open the dispenser door select Normal on th...

Page 17: ...HE DISPENSER Set the Function Selector Switch to NORMAL and the Mode Selector Switch to RUN 1 Simply place a cup on the drip tray beneath the center dispense nozzle 2 Press the DECAF button if a decaf...

Page 18: ...eps 3 and 4 with warm tap water 140 F 60 C to rinse the soapy water from the pump tubing Continue depressing the dispense switch until the water is clear and no soapy water is being dispensed 6 Prepar...

Page 19: ...or by pulling straight out 3 Rotate tab at bottom of mixing chamber bases counter clock wise to re lease base 2 Remove elbows from mixing chambers twist ing slightly to help re lease 1 Remove elbows f...

Page 20: ...tension on the pump bands Remove and discard pump tube assemblies 3 Apply lubricant BUNN O Matic part no M2531 0001 to the middle section of the new pump tubing 4 Insert the free end of the pump tube...

Page 21: ...Rate Left Decaf Water Rate Set PRIME NORMAL RINSE switch to PRIME position Press the DECAF button left pump will run for 20 seconds Refer to Field Calibration of the Concentrate Pumps Enter ml collec...

Page 22: ...to RINSE position Press the COFFEE button water will flow for 20 seconds Refer to Field Calibration of the Concentrate Pumps Enter Liters collected from 20 sec test above Default 41 Used to set the ta...

Page 23: ...ENU C E 0 0 6 0 Left Decaf Pump Failure Right Regular Pump Failure Heating Time Too Long Fill Time Too Long Cool Time Too Long Heat Sink Temp Too High Left Motor or RPM Sensor Failure Check Motor and...

Page 24: ...ensor Failed Overflow Switch Fault Power Supply Fault Sensor Reading Out Of Range High or Low Faulty Sensor wiring Sensor Reading Out Of Range High or Low Faulty Sensor wiring Sensor Reading Out Of Ra...

Page 25: ...ll display a 20 second count down timer and then shut the pump OFF automatically Release the dispense switch 5 Stop priming and allow the tip to stop dripping Discard the concentrate collected 6 Place...

Page 26: ...te Calibration Depress the MENU button to display the Regular Coffee Flow Rate calibration menu C4 run Repeat STEPS 3 12 above for the right side Regular dispense valve using the COFFEE dispense butto...

Page 27: ...ws and press any beverage button on the front door 6 The left hopper will run automatically for 10 second and then stop 7 Weight the contents of the container Divide by 10 to determine grams or ounce...

Page 28: ...GRY GRY TANK t 1 1 4 1 4 WHI ORG PNK ORG ORG ORG GRN BLK BRN WHI BRN WHI BRN WHI BRN BLK RED RED BLK ORG BLK ORG RED GRN BLK BLU BLK RED BLK RED BLK WHI WHI BLK WHI BLK WHI BLU WHI YEL RED RED RED BLK...

Page 29: ...ORG GRN BLK BRN WHI BRN WHI BRN WHI BRN BLK RED RED BLK ORG BLK ORG RED GRN BLK BLU BLK RED BLK RED BLK WHI WHI BLK WHI BLK WHI BLU WHI YEL RED RED RED BLK VIO VIO VIO WHI VIO WHI BLK WHI GRY GRY RED...

Reviews: