background image

Page 5

ELECTRICAL HOOK-UP

CAUTION – 

Improper electrical installation will damage electronic components.

1. An electrician must provide electrical service as specified.
2. Using a voltmeter, check the voltage and color coding of each conductor at the electrical source.
3. Remove the front, lower left access panel beneath the sprayhead.
4. Feed the cord through the strain relief and connect it to the terminal block.
5. Connect the brewer to the power source and verify the voltage at the terminal block before proceeding.  Replace the

access panel.

6. If plumbing is to be hooked up later be sure the brewer is disconnected from the power source.  If plumbing has been

hooked up, the brewer is ready for

 Initial Set-Up.

PLUMBING REQUIREMENTS

This brewer must be connected to a cold water system with operating pressure between 20 and 90 psi (138 and 620

kPa) from a 

1

2

" or larger supply line.  A shut-off valve should be installed in the line before the brewer.  Install a regulator

in the line when pressure is greater than 90 psi (620 kPa) to reduce it to 50 psi (345 kPa).  The water inlet fitting is 

3

8

" flare

or female quick connect.

NOTE – 

Bunn-O-Matic recommends 

3

8

" copper tubing for all installations from the 

1

2

" water supply line.  A tight coil of copper

tubing in the water line will facilitate moving the brewer to clean the counter top.  Bunn-O-Matic does not recommend the
use of a saddle valve to install the brewer.  The size and shape of the hole made in the supply line by this type of device may
restrict water flow.

This equipment must be installed to comply with the Basic Plumbing Code of the

Building Officials and Code Administrators International, Inc. (BOCA)

and the Food Service Sanitation Manual of the Food and Drug Administration (FDA).

PLUMBING HOOK-UP

1. Flush the water line and securely attach it to the flare fitting located on bottom of brewer.
2. Turn on the water supply.

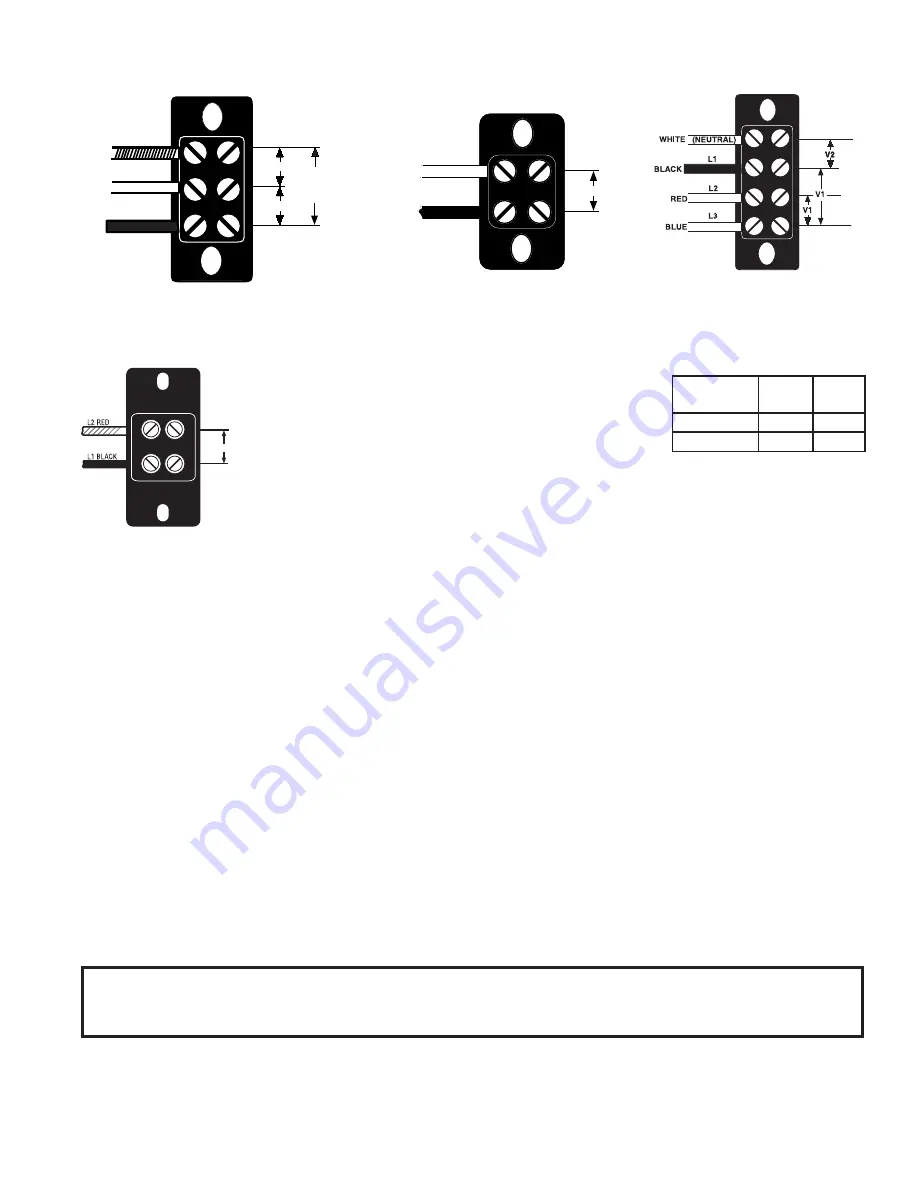
Requires 3-wire, grounded service rated
120/208 or 120/240 volts ac, 30 amp, single
phase, 60 Hz.

ELECTRICAL REQUIREMENTS

L2 RED

WHITE

NEUTRAL

L1 BLACK

120 V.A.C.

120 V.A.C.

208 OR 240 V A.C.

P1841

Requires 4-wire, grounded
service rated 120/208 volts
ac or 120/240 volts ac, 30
amp, three phase, 50 Hz.

L1, L2, L3, are the 3 phases
V1 = Phase to phase voltage, between any 2 phases.
V2 = Phase to neutral voltage, L1 to neutral must be 120V.

P2612

 SYSTEM
VOLTAGE

 V1

 V2

208

208

120

240

240

120

CAUTION:

 Do not connect L1 to a circuit operating at

more than 150 volts to ground.

35879 112204

Requires 2-wire, grounded
service rated 120 volts ac, 20
amp, single phase, 60 Hz.

120V.A.C.

NEUTRAL

WHITE

L1 BLACK

Requires 2-wire, grounded
service rated  or 200 volts
ac, 26.4 amp or 230 volts
ac, 26.9 amp, single phase,
60 Hz.

200 or 230V.A.C.

Summary of Contents for SINGLE TF DBC W/SMART FUNNEL

Page 1: ...ATION POST OFFICE BOX 3227 SPRINGFIELD ILLINOIS 62708 3227 PHONE 217 529 6601 FAX 217 529 6644 www bunnomatic com INSTALLATION OPERATING MANUAL 35879 0000E 04 05 2003 Bunn O Matic Corporation SINGLETF...

Page 2: ...n do not constitute warranties and should not be relied upon If BUNN determines in its sole discretion that the equipment does not conform to the warranty BUNN at its exclusive option while the equipm...

Page 3: ...w Recipe no Smart Funnel nor G9 2T DBC Grinder 17 Review Recipes Modify Recipes Set up No Name Coffee 18 Set Brew Volumes 19 Set Bypass Percentages 20 Set Pulse Brew Times 21 By Example 23 Enter Times...

Page 4: ...00 USER NOTICES The notices on this brewer should be kept in good condition Replace unreadable or damaged labels 10044 0000 03408 0000 03409 0000 CAUTION Do not connect to a circuit operating at more...

Page 5: ...opper tubing in the water line will facilitate moving the brewer to clean the counter top Bunn O Matic does not recommend the use of a saddle valve to install the brewer The size and shape of the hole...

Page 6: ...will exit the setup and return to the main screen c BREW PAD Momentarily pressing and releasing this pad begins a brew cycle d PAD Pressing and holding the pad allows entry to the programming menus P...

Page 7: ...into the funnel 3 Grind the selected amount of fresh coffee into the Smart Funnel using the G9 2T DBC with Smart Funnel operation and level the grounds by gently shaking 4 Slide the funnel into the fu...

Page 8: ...es through all holes in the sprayhead plate but a thin film of residue can pass light and still impede water flow a Remove sprayhead from brewer Disassemble by removing the seal b Clean the holes in t...

Page 9: ...hat name and batch size of coffee was ground into the funnel and allows for the brewer to automatically set itself to what is read from the funnel handle LAST ON TIME During a pulse brew this is the t...

Page 10: ...function screens hidden programming switches are used There are five of these switches that will be used for the setup of the brewer 1 2 3 4 5 1 symbol upper right of the BUNN logo This is used to acc...

Page 11: ...DY temperature Select NO to permit brewing at any water temperature When finished press and release DONE This will exit this function screen and return to the MAIN SCREEN on the display PROGRAMMING TH...

Page 12: ...e optimum brewing quality METHOD 2 Using a RECIPE CARD to enter all of the brew settings at one time If using a coffee name not in the G9 2T DBC s memory the customer can obtain a RECIPE CARD from the...

Page 13: ...g steps 1 and 2 7 If the grind is acknowledged by the brewer the displaywillreadBEGINSETUPOF COFFEENAME ThenthescreenwilldisplayBREWOZ andabatch lightwillbeblinking Refertopage18fordescrip tion of BRE...

Page 14: ...and repeat steps 12 through 15 If they are correct pressYES ThiswilladvancetoSETPULSE BREW Refer to page 20 for description of SET PULSE BREW function 16 To SET PULSE BREW if setting pulse brew BY EX...

Page 15: ...the brew spray ends to when the funnel is emptied of hot liquid for that batch size NOTE Set to OFF to prevent funnel locks from engag ing to disable this function for a particular batch size To set t...

Page 16: ...RD alongwiththecoffee name that is being programmed Procedure to program the coffee name 1 Remove the funnel if present from the funnel rails 2 Position the RECIPE CARD vertically so that the top end...

Page 17: ...ssed This means that no name was read from the funnel s handle There is one NO NAME coffee program that can be set in the brewer It is referred to as NO NAME The instructions for programming the NO NA...

Page 18: ...NEW RECIPES Release the Press the until the display reads REVIEW RECIPES PROGRAMMING FUNCTIONS LEVEL 2 cont P2442 2 Press YES to proceed The display should now read NO NAME along with MODIFY SHOW and...

Page 19: ...nd a batch light will be blinking Press and release the batch size to be modified P2443 PROGRAMMING FUNCTIONS LEVEL 2 cont 5 Using and set the amount of brew water in ounces to be dispensed over the g...

Page 20: ...ase NEXT to advance to the desired coffee name to be modified P2444 4 Press and release MODIFY The display should read BREW OZ 5 Press and release DONE The display should read 3 BATCHES DONE 6 Press a...

Page 21: ...ent steps under that function Either of these methods can be used to set the pulse brew for each batch P2293 Modifying pulse brew Range 1st on time off to 4 minutes Off time off to 4 minutes Last on t...

Page 22: ...Page 22 SET PULSE BREW cont PROGRAMMING FUNCTIONS LEVEL 2 cont P2445 35879 082203...

Page 23: ...the water level in the funnel drains to the desired level press again to end the OFF TIME This also begins the spray of water for the final setting d 7 The brew water will begin again and the water le...

Page 24: ...will show the three times just entered for that batch size After a 5 second delay the dis play will read 3 BATCHES DONE d and e P2411 6 If other batch sizes need to be modified press NO The display w...

Page 25: ...ld now read SET PULSE BREW 9 Press and release NO The display should now read SET PREINFUSION 10 Press YES to proceed The display should now read ON TIME and a batch light will be blinking 11 Using an...

Page 26: ...se DONE The display should read 3 BATCHES DONE 8 Press and release YES The display should now read SET PULSE BREW 9 Press and release NO The display should now read SET PREINFUSION 10 Press and releas...

Page 27: ...essandreleaseDONEtosavethe new setting exit the SET TEMP function and advance to the next function screen SET READY Another alternative is to press and release the pad located on the front switch pane...

Page 28: ...REFILL and return to the MAIN SCREEN SPRAY OZ M This function allows the operator to view or to enter the actual flow rate coming out of the sprayhead of the brewer This is NOT used to change the act...

Page 29: ...YES pad The display should read CONTAINER READY If the container is un der the funnel press YES The display should read CALIBRATE SPRAY PRESS BREW TO START 5 Pressandreleasethe pad Thedisplayshould r...

Page 30: ...S The display should read CALIBRATE BYPASS PRESS BREW TO START 6 Pressandreleasethe pad Thedisplayshould read CALIBRATE BYPASS 60 SEC TO FINISH The 60 second timer on the display will count down to ze...

Page 31: ...itch panel to exit the BREW COUNTERS function and return to the MAIN SCREEN P2448 FUNNEL DETECT Procedure to set funnel lockout 1 Press and hold the pad until the display reads SET NEW RECIPES Release...

Page 32: ...and the ability to check switches for proper function This function also tests the funnel sensor coil s frequency diagnostic tool for troubleshooting purposes only Pressing NO will forward to the next...

Page 33: ...PressYEStoruntestsonvariouscomponentsand outputs within the brewer Pressing NO will exit this function and advance to the next function screen 5 The display should read TEST OUTPUTS PROGRAMMING FUNCTI...

Page 34: ...eneath the brew funnel 3 Press and hold the pad until the display reads SET NEW RECIPES Release the pad Continue pressing and releasing the pad until SERVICE TOOLS appears 4 Pressing NO will exit this...

Page 35: ...ults Press YES to load the defaults ThiswillthenreverttotheMAINSCREEN and the factory default values will replace all previously entered values It will NOT reset the summation Brew counter P2312 PROGR...

Page 36: ...alve Damage may result if solenoids are energized for more than ten minutes without a supply of water The use of two wrenches is recommended whenever plumbing fittings are tightened or loosened This w...

Page 37: ...sition after the brew cycle was started a Wait for the brewer to heat to the proper temperature b Disable the BREW LOCKOUT function See page 10 for proce dure Removefunnel checkcontents and insert bac...

Page 38: ...pressed after the brew cycle was started 1 Tank Heater failure 2 Triac Failure 3 Control Board Thermistor failure To resume brewing press BREW again Thebrewcycleresumesform the point it was interrupte...

Page 39: ...e 1 TemperatureSensorProbewire s broken or not making connection 1 TemperatureSensorProbewire s shortedtohousing ortoeachother Check water supply shut off Service required Service required Check wire...

Page 40: ...ata plate within 10 Check plumbing and shut off valves Test the ON OFF switch Refer to the switch test procedures on page 32 Test the BREW switch Refer to the switch test procedures on page 32 Testthe...

Page 41: ...ow value when water IS touch ing the probe For best operation the right number should be set to a value midway between these low and high numbers Before changing the setting confirm that the refill pr...

Page 42: ...when waterisNOTtouchingtherefillprobe to a low value when water IS touch ing the probe For best operation the right number should be set to a value midway between these low and high numbers Before cha...

Page 43: ...wer Connect a voltmeter across one of the tank heaters Reapply power to the brewer and refer to Testing Indi vidual Components on page 32 If the full supply voltage is measured when the tank heater is...

Page 44: ...est sev eral times to confirm a consistent volume of dispensed water If not consistent check the valve tubing and sprayhead for lime buildup Ifbypassisbeingusedontheincon sistent brewing recipe test t...

Page 45: ...f ground cof fee in the funnel The BUNN paper filter should be centered in the funnel and the bed of groundcoffeeleveledbygentleshak ing Empty the server remove its cover and place the server beneath...

Page 46: ...ion Plumbing lines should not be rest ing on the counter top A The brewer must be connected to a cold water line B Water pressure to the brewer must not be higher than 90 psi 620 kPa Install a regulat...

Page 47: ...LK 14 BLK 14 MT2 L1 LIMIT THERMOSTAT FUNNEL SENSOR WHI VIO VIO WHI PNK BLK GRN TEMP PROBE WATER LEVEL PROBE RED RED N C OVERFLOW PROTECTION SWITCH CONTROL PC BOARD SWITCH UNIT ASSEMBLY Switch Unit Ass...

Page 48: ...14 RED 14 BLK 14 MT2 L1 LIMIT THERMOSTAT FUNNEL SENSOR WHI VIO VIO WHI PNK BLK GRN TEMP PROBE WATER LEVEL PROBE RED RED N C OVERFLOW PROTECTION SWITCH CONTROL PC BOARD SWITCH UNIT ASSEMBLY Switch Uni...

Page 49: ...BLK 14 MT2 L1 LIMIT THERMOSTAT FUNNEL SENSOR WHI VIO VIO WHI PNK BLK GRN TEMP PROBE WATER LEVEL PROBE RED RED N C OVERFLOW PROTECTION SWITCH CONTROL PC BOARD SWITCH UNIT ASSEMBLY Switch Unit Assembly...

Reviews: