background image


15 

Click ‘Allow access’, or IP Camera will not be able to function properly. 
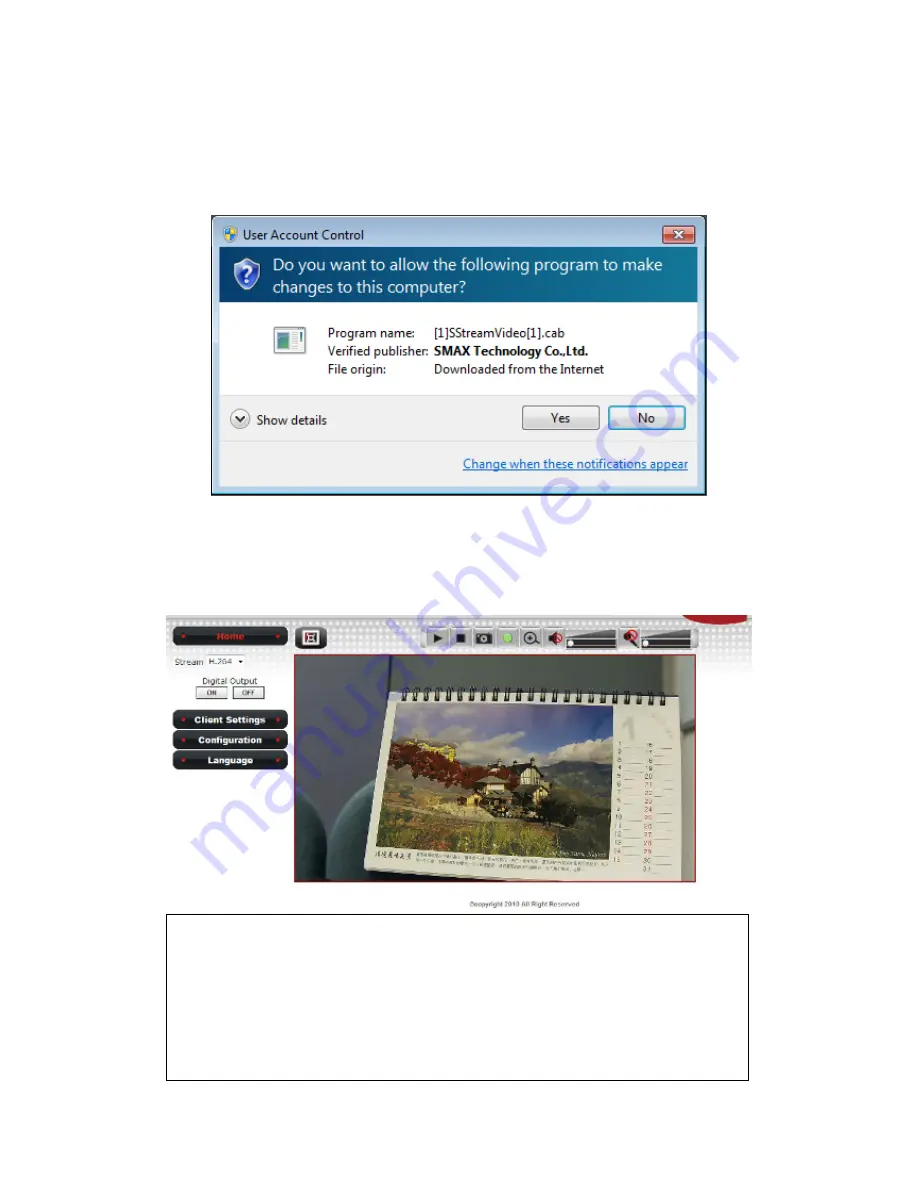
When  you’re  installing  Internet  Explorer  plugin,  you  may  also  be 
prompted  that  if  you  want  to  allow  changes  to  be  made  to  your 
computer: 


Click ‘Yes’ to allow changes. 
 
After  ActiveX  plugin  is  installed,  you  should  be  able  to  see  the  video 
stream from camera. 


NOTE:   

If this is the first time you use this IP Camera, you can refer to 

chapter 2.4 for instructions on Setup Wizard, which will guide 

you to complete the software setup of your new IP Camera. 

Summary of Contents for BU7217

Page 1: ...0 3M IP Camera Bullet WDR PoE User Manual Release 27 May 2014...

Page 2: ...rk IP Camera by Web UI 11 2 1 Locate the IP address of Network IP Camera 11 2 2 Access to IP Camera s Web User Interface and Install ActiveX Plugin 13 2 3 Viewing Live Video 16 2 4 Client Settings 19...

Page 3: ...3 10 Event 52 3 10 1 Settings 53 3 10 2 Media 55 3 10 3 Event Server 56 3 11 Recording 60 3 12 SDHC 62 3 13 Log 64 3 14 Device Info 65 3 15 Maintenance 66 3 16 Language 67 Chapter IV Troubleshooting...

Page 4: ...e Ultra high resolution 3Mega pixel CMOS image sensor Analog video BNC output works with conventional video devices such as TV Monitors analog DVRs etc Digital input output interface lets you connect...

Page 5: ...IP Camera into your body Make sure lens set is secured when you re using this IP Camera lens set may fall down if it s not properly secured and cause damage to human and itself If you want to use this...

Page 6: ...ew Network IP Camera when you unpack the package If any item is missing please contact your dealer of purchase for help Item No Description Quantity 1 Network IP Camera with Bracket 1 2 Sun Shield Kit...

Page 7: ...ork IP Camera Item Description 1 IP camera device IP camera 2 I O cable RS485 DI DO GND DC12Volt 2A input Reset Button Audio output Audio input Network RJ45 connector TV output BNC connector 3 Bracket...

Page 8: ...and IR LED ON OFF control 3 Lens Vari focal focal length Back Item Description 1 Sun Shield Screw Connects between camera device body sun shield 2 Sun Shield Protect camera device body from sun shine...

Page 9: ...D 1 3 DI 2 DC12 Volt 2A input 3 Reset Button 4 Audio output 5 Audio input 6 Network RJ45 connector two LED index orange color is power index green is network index 7 TV output BNC connector Please che...

Page 10: ...C power connector 4 If everything s ok you should see the left LED light on LAN port light up If not please recheck every step and try again or ask your dealer of purchase for help 5 Unplug the power...

Page 11: ...10 8 If this IP Bullet camera is connected to a PoE switch then the device can be powered on without use the power adapter...

Page 12: ...ust know the IP address of IP Camera before you can connect to it The IP Camera will use DHCP server on your local network to obtain an IP address automatically by default So you can check your DHCP s...

Page 13: ...a you wish to change IP address then click Change IP button to change select IP Camera s IP address setting If you no longer need to use this utility click Exit button to close it Please note If you h...

Page 14: ...username and password are both admin lower case by default Click OK button or press ENTER key on your keyboard when you finish entering username and password When you connect to IP Camera for the firs...

Page 15: ...14 For IE 9 or above version Click Install button located at the bottom of IE to install ActiveX plugin If you re prompted that Windows Firewall has blocked some features of this program...

Page 16: ...want to allow changes to be made to your computer Click Yes to allow changes After ActiveX plugin is installed you should be able to see the video stream from camera NOTE If this is the first time yo...

Page 17: ...hen you re in other page Stream Select video stream type H 264 or MJPEG H 264 required less network bandwidth and this will help when network connection is slow Digital Output ON OFF Switch digital ou...

Page 18: ...ur computer When you click this button a new window will appear Snapshot button Click Save button when you see the image you wish to save and you ll be prompted to indicate the folder on your computer...

Page 19: ...ical zoom ring on lens set of IP camera Enable Disable mute button When mute is enabled you will not hear the voice from IP camera If you want to hear voice from IP camera click this button to disable...

Page 20: ...s In Client Settings menu you configure basic IP camera settings like data transfer protocol and data storage folder To access Client Settings menu click Client Settings button on the left The followi...

Page 21: ...Select a folder on your computer to save recorded video Click Browse button and you ll be prompted to select a folder Prefix When saving video files the characters you typed in Prefix field will be us...

Page 22: ...camera s settings you can access IP camera s Configuration menu which provides various kinds of system setting To access configuration menu click Configuration button on the left The Configuration su...

Page 23: ...will help you to identify this IP camera You can use IP camera s installation location as host name and this will help you to identify IP camera when you have many IP cameras installed Indicator LED...

Page 24: ...elect this item and IP camera will use your computer s time as its time Synchronize with NTP Server Select this item and IP camera will keep its date and time setting synchronized with specified time...

Page 25: ...P camera s video and make changes of camera setting User Can view IP camera s video and see log only Guest Can view IP camera s video only There can be multiple users but only one administrator is all...

Page 26: ...sts all users existed in IP camera If you want to remove one user click it in the list and then click Remove button If no user is existed New Account message will be shown here User Name Input new use...

Page 27: ...this IP camera This IP camera supports both IPv4 and IPv6 IP address Here are the descriptions of every setup item Item Description LAN Select this option to assign an IP address to LAN port or obtai...

Page 28: ...Length Input IPv6 IP address prefix length 0 128 Subnet Mask Input subnet mask Gateway Input gateway address Primary DNS Input DNS server s IP address Secondary DNS Input backup DNS server s IP addre...

Page 29: ...amera For example IP camera s IP address is 192 168 2 3 and if you changed HTTP port number to 82 please input http 192 168 2 3 82 in web browser s address bar to access IP camera s web configuration...

Page 30: ...this page Here are the descriptions of every setup item Item Description Multicast Enable video multicast Multicast Group Address Input multicast group address here must be an address between 232 0 0...

Page 31: ...rt QoS You can select Video Audio s QoS DSCP value 0 to 63 or both video and audio DDNS Enable DDNS support if your ISP assigns dynamic IP address to you You must register a dynamic IP service first C...

Page 32: ...Enable HTTPS box to enable HTTPS channel to encrypt transferred data You can also define HTTPS port number in HTTPS Port field if you don t want to use default value 443 When you finish click Apply t...

Page 33: ...f every setup item Item Description Enable Filter Check this box to enable IP address filter uncheck this Box to disable this function Accepted IP list Here lists all IP address that can build connect...

Page 34: ...ra If you want to remove a set of IP address from the list click on the IP address and click Remove button IP Address Accepted IP list Input the starting and ending IP address of IP address you wish t...

Page 35: ...34 3 5 Video You can adjust the image of the IP camera in this menu There are 4 sub menus in this menu Image Setting Video Setting Overlay and Zoom Focus which can be accessed by tabs on the top...

Page 36: ...ration Sharpness Control the image parameters Click to decrease value or click to increase value You can also input the value in the field directly Default Set all above values to default value 128 Ex...

Page 37: ...era is hanged bottom up by camera holder You can click both Vertical and Horizontal box at the same time Power Line Frequency Select the frequency of power line of the place you re using this IP camer...

Page 38: ...t You can select the behavior or IR Cut filter Auto IR filter will act automatically If you don t know if you should use IR filter select this option Always ON IR filter is always on Always OFF IR fil...

Page 39: ...Description H 264 MPEG4 Select the compression of main stream H 264 MPEG4 Video Resolution Select video resolution H 264 2048x1536 QXGA 1920x1080 1080p 1280x960 960p 1280x720 720p 720x480 D1 640x480 V...

Page 40: ...lity select very high to improve video quality but consumes more network bandwidth and select very low will decrease video quality and consumes less network bandwidth Bitrate Input video s bit rate di...

Page 41: ...40...

Page 42: ...eck this box to remove time stamp s background color You may find this will help the readability of time stamp text in some cases Enable Text Display Check this box to display certain text on video th...

Page 43: ...fy this IP camera Click Browse button to pick a picture on your computer then click Update button to use the picture Please note that there are certain restrictions Select bmp jpg jpeg image files onl...

Page 44: ...m Focus Setting You can adjust the video overlay parameters in this page Here are the descriptions of every setup item Item Description Zoom A scroll bar is used to select zoom area T site zoom in W s...

Page 45: ...a will start to do auto focus and show processing message during focusing process Focus F F Fine tune focus steps Notes Before Processing message disappear please don t click the other button for the...

Page 46: ...d by microphone is too loud or silent you can use this function to improve voice volume so you can hear voice from IP camera more clearly Select 2 or 1 dB to correct the voice that is too loud Select...

Page 47: ...to 3 motion detection areas Here are the descriptions of every setup item Item Description Enable Motion Detection Check this box to enable motion detection Enable Window 1 to Window 3 Check this box...

Page 48: ...elect the percentage of pixel change that will trigger motion detection alert Select a lower percentage so you can detect tiny changes in motion detection area Sensitivity Select the sensitivity level...

Page 49: ...dow 1 to Window 3 Check this box to enable this privacy mask window You can select window 1 to 3 to enable up to 3 privacy mask windows When a privacy mask window is enabled a rectangular will appear...

Page 50: ...our different color for privacy mask window selection Select the specific color and click Apply then the privacy mask window will fulfill the specific color When you finish with above settings click H...

Page 51: ...RS 485 functionality Use Pelco D Address Select this option and RS 485 interface will output pan tile control signal in Pelco D format This format is widely accepted by most of pan tilt camera cradles...

Page 52: ...ct data bits of RS 485 connection Parity Select parity bit odd even or space Stop Bit Select stop bit 1 or 2 Customer Commands Home Up Down Left Right Input the command string used to move pan tilt ca...

Page 53: ...l or trigger digital output to activate external alarm There are three setup pages 1 Setting Define a new event and manage events 2 Media Define what kind of media file should be saved on designate me...

Page 54: ...1 Settings This page lists all existing events You can click Modify button to edit an existing event or Remove to delete an existing event To create a new even just click New button to add an Event s...

Page 55: ...s reached You also have to check weekday box and select time from dropdown list If you select Always as time this event will be activated during all the day Enable FTP Check this box and IP camera wil...

Page 56: ...Event For example if you set Pre Event to 5 and Post Event to 5 and an event is triggered at 14 10 30 then the video file will be 10 seconds long starting from 14 10 25 to 14 10 35 Notes The video re...

Page 57: ...le A Samba server can be any computer running windows operating system with network neighbor function enabled Many stand alone network file server also support samba server function Here are the descr...

Page 58: ...blank Enable Passive Mode Check this box to force IP camera to communicate with FTP server in passive mode Some FTP Server may only work when you check this box while others don t Test FTP Click this...

Page 59: ...r s username and password in corresponding field Requires SSL Encryption If your Email server required SSL encryption check this box Please note that some Email server uses different port number than...

Page 60: ...rd Test SMB Click this button to test Samba server settings above immediately Tips Some samba server does not have username and password check you can just input samba server address and path to acces...

Page 61: ...cannot be supported by this camera Here are the descriptions of every setup item Item Description Enable External storage Recording Check this box to record video on SD card Maximum Size of Each File...

Page 62: ...lected weekday s Recording Schedule Define the recording schedule You can check Sun to Sat boxes to represent a weekday and specify time period in From and To field Select Always to record 24 hours in...

Page 63: ...inserted the UI will show the capacity of the Micro SD card like the image hereunder There are two UI pages to show the record on the Micro SD card They are mapping to the setting of Recording to SD...

Page 64: ...63 Set the time range then click Search then shows the records like below...

Page 65: ...k the usage log of IP camera here In this page you can click 1 First page Final page Jump to first final page of log 2 Previous Next Jump to previous or next page of log 3 Remove Clear log You ll be p...

Page 66: ...Info You can check the information and network settings of this IP camera This information is very useful when you need to repair or fix the problem of this IP camera An example of device info page l...

Page 67: ...ton to reboot the IP camera This function is useful when you find IP camera is not working properly Factory Reset 1 Clear all settings of IP camera and reset to factory default setting 2 Reset all par...

Page 68: ...button to select a file on your computer first then click Restore button Restore from SD card device Restore IP camera s configuration which is previously saved on SD card Upgrade Upgrade IP camera s...

Page 69: ...amera again 2 Please make sure the network cable is correctly connected to your local area network 3 Please make sure power cable is correctly connected to IP Camera 4 Please make sure IP Camera is sw...

Page 70: ...69 How to insert the Micro SD card 1 remove the sun shield and the back cover 2 The Micro SD Card slot is shown in the following picture...

Page 71: ...Digital output For connecting external devices such as relays alarm bell or LEDs Connected devices can be activated by the Configuration Event interface or digital output buttons on the Home page Pin...

Page 72: ...acts glass break detectors etc When a signal is received the state changes and the input becomes active Pin Notes Specifications DI is floating trigger is high DI is high trigger is low Max current in...

Page 73: ...Lens Angle of View D 86 3 30 Mechanical IRCF Yes IR Distance 20M 5phy x 30pcs Day Night IR Wave Length 850nm H 264 20fps 2048 x 1536 30fps 1920 x 1080 1280 x 960 1280 x 720 720 x 480 640 x 480 320 x...

Page 74: ...just zoom focus Digital Zoom Yes up to 10x Remote Pan Tilt Yes 3GPP Supported Yes Packet Management IP Filter QoS Time Management Manual Time Setting Time Server NTP Support Real Time Clock Multi leve...

Page 75: ...74 Certificate CE FCC Class A Physical Info WEIGHT 1200gm Camera body only DIMENSIONS 73 0mm x 233 5mm L...

Reviews: