background image

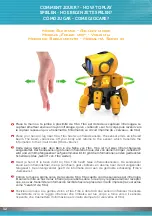
Mode Suis-moi - Follow mode

Modus „Folge mir“ - Volg mij

Modo de Seguimiento - Modalità Sono io 

Place ta main ou ta jambe à proximité de Tibo. Tibo est doté deux capteurs infrarouges. Le 

capteur émetteur envoie un rayon infrarouge, qui va « rebondir » sur ton corps puis revenir vers 

le capteur receveur qui va transmettre l’information au circuit imprimé (le « cerveau » de Tibo).

Place your hand or leg near Tibo. Tibo has two infrared sensors. The sensor emits an infrared 

beam.  The  beam  «bounces»  off  your  body  and  returns  to  the  sensor,  which  transmits  the 

information to the circuit board (Tibo’s «brain»).

Halte  deine  Hand  oder  dein  Bein  in  die  Nähe  von  Tibo.  Tibo  ist  mit  zwei  Infrarot-Sensoren 

ausgestattet. Der Sendesensor gibt einen Infrarotstrahl aus, der von deinem Körper „reflektiert“ 

wird und vom Empfangssensor aufgenommen wird. Er gibt die Informationen an den gedruckten 

Schaltkreis (das „Gehirn“ von Tibo weiter).

Houd  je  hand  of  je  been  dicht  bij  Tibo.  Tibo  heeft  twee  infraroodsensoren.  De  zendsensor 

stuurt een infraroodstraal, die op je lichaam gaat «botsen» en daarna naar de ontvangzender 

terugkeert.  De  ontvangzender  geeft  de  informatie  door  aan  de  gedrukte  schakeling  (Tibo’s 

«hersenen»).

Coloca tu mano o pierna cerca de la cara de Tibo. Tibo cuenta con dos sensores por infrarrojos. 

El sensor emite un haz de luz infrarroja que rebota sobre tu cuerpo y regresa al sensor receptor 

que, a su vez, transmite la información recibida hacia la placa de circuito impreso (la cual actúa 

como “cerebro” de Tibo).

Posiziona la mano o la gamba vicino a Tibo. Tibo è dotato di due sensori infrarossi. Il sensore 

trasmittente  invia  un  raggio  infrarossi  che  rimbalza  sul  tuo  corpo  e  torna  verso  il  sensore 

ricevente che trasmetterà l’informazione al circuito stampato (il «cervello» di Tibo).

FR

NL

EN

ES

DE

IT

32

COMMENT JOUER ? - HOW TO PLAY

SPIELEN - HOE BEGIN JE TE SPELEN?

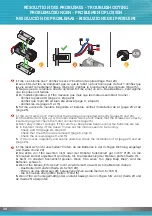
CÓMO JUGAR - COME GIOCARE?

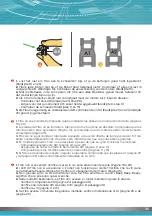
Summary of Contents for 3700802102243

Page 1: ......

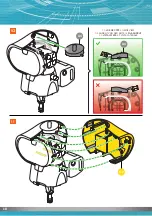
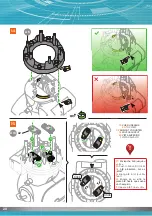
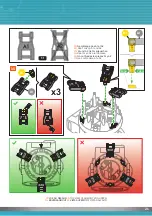
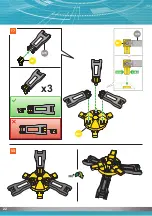
Page 2: ...10 x4 P11 x3 P12 x2 P13 x1 P15 x1 P14 x1 x2 P6 x1 1 1 1 1 Noir Black Schwarz Zwart Negro Nero Bleu Blue Blauem Blauwe Azul Blu Noir Black Schwarz Zwart Negro Nero Rouge Red Rotem Rode Rojo Rosso 2 CON...

Page 3: ...Batteriefach P16 Gedruckter Schaltkreis P17 Aufkleber P1 Tandwiel P2 Raderwerk Grijs P3 Raderwerk Blauw P4 Raderwerk Groen P5 Raderwerk Wit P6 Raderwerk Oranje P7 Raderwerk Roze P8 Klein raderwerk Ora...

Page 4: ...END DER MONTAGE HERAUSTRENNEN FR DE EN IT OM GELEIDELIJK AAN LOS TE MAKEN A RETIRAR SEG N VAYA SIENDO NECESARIO DA STACCARE MANO A MANO NL ES 4 PI CES D TACHER PARTS TO DETACH BUTEILE LOS TE MAKEN STU...

Page 5: ...roducir las pilas No recargue las pilas convencionales Los acumuladores solo deber n recargarse bajo la supervisi n de un adulto Antes de recargar los acumuladores ret relos del juguete No mezcle entr...

Page 6: ...ictograma sirve para reclamar tu atenci n acerca de un paso o cierta informaci nimportantequenodebessaltarte A Read the instructions carefully and follow the assembly steps in the right order B Detach...

Page 7: ...o IT Corta FR Frappe doucement EN Tap gently DE Vorsichtig klopfen NL Klop zachtjes ES Golpea con suavidad IT Picchia leggermente 2 P13 P1 1 B5 A B C F D E 7 CORPS DU ROBOT BODY OF THE ROBOT K RPER DE...

Page 8: ...B3 A15 3 4 5 P9 x3 FR Attention au sens EN Careful direction DE Auf die richtige Richtung achten NL Let op de richting ES Presta atenci n a la orientaci n IT Attenzione al senso 8 1 2 2 2...

Page 9: ...go DE P10 bis zum Ende hineinschrauben NL Schroef P10 tot het einde ES Rosque el tornillo P10 a fondo IT Avvita P10 fino in fondo B2 P10 FR Retirez l outil A15 apr s avoir fini l tape 7 EN Remove the...

Page 10: ...UE DE C T EN SIDE VIEW DE ANSICHT VON DER SEITE NL ZIJAANZICHT ES VISTA LATERAL IT VISTA LATERALE P12 P2 P8 P3 P5 P2 P3 P4 P8 FR Longue EN Long DE Lange NL Lang ES Largo IT Lunga FR Longue EN Long DE...

Page 11: ...s er correct in ES Tiende los cables por el sitio correcto IT Infila i cavi correttamente FR Enfile les c bles correctement EN Insert the wires correctly DE Die Kabel korrekt einf deln NL Schuif de ka...

Page 12: ...it bien t enlev EN Check that the A15 tool has been removed DE Pr fen dass das Werkzeug A15 drau en ist NL Zorg ervoor dat je instrument A15 zeker hebt weggehaald ES Aseg rese de haber retirado la her...

Page 13: ...Richtung achten NL Let op de richting ES Presta atenci n a la orientaci n IT Attenzione al senso FR Alignez correctement P17 avec le coin de A10 EN Align P17 correctly with the corner of A10 DE P17 r...

Page 14: ...lo P9 seg n se muestra en la ilustraci n superior IT Avvita P9 come descritto qui sopra FR Coupez proprement avant l assemblage EN Cut off burrs before assembly DE Vor dem Zusammenbau sauber abtrennen...

Page 15: ...ppuie pour rentrer les c bles EN Press down the wires DE Die Kabel hineindr cken NL Druk om de kabels erin te schuiven ES Presiona para que los cables encajen en su sitio IT Appoggia per inserire i ca...

Page 16: ...AAA x4 6 7 8 P16 16...

Page 17: ...R Enfile les c bles correctement EN Insert the wires correctly DE Die Kabel korrekt einf deln NL Schuif de kabels er correct in ES Tiende los cables por el sitio correcto IT Infila i cavi correttament...

Page 18: ...C2 1 0 1 1 A4 A4 FR VUE DE C T EN SIDE VIEW DE ANSICHT VON DER SEITE NL ZIJAANZICHT ES VISTA LATERAL IT VISTA LATERALE 18...

Page 19: ...VUE DE DROITE EN RIGHT VIEW DE ANSICHT VON RECHTS NL RECHTERZIJDE ES VISTA LATERAL DERECHA IT VISTA DA DESTRA FR VUE DE GAUCHE EN LEFT VIEW DE ANSICHT VON LINKS NL LINKERZIJDE ES VISTA LATERAL IZQUIE...

Page 20: ...l it clicks DE A18 einsetzen bis es klickt NL Breng A18 in tot je klik hoort ES Encaja en su sitio la pieza A18 hasta que suene un chasquido IT Innesca A18 fino al clic Click FR VUE DU DESSUS EN TOP V...

Page 21: ...ON UNTEN NL BOVENAANZICHT ES VISTA SUPERIOR IT VISTA DALL ALTO 1 1 FR Ne m lange pas A1 et A2 EN Don t mix up A1 and A2 DE A1 und A2 nicht vertauschen NL Haal A1 en A2 niet dooreen ES No confundas las...

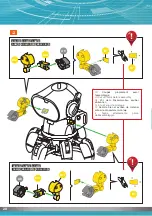
Page 22: ...PUSH PUSH A16 B1 x3 1 7 1 8 A16 B1 B13 22...

Page 23: ...1 9 FR VUE DU DESSUS EN TOP VIEW DE ANSICHT VON UNTEN NL BOVENAANZICHT ES VISTA SUPERIOR IT VISTA DALL ALTO 23...

Page 24: ...ierichtigeRichtungachten NLLetopderichting ES Presta atenci n a la orientaci n IT Attenzione al senso FR Attention au sens EN Careful direction DE Auf die richtige Richtung achten NL Let op de richtin...

Page 25: ...m lange pas A1 et A2 EN Don t mix up A1 and A2 DE A1 und A2 nicht vertauschen NL Haal A1 en A2 niet dooreen ES No confundas las piezas A1 y A2 IT Non confondere A1 e A2 A2 A2 A1 A1 A2 A16 A17 A17 A16...

Page 26: ...P9 x2 P9 x2 A11 1 1 2 2 P9x2 3 3 23 24 P9 x2 26...

Page 27: ...A12 27 1 2 x6 A12 A7 1 1 2 LES PATTES ET LES BRAS DU ROBOT THE ROBOT S LEGS AND ARMS BEINE UND ARME DES ROBOTERS DE POTEN EN ARMEN VAN DE ROBOT PATAS Y BRAZOS DEL ROBOT LE ZAMPE E LE BRACCIA DEL ROBOT...

Page 28: ...D FR Coupez proprement avant l assemblage EN Cut off burrs before assembly DE Vor dem Zusammenbau sauber abtrennen NL Snij af voor de montage ES Recorte bien el exceso de material antes de proceder al...

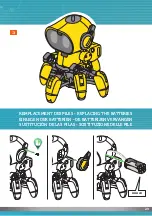
Page 29: ...3 29 REMPLACEMENT DES PILES REPLACING THE BATTERIES EINLEGEN DER BATTERIEN DE BATTERIJEN VERVANGEN SUSTITUCI N DE LAS PILAS SOSTITUZIONE DELLE PILE AAA x4...

Page 30: ...s it twice if Tibo is in Standby mode to change to Explorer mode Tibo s right eye will light up 5 Press the switch for 3 seconds to switch Tibo off Always pick up Tibo by the head to avoid damaging it...

Page 31: ...s modos de funcionamiento disponibles 3 Pulsa una sola vez el interruptor para seleccionar el modo de Seguimiento El ojo izquierdo de Tibo se iluminar 4 Pulsa por segunda vez el interruptor o bien p l...

Page 32: ...ormationen an den gedruckten Schaltkreis das Gehirn von Tibo weiter Houd je hand of je been dicht bij Tibo Tibo heeft twee infraroodsensoren De zendsensor stuurt een infraroodstraal die op je lichaam...

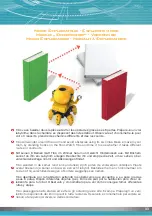
Page 33: ...Tibo wandelt in de kamer rond en kan dankzij zijn 6 poten de voorwerpen ontwijken Plaats overal boeken in je kamer en bouw zo een echt labyrint Bestudeer hem en chronometreer om te zien of hij versch...

Page 34: ...batteries are low 4 In Explorer mode if Tibo doesn t move but the motors seem to be turning Check part A19 page 24 step 20 Check that the A15 tool was removed page 9 step 9 Check the screws pages 11...

Page 35: ...t est expuesto a la acci n directa de los rayos del sol Si Tibo emite constantemente tonos de aviso ser indicativo de que sus pilas est n agotadas 4 En modo Explorador Tibo no se desplaza a pesar de q...

Page 36: ......

Reviews: