background image

Chapter 2 Additional Information

TeraStation WS Setup Manual

  18

18

System Recovery

If Windows Storage Server stops working properly, use the TeraNavigator DVD included with 

your TeraStation to perform a system recovery.  Note that all data on drive 1 (and any array 

that uses it) will be erased by the system recovery process. 

1

Turn off the TeraStation.
Click [Start] – [Shut down] – [Yes] from the Windows Storage Server desktop.  When 

shutdown is complete, the green power button will turn off.

2

Attach an external USB DVD drive to the TeraStation.  Insert the TeraNavigator DVD.

3

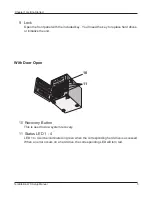
Hold in the Recovery Button on the TeraStation, and press the Power Button.  The 

recovery process will begin.

4

When the first part of the recovery process is complete, the TeraStation will automatically 

shut down.

5

Remove the TeraNavigator DVD, disconnect the DVD drive, hold in the Recovery Button, 

and press the Power Button again.  The TeraStation will complete the recovery process 

and restart automatically.  

Note:

  During recovery, the green power button flashes and the message "TeraStation 

Booting System" is displayed on the LCD panel.

After system recovery, your TeraStation will be configured as follows:

Drive 1 - One 30 GB basic partition.  The remaining space is unallocated.

Drives 2 - 4  Partitions are not visible.  In Windows Disk Management, they’re displayed as 

“foreign”.

In Windows Disk Management, right-click on a “foreign” partition, and select [Import Foreign 

Disks] from the menu.  The partitions will become visible.  Right-click a partition and click 

[Reactivate Volume] to rebuild the RAID array.

To build a RAID array using Drive 1, you must convert the usable space on drive 1 from [Basic 

Disk] to [Dynamic Disk].  Right-click the basic disk in the Windows Disk Management and 

select [Convert to Dynamic Disk].

Summary of Contents for TeraStation WS

Page 1: ...TeraStation WS Setup Manual www buffalotech com 35011179 ver 01...

Page 2: ...Log in to Windows Storage Server 14 Chapter 2 Additional Information 15 Optional Software 15 Troubleshooting 16 System Recovery 18 Appendix 19 Specifications 19 Compliance Information 20 FCC Informat...

Page 3: ...over and access the hard drives or execute a system recovery Keep them in a safe place Keep your original receipt It will be required for any warranty replacement Main Unit TeraStation 1 Power Cable 1...

Page 4: ...about the current status the amber Info LED is illuminated Check the LCD display for current status 3 Error LED The red Error LED is illuminated when an error occurs Check the LCD display for more inf...

Page 5: ...need the key to replace hard drives or initialize the unit 10 Recovery Button This is used to do a system recovery 11 Status LED 1 4 LED 1 to 4 will be illuminated in green when the corresponding hard...

Page 6: ...ms in the document ms license doc located on the TeraNavigator DVD Remove the protective sticker from the AC power cable to accept the terms of the license 16 Fan Do not block the fan Leave enough roo...

Page 7: ...indows 7 and Vista click Run TSNavi exe when the auto play screen is displayed When A program needs your permission to continue is displayed click Continue For OS X double click on the disk image WSQL...

Page 8: ...License Agreement in ms license doc located on your TeraNavigator DVD 5 You ve connected to the TeraStation and installed NAS Navigator2 Click in the top right corner of TeraNavigator to close it On a...

Page 9: ...ick on the TeraStation icon and click Properties IP Address For a Mac press and hold the Control key click on the TeraStation icon then click Configure TeraStation IP Address Check Obtain IP address a...

Page 10: ...on cannot be identified Do you still want to connect click Connect If the message Cannot verify the computer ID of the destination is displayed click Yes or Continue Run Windows Update Click Start All...

Page 11: ...uble click Buffalo Tool 3 Click Create Shared Folders 4 Right click Shares then select New Share 5 When the Share a Folder wizard opens click Next 6 Enter D share in Folder Path and click Next 7 The m...

Page 12: ...ed In OS X the TeraStation is mounted as a drive icon on the desktop and displayed in the sidebar of the Finder Setup is complete You can now use the TeraStation s shared folders to save files just li...

Page 13: ...by replacing the failed drive Usable capacity is the total space of all drives combined minus the space of a single drive Mirrored Volume Partitions on 2 drives are paired in a mirror array Identical...

Page 14: ...ote If the message Cannot verify the computer ID of the destination is displayed click Yes or Continue 3 Enter your user name and password and click OK Default User name Administrator Default Password...

Page 15: ...gator From options you can easily install it on other computers Memeo Backup Memeo Backup lets you easily back up data from your computer to the TeraStation After installing it refer to All Programs B...

Page 16: ...hernet cable Use a different port on the hub to connect Problem 5 Your NIC card or adapter is malfunctioning Replace the NIC card or adapter Problem 6 Your network is experiencing low speed or connect...

Page 17: ...2 to find the TeraStation on the network and make new links to your shares If NAS Navigator2 finds the TeraStation but shared folders don t open Did you have a power outage Was your TeraStation unplug...

Page 18: ...ove the TeraNavigator DVD disconnect the DVD drive hold in the Recovery Button and press the Power Button again The TeraStation will complete the recovery process and restart automatically Note During...

Page 19: ...Maximum Connector 2 x USB Series A USB printers are not supported Interface Serial Interface UPS D SUB 9 pin X 1 Hard Drives Disk Structure Drive C is a mirrored array accross drives 1 and 2 and Drive...

Page 20: ...nce at his own expense CE Mark This is a Class A product In a domestic environment this product may cause radio interference in which case the user may be required to take adequate measures Environmen...

Page 21: ...Technology provides technical support in English German French Italian and Spanish UK 0845 3511005 Austria 08101 0251552 Belgium 0787 99917 Denmark 70150919 Finland 010802812 France 0811 650220 Germa...

Page 22: ...ndonesia Malaysia TEL 021 6231 2893 TEL 03 5032 0138 e mail buffalo ecsm com my Philippines Republic of Korea TEL 2 688 3999 TEL 02 2057 2095 e mail digisupport msi ecs com ph e mail support buffalote...

Reviews: