background image

 41

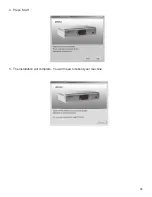
4.  Press ‘Start’.

5.  The installation will complete.  You will need to reboot your machine.

Summary of Contents for LinkTheater PC-4LWAG

Page 1: ...LinkTheater Wireless A G Media Player P4LWAG v 98...

Page 2: ...36 Reset System Settings 37 Choosing your Media Sources 38 Installing and Configuring Buffalo PC Utility 40 Installing and Configuring Windows Media Connect 48 Connecting to a Media Server 53 Browsin...

Page 3: ...n compatible video connectors as well as digital Dolby 5 1 and DTS compatible audio connectors LinkTheater also supports Universal Plug Play for easy installation Most of the industry s most popular v...

Page 4: ...itch USB 2 0 port for use with memory keys and FAT32 USB hard drives 5 V dc 110 240V 50 60Hz AC power to AC power adapter D4 Component HD video out 720p S Video port S Video port RCA stereo audio out...

Page 5: ...onnects to a TV or video moniter with composite RCA S Video D4 or component style video connectors Please locate an appropriate place to install the LinkTheater We recommend that the install place is...

Page 6: ...to initially access the configuration menu the LinkTheater must be hooked up with the standard yellow analog video connector For more information on component video please see the component video sec...

Page 7: ...e power button on the front of the LinkTheater If it does not light up then please check that the proper AC adapter is plugged in and seated correctly Also check that your power strip or surge protect...

Page 8: ...cle through the video modes by pressing the VIDEO button until the display returns Audio Audio is used to select different sound track options that may be available in video files Playback Controls Th...

Page 9: ...ontrol Stop The stop key will temporarily pause a slideshow that s in progress Track The track button will skip forward or back to the next video music or picture file INFO SETUP REFRESH REPEAT VIDEO...

Page 10: ...g a wired network and have plugged in an Ethernet cable then the LinkTheater will automatically connect to the wired network You should receive a message like this Highlight Finish and press the ENTER...

Page 11: ...p with a Viiv computer AOSS If your access point supports AOSS then you can connect your LinkTheater to it wirelessly by just pushing a couple of buttons Turn to page 20 for more information Regular S...

Page 12: ...the Viiv settings window by clicking the Viiv logo on your PC s desktop or system tray If your LinkTheater is connected to the network with a wired Ethernet connection and you re using a Viiv PC then...

Page 13: ...13 When you see this screen go to your LinkTheater Select Wirelessly then next...

Page 14: ...down You have ten minutes to type this into your Viiv PC If time runs out on the timer go back to the previous screen and select Yes again to get a new passcode Power on the LinkTheater and select Yes...

Page 15: ...15 Back at the PC click next Click next Enter the passcode that you got from the LinkTheater...

Page 16: ...16 Select media device and then next Your LinkTheater is now connected to the network Click next to begin building your media library Turn to page 21...

Page 17: ...nnected your LinkTheater to your network with a wired Ethernet connection you can still add the LinkTheater to a Viiv PC s list of devices Select connecting it to the router with an Ethernet network c...

Page 18: ...18 Select next Select media device When you see this screen your device has been sucessfully added to the network Select next to begin building your media library...

Page 19: ...9 Select next Read conditions Select agree to continue Building your Media Library Select Standard Setup and then choose finish Congratulations Your LinkTheater is configured to work with your Viiv PC...

Page 20: ...etwork settings select No Use AOSS Instead Now press the AOSS button on your access point or wireless router When you see this screen about 40 seconds later your LinkTheater is connected to your wirel...

Page 21: ...ight the wireless network you would like to connect to and then press the right control button on the remote control If you chose the regular setup method the LinkTheater will automatically detect all...

Page 22: ...address and subnet mask manually Input the WEP hex or WPA Personal alphanumeric key into the key field Highlight the key field press the remote s ENTER key type the key in and press ENTER again when...

Page 23: ...23 If all goes well you should see this screen You have connected the LinkTheater to your network...

Page 24: ...turns on what display mode you re running etc This section will explain each feature in detail To navigate to the Settings area please use the control arrows on the remote control to highlight settin...

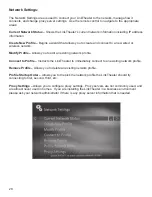
Page 25: ...et the Screen Saver Delay Slideshow Delay Check the firmware version and check for firmware updates Network Settings This area allows you to configure the LinkTheater to connect to a wired or wireless...

Page 26: ...k in the setting Screen Saver Delay This is the time of inactive use required by the LinkTheater before it activates its internal screen saver The screen saver is used to protect your TV or monitor fr...

Page 27: ...ters and plan on using access control to prevent certain servers from working with certain LinkTheaters Software The Software setup page informs you of the software firmware version on the device as w...

Page 28: ...fy Profile Allows you to edit an existing network profile Connect to Profile Instructs the LinkTheater to immediately connect to an existing network profile Remove Profile Allows you to delete an exis...

Page 29: ...network connection information regarding the wireless network This is more of a diagnostic information status screen It is mainly used to verify whether you have properly connected to a network Creat...

Page 30: ...ask your for network information Please fill it out and navigate and click the Continue button If you selected Connect Automatically DHCP then the above steps are not required After the device attemp...

Page 31: ...tus page will prompt you for additional information including encryption key info The Security type should automatically be set to the appropriate setting for that network Open Networks that are open...

Page 32: ...ur for network information Please fill it out and navigate and click the Continue button If you selected Connect Automatically DHCP then the above steps are not required After the device attempts to c...

Page 33: ...ollow the instructions available under the Create New Profile Connect to Profile Connecting to a profile just instructs the LinkTheater to connect to a specific existing network profile If you wish to...

Page 34: ...right arrow NOTE You cannot remove the profile that you are currently connected to In this case you will need to go back a page and use the Connect to Profile and connect to a different profile Additi...

Page 35: ...file it automatically becomes the top profile in the startup order To move a profile highlight a profile press the remote s ENTER key and then use the up and down arrows to move it in the list Once yo...

Page 36: ...component video connectors This is the highest and recommended setting if your TV or monitor supports it Most widescreen HDTVs should support this mode It uses 1280x720 progressive resolution If your...

Page 37: ...tion that the product was set in when it was brand new All settings will be erased and you will need to reconfigure the product Video modes will go back to Composite 480i 4x3 and network profiles will...

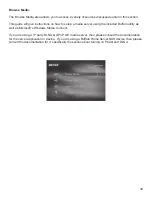
Page 38: ...There are three categories to choose from Browse Media This will access any the following media devices DLNA Media Servers The PC Utility that came with your LinkTheater Buffalo s DLNA Home Server NA...

Page 39: ...server using the included Buffalo utility as well as Microsoft s Windows Media Connect If you are using a 3rd party DLNA or UPnP A V media server then please consult the documentation for the server a...

Page 40: ...below if you wish to use the Buffalo PC Utility recommended 1 Insert the LinkTheater CD ROM into your PC s CD ROM drive The program should automatically launch if it does not browse for the CD and ru...

Page 41: ...41 4 Press Start 5 The installation will complete You will need to reboot your machine...

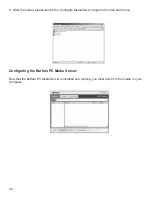
Page 42: ...t please launch the Configure MediaServer program from the start menu Configuring the Buffalo PC Media Server Now that the Buffalo PC Media Server is installed and running you must point it to the med...

Page 43: ...y pick a directory on your computer to share with the LinkTheater If you wish to add multiple directories then you can add them one at a time by repeating the process Auto Search Auto search launches...

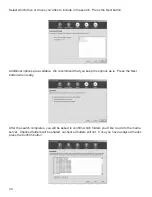
Page 44: ...available We recommend that you keep the options as is Press the Next button when ready After the search completes you will be asked to confirm which folders you d like to add to the media server Che...

Page 45: ...e sharing the button Turn OFF File Sharing can be pressed You may want to turn on Access Control to prevent certain devices from accessing your media content This is especially important if there are...

Page 46: ...ilable We recommend that you keep the options as is Press the Next button when ready Select how you wish to prohibit access Select the specific method in which you wish to grant access to devices Once...

Page 47: ...ue to add more access grants by pressing the Add button again The access rules will appear in the main application console Congratulations you ve completed the install and configuration of the Buffalo...

Page 48: ...ack of DRM protected files that use the WinDRM codec Currently the LinkTheater only supports playback of DRM protected files that use the WinDRM codec this includes napster com walmart com rhapsody co...

Page 49: ...y Windows Media Connect operates out of your system tray double click on its icon at any time to display the program Once Windows Media Connect is running and displayed on your screen the Devices page...

Page 50: ...le media players are available on your network in this case we recommend adding all of them or determining which one is the specific LinkTheater being used by turning LinkTheater on or off and seeing...

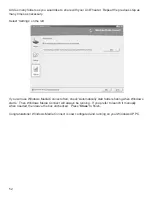
Page 51: ...older that contains data you would like to share with LinkTheater by pressing the Browse button Give it a name that you would recognize and select the privacy settings that apply to your environment t...

Page 52: ...eft If you will use Windows Media Connect often check Automatically start folder sharing when Windows starts Then Windows Media Connect will always be running If you prefer to launch it manually when...

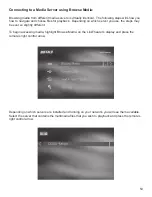
Page 53: ...on which server you use the steps may be ever so slightly different To begin accessing media highlight Browse Media on the LinkTheater s display and press the remote s right control arrow Depending o...

Page 54: ...ree categories Music Pictures and Video This guide will break down navigation based on these three categories Turn to page 47 for more on navigating music page 49 for more on navigating pictures and 5...

Page 55: ...t the Folder option Selecting All Tracks will put all of the pictures in one large list disregarding any folder structure Once you have selected a sort style then press the remote s right control butt...

Page 56: ...epending on which navigation you use you will ultimately find songs and or playlists listed To play a song or playlist select it and press the ENTER key or right control arrow on the remote Pressing t...

Page 57: ...ictures in one large list disregarding any folder structure Once you have selected a sort style then press the remote s right control button Thumbnails of the pictures in the folder will be displayed...

Page 58: ...see all the files in their folders then select the Folder option Selecting All Pictures will put all of the pictures in one large list disregarding any folder structure Once you have selected a sort...

Page 59: ...s simple Start by plugging the USB device into the LinkTheater s USB port Highlight Browse USB and press the right control button on the remote control NOTE To use a USB device on the LinkTheater it m...

Page 60: ...Media Servers and Intel Viiv zone servers Instead they are just navigated using the folder structure that is on the USB device Select a folder if one exists To play a file select it and press the ENT...

Page 61: ...er supports HD resolutions at 720p Natively it will play Mpeg 4 and WMV 9 HD clips that are encoded up to 2 5 Mbps For all other non HD content the LinkTheater will upconvert lower resolution content...

Page 62: ...ay install DirectX9 0c from the Buffalo software disk as well An electronic copy of the LinkStation user manual this guide is available from the disk as well The electronic copy of the maual is in PDF...

Page 63: ...CD Wireless Network Interface Standards IEEE802 11a IEEE 802 11g IEEE 802 11b Frequency 802 11a 5 180 5 240GHz Channels 36 40 44 48 802 11g b 2 412 2 472 GHz Channels 1 11 Access Method Infrastructur...

Page 64: ...day 7 days a week USA and Canada Toll free 866 752 6210 Email info buffalotech com Europe Buffalo Technology UK Ltd 176 Buckingham Avenue Slough Berkshire SL1 4RD United Kingdom General Inquiries Emai...

Page 65: ...e receipt to get warranty support All defective products shall be returned with a copy of proof of purchase In no event shall Buffalo Technology s liability exceed the price paid for the product from...

Page 66: ...ld be installed and operated with a minimum distance of 20 centimeters between the radiator and your body This transmitter must not be co located or operating in conjunction with any other antenna or...

Page 67: ...nse at the national spectrum authorities in order to obtain an authorization to use the device for setting up outdoor radio links In Belgium there is a restriction in outdoor use The frequency range i...

Reviews: