background image

7

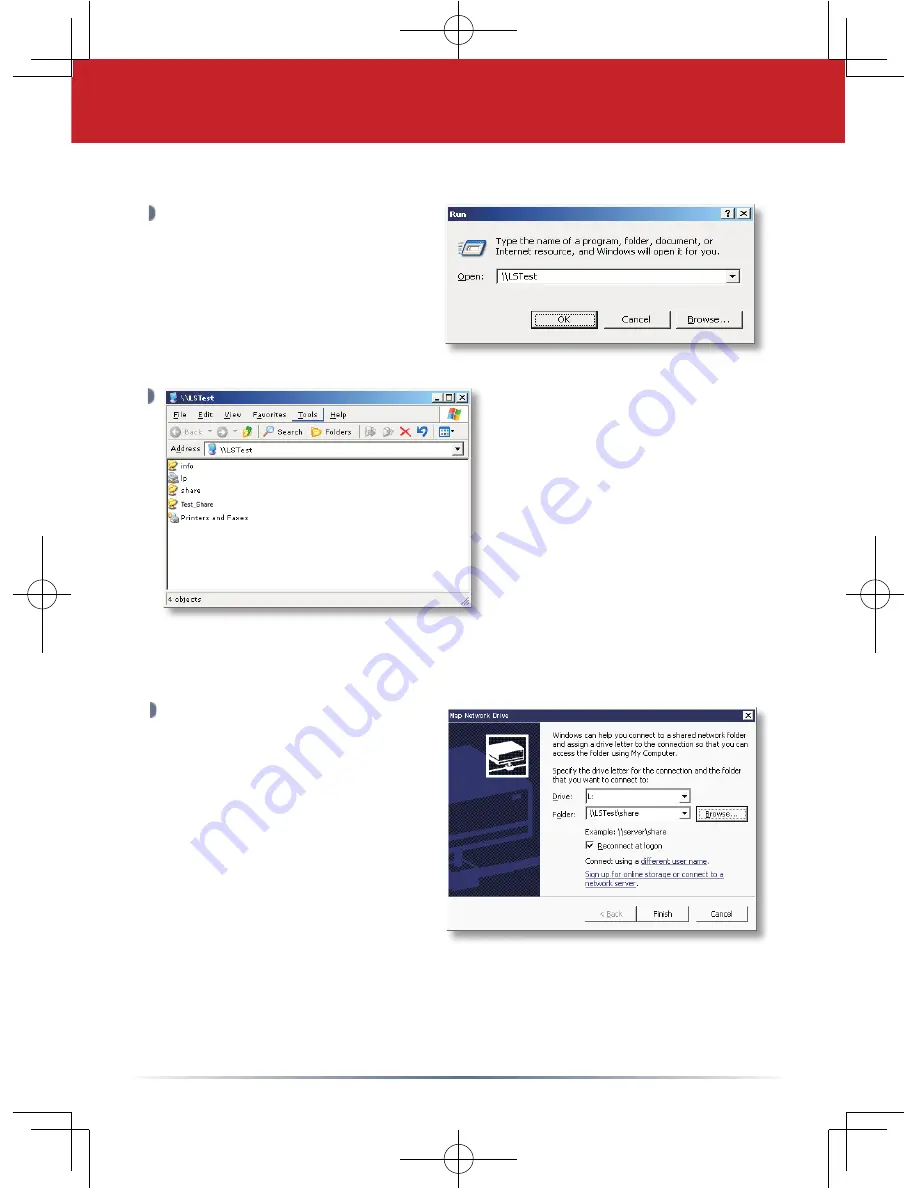
Accessing LinkStation data is performed using the following steps:

LinkStation’s ‘Root Directory’ 

will appear.  You will see all 

of the confi gured shares.  All 

users can read and write to all 

folders.  To setup security and 

password protection, please 

refer to the User Manual on the 

LinkNavigator CD-ROM.  Also, 

please refer to the User Manual 

to setup the print server.  A 

drive letter can also be mapped 

for LinkStation, see the next step for more information.  

LinkStation can 

be accessed by multiple computers simultaneously. 

From the previous step’s ‘Root 

Directory’ screen, use the pull 

down menu and click 

Tools


and then select 

Map Network 

Drive

. The ‘

Map Network 

Drive

’ program will run.  Select 

the drive letter you would like 

LinkStation to assume from the 

Drive:

’ pull down menu.   Enter 

the \\LinkStation_Name\share_

name in the ‘

Folder:

’ fi eld (where 

LinkStation_Name is the ‘LinkStation Name’ 

and share_name 

is the 

‘Shared Folder Name’ 

both set on

 Page 6

).  Once complete, check the 

‘Reconnect at logon’

 box and press the 

Finish

 button. 

Congratulations, LinkStation is set up!  Please see the User Manual  on 

the LinkNavigator CD-ROM for more help and confi guration options.

Press the 

Start

 menu, select 

the 

Run...

 option.  When the 

‘Run’ dialog  appears, please 

type \\LinkStation_Name 

(where LinkStation_Name is the 

‘LinkStation Name’ set on 

Page 

6

).  Press 

OK

 to continue.

Step 5:  Accessing LinkStation Data from a PC

Summary of Contents for LinkStation HS-DGL Series

Page 1: ...lation CD 1 Quick Setup Guide this user s guide 1 Warranty card 1 LinkStation s face is protected during shipping by a plastic film covering The film may be removed by peeling it away from any corner...

Page 2: ...the back of LinkStation Connect the other end of the Ethernet Cable into a hub switch or router on the network or connect it directly to a PC Connecting directly to a PC is not recommended Many featur...

Page 3: ...up If it is not lit continue to the next step If the LINK ACT light is still not lit please verify the following Both LinkStation and the hub switch or PC are powered on The Ethernet Cable is securely...

Page 4: ...y button then press the Start button The LinkStation IP Address Configuration Utility will launch and begin scanning for all available LinkStation devices on the network The IP Setup Utility allows yo...

Page 5: ...user name is root There is NO password by default If a password was specified on the previous step then type that password in the Password field Press the OK button when finished These are LinkStation...

Page 6: ...cific users or specific types of data then click on the Security tab Then click on the Shared Folder Setup link From this configuration page you can add new shares or edit existing shares Press the Ad...

Page 7: ...u and click Tools and then select Map Network Drive The Map Network Drive program will run Select the drive letter you would like LinkStation to assume from the Drive pull down menu Enter the LinkStat...

Page 8: ...Data Transmission Speed Max 480 Mbps HS Mode Max 12 Mbps FS Mode Electric Current 5 0V 1 5A 12V 1 5A Power Consumption 17W Maximum Dimensions 2 4 x 6 94 x 7 4 in 60 x 173 5 x 185 mm Weight 3 8 LB 1 3...

Page 9: ...MEMO...

Page 10: ...10 MEMO...

Page 11: ...g the following information Online Help Available on the enclosed LinkNavigator CD Web www buffalo technology com E mail helpdesk buffalo technology ie Telephone UK only 08712 50 12 60 Elsewhere 353 6...

Page 12: ...liable in any way to the user for damages including any lost profits lost savings or other incidental or consequential damages arising out of the use of or inability to use the Buffalo products Buffa...

Reviews: