background image

WLA-L11 User’s Manual

12

WindowsNT4.0

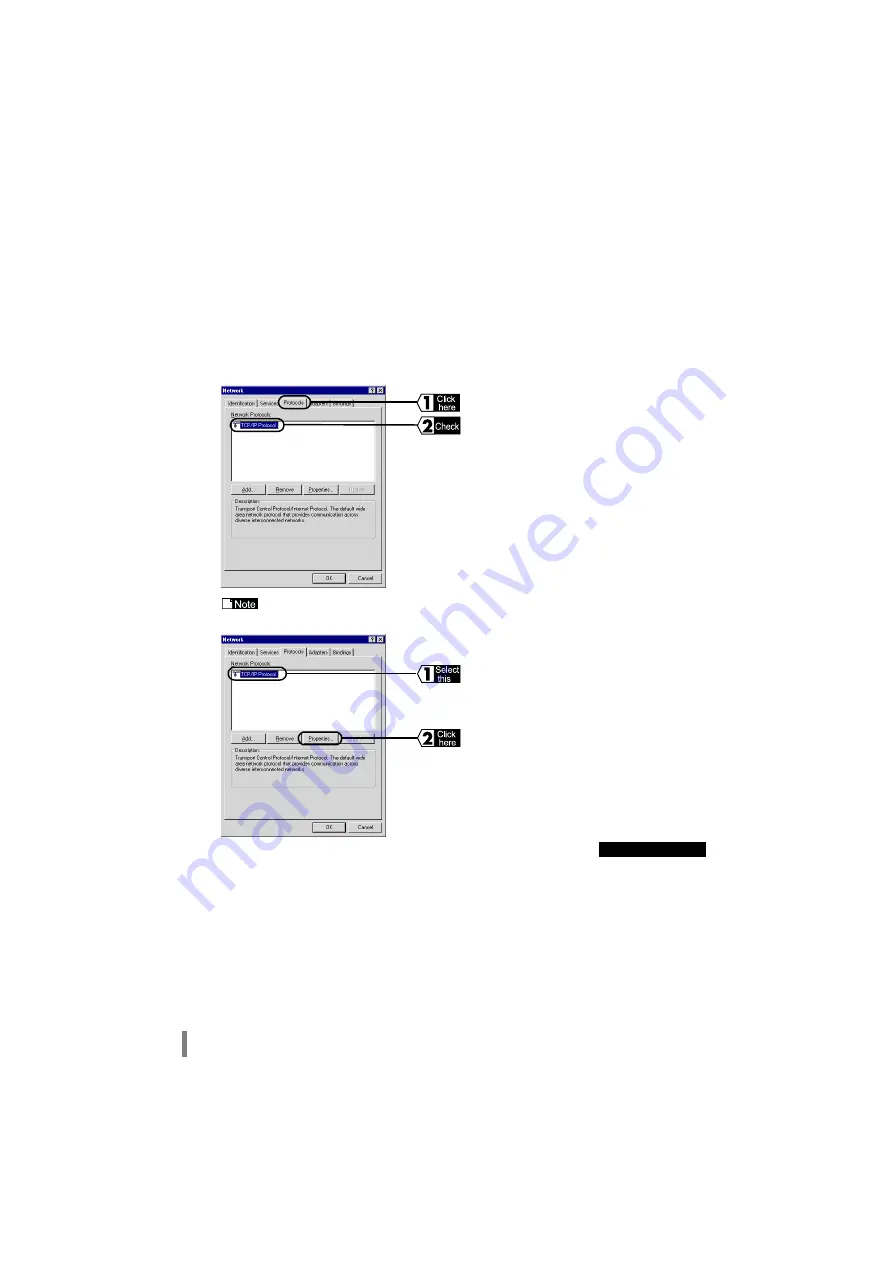
Make the TCP/IP protocol settings on the settings personal computer using the following procedure.

1

Start the personal computer.

2

Click the 

Start

 button, and then select 

Settings

 and 

Control Panel

.

3

Double-click the 

Network

 icon.

4

Click the 

Protocols

 tab, and make sure that

TCP/IP Protocol is displayed in the Network
Protocols field.


If Internet Protocol (TCP/IP) is not displayed, refer to 

the


Adding TCP/IP Proto-

cols (Windows NT 4.0) section (page13)

.

5

Select TCP/IP Protocol, and click the 

Proper-

ties

 button.

Continue to next page

Summary of Contents for AirStation WLA-L11G

Page 1: ...Self Diagnostic Function 4 Setting Screen Tables 5 Glossary 6 Product specifications 7 This manual explains the procedure for commu nications between Ethernet LAN and wireless LAN examples of AirStati...

Page 2: ...settings is referred as the Settings Personal Com puter Precaution for the Usage Be sure to read this manual before using the product because this product is refined highly MELCO INC is not responsibl...

Page 3: ...Illustration Current Network Environment Wired LAN Network Desired Network Network comprising wireless and wired LAN PCs Setup Flow The setup flow for communication between wired LAN PCs and wireless...

Page 4: ...ns from Wireless LAN Personal Computers 29 Strengthening Security Using the WEP Encoding Function 31 Multiple AirStation Groups 32 Setting Send Mode 33 Connecting to AirStation Using an AirPort compat...

Page 5: ...WLAR L11 Reference Manual 3 6 Glossary 66 7 Product Specifications 70 Specifications 70 LAN Port Connector Specifications 71...

Page 6: ...plains the procedure for enabling communication between personal com puters on an Ethernet LAN and personal computers on a wireless LAN using AirStation Connection to the AirStation hub ground wire an...

Page 7: ...lowing for the proper settings Before the setting check the LAN port drivers are properly installed in the personal com puter and it is connected to the network Windows 98 95 Refer to Windows 98 95 be...

Page 8: ...IP address click the OK button Consult your network manager for the IP address settings of the personal computer If there is a DHCP server on the network select Obtain an IP address automatically For...

Page 9: ...TCP IP protocol installation Continue to the TCP IP Protocol Settings Windows 98 95 section procedure Step 5 1 Click the Start button and select Settings Control Panel and then Network 2 Click the Add...

Page 10: ...dministrator access 2 Click the Start button Then select Settings and Network and Dial up Connec tions 3 Double click the Local Area Connection icon 4 Click the Properties button 5 Check it Internet P...

Page 11: ...7 Set the IP address and click the OK button If there is a DHCP server on the network select Obtain an IP address automatically For IP address settings refer to Allocating IP Addresses page 52 in Cha...

Page 12: ...add the protocol using the following procedure 1 Click the Start button and then select Settings and Network and Dial up Con nections 2 Double click the Local Area Connection icon 3 Click the Propert...

Page 13: ...WLA L11 User s Manual 11 This completes the TCP IP protocol installation Continue to the TCP IP Protocol Settings Windows 2000 section procedure Step 6 7 Check if the Internet Protocol TCP IP is added...

Page 14: ...t button and then select Settings and Control Panel 3 Double click the Network icon 4 Click the Protocols tab and make sure that TCP IP Protocol is displayed in the Network Protocols field If Internet...

Page 15: ...address setting of the settings personal computer If there is a DHCP server on the network select Obtain an IP address from a DHCP server For IP address settings refer to Allocating IP Addresses page...

Page 16: ...ager in the settings personal computer using the following procedure 5 The TCP IP protocol is added 1 Insert the AirStation Series Driver CD in the CD ROM drive 2 Click the Start button and select Run...

Page 17: ...truction on screen 6 Click the Next button 7 Select the directory in which you want to install AirStation Manager and click the Next button To change the default installation directory select a new di...

Page 18: ...different Please refer to Windows 2000 NT 4 0 page 19 AirStation Settings Settings Personal Computer 1 Insert the AirStation Series Driver CD in the CD ROM drive 2 Click the Start button and select Ru...

Page 19: ...P IP settings have not been set correctly Refer to the TCP IP Protocol Setting section page 5 in the Preparing AirSta tion Settings and correct the TCP IP setting 8 Windows will search for the AirStat...

Page 20: ...ation Wizard 12 Click the Standard Settings button 13 Click the Yes button If using Netscape Navigator the following message will be displayed Send data cannot be protected from here 14 The Enter Netw...

Page 21: ...rStation 4 Select the AirStation once it has been found and then select Admin and Set IP Address 5 The IP address settings is set and click the OK button Change the IP address and net mask depending o...

Page 22: ...een will be displayed When the settings screen is not displayed after the Web browser starts refer to the Setting Screen Is Not Dis played page 44 section in Chapter 3 Troubleshooting 8 Repeat from st...

Page 23: ...the following procedure Connecting To the AirStation 1 Format a floppy disk or use a ready formatted disk Affix a label reading AirSta tion Information Files to the disk 2 Click the Start button and s...

Page 24: ...install Client Manager 8 In the Save In field select 3 Floppy A and enter a suitable name such as Airsta tion Apd in the File Name field Next click the Save button 1 Refer to the manual supplied with...

Page 25: ...Manager is correct and click NEXT If you want to change the directory enter the path select the appropriate drive and click NEXT 8 Check that the correct destination directory is specified and click S...

Page 26: ...rStation Connection Settings on page 25 To uninstall the Client Manager click Start and select MELCO Wireless LAN and then Uninstall Client Manager and follow the screen prompts 10 Click OK This compl...

Page 27: ...es Disk into the floppy disk drive 4 In the Look In field select 3 Floppy A the file name e g Airstation Apd and then click the Open button 5 The AirStation applications will be dis played as unavaila...

Page 28: ...ompleted the application name in the AirStation display will change from gray to black and an antenna mark will also be displayed If the AirStation application is not displayed in black refer to Canno...

Page 29: ...rrective measures 1 Move the wireless LAN personal computer closer to the AirStation Be sure to maintain the distance of 30 cm min 2 Change the AirStation position 3 Improve conditions between the Air...

Page 30: ...sonal Computers 1 Double click the Network Neighborhood icon on the Desktop The personal computers connected to the Ethernet LAN and the wireless LAN network will be dis played 2 Double click the pers...

Page 31: ...tion Manager page 14 section in Chapter 1 Communications Between Ethernet LAN and Wireless LAN and install the AirStation Manager 2 Click the Start button and select Programs MELCO AirStation and AirS...

Page 32: ...the wireless LAN you cannot to con nect to the AirStation If it is the case please refer to Chapter 3 Troubleshooting The AirStation Setting Follow the on screen instructions to complete the settings...

Page 33: ...able the ESS ID of the AirStation will be changed to 000000 group name Enter 000000 group name in the ESS ID field and then click the OK button 4 Click the OK Button If you have set a password using t...

Page 34: ...Click the Custom Setup button 3 Click the Wireless LAN Computer Limita tion Setup hyperlink 4 Enter the MAC address of wireless LAN per sonal computers that can connect to the net work in the Wireles...

Page 35: ...ess LAN Computer field select the Set Limit option and click the Set button If you make the settings using a wireless LAN personal computer check that the wireless LAN personal computer is registered...

Page 36: ...h the AirStation is disabled refer to Chapter 3 Troubleshooting Setting Procedure Strengthening Security Using the WEP Encoding Function 1 Refer to the Displaying AirStation Setting Screen section pag...

Page 37: ...ne using the following procedure Setting Procedure Multiple AirStation Groups 1 Refer to the Displaying the AirStation Setting Screen section in Chapter 2 What is Next and display the AirStation setti...

Page 38: ...splay the AirStation setting screen 2 Click the Custom Setup button 3 In the Communication Type field select either full duplex or half duplex and click the Set button When the AirStation s send mode...

Page 39: ...dure for installing AirPort software refer to the manual supplied with the AirPort Connecting to the AirStation Using an AirPort compatible Personal Computer 1 Display the AirStation setting screen us...

Page 40: ...n 4 Windows will search for the AirStation 5 AirStation s IP address will be displayed AirStation s IP address will be displayed in the IP Address field Reset the AirStation Setting to the Factory Set...

Page 41: ...ocedure Checking the Wireless Frequency Status 1 Click the Start button and then select Programs MELCO Wireless LAN and Client Manager 2 On the Menu Bar select File Then select Test Connection and Dia...

Page 42: ...unstable perform the following corrective measures 1 Move the wireless LAN personal computer closer to the AirStation Be sure to maintain the distance of 30 cm min 2 Change the AirStation position 3 I...

Page 43: ...manual supplied with the net work adapter Cause Network adapter drivers are not installed correctly A mark or a X mark is attached to the network adapter Remedy Refer to the network adapter manual and...

Page 44: ...CP server automatically Remedy Check if TCP IP is correctly installed and set Refer to the TCP IP Protocol Setting section page 5 in Chapter 1 Communications Between Ethernet LAN and Wireless LAN The...

Page 45: ...ersonal computers to the hub Cause 3 The cable is broken Remedy 3 Reconnect using good UTP straight cable Cause 4 The hub is malfunctioning Remedy 4 Check if the AirStation and the hub Link lamps are...

Page 46: ...hange the setting to disable dial up from the Web browser settings Setting by the following procedure Setting Screen Is Not Displayed Internet Explorer 5 or Later 1 Start Internet Explorer 2 On the Me...

Page 47: ...hen select Internet Options 3 Click the Connection tab 4 Select Connect to the Internet using a local area network and click the Advanced but ton in the Proxy server group box If the Access the Intern...

Page 48: ...If Direct connection to the Internet or Automatic proxy configuration is selected there should be no problem with the Web browser settings 5 Enter the AirStation s IP address in the Do not use proxy...

Page 49: ...wireless LAN personal computer click the Start button Then select either one of Programs MELCO WirelessLAN and Client Manager 2 Select File Then select Connections 3 In the MAC Address Group Name and...

Page 50: ...the OK button If you changed the password WEP Enter the password WEP set in the AirStation If you did not changed the password Click the OK button without entering anything in the Password field Chec...

Page 51: ...e 3 You are not trying to log in as a user with Administrator privileges Windows 2000 and Win dows NT 4 0 only Remedy 3 Log in as a user with Administrator privileges Cause 1 Installation of the Ether...

Page 52: ...r it is not set correctly Remedy 4 Check the wireless LAN personal computer Ethernet LAN personal computer and the AirSta tion IP address setting validity using the following procedure Procedure for C...

Page 53: ...e Internet Connection Manual Cause 5 You did not enter your password when starting Windows 98 95 On the Network Password screen you clicked the Cancel button or pressed the ESC key without entering yo...

Page 54: ...tallation of the wireless LAN card drivers is failed Remedy 1 Refer to the wireless LAN card manual and check if the driver is installed correctly Also check if the AirStation s Wireless lamp is lit C...

Page 55: ...ing example Personal computer A 192 168 100 2 255 255 255 0 Personal computer B 192 168 100 3 255 255 255 0 Personal computer C 192 168 100 4 255 255 255 0 Personal computer X 192 168 100 254 255 255...

Page 56: ...s written when the firmware is replaced Error Details when DIAG Lamp Flashes If one of the above errors is displayed try removing the AC adapter from the socket to restart If the error is still displa...

Page 57: ...ommunications Between the Ethernet LAN and the Wireless LAN Main menu Standard Setup Custom Setup Basic Setting P56 Password Setup P56 Time Setup Wireless LAN Personal Computer Limit Setting P56 Power...

Page 58: ...t six digits of MAC address group name Wireless Channel Set the wireless channel 1 to 11 Channel 11 Roaming Enable disable wireless roaming function Not used Encryption Code WEP Set the keyword for en...

Page 59: ...y ESS ID Wireless roaming func tion Display whether wireless roaming function is enabled or disabled Encryption WEP function Display whether Encryption WEP function is enabled or disabled DS channel D...

Page 60: ...nufacturer There should be no DHCP server problems for Windows 98 95 personal computers only on the network ESS ID This ID is used to prevent cross communication during communication between the AirSt...

Page 61: ...er when not using the network Set your user name and password during Windows 98 95 setup When you log on for the first time enter the user name and password you created during the setup Using the netw...

Page 62: ...ns by formatting all required information The protocol such as which terminal sends first what type of message what type of message the receiving terminal should send in reply the data format and resp...

Page 63: ...the office to the conference room while maintaining access to the network Ethernet LAN and Wireless LAN The following terms are used in this manual to clarify the distinction between the wired 10 100...

Page 64: ...frastructure mode Frequency range mid frequency 2412 to 2483 5 MHz Communications dis tance depending on ambient conditions 25 m indoors 50 m outdoors at 11 Mbps 35 m indoors 70 m outdoors at 5 5 Mbps...

Page 65: ...fied by ISO IEC8877 1992 MDI Signal Assignment LAN Port Connector Specifications Pin number MDI signal Signal function 1 TD Send data 2 TD Send data 3 RD Receive data 4 Not Use Not used 5 Not Use Not...

Page 66: ...WLA L11 User s Manual 64 MEMO...

Page 67: ...e with the instructions may cause harmful interference to radio communications However there is no guarantee that interference will not occur in a particular installation If this equipment does cause...

Page 68: ...PY00 26037 DM10 02 2 01...

Reviews: