background image

12

BÜCHI 

Rotavapor

 R-220

4 Putting into Operation

4.8

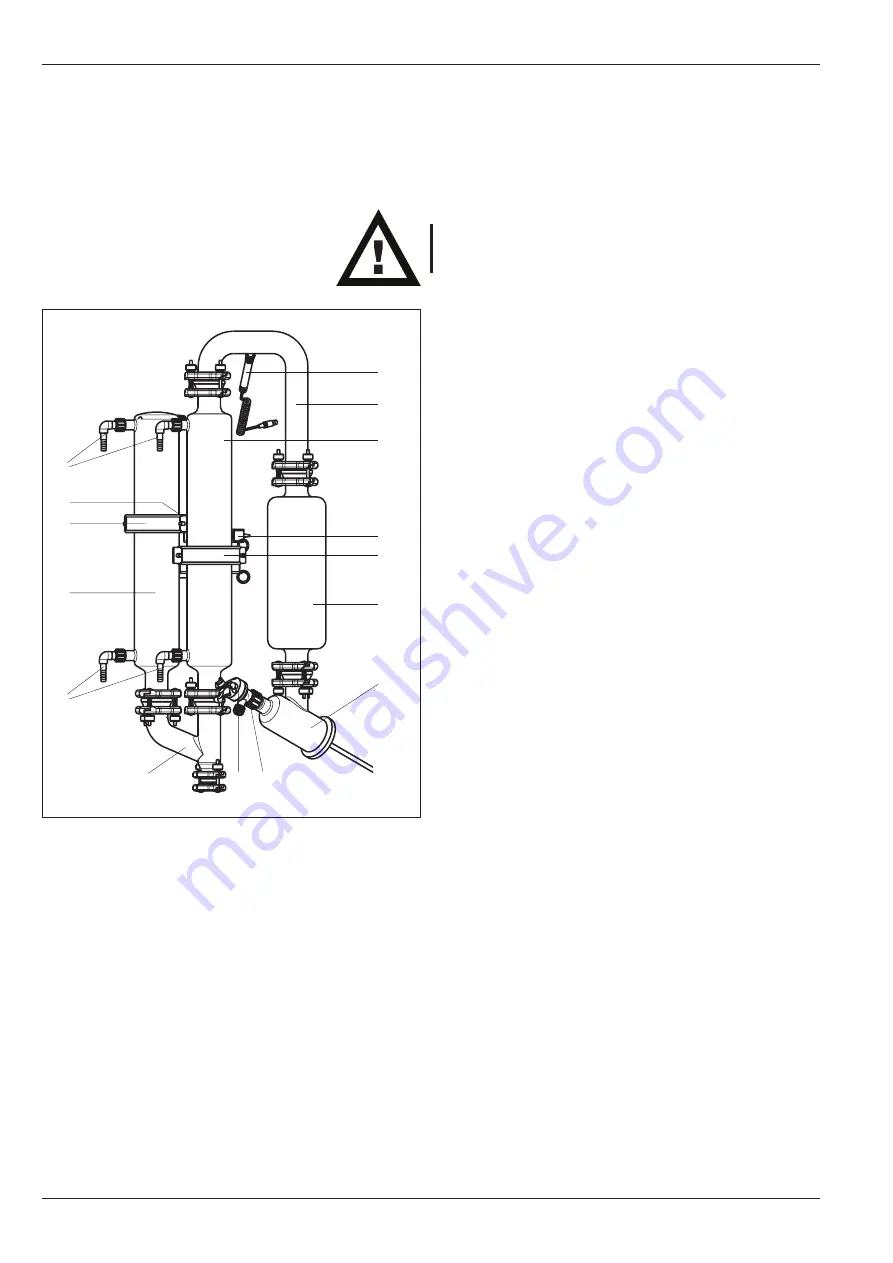
Installation of the Descending Glass Assembly
with a 2

nd

 Cooler

All glassware used must be intact, with no signs of cracks,
spreading impact marks, or other damage. Inspect the glass-
ware visually before installing it.

Fix the descending distributor head 

 in position on the

gear head using a DN70 EasyClamp connection.

Place the expansion vessel 

 on the distribution head

and fix it in position with a DN45 EasyClamp connection.

Introduce the cooler 

, together with the cooler holder

, into the pivoting clamp 

.

Connect the cooler and the expansion vessel with the U-
tube 

 and fix them in position with two DN45 EasyClamp

connections.

Insert the second cooler 

, together with the cooler holder

, into the pivoting clamp 

.

Join the two coolers with the Y-connection 

 and fix them

in position with two DN45 EasyClamp connections.

Align the coolers (

 and 

) and the expansion vessel 

in their vertical positions and fix them in place with pivoting
clamps (

 and 

).

Screw the cooling water hose nipples 

 onto coolers 

and 

.

Insert the stop cock 

, with the PTFE hose mounted on

it, into the distribution head, and secure it with a standard
joint clamp 

.

Screw the temperature sensor 

 into the support connec-

tion in the U-tube.

Check all EasyClamp connections and tighten them evenly
and in parallel.

The installation of the receiving fixture is described on Page
13.

Fig. 8: Downgrade glass assembly with two coolers

햿 햾

Summary of Contents for Rotavapor R-220

Page 1: ...ing for Leaks 27 6 10 Customer Service 27 7 Taking out of Operation 28 8 Spare Parts and Accessories 29 8 1 Glass Assemblies D D2 DB DB2 30 31 8 2 Glass Assemblies R RB C 32 33 8 3 Miscellaneous 34 8...

Page 2: ...ng bath 1 6L 10L or 20L Evaporation flask 1 Receiving flask 1 x 10L Single receiver or 2 x 10L Interchangeable receivers 1 Glass assembly Refer to Chap 4 6 4 8 for Figure Table 1 Scope of Supply Stand...

Page 3: ...Operator This unit may only be used by technical staff and by individuals who based on their training or their professional experience have a good understanding of the dangers that can arise from the...

Page 4: ...e Rotavapor R 220 is not intended for work done under overpressures 2 5 Basic Dangers Basic dangers arise when working with the following The hot water or oil bath risk of being scalded Contaminated s...

Page 5: ...also available in several other languages As an integral component of the rotary evaporator this Operating Manual must be readily available at all times to the operating staff at the location where t...

Page 6: ...flask forming a thin film of solvent on the inner surface of the flask This combination of turbulence and film prevents local overheating and ensures high distillation speed Rotary Drive The drive uni...

Page 7: ...mensions of the rotary evaporator are Height without trolley Reflux 1700 mm Descending 1800 mm Bullfrog Reflux 1430 mm Bullfrog Descending 1550 mm with trolley Reflux 2300 mm Descending 2400 mm Width...

Page 8: ...tioning ring on over the rod 150 mm below the upper edge Lay the pivoting clamp on top of the positioning ring Attach the pivoting clamp for the receiving flask 200 mm above the bottom edge of the rod...

Page 9: ...t always be a gap of about 2 mm between the knurled nut and the support surface 4 5 Removal of the EasyClamp On all EasyClamp connections only the bolt without a spacer spring has to be removed in ord...

Page 10: ...nnection Align the cooler in a vertical position and fix it in place with the pivoting clamp Screw the cooling water hose nipples onto the cooler Insert the shut off tap into the distribution head and...

Page 11: ...ct to the cooler and the expansion vessel using the U tube and fix in position with two DN45 EasyClamp connections Align the cooler and the expansion vessel in their vertical positions and fix them in...

Page 12: ...tube and fix them in position with two DN45 EasyClamp connections Insert the second cooler together with the cooler holder into the pivoting clamp Join the two coolers with the Y connection and fix th...

Page 13: ...and tighten it firmly Bring the support up and fix the receiving flask in position on the branching piece using a DN25 EasyClamp con nection Dual Receiver Fasten the support rings to the support rods...

Page 14: ...lever A clear resistance must be felt when this is done If not readjust the tension on the closure Adjusting the tension on the closure Open the closure hook up and turn it Turning clockwise increases...

Page 15: ...lask to hold it from below Open the closure lever Use your thumb to release the closure hook Flip up the first segment of the snap flange coupling With your hand under the flask lift it lightly slight...

Page 16: ...two con densers can be connected serially the additional condenser being cooled first The following is the key for all of the hose diagrams on these two pages Cooling water inlet for first condenser C...

Page 17: ...these two pages Cooling water inlet for first condenser Cooling water outlet for first condenser Cooling water inlet for second condenser Cooling water outlet for second condenser Vacuum connection V...

Page 18: ...Bath replenishment inlet Hose nipple Diam 14 mm Bath replenishment outlet Hose nipple Diam 14 mm Opening the needle valve slightly by one quarter turn pro duces a continuous supply flow Introduce the...

Page 19: ...at temperatures up to 160 C e g Ucon HTF 14 Fluka AG Water soluble polyethylene glycol e g Polyethylene glycol 600 Fluka AG After the oil bath has been standing opened for a prolonged period condensat...

Page 20: ...he bath is lowered automatically when the unit is switched off or in case of a power failure to ensure that the evaporating flask will in all cases remain outside the source of heat optional 5 2 Adjus...

Page 21: ...be dissipated again across the cooler In order to ensure this it is best to work according to the following rule of thumb Cooling water T2 Boiling temperature T1 Bath max 20 C 40 C 60 C How do you att...

Page 22: ...2 0 318 68 0 724 375 Dioxane C4 H8 O2 88 1 406 101 1 034 107 DMF Dimethylformamide C3 H7 NO 73 1 153 0 949 11 Ethanol C2 H6 O 46 0 879 79 0 789 175 Ethyl acetate C4 H8 O2 88 1 394 77 0 900 240 Heptane...

Page 23: ...6 1 Taking Apart the Snap Flange Coupling Close the two segments of the snap flange coupling Turn the snap flange coupling by 180 until the closure faces down Have Tool No 20075 ready at hand Reopen...

Page 24: ...ck slightly and close it until the hook latches in place Close the segment on the right Insert the closure hook and close the snap flange coupling with the closure lever A clear resistance must be fel...

Page 25: ...the notch in the vapour duct 6 5 Replacement of the Seals for the Distribution Head Open the DN70 EasyClamp by releasing the knurled nuts on all 3 bolts but do not screw the nuts completely off Tilt t...

Page 26: ...gments of the EasyClamp Flip the top bolt up and in and hand tighten all 3 knurled nuts Tip When the glass assembly R is in place the vacuum seal can be taken out and or cleaned without the glass asse...

Page 27: ...line The rate of pressure rise must not exceed 3 to 5 mbar per 15 minutes A greater pressure rise indicates a leak in the vacuum seal In such a case recheck all EasyClamp connections and all valves 6...

Page 28: ...Use only the original packing materials for any further transport 7 3 Waste Disposal Table 7 in the Appendix Chapter 9 contains a list of the mate rials including their material codes used for the mos...

Page 29: ...and accessories other than those from B CHI is permissible only with prior approval of the manufacturer The Spare Parts Catalog may be used for purposes of assembly and disassembly only in conjunction...

Page 30: ...27277 41164 41335 41151 41156 1165 41131 27150 41076 1169 27338 3577 5155 1129 41348 41155 27308 27289 41130 41076 27277 41164 27150 41335 27308 41131 1165 41130 1169 27289 41155 41159 41348 41076 27...

Page 31: ...27289 Cooler 3 coil PLG 27308 Hose nipple 27338 Cooler Bullfrog closed PLG 27824 Cooler Bullfrog PLG 27825 U Tube Bullfrog PLG 27837 Temperature sensor B complete 41076 Glass holder B complete 41120 E...

Page 32: ...Assemblies R RB C 3577 5155 27338 25979 25981 25124 25978 41079 41060 41076 27277 41164 41348 41373 41162 41151 41156 27289 41348 41373 41162 27289 27277 41164 41076 41060 41155 41159 R RB C 41348 41...

Page 33: ...e 27338 Cooler Bullfrog closed PLG 27824 Shut off tap large complete 41060 Temperature sensor B complete 41076 Glass holder C complete 41079 Glass holder B complete 41120 EasyClamp DN25 41130 EasyClam...

Page 34: ...ete 41062 EasyClamp DN25 41130 Pivoting clamp complete 41151 Base for flask 41252 Single receiver E Receiving flask 10L 37569 Branching piece PLG 41053 Outlet valve DN25 2 41061 Shut off tap small com...

Page 35: ...ating flask seal complete 41121 Easy Clamp element DN70 41135 Set of 5 O rings 64x5 0 41229 Set of 10 cover caps D11 Pa 41230 Set of distribution head sealings 41231 Glass body 41346 Inlet valve compl...

Page 36: ...cessories Fig 40 Protective screen Fig 38 Machine leg Fig 39 Snap flange coupling complete 41112 41110 41111 Component Ordering No Adjustable machine leg 41018 Clip 41110 Detent 41111 Snap flange coup...

Page 37: ...tructions 1 Put the lamella curtain on the support rod 2 Turn the lamella curtain until position is parallel to the edge of the chassis 3 Tighten the screw Foam detector The foam detection consists of...

Page 38: ...flask is particularly suited for drying powdery sub stances or a homogeneous mixture of solid products The baffles attached on the circumference of the flask ensure an intensive circulation of the con...

Page 39: ...the two bolts and the plastic cover 3 Put on the seal 4 Plug in the plug 5 Fasten the splash protection in place with the bolts 6 Switch the unit ON Operating Instructions Opening the splash protectio...

Page 40: ...end of the water hose to the control valve for bath replenishment and secure it with pivoting clamps 5 Connect the end of the hose at CW in on the R 220 and secure it with pivoting clamps 6 Connect th...

Page 41: ...on Instructions 1 Remove the cover 2 Fasten the support using the bolt supplied with the unit Vacuum Controller V 800 for R 220 Vacuum Controller V 800 230 V 40721 Vacuum Controller V 800 120 V 40722...

Page 42: ...bath temperatures 20 C 180 C Overheating protection Separate monitoring circuit Responds at 15 C over set point temperature Bath lift Linear drive Safety Class IP 65 Battery Battery PB 12V Measurement...

Page 43: ...nit OFF E3 Message The rotary drive does not reaching the required speed or is turning too quickly Cause Drive defective Mechanical blocking No power Semi conductor relay defective Action Bath heater...

Page 44: ...which case the user will be required to correct the interference at his own expense Fran ais Cet appareil a t test et s est av r conforme aux limites pr vues pour les appareils num riques de classe A...

Page 45: ...uirements EN 61326 1 1997 Electrical Equipment for Measurement Control and Laboratory Use EMC Requirements EN 61000 3 2 1995 1996 Limits for harmonic current emissions EN 61000 3 3 1995 Limitation of...

Page 46: ...46 B CHI Rotavapor R 220 9 Appendix...

Reviews: