3
321071
10” touch screen handsfree internal unit
BT00852-a-EN
03/09/2014
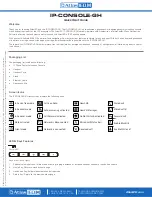
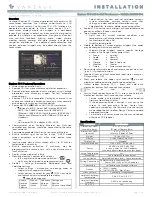
Room Number
IU Type
Configuration
Click on the white circle to select “
With apartment interface 323009
” or “
Without
apartment interface 323009
”. If you select “With apartment interface 323009”,you
can’t set the room number because this is directly set by the apartment interface. If
you select “With apartment interface 323009, two modes are available:
direct call
mode
and
normal call mode
. With direct call mode, the room number is a digital
value (1 to 4000). With normal call mode, the room number is a combination of floor
number and room number. You need to set the room number and the maximum
apartment quantity per floor.
Click on the white circle to select “
With lift controller
” or “
Without lift controller
”.
If you select “With lift controller”, a lift icon
will appear in the main interface. In
idle state, press this icon or the unlock key to call the lift.
Note
: lift control function should be equipped with a lift controller interface and
supported by the lift manufacturers. Default setting is without lift controller.
Click on the white circle to select SOS alarm contact status “
Normal open
” or
“
Normal close
”.
Default setting is Normal open.
The alarm detector sub menus include two pages, the setting item in the first page as
below :
Enable /Disable
: enable or disable the detector, click on the “Enable” or “Disable” to
switch enable /disable.
Detector mode
: set the detector normal open or normal close, select “ON” (normal
open) or “OFF” (normal close) to switch detector mode.
Definition
: define the detector type, (area1-infrared), (area2-door contact), (area3-
smoke), (area 4-gas), (area5-infrared/no infrared), (area 6- infrared/no infrared),
(area 7- infrared/no infrared), (area 8- infrared/no infrared), click on the “infrared” or
“no infrared” to switch detector definition of area 5 to area 8. Area1 to area 4 can’t be
changed.
Status
: display the detector status, when it becomes blue detector is enabled and
when it becomes gray means disabled.
Areas
: show area1 to area 8 alarms.
Click on “
Reset
” to restore the parameters of the page to default value.
Click on the
PgDn
icon to have access to the second page. Setting item in the second
page as below:
Alarm
: define alarm whether with sound, click on the white circle to select “YES/ON”.
Effective time for alarmed
: click on the white circle to set the effective time as 40
sec./100 sec./150 sec./210 sec./225 sec.
Delay
: when the detector monitors an alarm, it will report the message after the
setting delay time. You can click on the white circle to set the delay time as 40 sec./100
sec./150 sec./210 sec./225 sec. For Area 3 and Area 4 you can’t set delay time.
Click on “reset” to restore the parameters of the page to default value.
Click on the
PgUp
icon to return to the first page
Lift
Entry Panel
SOS
Restore
Detector
Click on the white circle to select “
Master
” or “
Slave
” IU. When one apartment install
multiple handsets, if the handsets be called, only the master handset opens the video,
slave handsets do not open the video. If the slave handset answered, the other handset
returns to static, the answered handset open the video and audio, and then you can
talk with the entry panel.
Default setting is master handset.
Click on the white circle to select “
Doorbell
” or “
Entry panel
”. If the handset linked
is a small entry panel, we can set whether monitor the small entry panel, if you select
“
Monitor enable
”, “Video door phone” menu will display “
”.
When the small entry panel call handset, the handset will ring and turn on the video;
if linked with doorbell ,it can’t monitor and when the handset detect income signal the
handset only ringing for 10 seconds.
Click on “
OK
” to restore all the parameters to default value or click on “
Cancel
” to abort
your operation.