background image

26


VISIT BAOFENGTECH.COM AND MIKLOR.COM FOR DOWNLOADS AND HELP


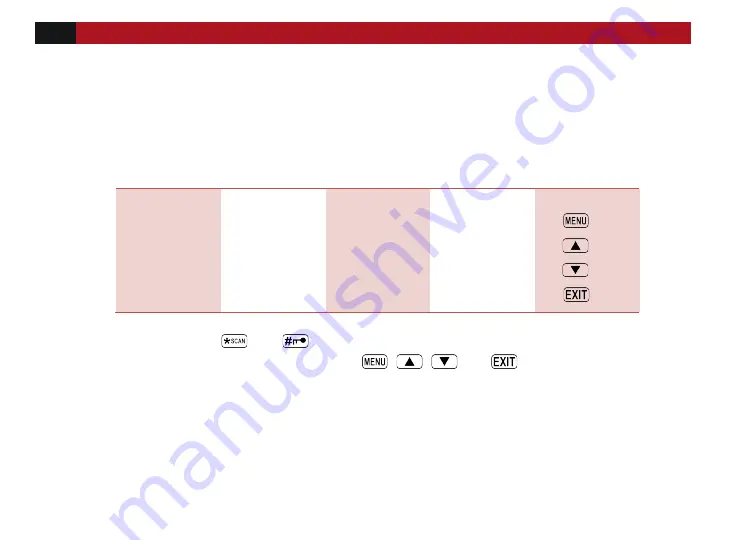
DTMF TX Settings 

In two-way radio systems, DTMF is most commonly used for automation systems and remote control. A 

common example would be in amateur radio repeaters where some repeaters are activated by sending 

out a DTMF sequence (usually a simple single-digit sequence). 

Table 7.1. DTMF frequencies and corresponding codes 


1209 Hz 

1336 Hz 

1477 Hz 

1633 Hz 

697 Hz 

A - 


770 Hz 

B - 


852 Hz 

C - 


941 Hz 

D - 


The BTECH GMRS-20V2 has a full implementation of DTMF, including the A, B, C and D codes. The 

numerical keys, as well as the 

, and 

, keys correspond to the matching DTMF codes as you would 

expect. The A, B, C and D codes are located in the 

 and 

 keys respectively (†). 

Manually TX DTMF Tones:

 To manually send DTMF codes, press the key(s) while holding down the PTT 

key.  


Automatically TX DTMF Tones: 

Save it to Memory and Transmit: 

You can also program a DTMF tone to the saved calling list (requires 

the PC software) to the one of the 15 Memory call banks in the radio. To transmit select the Pre-set 

Summary of Contents for GMRS-20V2

Page 1: ...n permission of the publisher except in the case of brief quotations embodied in critical reviews and certain other noncommercial uses permitted by copyright law For permission requests write to the publisher Contributions taken from Miklor com Resource Site and Jim Unroe KC9HI Used by permission All rights reserved THANK YOU FOR YOUR PURCHASE OF THE BTECH GMRS 20V2 THIS RADIO WILL DELIVER INSTANT...

Page 2: ...ote Speaker Jack Info 7 GMRS 20V2 Overview of the Rear Ports 8 Handheld Mic Keys Explanation 9 Handheld Mic Keys ICON Explanation 10 Programming Cable Info 11 Antenna Basics 12 Ground Plane 12 Antenna Requirements 13 Chapter 2 GMRS Information and FCC Declaration 15 GMRS Repeaters 15 FCC NOTICE AND DECLARATION 15 FCC LICENSE REQUIRED FOR GMRS OPERATION 16 GMRS Frequency Chart Channel Guide 17 ...

Page 3: ...a call 20 Channel selection 20 Channel mode 20 Chapter 4 Programming Scanning Channels 21 Manual Programming 22 Adding GMRS Channels 22 Adding Receive Scanner Channels 23 Deleting Channels 24 Computer programming 24 Chapter 5 Other Settings 25 Toggle from High to Low Power 25 Keypad Lock out 25 PTT ID Setting 25 DTMF RX Settings 25 DTMF TX Settings 26 DTMF Receive Settings Transmit Setting Call Ke...

Page 4: ... Carrier operation 29 Search operation 29 SKIP Scanning Channels 30 Tone Scanning 30 Scanning for CTCSS and DCS Tones Codes 30 Tri Watch TMR 33 Chapter 6 Selective calling 35 CTCSS 37 DCS 38 1000Hz 1450Hz 1750Hz 2100Hz Tone burst 39 Part III How to and setup guides 40 Chapter 7 Customization 41 Text Display Colors 41 Sync Display Channels 42 Voice Operated Xmitter VOX 43 Appendix A Menu Definition...

Page 5: ...iv VISIT BAOFENGTECH COM AND MIKLOR COM FOR DOWNLOADS AND HELP FCC Notice 54 Appendix B Technical specifications 56 General 56 Receiver 57 Transmit 57 DCS table 58 CTCSS table 61 ...

Page 6: ...hapter List Part one covers the basic setup and use of your mobile two way transceiver CHAPTER 1 GETTING STARTED CHAPTER 2 GMRS INFORMATION AND FCC DECLARATION CHAPTER 3 BASIC USE CHAPTER 4 PROGRAMMING SCANNING CHANNELS CHAPTER 5 OTHER SETTINGS CHAPTER 6 SELECTIVE CALLING ...

Page 7: ...oyment area Do not expose the radio to direct sunlight over a long time nor place it close to a heating source If the unit emits smoke or an odor you should immediately cut off the power supply Then send the radio to the nearest service center or dealer Do not operate the mobile transceiver on high power unless it is necessary Do not transmit for long periods of time as it may overheat the transce...

Page 8: ...nic Engineers IEEE C95 1 1992 Institute of Electrical and Electronic Engineer IEEE C95 1 1999 Edition National Council on Radiation Protection and Measurements NCRP of the United States Report 86 1986 International Commission on Non lionizing Radiation Protection ICNIRP 1998 To control your exposure and ensure compliance with the general population or uncontrolled environment exposure limits trans...

Page 9: ...radio for any signs of damage Carefully open the box and confirm you received the items listed below If you find the radio or the included accessories are damaged or lost immediately contact your dealer What s in the Box GMRS 20V2 Mobile Radio Microphone Power Cable Direct Connect Mounting Screws Mounting Bracket and Fuse ...

Page 10: ...VISIT BAOFENGTECH COM AND MIKLOR COM FOR DOWNLOADS AND HELP 5 ...

Page 11: ...6 VISIT BAOFENGTECH COM AND MIKLOR COM FOR DOWNLOADS AND HELP GMRS 20V2 Overview of the Front Panel ...

Page 12: ...t follows the TRRS wiring you can run a cable from this jack into the AUX port on your car stereo if you desire Then place the stereo in the AUX Input mode to hear the radio audio CAUTION This is NOT a MONO speaker jack It does require you follow the pinout below use caution if plugging an external speaker directly in this jack ...

Page 13: ...8 VISIT BAOFENGTECH COM AND MIKLOR COM FOR DOWNLOADS AND HELP GMRS 20V2 Overview of the Rear Ports ...

Page 14: ...VISIT BAOFENGTECH COM AND MIKLOR COM FOR DOWNLOADS AND HELP 9 Handheld Mic Keys Explanation ...

Page 15: ...10 VISIT BAOFENGTECH COM AND MIKLOR COM FOR DOWNLOADS AND HELP Handheld Mic Keys ICON Explanation ...

Page 16: ...SIT BAOFENGTECH COM AND MIKLOR COM FOR DOWNLOADS AND HELP 11 Programming Cable Info PC 04 Cable available at www baofengtech com accessories Programming software available at www baofengtech com download ...

Page 17: ...tuned for the frequency you transmit on it can cause damage with the reflected power going back into the radio Pick an antenna with SWR of less than 1 5 1 to safely transmit Ground Plane Antennas require an appropriate ground plane to properly work This can be a car body not a fiberglass car body but some metal or a set of ground radials for homebrewed antennas or commercially designed antennas wh...

Page 18: ...u come in contact with them Keep a minimum distance of 10 feet with the antenna and yourself from the lines Antenna Requirements Antenna SWR Rating 1 5 1 or less on the radio frequencies in use Antenna Impedance 50 ohms use 50 ohms rated coax and coax connectors Antenna Grounding Ensure the antenna is mounted with a grounding plane Visually Inspect Coax Connectors for any Slits or Damage moisture ...

Page 19: ...hen setting up your radio for the first time periodically checking SWR and your antenna set up is advised You will need to use a SWR meter designed for the UHF band Other meters will NOT read correctly Another option is an Antenna Analyzer With those you can sweep the entire UHF band and find the sweet spot or resonant point of your antenna Use this information to tune for the LOWEST SWR or reflec...

Page 20: ...n from those that run your local repeater for GMRS channels FCC NOTICE AND DECLARATION This device complies with part 15 of the FCC Rules Operation is subject to the following two conditions 1 This device may not cause harmful interference and 2 This device must accept any interference received including interference that may cause undesired operation The scanning receiver in this equipment is inc...

Page 21: ... s Sections 501 and 502 amended You will be issued a call sign by the FCC which should be used for station identification when operating the radio on GMRS channels You should also cooperate by engaging in permissible transmissions only avoiding channel interference with other GMRS users and being prudent with the length of your transmission time To obtain a license or ask questions about the licen...

Page 22: ...5MHz 04 GMRS04 462 63750 11 GMRS11 467 6375 18 GMRS18 462 6250 26 REPT18 462 6250 5MHz 05 GMRS05 462 66250 12 GMRS12 467 6625 19 GMRS19 462 6500 27 REPT19 462 6500 5MHz 06 GMRS06 462 68750 13 GMRS13 467 6875 20 GMRS20 462 6750 28 REPT20 462 6750 5MHz 07 GMRS07 462 71250 14 GMRS14 467 7125 21 GMRS21 462 7000 29 REPT21 462 7000 5MHz 22 GMRS22 462 7250 30 REPT22 462 7250 5MHz Per FCC GMRS Radio Guide...

Page 23: ...TT MONI and Power Buttons will not be locked when enabled Star Key A short momentary press of the key enables the reverse function reverses the Transmit and Receive settings according to Offset settings This allows you to hear the signals into the system repeater to determine if simplex or direct radio to radio communications are possible To enable scanning press and hold the key for about two sec...

Page 24: ...the ORANGE top button on the microphone until it turns off The unit is now off Adjusting the volume To turn up the volume press the ORANGE microphone button which will put the radio into MONI mode then use the button to set desired level Press the ORANGE button again to quiet the radio until a signal is received To turn the volume down press the ORANGE microphone button then use the button to set ...

Page 25: ...oximately 3 5cm 1 2 inches from the microphone When you release the PTT your transceiver will go back to it receive mode Channel selection Channel mode The GMRS 20V2 is hard loaded with the 30 GMRS channels see the GMRS Frequency Chart Channel Guide in Chapter 2 for Channels and Transmitting restrictions You can program additional analog scanning channels into memory channels 000 and 031 199 You c...

Page 26: ...cter alphanumeric identifier or channel name 1 GMRS Channels 001 030 are the default programmed GMRS channels you can remove and rearrange the memory locations as preferred a radio menu reset will restore the radio to the default 30 channel lineup Settings such as the calling CTCSS or DCS tone can be edited on any GMRS channels Channels 000 199 can be added or deleted via computer or manual progra...

Page 27: ...200 channel 0 to 199 1 Press the key to enter the menu 2 Enter 64 on the numeric keypad to get to the GMRS channel add menu item 3 Press the key to select 4 Use the and keys to select an empty memory channel or enter it directly on the numerical keypad 5 Enter the Channel number you want to add select one of the channels 1 to 30 from the list below for example if you want to add GMRS 23 which is R...

Page 28: ...Name Ch Freq Offset 01 GMRS01 462 56250 08 GMRS08 467 5625 15 GMRS15 462 5500 23 REPT15 462 5500 5MHz 02 GMRS02 462 58750 09 GMRS09 467 5875 16 GMRS16 462 5750 24 REPT16 462 5750 5MHz 03 GMRS03 462 61250 10 GMRS10 467 6125 17 GMRS17 462 6000 25 REPT17 462 6000 5MHz 04 GMRS04 462 63750 11 GMRS11 467 6375 18 GMRS18 462 6250 26 REPT18 462 6250 5MHz 05 GMRS05 462 66250 12 GMRS12 467 6625 19 GMRS19 462...

Page 29: ...nter the menu 2 Enter 47 on the numerical keypad to get to DEL CH 3 Press to select 4 Use the and keys to select an empty memory channel or enter it directly on the numerical keypad 5 Press the key to confirm 6 Press the key to confirm and save 7 Press the key to exit the menu Computer programming The GMRS 20V2 kit does not include a programming cable The GMRS 20V2 uses the PC04 Programming cable ...

Page 30: ... when the radio is locked out repeat to unlock PTT ID Setting 1 Use PC software to change PTT ID code 2 Set the Menu 18 settings on the radio to select the PTTID signal mode 2Tone 5Tone or DTMF 3 Set the Menu 20 settings to select when the PTTID is transmitted 4 Set the Menu 21 settings to program the PTTID transmit delay time 5 When all the settings are set when you transmit Press the PTT The rad...

Page 31: ... 1 2 3 A 770 Hz 4 5 6 B 852 Hz 7 8 9 C 941 Hz 0 D The BTECH GMRS 20V2 has a full implementation of DTMF including the A B C and D codes The numerical keys as well as the and keys correspond to the matching DTMF codes as you would expect The A B C and D codes are located in the and keys respectively Manually TX DTMF Tones To manually send DTMF codes press the key s while holding down the PTT key Au...

Page 32: ...uelch when it receives the required DTMF signal 4 Press Call Key to send the same DTMF you have selected in Menu 22 2TONE Receive Settings Transmit Setting Call Key 1 Press MENU Key select 18 OPTSIG press F Key select 2TONE function 2 Press MENU Key select 22 S INFO press F Key select pre code signal group 1 15 The 2Tone Signal must be saved first in the PC software setting under 2TONE settings 3 ...

Page 33: ...Key select pre code signal group 1 15 The 5Tone Signal must be saved first in the PC software setting under 5TONE settings 3 If properly set up on Menu 18 and 19 your radio will open the squelch when it receives the required 5TONE signal 4 Press Call Key to send the same 5TONE you have selected in Menu 22 ...

Page 34: ...ect 4 Use the and keys to select scanning mode 5 Press the key to confirm and save 6 Press the key to exit the menu Time operation In Time Operation TO mode the scanner stops when it detects a signal and after a factory pre set time out it resumes scanning Carrier operation In Carrier Operation CO mode the scanner stops when it detects a signal and after a factory preset time with no signal it res...

Page 35: ...ove from the scan list The change will apply to the current channel selected 5 Press the key to confirm and save 6 Press the key to exit the menu Tone Scanning Scanning for CTCSS and DCS Tones Codes CTCSS tone and DCS code scanning mode can be accessed with or without a signal being present The scanning process itself only occurs while a signal is being received Not all repeaters requiring a CTCSS...

Page 36: ...n RF signal on the selected channel the display will cycle through the CTCSS tones as they are being tested Once the frequency of the received CTCSS tone is determined the scan will stop and audio will be able to be heard from the repeater Press the key to save the scanned tone into memory then press the key to exit the menu Don t forget to set menu 11 back to OFF when the CTCSS tone is no longer ...

Page 37: ...ng an RF signal on the selected channel the display will cycle through the DCS codes as they are being tested Once the bits of the received DCS code are determined the scan will stop and audio will be heard from the repeater Press the key to save the scanned tone into memory then press the key to exit the menu Don t forget to set menu 10 back to OFF when the DCS tone is no longer required ...

Page 38: ...ne of the three channels it monitors 1 Press the key to enter the menu 2 Enter 0 on the numeric keypad to get to the TMR Watch Settings 3 Press to select which channels are monitored See Appendix A 4 Use the and keys to enable or disable 5 Press the key to confirm 6 Press the key to exit the menu Due to the way theBTECHGMRS 20V2 is constructed wheneverone of the A B or C Frequencies goes active it...

Page 39: ...t on the channel which had the last activity the amount of time before it reverts to transmitting on the primary selected channel is set in menu 54 Locking the Default transmit channel 1 Press the key to enter the menu 2 Enter 62 on the numeric keypad to get to TMR TX 3 Press to select 4 Select FIXED to always reply on the primary selected channel Menu 54 5 Press the key to confirm 6 Press the key...

Page 40: ...individual calling Group calling as the name suggest is a one to many form of communication Every radio in your working group is configured the same way and any radio will make contact with every other radio in the group Individual calling sometimes also known as paging is a one to one form of communication Every radio is programmed with a unique ID code And only by sending out a matching code can...

Page 41: ...y only provide a method to filter out unwanted incoming transmissions Any communications made while using these features will still be heard by anyone not employing filtering options of their own You can change the CTCSS or DCS settings while in memory MR mode CTCSS and 1750Hz tone burst are also popular methods among amateur radio operators to open up repeaters ...

Page 42: ...e 6 Enter on the numeric keypad to go to transmitter CTCSS 7 Press to select 8 Enter desired CTCSS sub tone frequency in hertz on the numeric keypad Make sure it s the same frequency as that you entered for receiver CTCSS 9 Press to confirm and save 10 Press to exit the menu system To turn CTCSS off follow the same procedure but set it to off with the key instead of selecting a CTCSS sub tone freq...

Page 43: ...desired DCS code on the numeric keypad 5 Press to confirm and save 6 Enter on the numeric keypad to go to transmitter DCS 7 Press to select 8 Scroll to the desired DCS code on the numeric keypad Make sure it s the same code as that you entered for receiver DCS 9 Press to confirm and save 10 Press to exit the menu system To turn DCS off follow the same procedure but set it to off with the key inste...

Page 44: ... 1750Hz 2100Hz Tone burst To send out a tone burst you simultaneously will press the PTT key while holding down the Call button To configure which Tone Burst is transmitted select the Tone Burst desired from Menu Item 50 REP S PTT Selected Tone Burst Selectable in Menu 50 REP S ...

Page 45: ...IT BAOFENGTECH COM AND MIKLOR COM FOR DOWNLOADS AND HELP Part III How to and setup guides Part three covers is a collection of how to documents to help you set up your radio for specific working environments ...

Page 46: ...numeric keypad a 33 to change the status icons text color b 34 to change the primary selected channel frequency display text color c 35 to change the channel A text color d 36 to change the channel B text color e 37 to change the channel C text color f 38 to change the decode tone text color g 39 to change the voltage text display text color h 40 to change the status bottom bar display color i 41 ...

Page 47: ...quency follow these steps 1 Press the key to enter the menu 2 Enter 32 on your numeric keypad to come to the Sync Menu 3 Press key to select 4 Use the and keys to select a AB To sync A B Displays b AC To sync A C Displays c BC To sync B C Displays d ABC to sync ABC Displays 5 Press to confirm and save 6 Press to exit the menu Use SYNC in Conjunction with Menus 27 28 29 to coordinate what is displa...

Page 48: ...uiet atmosphere and any background noise which can be picked up will switch the radio from transmit to receive By using this you do not use the PTT button on the side of the microphone to transmit To use VOX follow these steps 1 Press the key to enter the menu 2 Enter 30 on your numeric keypad to come to the VOX Menu 3 Press key to select 4 Select from Off or any number which sets the sensitivity ...

Page 49: ...between all or partial channels to allow tri watch Selected Memory Displays A B C M Selected Memory A Display A B Display B C Display C 1 STEP Frequency Step Size Setup 2 5 to 25 kHz 2 5 5 6 25 10 12 5 25 kHz 2 SQL Squelch Level 00 09 10 squelch levels 00 minimum normally open TXP Transmit Power High Full Power 50W Mid Mid Power 20W Low Low Power 5W 4 AUTOLK Auto Keypad Lock ON Keypad Auto Lock En...

Page 50: ...Turns off Decode all signals will be heard 11 R CTCS Receive Analog Tone Squelch 67 0 254 1 Hz Squelch opens when proper CTCSS tone detected OFF Turns off Decode all signals will be heard 12 T DCS Transmit DCS Code D023N D754I Transmits specified code OFF No DCS code transmitted 13 T CTCS Transmit CTCSS Code 67 0 254 1 Hz Transmits specified tone OFF No CTCSS tone transmitted 14 DTMFST Determines ...

Page 51: ...detected Scanning will not resume 18 OPTSIG Optional Signaling OFF No optional signaling DTMF DTMF signaling selected 2TONE 2TONE signaling selected 5TONE 5TONE signaling selected 19 SPMUTE Speaker Mute Settings QT Squelch opens for CTCSS DCS tones only AND Squelch opens when CTCSS DCS tone is recognized along with the optional signaling OR Squelch opens when either the CTCSS DCS tone OR the optio...

Page 52: ...ignal Beep ON Pager Ring at Reception of Matching 2Tone 5Tone DTMF OFF Tone OFF 26 CHNAME Channel Name Edit In Channel Mode edits the Current Name 27 CA MDF Channel A Display Mode FREQ In Channel Mode display the selected format in display A CH NAME 28 CB MDF Channel B Display Mode FREQ In Channel Mode display the selected format in display B CH NAME 29 CC MDF Channel C Display Mode FREQ In Channe...

Page 53: ...onizes display AB AC BC or ABC AC BC ABC 33 ST FC Status Icons Color Foreground Color Select Color WHITE RED BLUE GREEN YELLOW INDIGO PURPLE GRAY 34 MF FC Primary Selected Channel Foreground Color Text Select Color WHITE RED BLUE GREEN YELLOW INDIGO PURPLE GRAY 35 SFA FC Display Channel A Text Foreground Color Text Select Color WHITE RED BLUE GREEN YELLOW INDIGO PURPLE GRAY 36 SFB FC Display Chann...

Page 54: ...LOW INDIGO PURPLE GRAY 39 FM FC Voltage Text Display Color Foreground Color Text Select Color WHITE RED BLUE GREEN YELLOW INDIGO PURPLE GRAY 40 SIG FC Status Bottom Bar Display Foreground Color Text Select Color WHITE RED BLUE GREEN YELLOW INDIGO PURPLE GRAY 41 MENU FC Menu Text Display Color Select Color WHITE RED BLUE GREEN YELLOW INDIGO PURPLE GRAY 42 TX FC Transmitting Channel Color Foreground...

Page 55: ...CH AD Add RX Channel 000 199 Indicates channel number to be stored 47 DEL CH Delete Channel 000 199 Indicates channel number to be deleted 48 SFT D Frequency Shift Direction OFF No Offset TX and RX same frequency or simplex Plus shift in transmit frequency from receive frequency Minus shift in transmit frequency from receive frequency 49 OFFSET Frequency Shift Offset Amount 00 00 69 99 Set Shift o...

Page 56: ...s is the delay time before returning to the primary channel after secondary signal is clear Sets the PTT to the last received transmission channel Time delay selectable 55 STE Squelch Tail Elimination OFF Function OFF ON Eliminates squelch tail at end of transmission on receiving radio 56 RP STE Repeater Squelch Tail Elimination Requires a repeater using this function OFF Function OFF 1 10 Delay T...

Page 57: ...er random frequency SKIP2 Alternates transmitting on A B C each PTT press the radio will transmit on the next channel in order of their display A B C Repeat Requires a GMRS 20V2 on both ends with identical programming to work 61 SC MOD Automatic Scan Resume Method OFF Scan is disabled with a Radio Reboot or by Pressing a Menu Key PTT PTT SC Scanning will resume after transmitting or other Menu Ope...

Page 58: ... Will only TX on Primary Selected Channel 63 VOL Volume Level 0 1 2 3 58 Adjust the output volume of the radio The higher the number the higher the volume 64 GCH AD Quick GMRS Channel Add GCHxx Quickly add GMRS channel XX is the GMRS channel number to be added 65 SAVE Battery Save Ratio OFF 1 1 1 2 1 8 Selects the ratio of sleep cycles to awake cycles 1 1 1 2 1 8 The higher the number the longer i...

Page 59: ...io or television reception which can be determined by turning the equipment off and on the user is encouraged to try to correct the interference by one or more of the following measures Reorient or relocate the receiving antenna Increase the separation between the equipment and receiver Connect the equipment into an outlet on a circuit different from that to which the receiver is connected Consult...

Page 60: ...VISIT BAOFENGTECH COM AND MIKLOR COM FOR DOWNLOADS AND HELP 55 WARNING MODIFICATION OF THIS DEVICE TO RECEIVE CELLULAR RADIOTELEPHONE SERVICE SIGNALS IS PROHIBIITED UNDER FCC RULES AND FEDERRAL LAW ...

Page 61: ...x Channels 001 007 015 030 GMRS Channels Rx Only Channels 008 014 Memory channels 200 Frequency stability 2 5ppm Frequency step kHz 2 5K 5 0K 6 25K 10 0K 12 5K 25 0K Squelch Setup CARRIER CTCSS DCS 5Tone 2TONE DTMF Antenna impedance 50 Ohm Operating temperature 20 C to 60 C Supply voltage 13 8V DC 15 7A Peak GMRS 20V2 Dimension GMRS 20V2 4 0 W x 1 50 H x 5 0 D in 2 2lb Operating Temperature 5 F 14...

Page 62: ... Spurious Rejection 70dB 70dB Audio response 1 3dB 0 3 3KHz 1 3dB 0 3 2 55KHz Signal to noiseratio 45dB 40dB Audio Distortion 5 Audio output power 2W 10 Transmit Broadband Narrow band Output power 20W 5W GMRS 20V2 Modulation Mode 16K F3E 11K F3E Channel Power 70dB 60B Signal to noiseratio 40dB 36dB Parasitic harmonic 60dB 60dB Audio response 1 3dB 0 3 3KHz 1 3dB 0 3 2 55KHz Audio distortion 5 ...

Page 63: ...N 020 D122N 021 D125N 022 D131N 023 D132N 024 D134N 025 D143N 026 D145N 027 D152N 028 D155N 029 D156N 030 D162N 031 D165N 032 D172N 033 D174N 034 D205N 035 D212N 036 D223N 037 D225N 038 D226N 039 D243N 040 D244N 041 D245N 042 D246N 043 D251N 044 D252N 045 D255N 046 D261N 047 D263N 048 D265N 049 D266N 050 D271N 051 D274N 052 D306N 053 D311N 054 D315N 055 D325N 056 D331N 057 D332N 058 D343N 059 D346...

Page 64: ...31N 102 D732N 103 D734N 104 D743N 105 D754N 106 D023I 107 D025I 108 D026I 109 D031I 110 D032I 111 D036I 112 D043I 113 D047I 114 D051I 115 D053I 116 D054I 117 D065I 118 D071I 119 D072I 120 D073I 121 D074I 122 D114I 123 D115I 124 D116I 125 D122I 126 D125I 127 D131I 128 D132I 129 D134I 130 D143I 131 D145I 132 D152I 133 D155I 134 D156I 135 D162I 136 D165I 137 D172I D174I D205I D212I D223I D225I D226I ...

Page 65: ...LOR COM FOR DOWNLOADS AND HELP D446I D452I D454I D455I D462I D464I D465I D466I D503I D506I D516I D523I D526I D532I D546I D565I D606I D612I D624I D627I D631I D632I D645I D654I D662I D664I D703I D712I D723I D731I D732I D734I D743I D754I ...

Page 66: ...ncy Frequency Frequency Frequency 67 0 69 3 71 9 74 4 77 0 79 7 82 5 85 4 88 5 91 5 94 8 97 4 100 0 103 5 107 2 110 9 114 8 118 8 123 127 3 131 8 136 5 141 3 146 2 151 4 156 7 159 8 162 2 165 5 167 9 171 3 173 8 177 8 179 9 183 5 186 2 189 9 192 8 196 6 199 5 203 5 206 5 210 7 218 1 225 7 229 1 233 6 241 8 250 3 254 1 ...

Page 67: ...e by one or more of the following measures Reorient or relocate the receiving antenna Increase the separation between the equipment and receiver Connect the equipment into an outlet on a circuit different from that to which the receiver is connected Consult the dealer or an experienced radio TV technician for help WARNING MODIFICATION OF THIS DEVICE TO RECENE CELLULAR RADIOTELEPHONE SERVICE SIGNAL...

Reviews: