background image

On-Air 1100 Executive user guide ~ Edition 5.1 ~ 4.7.00

15

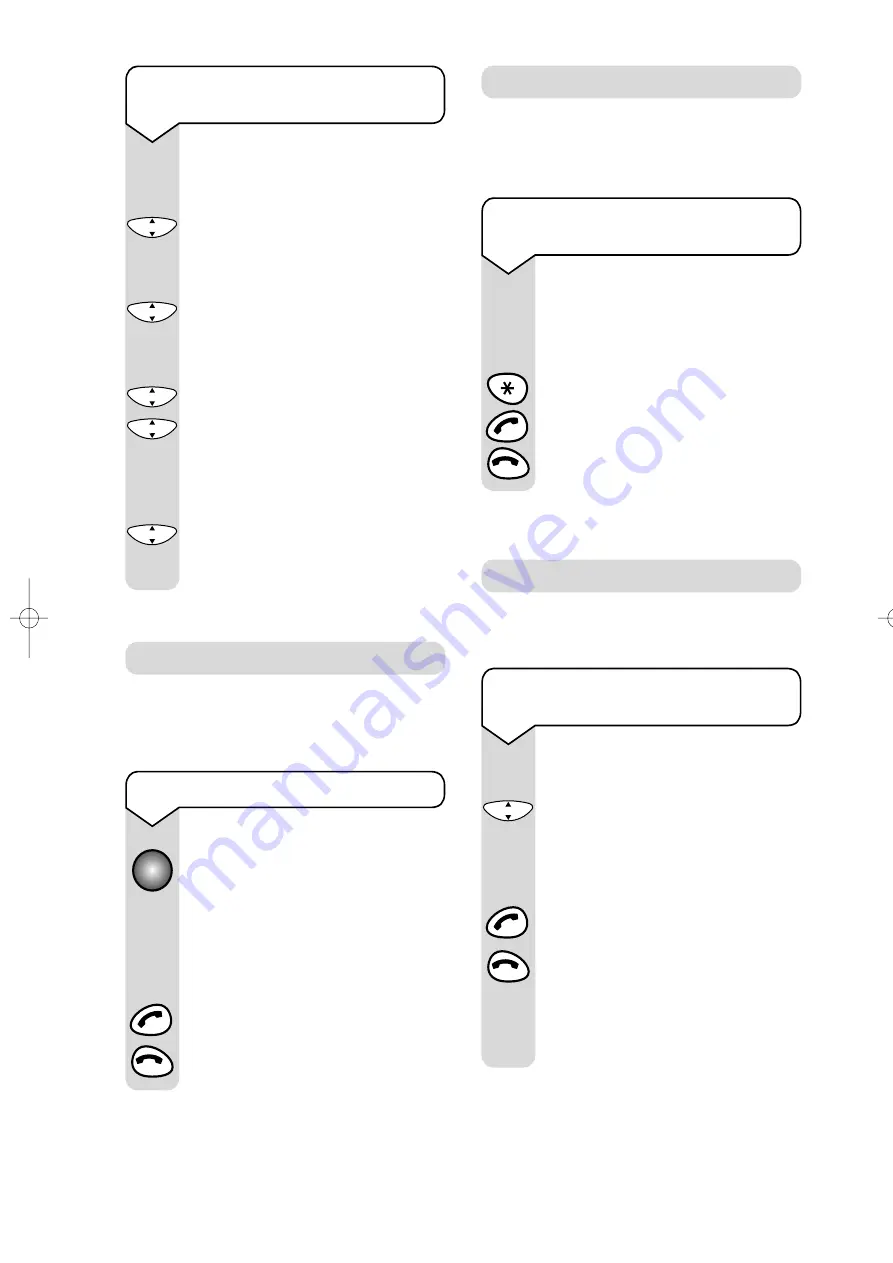
Press the 

DOWN

button to select

DIRECTORY

.

Press 

OK

to confirm.

Use the 

UP

or 

DOWN

buttons to

scroll to 

EDIT

.

Press 

OK

to confirm.

Use the 

UP

and 

DOWN

buttons to

find the entry you want to amend.

Press 

OK

to confirm.

Use the 

C

button to delete numbers

or letters.

Edit the entry using the
numbers/letters on the keypad.

Press the 

OK

button to store the 

new entry.

The display will then show 

DONE

.

To edit and delete directory

numbers

You can alert handset users that they are
wanted, or locate a missing handset. (Paging
calls cannot be answered by a handset.)

To page a handset from the base

Press the button on the base. All
handsets registered with the base
will ring.

To end paging, press the button
again.

Or

Press the 

GREEN PHONE

button on

any handset, followed by the 

RED

PHONE

button

Paging handsets


C

O

K

C

O

K

C

O

K

C

O

K

C

O

K

123

If you have multiple handsets registered to a
base you can make internal calls between
handsets.

Internal calls

Press the number of the handset you
wish to dial i.e 

1

2

3

4

5

6

.

Or

To call all handsets press the 

button

Press the 

GREEN PHONE

button.

Press the 

RED PHONE

button to end

the call.

To make an internal call to another

handset

123

You can transfer an external call to another
handset registered to the base.

Transferring calls

While on an external call:

Press the 

OK

button and 

CALL ON

HOLD

will be displayed.

Enter the number of the handset to
which you want to transfer the call.

Press the 

GREEN PHONE

button,

then press the 

RED PHONE

button.

The call will be transfered. You can
still talk on transfer if you want to.

If there is no reply to the transferring
handset it will eventually call you back.

To transfer an external call

between handsets

C

O

K

123

On-Air 1100 Executive  4/7/00  1:48 pm  Page 15

All manuals and user guides at all-guides.com

Summary of Contents for ON-AIR 1100 EXECUTIVE

Page 1: ...RM ATIO N This equipment is not designed for making emergency telephone calls when the power fails Alternative arrangements should be made for access to emergency services This product is intended fo...

Page 2: ...and turn the power off Keypad Up Down Lets you move through the menu options and list Option buttons Select options presented in the display above the buttons OK button To confirm settings Clear Displ...

Page 3: ...ates that you are in range of the base station Memory number Indicates the memory location number under which a number is stored Handsfree Indicates that you are in handsfree mode Internal Intercom Ca...

Page 4: ...Secrecy X Name and number directory X Paging handsets X Internal calls X Transferring calls X Caller Display X Alarm clock X Handset settings X Base settings X Using additional handsets and bases X B...

Page 5: ...or ON 32 SILENT MODE OFF or ON 33 ALARM 34 TIMER 351 SET 352 STATUS DIRECTORY REDIAL SILENT MODE ANS MACHINE INTERCOM 341 SET 342 STATUS 35 BEEPS 361 KEYPAD PRESS 362 BATTERY LOW 511 KEY 52 WELCOME SC...

Page 6: ...TIME VIEW 632 PHONE LINE LINE TYPE 633 HANDSETS CHANG CODE REGISTER DEREGISTER PUBLIC PRIVATE DIAL TYPE FREQUENCY R DURATION SHORT PREFIX PREFIX VAL MIN LENGTH STATUS RESTRICT TIME CREDIT VIEW PULSE L...

Page 7: ...tem Up to 30 last number redial Allows you to quickly redial the last 30 phone numbers dialled This can also incorporate incoming calls if you subscribe to BT s Caller Display Internal calls and call...

Page 8: ...please contact your place of purchase immediately One BT On Air 1100 base One BT On Air 1000 Executive handset One power supply for base station One telephone line cord One NiMH rechargeable battery...

Page 9: ...ons Cleaning Simply clean the handset and base station with a damp not wet cloth or an antistatic wipe Never use household polish as this will damage the product Never use a dry cloth as this may caus...

Page 10: ...is switched on the button on your base will light up Setting up Plan the location 1 Connect the power supply and switch on Thread the power supply cable and line cord through the square hole in the p...

Page 11: ...e However the charge capacity of rechargeable batteries will reduce with time as they wear out so reducing the talk standby time of the handset Eventually they will need to be replaced New batteries c...

Page 12: ...in the display If you have entered the number correctly press the GREEN PHONE button to dial the number Your handset will automatically time the duration of all external calls The handset display show...

Page 13: ...The redial list can also incorporate incoming calls if you subscribe to BT s Caller Display Press and hold down the GREEN PHONE button Use the UP and DOWN buttons until the number you want is displaye...

Page 14: ...owing characters appear T U V t u v For example if you wish to store the name TOM To enter the letter T press 8 and hold the cursor will automatically move to the right and display the next chosen let...

Page 15: ...PHONE button Paging handsets C OK C OK C OK C OK C OK 123 If you have multiple handsets registered to a base you can make internal calls between handsets Internal calls Press the number of the handse...

Page 16: ...vate after one minute Press the STAR button Press OK to confirm If you receive an incoming call whilst the keyguard is on just press the GREEN PHONE button C OK To switch keyguard off Press the STAR b...

Page 17: ...ress OK to confirm When the alarm is set is displayed You can use your handset as an alarm clock You must set the time before the alarm will work The alarm will ring daily until the setting is turned...

Page 18: ...a name to go with the number in your handset directory the name will be displayed instead Caller Display Important To use Caller Display you must first subscribe to BT s Caller Display Service Your B...

Page 19: ...calls list When the number you wish to call is displayed press the GREEN PHONE button The number will be automatically dialled C OK C OK To adjust ringer melody and volume Choose from 10 different han...

Page 20: ...s the UP button to scroll to BASE Press OK to confirm Use the UP button to scroll to BASE SETTINGS Press OK to confirm Use the UP or DOWN buttons to scroll to DATE TIME Press OK to confirm Use the UP...

Page 21: ...OK C OK C OK C OK C OK 123 123 123 To change base station name You can personalise your base stations This can make life easier when using multiple base stations For example you could name them Kitch...

Page 22: ...the UP button to scroll to BASE Press OK to confirm The display will show REGISTER Press OK to confirm Use the UP or DOWN buttons to scroll to AUTOMATIC Press OK to confirm The display will now flash...

Page 23: ...ase Press and hold down the PAGE button on the base until it starts to flash On the handset Use the UP button to scroll to BASE Press OK to confirm The display will show REGISTER Press OK to confirm U...

Page 24: ...r to each base from 1 4 Number or name each handset from 1 6 Register your handset s at base 2 and 3 4 if used using the same internal number as at base 1 Helpline If you are experiencing difficulty p...

Page 25: ...and 98 13 EC for Telecommunication network access The manufacturer declares that the products have been manufactured in conformity with Annex III of R TTE Directive 99 05 EC Technical information With...

Page 26: ...umbers stored in the handset directory without the area code To overcome potential problems ensure that all numbers are stored complete with area code To set the external line access code Press the UP...

Page 27: ...SETTINGS Press OK Press the DOWN button to select Phone Line Press OK Press the DOWN button to select PREFIX Press OK Press the DOWN button to select Status Press OK Press the to activate or de activa...

Page 28: ...deep using a 3mm drill 122mm apart to take the wall plugs Put wall plugs into the drill holes and then insert both screws Leave 2 3mm between the head of the screw and the wall You are now able to mou...

Page 29: ...29 All manuals and user guides at all guides com...

Page 30: ...s respective standard conditions of contract Nothing in this publication forms any part of any contract Touchtone is a registered trade mark of British Telecommunications plc in the UK British Teleco...

Reviews: