background image


20 


                          4 Basic Setting 

4.1 SIM Management 

Your Bryte Tablet is a Dual SIM device (2 SIM Cards) and you can set a default SIM for Voice 

call, Video call, Data Connection, Messaging etc. 

4.1-1 Voice call 

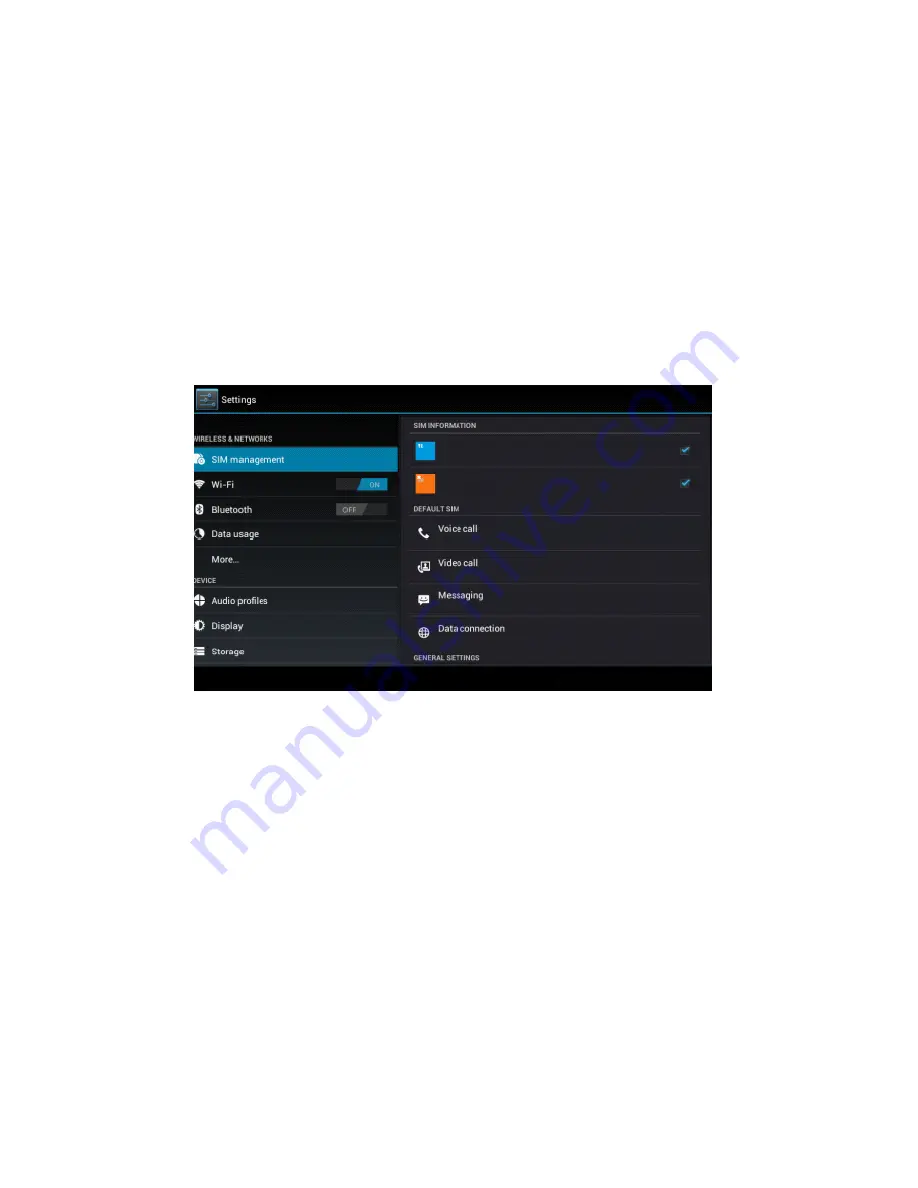
Click settings in main menu; choose SIM Management, as Picture 4.1 


                                    Picture 4.1 

Click voice call, choose defaulted SIM card, as Picture 4.2 


Summary of Contents for IPX

Page 1: ...1 Bryte Tablets From Technology Professionals Limited...

Page 2: ...12 3 6 Visit Application Procedures 16 3 7 USB Connection 16 3 8 Words Input 17 3 9 Application Technique 19 4 Basic Setting 17 4 1 SIM Card Management Management 17 4 2 Wireless and Internet 17 4 3...

Page 3: ...1 Phone 58 6 2 Text Message 58 6 3 Contact List 59 7 Internet 60 7 1 Browser 60 7 2 Email 60 8 Other Application Procedures 65 8 1 Clock 65 8 2 Calculator 65 8 3 File Manager 66 8 4 Recorder 69 9 Ins...

Page 4: ...uide and announcements please read this manual carefully before using this device 1 2 Caution Preventive maintenance To avoid failure of device your Tablet battery charger and other accessories should...

Page 5: ...Do not use the device in high temperature or low temperature environment inflammable gas petrol stations Protect the Bryte Tablet and accessories from the reach of Children Children should only be all...

Page 6: ...ryte Tablet Status and Reminder Notifications Reminder icons When reminder message pops up in your reminder window Swipe the column down to open the reminder list Choose the menu you need and confirm...

Page 7: ...d to use two Standard SIM cards Dual SIM the size of the SIMs depends on the model But the procedure used in inserting the SIM card are similar Bryte Tablet 2 3 1 Locate the SIM Slot cover compartment...

Page 8: ...2 3 4 Insert you SIM Card Either Single or Double depending on Model you can also install the microSD external memory storage card in the microSD card slot on your tablet 2 3 5 Insert you SIM Card Eit...

Page 9: ...3 6 Replace Back the Cover Compartment and ensure that it grip firmly You can now use your Bryte Tablet to make and receive calls access the Internet via your 3G SIM card or Wi Fi network and do much...

Page 10: ...erface Setting button display recently browsed history 3 2 Startup and Shutdown Startup Press and hold the POWER Button for about three seconds you can select your preferred interface iOS or Android i...

Page 11: ...g battery life 2 You press POWER Button Short Press Activate Display when in Sleep Mode If the screen is in Sleep Mode press the POWER Button once to activate screen display The screen will be locked...

Page 12: ...de Slide or Swipe is simply to make a quick vertical or horizontal movement across the screen with your finger You slide to change views display options etc Pull or Drag To drag an image or icon press...

Page 13: ...ideness of screen to provide more space which you can put new added shortcuts and widgets Click the blank space in home page then slide right or left to extend to the right or left of the screen In th...

Page 14: ...be put together on one icon can also overlay several icons as Picture 3 4 2 Then click the over layed icons the applications can be folded Click the unnamed folder in the black box it will pop up the...

Page 15: ...n the top right corner of the screen 2 Drag the icon to the remove icon above till the icon become red then remove your finger to delete the icon Change the wallpaper of desktop 1 In home page long pr...

Page 16: ...k up or restore important files Before transferring file documents you have connect your Bryte Tablet to your Computer using the USB cable 1 Connect the Bryte Tablet and computer by USB cable the Noti...

Page 17: ...utdown the USB storage configuration on your tablet to uninstall Then disconnect the USB cable Notice When your Bryte Tablet is connected with USB cable and USB Storage is turned ON you will not be ab...

Page 18: ...setting area will reveal all the installed words typing methods in your Bryte Tablet 4 Tick the typing method you want Use and Switch of input method Picture 3 8 NO Meaning as in Picture 3 8 above 1 S...

Page 19: ...he screen it will switch into widgets interface Long press any widget to create its shortcut then you can enter into the application through the shortcut icon Create application shortcut icons in the...

Page 20: ...al SIM device 2 SIM Cards and you can set a default SIM for Voice call Video call Data Connection Messaging etc 4 1 1 Voice call Click settings in main menu choose SIM Management as Picture 4 1 Pictur...

Page 21: ...choose SIM Management and click video call choose default SIM card when makes video call as Picture 4 3 Picture 4 3 4 1 3 Message Click settings in main menu choose SIM Management click message and ch...

Page 22: ...ing application in main menu choose SIM management click data connection and choose the defaulted SIM card as Picture 4 5 Picture 4 5 4 2 Wireless and Internet 1 Wi Fi Connection Setting 1 In the main...

Page 23: ...e 4 6 3 Choose the Wi Fi Network you want to connect if password is required supply it and click Connect Picture 4 6 2 Add Network 1 Click icon in right top as Picture 4 7 Picture 4 7 2 Input network...

Page 24: ...ice when WIFI signal appears the right bottom will remind you available WLAN network as Picture 4 6 4 Keep WI FI on during sleep 1 Click icon on the top right as in Picture 4 8 select advanced 2 Click...

Page 25: ...earby if the device you want to connect to is not displayed make sure it s Bluetooth radio is switched on and click Search in your tablet as in picture 4 10 Picture 4 10 4 To connect to the device cli...

Page 26: ...4 10 as Picture 4 12 select rename tablet you can rename it as you want Picture 4 12 2 Check visibility timeout Select visibility timeout setting in Picture 4 12 choose the time you want to set as Pi...

Page 27: ...you received Choose display the file you received in Picture 4 12 you can view download and upload files 4 Bluetooth advanced setting Choose Bluetooth advanced setting in Picture 4 12 enter into Pict...

Page 28: ...luetooth devices are far from one another the connection is cut off the Bluetooth Proximity Reporter will notify you with a sound 4 4 Data Usage Check SIM card data usage as Picture 4 15 Picture 4 15...

Page 29: ...ce Video connection of your GSM Network Hence when in Airplane mode is turned on you cannot receive or make calls use Bluetooth WIFI until you return to previous state 4 5 2 VPN Open VPN click add VPN...

Page 30: ...name and password click connect Picture 4 18 4 5 3 Network sharing and portable hotspots Portable WI FI hotspots 1 Click Setting in main home menu 2 Click more when Wi Fi is well connected open netwo...

Page 31: ...nu open portable WLAN hotspots click configure WI FI hotspots Picture 4 21 5 Set passwords you want to password should be more than 8 numbers 4 5 4 Mobile Networks 1 3G service Click 3G service as Pic...

Page 32: ...32 Picture 4 22 3 Access Point Name APN Click mobile network as Picture 4 23 Picture 4 23 Choose access points name APN choose SIM card you need to connect Choose connect type as Picture 4 24...

Page 33: ...one network or computer Charges may apply depending on your network service provider 3 Network Operator Click network operator choose SIM card you need to connect system will search available GSM and...

Page 34: ...1 Open settings click contextual model as Picture 4 26 Picture 4 26 2 Click standard to enter into Picture 4 27 Picture 4 27 1 Vibrate In picture 4 27 click vibrate Bryte Tablet will vibrate when som...

Page 35: ...volume as Picture 4 28 Picture 4 28 3 Voice call Ringtone In picture 4 27 click voice call ringtone to choose voice call ringtone as Picture 4 29 Picture 4 29 4 Video call ringtone In Picture 4 27 cl...

Page 36: ...outdoor are only for selection they can t be set 4 7 Display 4 7 1 Adjust the screen brightness 1 Click Setting application procedure 2 Click display choose brightness 3 Drag the portion to adjust th...

Page 37: ...r defined wallpapers system defect video wallpaper as Picture 4 32 Picture 4 32 4 7 3 Auto rotation Your Bryte Tablet comes with G sensor when Auto Rotation is ON your screen orientation changes as yo...

Page 38: ...ize Click font size to adjust the font size as Picture 4 34 Picture 4 34 4 7 6 HDMI setting 1 Use HDMI connector in the right bottom of Bryte Tablet it will remind HDMI connector is connected 2 Click...

Page 39: ...Picture 4 35 1 Audio Open audio to realize HDMI audio output 2 Never Click never Bryte Tablet will never sleep 3 Video Resolution Click video resolution to adjust resolution as Picture 4 36 Picture 4...

Page 40: ...ry click preferred install location you can choose install new application to choose preferred install location Check SD card and tablet storage space 1 Enter into setting application 2 Click storage...

Page 41: ...Bryte Tablet local NAND storage as Picture 4 39 if you need to check the storage content you can check it in main menu Picture 4 39 2 SD card You can check storage space SD card available space remov...

Page 42: ...Click memory 3 Click uninstall SD card 4 Now you can remove SD card safely Note Removing SD card safely can protect SD card and increase its lifetime 4 9 Battery Setting Click setting function select...

Page 43: ...ting application in Apps 2 Select application after enter you can manage and delete installed application and check system used storage space and left space As Picture 4 42 Picture 4 42 3 View interna...

Page 44: ...44 Picture 4 43 4 View the working device used space and available space as Picture 4 44 Picture 4 44 4 11 Account and Sync 1 Select setting application 2 Open account and sync as Picture 4 45...

Page 45: ...45 Picture 4 45 3 Click add an account as Picture 4 46 Picture 4 46 4 After successfully load it will open the sync function as Picture 4 47...

Page 46: ...47 4 12 Location service Click setting select location service as Picture 4 48 Picture 4 48 1 Google s location service Open Google location service you can use WIFI to positioning Bryte Tablet 2 GPS...

Page 47: ...g but you need to insert SIM card and use data transmission 4 EPO setting Click EPO setting enter into Picture 4 46 then check if EPO positioning information and EPO has turned on auto download Pictur...

Page 48: ...isable after reboot when you reboot your Bryte Tablet A GPS will auto turn off 2 Network Request Click network request Bryte Tablet can get your location through network 3 Network used Open network us...

Page 49: ...ting Set locked screen Lock the touch screen by unlock icon or password to protect your Bryte Tablet Note After setting screen locked you should enter the passcode each time when you startup or screen...

Page 50: ...ting application in main interface 2 Click safe 3 Click screen locked 4 Choose PIN in text setting area 5 Enter new PIN code numbers and click continue 6 Enter new PIN code again and click confirm Set...

Page 51: ...n source as Picture 4 54 Picture 4 54 Note Manual installing APK files needs to turn on unknown source 4 14 Language and Input Method Click setting select language and input method choose language to...

Page 52: ...yboard setting and click input language as Picture 4 56 Picture 4 56 Choose the language you want to change in the language list as Picture 4 57 Picture 4 57 Return to language and input method click...

Page 53: ...WIFI and login your Google account choose backup my data system will back up your data into Google server If you need to recovery factory reset please click reset as Picture 4 59 if you need to forma...

Page 54: ...view more zones 6 Click Date setting then click upper or down button to adjust date month and year click setting when you finish selection 7 Click Time setting then click upper or down button to adju...

Page 55: ...re 4 61 Picture 4 61 4 18 Assistance Function 4 18 1 Large size Click it to make system font large size 4 18 2 Click power button to end calls When Click call press Power button call will end but not...

Page 56: ...the awaken state your Bryte Tablet will not automatically go to sleep mode when charging 4 19 3 Pointer Location If you open pointer location it will display touch vertical and horizontal direction 4...

Page 57: ...te Tablet such as Android version SIM state IMEI number etc 1 Click Setting on Main menu 2 Click about tablet check state message model Android version version No and so on 3 Click state message check...

Page 58: ...c Enter into music player in menu or desktop click music icon to enter into music player click the music you want to play as Picture 5 1 Picture 5 1 Album Pause play Next song Previous song Artist Alb...

Page 59: ...d video files in SD card and photo gallery will classify these photos and videos in folder You can apply photo gallery to view and edit photos set the photos as wallpaper and watch the video View pict...

Page 60: ...1 Click menu key to display menu selection 2 Then click crop click and drag related area to adjust the cropper 3 Click cropper and drag it inside and outside to adjust the image 4 After adjust the siz...

Page 61: ...rface Radio button operation instruction as Picture 5 5 Picture 5 5 Click search to search FM band as Picture 5 6 Enter into channel list Save button Previous channel Next channel Current frequency Vi...

Page 62: ...nel and the channel will be saved in channels list Note You need to insert earphone as antenna when using FM radio if no antenna your Bryte Tablet can t search any frequency band 6 Communication Funct...

Page 63: ...1 6 2 Text Message 1 Enter into main menu choose application procedure 2 Click Edit new message Display phone numbers Dial phone numbers The area of dial phone numbers Call history Contact Hide keypad...

Page 64: ...2 6 3 Contact List Click Contact list in the main interface enter into the contact list as Picture 6 3 Directly input phone number Add receiver Send message Attach some files Menu discard insert text...

Page 65: ...ntact click button enter into add contact interface 7 Internet 7 1 Browser In case of Wi Fi or mobile internet is connected well Please refer to Chapter 4 1 for wireless and internet setting click IE...

Page 66: ...click start enter related webpage then you can browse the website information as Picture 7 1 2 and you can click the menu you can refresh save to bookmarks share page bookmarks history and setting th...

Page 67: ...email address and password 3 Click Next step button choose your email type is POP3 or IMAP 4 Click Next Step button to check whether the email box servicer can receive or send emails 5 Input the email...

Page 68: ...ess Menu key Menus will popup 4 Click Edit to enter into new email editing interface 5 Input the receiver s email address 6 Input the subject and email content 7 If you want to add attachment click me...

Page 69: ...procedure enter into below interface as Picture 9 1 There are clock picture music and homepage buttons Picture 9 1 8 2 Calculator 1 Click 2 Enter into the basic board of calculator 3 Soft touch the n...

Page 70: ...he folder in the TF card it also will share the files install apps etc In the main menu or desktop click the document manager icon to enter into documents manager Picture 9 3 a Copy cut delete rename...

Page 71: ...ace as Picture 9 4 you can operate the file or folder Picture 9 4 paste the copy or cut file choose the file you want to paste choose right top icon to enter into Picture 9 5 choose right top icon to...

Page 72: ...le choose any file long press it it will popup share choose the share way you want in the list Picture 9 7 install apps file Choose the file suffixed app in the file manager you can install the third...

Page 73: ...ick recorder icon to enter into record interface click record key to start record Click Stop key to stop recording Click Play key to play the recorded sound The system will auto remind you to use or a...

Page 74: ...ocedure searched from internet to use on the system are all suffixed with app 9 2 Uninstall Uninstall application procedure 1 Click setting icon in main interface 2 Click manage application procedure...

Page 75: ...ometime it is normal 4 Email can t be set or Registration of application procedure Ensure your internet is well connected Make sure your email setting is correctly configured Keep your system time and...

Page 76: ...ectify such defect or replace the device with same or similar model as may be required B WARRANTY PERIOD The warranty period starts when the Product is sold to an end user for the first time This can...

Page 77: ...hermal or environmental conditions or to rapid changes in such conditions to corrosion to oxidation to spillage of food or liquid or to influence from chemical products The Operating System Platform M...

Page 78: ...us on Facebook www facebook com brytestore Follow us on Twitter http twitter com brytestore Add us to your circle at Google Plus Technology Professionals Limited 15 17 Abimbola Way Isolo Industrial Es...

Reviews: