background image

11

ALTERNATE UNIT SUPPORT (IN LIEU OF CURB OR

SLAB MOUNT)
A non-combustible sleeper rail can be used in the unit curb

support area. If sleeper rails cannot be used, support the long

sides of the unit with a minimum of 3 equally spaced 4-in. x

4-in. (102 mm x 102 mm) pads on each side.

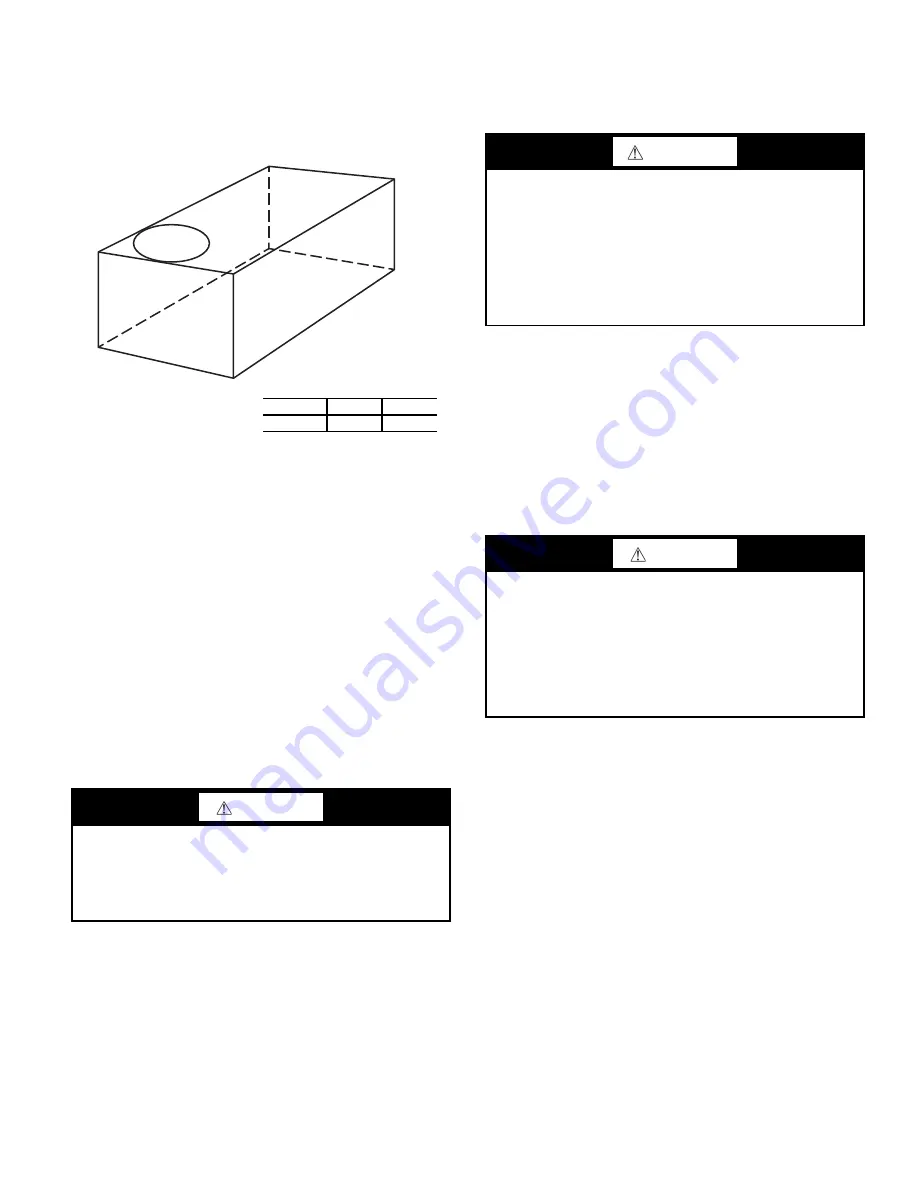
Fig. 8 — Unit Leveling Tolerances

Step 5 — Field Fabricate Ductwork

Cabinet return-air static pressure (a negative condition) shall

not exceed 0.35 in. wg (87 Pa) with economizer or 0.45 in. wg

(112 Pa) without economizer.
For vertical ducted applications, secure all ducts to roof curb

and building structure. 

Do not connect ductwork to unit.

Fabricate supply ductwork so that the cross sectional dimen-

sions are equal to or greater than the unit supply duct opening

dimensions for the first 18-in. (458 mm) of duct length from

the unit basepan.
Insulate and weatherproof all external ductwork, joints, and

roof openings with counter flashing and mastic in accordance

with applicable codes.
Ducts passing through unconditioned spaces must be insulated

and covered with a vapor barrier.
If a plenum return is used on a vertical unit, the return should

be ducted through the roof deck to comply with applicable fire

codes.

UNITS WITH ACCESSORY ELECTRIC HEATERS
All installations require a minimum clearance to combustible

surfaces of 1-in. (25 mm) from duct for first 12 in. (305 mm)

away from unit.

Outlet grilles must not lie directly below unit discharge.
NOTE: A 90 degree elbow must be provided in the ductwork to

comply with UL (Underwriters Laboratories) code for use with

electric heat.

Step 6 — Rig and Place Unit

Keep unit upright and do not drop. Spreader bars are required.

Rollers may be used to move unit across a roof. Rigging mate-

rials under unit (cardboard or wood) must be removed PRIOR

to placing the unit on the roof curb. Level by using unit frame

as a reference. See Table 2 on pag9 and Fig. 9 for additional

information.
Lifting holes are provided in base rails as shown in Fig. 9. Re-

fer to rigging instructions on unit.
Before setting the unit onto the curb, recheck gasketing on

curb.

Position unit on roof curb so that the following clearances are

maintained: 

1

/

4

-in. (6.4 mm) clearance between the roof curb

and the base rail inside the front and rear, 0.0-in. clearance be-

tween the roof curb and the base rail inside on the duct end of

the unit. This will result in the distance between the roof curb

and the base rail inside on the condenser end of the unit being

approximately 

1

/

4

-in. (6.4 mm).

Although unit is weatherproof, guard against water from higher

level runoff and overhangs.
After unit is in position, remove the compressor access panel.

Holding the blocking between compressors with one hand, cut

the strapping. Carefully remove the blocking without damag-

ing tubing, wiring, or controls. Remove the strapping and re-

place the access panel.
After unit is in position, remove rigging skids and shipping

materials.

CAUTION

PROPERTY DAMAGE HAZARD
Failure to follow this caution may result in damage to roof-

ing materials.
Membrane roofs can be cut by sharp sheet metal edges. Be

careful when placing any sheet metal parts on such roof.

A

B

C

MAXIMUM ALLOWABLE

DIFFERENCE IN. (MM)

A-B

B-C

A-C

0.5 (13)

1.0 (25)

1.0 (25)

WARNING

PERSONAL INJURY HAZARD
Failure to follow this warning could cause personal injury.
For vertical supply and return units, tools or parts could drop

into ductwork and cause an injury. Install a 90 degree turn in

the return ductwork between the unit and the conditioned

space. If a 90 degree elbow cannot be installed, then a grille of

sufficient strength and density should be installed to prevent

objects from falling into the conditioned space. Due to electric

heater, supply duct will require 90 degree elbow.

CAUTION

UNIT DAMAGE HAZARD
Failure to follow this caution may result in equipment damage.
All panels must be in place when rigging. Unit is not designed

for handling by fork truck when packaging is removed.
If using top crate as spreader bar, once unit is set, carefully

lower wooden crate off building roof top to ground. Ensure

that no people or obstructions are below prior to lowering the

crate.

Summary of Contents for Preferred 549J 04

Page 1: ...NG RETURN AIR SMOKE SENSOR INSTALLATION ADDITIONAL APPLICATION DATA RTU Open Control System 43 Controller Options 43 LOW AMBIENT Step 12 Adjust Factory Installed Options 43 SMOKE DETECTORS ECONOMI ER...

Page 2: ...his warning could cause personal injury death and or equipment damage R 410A refrigerant systems operate at higher pressures than standard R 22 systems Do not use R 22 service equipment or components...

Page 3: ...Options Indoor Fan Options 0 Electric Drive X13 Motor 04 06 1 Standard Static Option Belt Drive 2 Medium Static Option Belt Drive 3 High Static Option Belt Drive Outdoor Air Options A None B Temp Eco...

Page 4: ...4 Fig 2 549J 04 06 Units Built On and After 4 15 2019...

Page 5: ...5 Fig 3 549J 04 06 Units Built Prior to 4 15 2019...

Page 6: ...6 Fig 4 549J 04 06 Corner Weights and Clearances...

Page 7: ...7 Fig 5 549J 04 06 Base Rail Details...

Page 8: ...8 Fig 6 549J 04 06 Thru the Base Charts...

Page 9: ...sate drain connection plug 3 Rig and place unit 4 Convert unit to side duct connection arrangement 5 Install field fabricated ductwork at unit duct openings 6 Install outdoor air hood 7 Install conden...

Page 10: ...10 Fig 7 Roof Curb Details 549J 04 06 ROOFCURB ACCESSORY CRRFCURB001A02 CRRFCURB002A02 1 2 356 2 0 610 UNIT SIZE...

Page 11: ...Fig 9 Re fer to rigging instructions on unit Before setting the unit onto the curb recheck gasketing on curb Position unit on roof curb so that the following clearances are maintained 1 4 in 6 4 mm cl...

Page 12: ...ld be secured to the flanges In sulate and weatherproof all external ductwork joints and roof or building openings with counter flashing and mastic in accor dance with applicable codes Do not cover or...

Page 13: ...To gain access to the hood remove the filter access panel See Fig 13 2 Locate the 2 screws holding the metal tray to the basepan and remove Locate and cut the 2 plastic tie wraps secur ing the assembl...

Page 14: ...Step 10 Install External Condensate Trap and Line The unit has one 3 4 in condensate drain connection on the end of the condensate pan and an alternate connection on the bot tom See Fig 20 Unit airflo...

Page 15: ...nection pressure lugs only Connect field power supply conductors to LINE side terminals when the switch enclosure cover is removed to attach the handle Fig 22 Disconnect Switch and Unit UNITS WITHOUT...

Page 16: ...venience outlets is now required by UL standards This cover cannot be factory mounted due its depth it must be in stalled at unit installation For shipment the convenience outlet is covered with a bla...

Page 17: ...enience outlets Fuse On Power Type The factory fuse is a Bussman Fusetron 1 T 15 non renew able screw in Edison base type plug fuse Duty Cycle The unit powered convenience outlet has a duty cycle limi...

Page 18: ...cated on the bottom left side of the unit control box Use this hole for the control conduit UNITS WITHOUT THRU BASE CONNECTIONS ELEC TRICAL CONNECTIONS 1 Install power wiring conduit through side pane...

Page 19: ...n Kit Pass the thermostat control wires through the hole provided in the corner post then feed the wires through the raceway built into the corner post to the control box Pull the wires over to the te...

Page 20: ...t interval timing is reduced by a factor of 0 1 seconds minute based on the posi tions of DIP switches SW1 and SW2 i e 90 minutes will be reduced to 9 seconds 2 Jumper for 5 20 seconds Forced Defrost...

Page 21: ...DIP Switch Settings Defrost Board ELECTRIC HEATERS 549J units may be equipped with field installed accessory elec tric heaters The heaters are modular in design with heater frames holding open coil re...

Page 22: ...necessary Single Point Boxes without Fuses Refer to accessory heater and single point box installation in structions for details on tap connections Fig 39 Typical Single Point Installation Low Voltag...

Page 23: ...23 Fig 41 Electro Mechanical Control Wiring 208 230v 460v...

Page 24: ...24 Fig 42 Electro Mechanical Control Wiring 575v...

Page 25: ...25 Fig 43 Electro Mechanical Power Wiring 208 230 1 60...

Page 26: ...26 Fig 44 Electro Mechanical Power Wiring 208 230 3 60...

Page 27: ...27 Fig 45 Electro Mechanical Power Wiring 460 3 60...

Page 28: ...28 Fig 46 Electro Mechanical Power Wiring 575 3 60...

Page 29: ...29 Fig 47 RTU Open System Control Wiring...

Page 30: ...are available with bus sensors User Interface Provides status for normal operation setup parameters check out tests and alarm and error conditions with a 2 line 16 char acter LCD display and four butt...

Page 31: ...odule Left Hand Terminal Blocks LABEL TYPE DESCRIPTION Top Left Terminal Block MAT MAT 20k NTC and COM Mixed Air Temperature Sensor Polarity Insensitive Connection OAT OAT 20k NTC and COM Outdoor Air...

Page 32: ...menu items and to change parameter and configuration settings To use the keypad when working with menus Press the Up arrow button to move to the previous menu Press the Down arrow button to move to t...

Page 33: ...ers in the menus use the letters MA or MAT indicating a mixed air temperature sensor location before the cooling coil This unit application has the control sensor locat ed after the cooling coil in th...

Page 34: ...r from MAT sensor Displays _ _ _ F if not connected short or out of range DA TEMP _ _ _ F or _ _ _ C 40 F to 150 F 40 C to 66 C DISCHARGE AIR TEMPERATURE after Heating section Displays when Discharge...

Page 35: ...the set point the Y1 O and Y2 O will not be energized on the controller DRYBLB SET 63F 17C 48 F to 80 F 9 C to 27 C increment by 1 F OA DRY BULB TEMPERATURE CHANGEOVER SETPOINT Dry bulb set point wil...

Page 36: ...he capacity of the RTU The value is found on the nameplate label for the specific unit AUX1 OUT NONE NONE ERV EXH2 SYS Select OUTPUT for AUX1 O relay NONE not configured output is not used ERV Energy...

Page 37: ...damper to the full open position Exhaust fan contacts enable during the DAMPER OPEN test Make sure to pause in the mode to allow exhaust contacts to energize due to the delay in the system DAMPER CLOS...

Page 38: ...N A N A ACTUATOR ERROR Actuator has failed or become disconnected check for stall over voltage under voltage and actuator count Replace actuator if damper is movable and supply voltage is between 21 6...

Page 39: ...ENTILATION DCV OUTSIDE AIR GOOD TO ECONOMIZE Y1 I Y2 I FAN SPEED Y1 O Y2 O OCCUPIED UNOCCUPIED Below CO2 set No Off Off High 0 v Off 0 v Off VENTMIN Closed On Off High 24 v On 0 v Off VENTMIN Closed O...

Page 40: ...ZE Y1 I Y2 I FAN SPEED Y1 O Y2 O OCCUPIED UNOCCUPIED Below CO2 set No Off Off High 0 v Off 0 v Off VENTMIN Closed On Off High 24 v On 0 v Off VENTMIN Closed On On High 24 v On 24 v On VENTMIN Closed Y...

Page 41: ...irst line and economizer W7220 on the second line After a brief pause the revision of the software appears on the first line and the second line will be blank Power Loss Outage or Brownout All set poi...

Page 42: ...r vertical return configurations only All compo nents necessary for operation are factory provided and mount ed The unit is factory configured for immediate smoke detec tor shutdown operation addition...

Page 43: ...r IV wiring External occu pancy control is managed through a connection on the Controls Connections Board If external occupancy control is desired connect a time clock or remotely controlled switch cl...

Page 44: ...includes a compressor ac cumulator reversing valve dual function outdoor coil with va por header check valve cooling liquid line with a filter drier and a check valve dual function indoor coil with a...

Page 45: ...s B Acutrol DFT 1 Cooling Liquid Line A D Outdoor Coil Indoor Coil C Heating Mode Liquid Line Strainer Filter Drier LPS LOC Accurater all 3 4 and 5 ton units Accurater 3 and 4 ton units only Acutrol C...

Page 46: ...ht to change at any time specifications and designs without notice and without obligations Replaces II549J 4 6 01 2019 Bryant Heating Cooling Systems Cat No 04 53549009 01 Edition Date 12 19 Printed i...

Page 47: ...N _____ Check that indoor air filters are clean and in place Y N _____ Check that outdoor air inlet screens are in place Y N _____ Verify that unit is level Y N _____ Check fan wheels and propeller fo...

Page 48: ...mperature _______________ F D Liquid line temperature at outlet or reheat coil _______________ F E Confirm correct rotation for compressor Y N _____ F Check for correct ramp up of outdoor fan motor as...

Reviews: