Brute 7800802 Operator'S Manual Download Page 21

Warranty

21

BRIGGS & STRATTON POWER PRODUCTS GROUP, L.L.C. OWNER WARRANTY POLICY

LIMITED WARRANTY

Briggs & Stratton Power Products Group, LLC will repair and/or replace, free of charge, any part(s) of the equipment that is 
defective in material or workmanship or both. Briggs & Stratton Corporation will repair and/or replace, free of charge, any 
part(s) of the Briggs and Stratton engine* (if equipped) that is defective in material or workmanship or both. Transportation 
charges on product submitted for repair or replacement under this warranty must be borne by purchaser. This warranty is 
effective for the time periods and subject to the conditions stated below. For warranty service, find the nearest Authorized 
Service Dealer using our dealer locator at www.BriggsandStratton.com or www.Brutepower.com.

There is no other express warranty. Implied warranties, including those of merchantability and fitness for a particular 
purpose, are limited to one year from purchase or to the extent permitted by law. Liability for incidental or consequential 
damages are excluded to the extent exclusion is permitted by law. 

Some states or countries do not allow limitations on how long an implied warranty lasts, and some states or countries do 
not allow the exclusion or limitation of incidental or consequential damages, so the above limitation and exclusion may not 
apply to you. This warranty gives you specific legal rights and you may also have other rights which vary from state to state 
or country to country.

WARRANTY PERIOD

The warranty period begins on the date of purchase by the first retail consumer or commercial end user, and continues for the 
period of time stated above. “Consumer use” means personal residential household use by a retail consumer. “Commercial 
use” means all other uses, including use for commercial, income producing or rental purposes. Once product has experienced 
commercial use, it shall thereafter be considered as commercial use for purposes of this warranty.

No warranty registration is necessary to obtain warranty on Briggs & Stratton products. Save your proof of purchase receipt. If you 
do not provide proof of the initial purchase date at the time warranty service is requested, the manufacturing date of the product will 
be used to determine warranty eligibility.

ABOUT YOUR WARRANTY

We welcome warranty repair and apologize to you for being inconvenienced. Warranty service is available only through servicing 
dealers authorized by Briggs & Stratton or BSPPG, LLC. 

Most warranty repairs are handled routinely, but sometimes requests for warranty service may not be appropriate. This warranty 
only covers defects in materials or workmanship. It does not cover damage caused by improper use or abuse, improper 
maintenance or repair, normal wear and tear, or stale or unapproved fuel.

Improper Use and Abuse 

- The proper, intended use of this product is described in the Operator’s Manual. Using the product in 

a way not described in the Operator’s Manual or using the product after it has been damaged will void your warranty. Warranty is 
not allowed if the serial number on the product has been removed or the product has been altered or modified in any way, or if the 
product has evidence of abuse such as impact damage, or water/chemical corrosion damage.

Improper Maintenance or Repair 

- This product must be maintained according to the procedures and schedules provided in the 

Operator’s Manual, and serviced or repaired using genuine Briggs & Stratton parts. Damage caused by lack of maintenance or use 
of non-original parts is not covered by warranty.

Normal Wear

 - Like all mechanical devices, your unit is subject to wear even when properly maintained. This warranty does not 

cover repairs when normal use has exhausted the life of a part or the equipment. Maintenance and wear items such as filters, 
belts, cutting blades, and brake pads (engine brake pads are covered) are not covered by warranty due to wear characteristics 
alone, unless the cause is due to defects in material or workmanship.

Stale Fuel 

- In order to function correctly, this product requires fresh fuel that conforms to the criteria specified in the Operator’s 

Manual. Damage caused by stale fuel (carburetor leaks, clogged fuel tubes, sticking valves, etc) is not covered by warranty.

* Applies to Briggs and Stratton engines only. Warranty coverage of non-Briggs and Stratton engines is provided by the engine manufacturer.
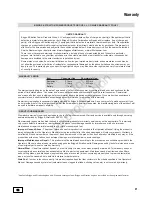
Item Consumer 

Use 

Commercial 

Use: 

Equipment 2 

Years 

90 

Days

Engine* 2 

Years 

90 

Days

Battery 

1 Year 

1 Year

en

Not 

for  

Reproduction

Summary of Contents for 7800802

Page 1: ...Model No Description 7800802 BTPV226750HW 22 Self Propelled Walk Behind Mower 7104822 Rev Operator s Manual N o t f o r R e p r o d u c t i o n...

Page 2: ...____ Engine Model_________________________Type__________________Code___________________ This manual contains safety information to make you aware of the hazards and risks associated with the machine a...

Page 3: ...6 Handle Height 7 Grass Bag 8 Side Discharge Deflector 10 Mulching Tips 11 How to Prepare the Engine 11 Final Preparation 11 Operation 12 Engine Stop Lever 12 Wheel Drive System 12 Stopping the Engin...

Page 4: ...manual and on the mower engine and attachments Know the controls and the proper use of the mower before starting 2 Only mature responsible persons shall operate the machine and only after proper instr...

Page 5: ...clearing grass Operation Continued From Previous Column 13 DO NOT operate mower without the entire grass catch er rear guard or other safety devices in place and working DO NOT point discharge at peo...

Page 6: ...g it with one of the three sets of holes in the handle brackets C Reinstall the bolts washers and wingnuts 5 Put the upper handle A Figure 2 in the operating upright position Tighten the wingnuts B NO...

Page 7: ...Do not remove the lower set of handle hardware D 2 Adjust the handle to a higher or lower height adjustment hole A Figure 5 3 Reinstall the bolts washers and wingnuts removed in Step 1 A Figure 4 Rem...

Page 8: ...charge deflector 1 Slide the frame assembly A Figure 6 into the grass bag B Make sure the handle C is on the outside of the grass bag 2 First attach the clips A Figure 7 to the side of the frame assem...

Page 9: ...k the condition of the grass bag for wear or deterioration If worn or damaged replace the parts only with approved factory replacement parts Emptying the Grass Bag WARNING Before you remove the grass...

Page 10: ...deflector and install as follows 1 Raise the mulcher cover A Figure 10 2 Attach the side deflector B Make sure the locking tabs C go through the slots in the side deflector 3 Lower the mulcher cover...

Page 11: ...g limitations and environmental factors Final Preparation Before you use the mower check the assembly of the wheels the handle and the controls Make sure all the fasteners are tight Make sure the thro...

Page 12: ...ver The drive system will disengage but the engine will continue to run Note When the drive system is disengaged on a new unit it is possible for the wheels to rotate if lifted off the ground This is...

Page 13: ...ng gasoline to the fuel tank When inside an enclosure do not add gasoline Before you add gasoline stop the engine and let the engine cool for several minutes 3 Make sure the spark plug wire is connect...

Page 14: ...GINE First 5 Hours Change engine oil Every 8 Hours or Daily Check engine oil level Every 25 Hours or Annually Clean engine air filter and pre cleaner if equipped Every 50 Hours or Annually Change engi...

Page 15: ...of the air filter Figure 15 No forward engine tipping Lubrication 1 For maximum performance lubricate the wheels and all pivot points with engine oil every 25 hours 2 To lubricate the engine refer to...

Page 16: ...cable moves freely Note The engine design does not include a throttle control or an engine speed adjustment The engine is set at the best speed for cutting grass bagging grass and for extended engine...

Page 17: ...n the blade with the original washer D and bolt Make sure the outside rim of the Belleville washer is toward the blade 8 Tighten the bolt that holds the blade to a torque of 30 foot pounds WARNING Alw...

Page 18: ...he bottom of the mower housing To use the washout port 1 Be sure the grass bag and side discharge deflector are removed and the mulching plug is installed 2 Set the height of cut to the lowest positio...

Page 19: ...the spark plug from the cylinder Pour one ounce of oil into the cylinder Slowly pull the recoil start grip so that the oil will protect the cylinder Install a new spark plug in the cylinder 5 Clean th...

Page 20: ...lug gap Refer to the engine manual 6 Check the amount of oil in the engine Fill with oil if necessary 7 Check the engine air cleaner Refer to the engine manual 8 The gasoline is bad Drain and clean th...

Page 21: ...rranty service is requested the manufacturing date of the product will be used to determine warranty eligibility ABOUT YOUR WARRANTY We welcome warranty repair and apologize to you for being inconveni...

Page 22: ...22 Notes www brutepower com N o t f o r R e p r o d u c t i o n...

Page 23: ...23 Slope Guide en N o t f o r R e p r o d u c t i o n...

Page 24: ...may not develop the rated gross power when used in a given piece of power equip ment This difference is due to a variety of factors including but not limited to the variety of engine components air cl...

Page 25: ...No de Modelo Descripci n 7800802 BTPV226750HW 22 autopropulsado Cortac sped Walk Behind Manual para el operador N o t f o r R e p r o d u c t i o n...

Page 26: ...tor Modelo _______________________ Tipo __________________ C digo___________________ Este manual contiene informaci n de seguridad para avisarle de los peligros y riesgos asociados con el dispositivo...

Page 27: ...de la cuchilla 17 Desmontaje de la cuchilla 17 Afilado de la cuchilla 17 Verificaci n del nivel de corte 17 Limpieza de la cubierta del cortac sped 18 Preparaci n del cortac sped para almacenamiento 1...

Page 28: ...uada antes de empezar 2 nicamente deber hacer funcionar la m quina personas maduras y responsables y nicamente tras la adecuada instrucci n 3 Los datos indican que operadores de 60 o m s a os est n im...

Page 29: ...s coches en tr nsito ventanas o puer tas Funcionamiento Continuaci n de la columna previa 14 NO descargue materiales contra paredes u obst culos Los materiales puede rebotar hacia el operador 15 Reduz...

Page 30: ...s jue gos de agujeros de los soportes de manija C Vuelva a insta lar los pernos arandelas y tuercas de alas 5 Coloque la manija superior A Figura 2 en la posici n opera tiva hacia arriba Apriete las t...

Page 31: ...o inferior de aditamentos del mango D 2 Ajuste el mango hasta un orificio de ajuste de altura inferior o superior A Figura 5 3 Vuelva a instalar los pernos arandelas y tuercas de alas reti radas en el...

Page 32: ...r de descarga de montaje lateral 1 Deslice el armaz n A Figura 6 dentro de la bolsa de c sped B Verifique que la manija C est en el lado exterior de la bolsa de c sped 2 Primero sujete los ganchos A F...

Page 33: ...n la barra pivote ADVERTENCIA Revise la condici n de la bolsa de c sped en cuanto a desgaste o deterioro Si est desgastada o da ada reemplace las piezas s lo con piezas de repuesto aprobadas por f bri...

Page 34: ...siguiente manera 1 Levante la cubierta del triturador A Figura 10 2 Sujete el deflector lateral B Verifique que las leng etas de enganche C atraviesa las ranuras en el deflector lateral 4 Baje la cubi...

Page 35: ...ebe utilizar el cortac sped revise las ruedas el asidero y los controles Verifique que todos los tornillos est n apretados Verifique que el control del acelerador en caso de tenerlo y la palanca de pa...

Page 36: ...el sistema de transmisi n libere la palanca de tracci n El sistema de tracci n se desactivar pero el motor continuar en funcionamiento Nota Cuando el sistema de tracci n est desactivado en una unidad...

Page 37: ...dentro de un lugar cerrado no agregue gasolina Antes de agregar gasolina detenga el motor y permita que el motor se enfr e durante varios minutos 3 Verifique que el cable de la buj a est conectado a...

Page 38: ...r Cada 8 horas o diariamente Comprobar el nivel de aceite del motor Cada 25 horas o anualmente Limpiar el filtro y el depurador de aire del motor si equipado Cada 50 horas o anualmente Cambiar el acei...

Page 39: ...asolina del filtro de aire Figura 15 No incline hacia adelante el motor Lubricaci n 1 Para m ximo desempe o lubrique con aceite de motor cada 25 horas las ruedas y todos los puntos de pivote 2 Para lu...

Page 40: ...de parada del motor se mueve libremente Nota El dise o del motor no incluye un control del acelerador o un ajuste de la velocidad del motor El motor est ajustado en la mejor velocidad para el corte d...

Page 41: ...jete la cuchilla con la arandela D original y el perno Verifique que el borde exterior de la arandela Belleville est dirigida hacia la cuchilla 8 Apriete el perno que sostiene la cuchilla hasta un apr...

Page 42: ...del cortac sped sin usar las manos Para usar el puerto de deslave 1 Aseg rese de que la bolsa para hierba y el deflector de descar ga lateral est n quitados y que el tap n de cubrici n de suelos est...

Page 43: ...er del motor con aceite nuevo 4 Remueva la buj a del cilindro Vierta una onza de aceite dentro del cilindro Hale lentamente el mango del cable retr ctil de arranque para que el aceite proteja el cilin...

Page 44: ...ctrodos de la buj a Consulte el Manual del Motor 6 Verifique la cantidad de aceite en el motor Llene con aceite si es necesario 7 Revise el filtro de aire del motor Consulte el Manual del Motor 8 La g...

Page 45: ...as El servicio de garant a se encuentra disponible solamente a trav s de concesionarios de servicio autorizados por Briggs Stratton o BSPPG LLC La mayor a de las reparaciones por el servicio de garant...

Page 46: ...Notas www brutepower com 22 N o t f o r R e p r o d u c t i o n...

Page 47: ...ped de empuje a lo ancho de las pendientes nunca subiendo o bajando Sea sumamente cuidadoso cuando maneje en o cerca de pendientes y obstrucciones Para determinar si no es peligroso cortar el c sped e...

Page 48: ...an do sea usado en una parte dada del equipo acoplado Esta diferencia se debe a una variedad de factores que incluyen sin limitarse a l avier dad de componentes del motor filtro de aire sistema de esc...

Reviews: