


23
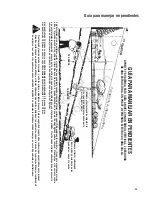
Guía para manejar en pendientes
GUÍA
PARA
MANEJAR
EN
PENDIENTES
APUNTE
Y
SOSTENGA
ESTA
GUÍA
A
NIVEL
CON
UN
ÁRBOL
VERTICAL,
LA
ESQUINA
DE
UNA
ESTRUCTURA,
UN
POSTE
DE
ENERGÍA
ELÉCTRICA
O
UNA
VALLA.
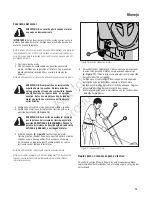
Maneje
el
cortacésped
de
empuje
a
lo
ancho
en
las
pendientes,
nunca
hacia
arriba
y
hacia
abajo.
Maneje
el
tractor
cortacésped
hacia
arriba
y
hacia
abajo
en
las
pendientes,
nunca
a
lo
ancho.
10
GRADOS
15
GRADOS
15
GRADOS
PLIEGUE
EN
LA
LÍNEA
DE
PUNTOS
Preste
mucha
atención
en
todo
momento,
y
evite
los
virajes
o
maniobras
bruscas.
Para
su
seguridad,
respete
otras
instrucciones
encontradas
en
este
manual
mientras
corta
césped
en
pendientes.
Maneje
el
tractor
cortacésped
de
subida
o
bajada
en
las
pendientes,
nunca
a
lo
ancho
de
las
mismas.
Maneje
el
cortacésped
de
empuje
a
lo
ancho
de
las
pendientes,
nunca
subiendo
o
bajando.
Sea
sumamente
cuidadoso
cuando
maneje
en
o
cerca
de
pendientes
y
obstrucciones.
Para
determinar
si
no
es
peligroso
cortar
el
césped
en
una
pendiente
cuando
maneja
un
tractor
cortacésped:
(1)
desengrane
la
cuchilla(s),
(2)
ponga
la
máquina
en
marcha
atrás,
y
(3)
pruebe
ascender
la
pendiente
retrocediendo
en
línea
recta.
Si
puede
hacerlo,
por
lo
general
no
es
peligroso
cortar
el
césped.
Sin
embargo,
si
no
se
siente
seguro,
o
no
está
totalmente
convencido,
use
esta
guía
y
no
corte
el
césped
en
una
pendiente
que
sea
mayor
que
15
grados.
Si
está
usando
el
tractor
cortacésped
con
un
accesorio
remolcado
o
de
montaje
trasero,
no
lo
maneje
en
una
pendiente
que
sea
mayor
que
10
grados.
Una
pendiente
de
15
grados
es
un
cerro
cuya
altura
aumenta
aproximadamente
2.5
pies
en
10
pies.
Una
pendiente
de
10
grados
es
un
cerro
cuya
altura
aumenta
aproximadamente
1.7
pies
en
10
pies.
Not
for
Reproduction