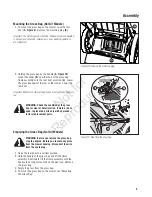
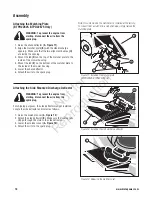
Brute 7800583 Operator'S Manual Download Page 17

17

Blade Service 

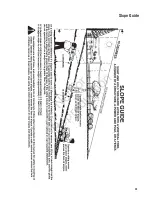
WARNING: Before you inspect the blade or 

the blade adapter, disconnect the wire to the 

spark plug. If the blade hits an object, stop the 

engine. Disconnect the wire to the spark plug. 

Check the unit for damage. 

Frequently check the blade for wear or damage such as 

cracks. Frequently check the bolt that holds the blade. Keep 

the bolt tight. If the blade hits an object, stop the engine. 

Disconnect the wire to the spark plug. Check the blade 

adapter


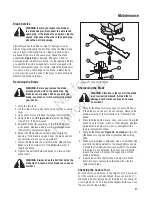
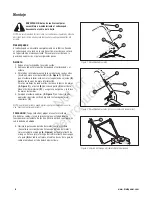
(A, Figure 25) for damage. Check for a bent or   

damaged blade, a badly worn blade, or other damage. Before 

you operate the unit, damaged parts must be replaced with 

factory replacement parts. For safety, replace the blade every 

two years. Keep a sharp edge on the blade. A blade that is 

not sharp will cause the ends of the grass to become brown. 

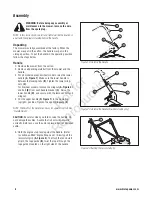
Remove the blade as follows. 

Removing the Blade

WARNING: Before you remove the blade,      

disconnect the wire to the spark plug. The 

blade has sharp edges. When you hold the 

blade, use gloves or cloth material to protect 

your hands. 

1.  Drain the fuel tank. 

2.  Lift the side of the mower that has the muffler or spark 

plug. 

3.  Use a piece of wood to keep the blade from rotating. 
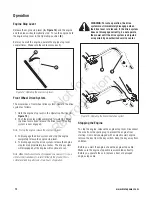
4.  Remove the bolt 

(B, Figure 25) that holds the blade 

with a 9/16” (14mm) wrench. 

5.  Check the blade 

(C) according to the “Blade Service” 

instructions. Replace a badly worn or damaged blade 

with a factory replacement blade. 

6.  Mount the blade with the curved edges toward the  

housing. If the blade is upside down, the blade will not 

cut correctly and can cause an accident. 

7.  Fasten the blade with the original washer 

(D) and bolt. 

Make sure the outside rim of the Belleville washer is 

toward the blade. 

8.  Tighten the bolt that holds the blade to a torque of 30 

foot pounds. 

WARNING: Always keep the bolt that holds the 

blade tight. A loose bolt or blade can cause an 

accident. 

Sharpening the Blade

WARNING: Vibration is the result if the blade 

is not correctly balanced. A blade that is   

damaged with cracks can break and cause    

an accident. 

1.  Sharpen the blade two times a year or every 25 hours. 

2.  If the blade is on the unit, do not sharpen. Remove the 

blade according to the instructions in “Removing The 

Blade”. 

3.  Clean the blade with a brush, soap, and water. Check the 

blade. Look for cracks, nicks, or other damage. Replace 

a blade that is badly worn, bent, or damaged with a   

factory replacement blade. 

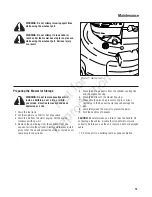
4.  Sharpen the blade 

(A, Figure 26, next page) with a file 

(B). Make sure you keep the original beveled cutting 

edge. 

5.  Make sure the blade is balanced. Use a screwdriver 

(C) 

and hold the blade parallel to the ground 

(D) as shown. 

A blade that is balanced will stay parallel to the ground. 

If the blade is not balanced, the heavy end will rotate 

toward the ground. Sharpen the heavy end until the 

blade is balanced. 

6.  A new blade will cut better than a badly worn blade. 

Every two years replace the old blade with a factory 

replacement blade. 

Checking the Level of Cut

Test the unit in a small area. If the height of cut is not level 

or if the cut grass is not discharged, the cause can be: (1) 

the blade is bent or damaged, (2) the blade is not sharp, (3) 

a worn blade, (4) or a broken blade adapter. Before you use 

the unit, correct the problem.

Figure 25: Removing the blade

D

B

D

C

B

C

A

A

Maintenance

Not 

for  

Reproduction

Summary of Contents for 7800583

Page 1: ...Model No Description 7800583 BTXP226750HW 7800661 BTPD22625 7800742 BTPD22675 7800821 BTPD22625 22 Self Propelled Walk Behind Mower 7104971 Rev Operator s Manual N o t f o r R e p r o d u c t i o n...

Page 2: ...operate this equipment Save these original instructions for future reference Complete the following information on your Brute purchase Date of Purchase_________________________________________________...

Page 3: ...the Drive Belt 15 Adjusting the Drive Cable 16 Blade Service 17 Removing the Blade 17 Sharpening the Blade 17 Checking the Level of Cut 17 Cleaning the Mower Housing 18 Preparing the Mower for Storag...

Page 4: ...warnings in this manual and on the mower engine and attachments Know the controls and the proper use of the mower before starting 2 Only mature responsible persons shall operate the machine and only...

Page 5: ...s Operation Continued From Previous Column 13 DO NOT operate mower without the entire grass catcher or guards in place discharge guard rear guard or other safety devices in place and working DO NOT po...

Page 6: ...ingnut A Figure 2 and bolt B from each handle bracket C Raise the lower handle D and secure with the removed bolt and wingnut 4 Put the upper handle D Figure 1 in the operating upright position Tighte...

Page 7: ...Remove the wingnuts A Figure 6 and bolts B from the right and left handle brackets C Note Do not remove the lower set of bolts and nuts securing the lower handle 2 To raise the handle mount the lower...

Page 8: ...remove the side mounted discharge deflector 1 Slide the frame assembly A Figure 7 into the grass bag B Make sure the handle C is on the outside of the grass bag 2 First attach the clips A Figure 8 to...

Page 9: ...ck the condition of the grass bag for wear or deterioration If worn or dam aged replace the parts only with approved factory replacement parts Emptying the Grass Bag Not All Models WARNING Before you...

Page 10: ...ing the Mulching Plate BTPD22625 BTPD22675 Only WARNING To prevent the engine from starting disconnect the wire from the spark plug 1 Raise the chute deflector A Figure 11 2 Align the mulcher plate B...

Page 11: ...ting limitations and environmental factors Final Preparation Before you use the mower check the assembly of the wheels the handle and the controls Make sure all the fas teners are tight Make sure the...

Page 12: ...age but the engine will continue to run Note When the drive system is disengaged on a new unit it is pos sible for the front wheels to rotate if lifted off the ground This is normal and will stop afte...

Page 13: ...lever is in the DISENGAGED posi tion When the drive lever is in the ENGAGED position do not start the engine 5 The primer button A Figure 16 is on the right front of the engine Push the primer button...

Page 14: ...on of the air filter Figure 18 No forward engine tipping Lubrication 1 For maximum performance lubricate the wheels and all pivot points with engine oil every 25 hours 2 To lubricate the engine refer...

Page 15: ...from the factory 6 To assemble the drive belt reverse the above steps 7 Set the belt tension a Tighten the adjuster nut A Figure 23 until the nut touches the spacer B Try to turn the spacer When the a...

Page 16: ...s Make sure the engine stop cable moves freely Note The engine design does not include a throttle control or an engine speed adjustment The engine is set at the best speed for cut ting grass bagging g...

Page 17: ...asten the blade with the original washer D and bolt Make sure the outside rim of the Belleville washer is toward the blade 8 Tighten the bolt that holds the blade to a torque of 30 foot pounds WARNING...

Page 18: ...ee cleaning of the bottom of the mower housing To use the washout port 1 Be sure the grass bag and side discharge deflector are removed and the mulching plug is installed 2 Set the height of cut to th...

Page 19: ...ur one ounce of oil into the cylinder Slowly pull the recoil start grip so that the oil will protect the cylinder Install a new spark plug in the cylinder 5 Clean the dirt and debris from the cylinder...

Page 20: ...lug Make sure the wire is connected 4 Clean the engine cooling fins of grass and other debris 5 Check the spark plug gap Refer to the engine manual 6 Check the amount of oil in the engine Fill with oi...

Page 21: ...arranty service is requested the manufacturing date of the product will be used to determine warranty eligibility About Your Warranty We welcome warranty repair and apologize to you for being inconven...

Page 22: ...www brutepower com 22 Notes N o t f o r R e p r o d u c t i o n...

Page 23: ...23 Slope Guide N o t f o r R e p r o d u c t i o n...

Page 24: ...s engine may not develop the rated gross power when used in a given piece of power equip ment This difference is due to a variety of factors including but not limited to the variety of engine componen...

Page 25: ...N de Modelo Descripci n 7800583 7800661 7800742 7800821 BTXP226750HW BTPD22625 BTPD22675 BTPD22625 22 autopropulsado Cortac sped Walk Behind Manual para el operador N o t f o r R e p r o d u c t i o n...

Page 26: ..._ _ _ _ _ _ _ _ _ _ _ _ _ _ _ _ _ _ _ _ _ _ _ _ _ _ _ _ _ _ _ _ _ _ _ _ _ _ _ _ _ _ _ _ _ N mero de tel fono del concesionario_ _ _ _ _ _ _ _ _ _ _ _ _ _ _ _ _ _ _ _ _ _ _ _ _ _ _ _ _ _ _ _ _ _ _ _ _...

Page 27: ...Servicio de mantenimiento de la cuchilla 17 Desmontaje de la cuchilla 17 Afilado de la cuchilla 17 Verificaci n del nivel de corte 17 Limpieza de la cubierta del cortac sped 18 Preparaci n del cortac...

Page 28: ...te todos los mensajes de advertencia y las instrucciones incluidas en la m quina el motor y los implementos Aprenda la ubicaci n de todos los mandos y practique c mo usarlos antes de poner en marcha l...

Page 29: ...mpleto antes de quitar el recogedor y o desatascar c sped Manejo viene de la columna anterior 13 NO maneje la cortadora sin que el recogedor de hierba completo la protecci n de descarga la protecci n...

Page 30: ...o B de cada soporte C del asidero Eleve el asidero inferior D y asegure con el perno y la tuerca de orejas removidos 4 Coloque el asidero superior D Figura 1 en la posici n de operaci n posici n verti...

Page 31: ...as de orejas A Figura 6 y los pernos B de los soportes C derecho e izquierdo del asidero NOTA No remueva el conjunto inferior de pernos y tuercas que aseguran el asidero inferior 2 Para elevar el asid...

Page 32: ...l deflector de descarga de montaje lateral 1 Deslice el armaz n A Figura 7 dentro de la bolsa de c sped B Verifique que la manija C est en el lado exterior de la bolsa de c sped 2 Primero sujete los g...

Page 33: ...n la barra pivote ADVERTENCIA Revise la condici n de la bolsa de c sped en cuanto a desgaste o deterioro Si est desgastada o da ada reemplace las piezas s lo con piezas de repuesto aprobadas por f bri...

Page 34: ...DVERTENCIA Para evitar que el motor arranque desconecte el cable de la buj a 1 Levante el deflector tipo canal A Figura 11 2 Alinee la placa B del triturador con la abertura de descarga lateral Verifi...

Page 35: ...s debe utilizar el cortac sped revise las ruedas el asidero y los controles Verifique que todos los tornillos est n apretados Verifique que el control del acelerador en caso de tenerlo y la palanca de...

Page 36: ...e tracci n se desactivar pero el motor continuar en funcionamiento Nota Cuando el sistema de tracci n est desactivado en una unidad nueva es posible que las ruedas delanteras giren si se levantan del...

Page 37: ...a del sistema de tracci n est en la posici n DESACTIVADA DISENGAGED Cuando la palanca del sistema de tracci n est en la posici n ACTIVADA ENGAGED no arranque el motor 5 El bot n cebador A Figura 16 es...

Page 38: ...ante el motor Lubricaci n 1 Para m ximo desempe o lubrique con aceite de motor cada 25 horas las ruedas y todos los puntos de pivote 2 Para lubricar el motor consulte el manual de Instrucciones del mo...

Page 39: ...brica 6 Para montar la correa de transmisi n invierta los anteriores pasos 7 Ajuste la tensi n de la correa a Apriete la tuerca ajustadora A Figura 23 hasta que la tuerca haga contacto con el espacia...

Page 40: ...e de parada del motor se mueve libremente Nota El dise o del motor no incluye un control del acelerador o un ajuste de la velocidad del motor El motor est ajustado en la mejor velocidad para el corte...

Page 41: ...Sujete la cuchilla con la arandela D original y el perno Verifique que el borde exterior de la arandela Belleville est dirigida hacia la cuchilla 8 Apriete el perno que sostiene la cuchilla hasta un a...

Page 42: ...carcasa del cortac sped sin usar las manos Para usar el puerto de deslave 1 Aseg rese de que la bolsa para hierba y el deflector de descarga lateral est n quitados y que el tap n de cubrici n de suel...

Page 43: ...dro y de la carcasa del motor 6 Limpie la parte inferior de la cubierta del cortac sped 7 Verifique que la bolsa de c sped est vac a El c sped que permanece en la bolsa durante el almacenamiento da ar...

Page 44: ...ento del motor para remover c sped y otros residuos 5 Revise la separaci n entre electrodos de la buj a Consulte el Manual del Motor 6 Verifique la cantidad de aceite en el motor Llene con aceite si e...

Page 45: ...las molestias El servicio de garant a se encuentra disponible solamente a trav s de concesionarios de servicio autorizados por Briggs Stratton o BSPPG LLC La mayor a de las reparaciones por el servic...

Page 46: ...22 Notas www brutepower com N o t f o r R e p r o d u c t i o n...

Page 47: ...tac sped de empuje a lo ancho de las pendientes nunca subiendo o bajando Sea sumamente cuidadoso cuando maneje en o cerca de pendientes y obstrucciones Para determinar si no es peligroso cortar el c s...

Page 48: ...ar la potencia total nominal cuando sea usado en una parte dada del equipo acoplado Esta diferencia se debe a una variedad de factores que incluyen sin limitarse a l avierdad de componentes del motor...

Reviews: