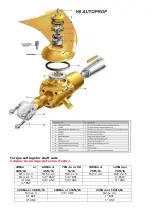
Fitting.
Montage.
Before fitting your new Autoprop ensure that the cutlass bearing is not worn. A worn bearing will be problematic
and may cause vibration. Replace your bearing with a good quality bearing preferably with a brass shell, which
uses nitrile rubber.
Avant de monter votre nouvelle Autoprop, assurez-vous que le palier hydrolube n’est pas usé. Un palier usé peut
engendrer des complications et peut engendrer des vibrations. Remplacez votre palier avec un palier de bonne
qualité, de préférence avec une douille en bronze qui utilise du caoutchouc nitrile.
1
. After removing the old propeller check that the shaft taper, key, and thread are undamaged. Try the new shaft
nut on to the thread. The taper should be clean and dry. Check that the key will slide through the keyway in the
Autoprop without jamming at any point.
Après avoir enlevé l’ancienne hélice vérifiez que le cône, la clavette et le
filetage ne sont pas endommagés. Le cône doit être propre et sec. Vérifiez que la clavette coulisse dans son
logement coté Autoprop sans difficulté sur toute la longueur.
2.
Fit the key into its seat on the shaft. Push the Autoprop on to the shaft making sure it fits snugly on the taper. If it
does not appear to fit well, there may be some foreign objects on the taper, or you may need to file the key down
until the Autoprop fits snugly on to the taper.
Placez la clavette dans son logement sur l’arbre. Poussez l’Autoprop
sur l’arbre en vous assurant d’un montage ajusté sur le cône. S’il apparaît que l’ajustage pose problème, il peut
s’agir d’objets étrangers sur le cône, ou vous pouvez avoir à limer la clavette jusqu’à ce que l’Autoprop soit ajustée
au cône.
3.
Screw the new shaft nut up tight using a 24mm socket spanner, finishing with one of the flats of the nut coming
under the shaft nut locking screw. If the shaft nut locking screw does not bear on to the body of the shaft nut you
may dimple the body of the shaft nut, with a drill or punch.
Vissez le nouvel écrou et serrez en utilisant une clé à
douille de 24mm, finissant avec un plat de l’écrou venant au dessous de la vis de blocage d’écrou. Si la vis de
blocage ne porte sur le corps de l’écrou d’arbre, vous pouvez bossuer le corps de l’écrou à l’aide d’une perceuse ou
un poinçon.
4.
Smear the thread of the shaft nut locking screw (10) with thread locking compound and screw it down on to the
shaft nut.
Barbouillez de frein-filet le filetage de la vis arrête écrou (10) et vissez/serrez sur l’écrou d’arbre .
5.
Hold the anode nose cone in place and screw down to fit. Do not over tighten
. Installez l’anode en utilisant les vis
fournies sans trop serrer. Vous pouvez appliquer de l’anti-fouling dans les trous des vis afin de diminuer la corrosion
de ces trous
Your Autoprop is now ready for use
Votre Autoprop est prête à être utilisée
.
Removal.
Démontage.
1.
We recommend that you use a special extractor available from your Autoprop supplier. This is simple to use and
avoids having to remove the rope cutter, if fitted. Most three legged pullers will fit the Autoprop.
Nous
recommandons l’usage d’un extracteur spécial disponible chez votre fournisseur d’Autoprop. Il est facile à utiliser et
évite d’avoir à enlever le coupe-orin s’il y en a un. La plupart des extracteurs à trois branches s’adapteront aussi à
l’Autoprop.
2.
Remove the anode nose cone by removing the nylon screws.
Enlevez l’anode conique en enlevant les vis nylon.
3.
Unscrew the shafts nut locking screw until it is clear of the shaft nut.
Dévissez la vis de blocage d’écrou jusqu’à
libérer l’écrou d’arbre.
4.
Unscrew the shafts nut remembering whether it has a right or left hand thread.
Dévissez l’écrou d’arbre se
souvenant si le filetage est à droite ou à gauche.
5.
You can now use your three-legged puller to remove your Autoprop from the shaft. With the Brunton's extractor
tool, screw the extractor plate on to the end of the propeller boss using the socket head screws provided. Screw
in the jacking screw and tighten until the Autoprop loosens on the taper, and remove from the shaft.
Vous
pouvez maintenant utiliser l’extracteur à trois branches pour extraire l’Autoprop de l’arbre. Avec l’extracteur

