


123
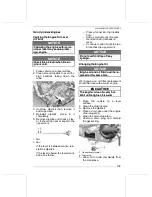
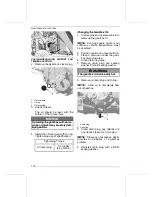
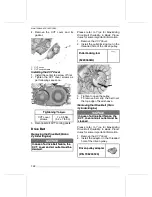
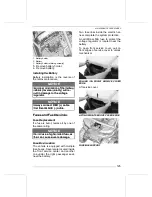
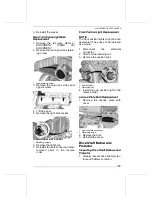
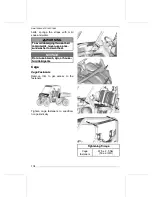
3. Screw the puller/locking tool in the
threaded hole of the adaptor.
P
Pu
ulllle
err//llo
occkkiin
ng
g tto
oo
oll
((P
P//N
N 5
52
29
90
00
00
00
08
88
8))
4. Tighten to open the pulley.
1. Fixed sheave of driven pulley
2. Adaptor
3. Puller/locking tool
4. Wrench
5. To remove belt, slip the belt over
the top edge of fixed sheave, as
shown.
IIn
nsstta
alllliin
ng
g tth
he
e D
Drriivve
e B
Be
elltt
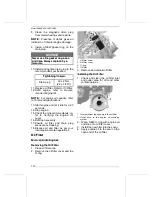
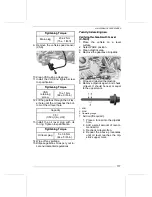
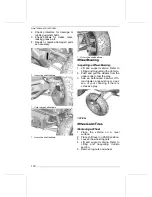
For installation, reverse the removal
procedure. Pay attention to following
details.
The maximum drive belt life span is
obtained when the drive belt has the
proper rotation direction.
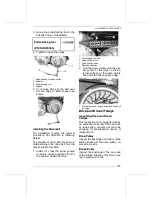
1. Install it so that the arrow printed
on belt is pointing towards front of
the vehicle, viewed from top.
1. Arrow printed on belt
2. Drive pulley (front)
3. Driven pulley (rear)
4. Rotation direction
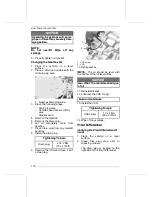
2. Turn the driven pulley until the low-
est portion of the cogs on the ex-
ternal surface of the drive belt is
even with the driven pulley edge.
1. Lowest portion of cogs even with driven pul-
ley edge
D
Drriivve
e a
an
nd
d D
Drriivve
en
n P
Pu
ulllle
eyyss
IIn
nssp
pe
eccttiin
ng
g D
Drriivve
e a
an
nd
d D
Drriivve
en
n
P
Pu
ulllle
eyyss
This inspection must be performed by
an authorized Can-Am Off-road deal-
er, repair shop, or person of your own
choosing for maintenance, repair, or
replacement.
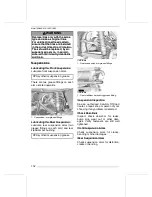
D
Drriivve
e P
Pu
ulllle
eyy
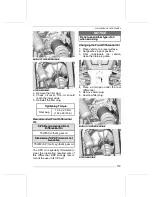
Inspect the bushings and rollers of the
sliding sheave of the drive pulley, re-
place worn parts.
D
Drriivve
en
n P
Pu
ulllle
eyy
Inspect the bushings of the cam and
of the sliding sheave of the driven pul-
ley, replace worn parts.
MAINTENANCE PROCEDURES
Summary of Contents for Can-Am Traxter HD7 2022
Page 10: ...8 This page is intentionally blank TABLE OF CONTENTS...
Page 11: ...9 G GE EN NE ER RA AL L I IN NF FO OR RM MA AT TI IO ON N...
Page 14: ...12 This page is intentionally blank GENERAL INFORMATION...
Page 15: ...Safety Information 13 S SA AF FE ET TY Y I IN NF FO OR RM MA AT TI IO ON N...
Page 42: ...40 Safety Information IMPORTANT ON PRODUCT LABELS ALL COUNTRIES EXCEPT CANADA UNITED STATES...
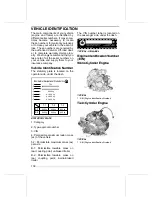
Page 57: ...55 V VE EH HI IC CL LE E I IN NF FO OR RM MA AT TI IO ON N...
Page 96: ...94 This page is intentionally blank LIFTING AND SUPPORTING THE VEHICLE...
Page 97: ...95 M MA AI IN NT TE EN NA AN NC CE E...
Page 139: ...137 T TE EC CH HN NI IC CA AL L I IN NF FO OR RM MA AT TI IO ON N...
Page 144: ...142 This page is intentionally blank EAC DECLARATION OF CONFORMITY...
Page 145: ...143 T TE EC CH HN NI IC CA AL L S SP PE EC CI IF FI IC CA AT TI IO ON NS S...
Page 155: ...153 T TR RO OU UB BL LE ES SH HO OO OT TI IN NG G...
Page 160: ...158 This page is intentionally blank DIGITAL DISPLAY MESSAGES...
Page 161: ...159 W WA AR RR RA AN NT TY Y...
Page 184: ...182 This page is intentionally blank MAINTENANCE RECORDS...
Page 185: ...183 C CU US ST TO OM ME ER R I IN NF FO OR RM MA AT TI IO ON N...
Page 189: ...187 CHANGE OF ADDRESS AND OWNERSHIP...
Page 190: ...188 This page is intentionally blank CHANGE OF ADDRESS AND OWNERSHIP...
Page 191: ...189 CHANGE OF ADDRESS AND OWNERSHIP...
Page 192: ...190 This page is intentionally blank CHANGE OF ADDRESS AND OWNERSHIP...
Page 193: ...191 NOTE CHANGE OF ADDRESS AND OWNERSHIP...
Page 194: ...192 NOTE CHANGE OF ADDRESS AND OWNERSHIP...
Page 195: ...201 Model No CHANGE OF ADDRESS AND OWNERSHIP...


