background image

X

Error message

X

What to do when...

Troubleshooting

Message

Cause/Remedy

Battery Low!

The batteries are weak.
If using AAA alkaline batteries: Replace them 
with new ones.
If using Ni-MH batteries: Charge them fully.

Battery Empty! The installed batteries are running low and will 

need to be changed for continued operation.

Invalid!

• There is no text above the cursor when you 

selected [Numbering].

• Invalid character is selected for [Numbering].
• Invalid number is selected for [Tab Length] or 

[Label Length].

• An invalid value was entered as the label 

length while using templates.

No Text!

• You tried to print a text file when there is no 

data stored in the memory.

 is pressed when no text is entered.

  is pressed when no text is 

entered.


is pressed when no text is entered.

 or 

 was pressed when no text 

was entered while using templates.

2 Line Limit! / 
1 Line Limit!

• You tried to enter a 3rd line by pressing 

.

• You tried to print or preview two lines of text 

while 0.13" (3.5mm) or 0.23" (6 mm) tape is 
installed. Install larger tape size.

No Cassette!

You tried to print, feed or preview a label when 
there is no cassette installed.

Cutter Pressed Tape cutter lever is pressed in the middle of 

printing process.

Text Full!

The maximum number of characters (80 
characters for text, 50 characters for templates) 
have already been entered.

Change Length Since the number of entered characters 

exceeds the label length, reduce the text, or 
select [Auto] as the label length.

No Frame OK? • Printing on 0.13" (3.5mm) tape with invalid 

Frame setting ON. 

• Using tape cassette smaller than 

0.47"(12mm) wide though you selected a 
frame which is only available for 0.47"(12mm) 
wide tape cassettes.
(Select 

 to print with no Frame, 

 to cancel.)

Feed OK?

• Feeding tape after printing when [Chain Print] 

is selected. Refer to “Setting Margin”.

Insert 0.47"

• Only 0.47"(12mm) tape cassette is available 

for templates.

Use TZe Tape! • Use a tape cassette with the   mark.

Problem

Solution

The display 
stays blank 
after you have 
turned on the 
machine.

• Check that the batteries are correctly 

inserted.

• If the batteries are weak, replace them.
• Check that the adapter is correctly connected.

When the label 
is printed out, 
there is too 
much margin 
(space) on both 
sides of the text.

• See “Setting Margin” in this users guide and 

select [Half] or [Narrow] to have smaller 
margins for your label.

The machine 
does not print, 
or the printed 
characters are 
not formed 
properly.

• Check that the tape cassette has been 

inserted correctly.

• If the tape cassette is empty, replace it.
• Check the cassette cover is properly closed.

The setting has 
cleared on its 
own.

• The batteries may be weak. Replace them.
• When power is disconnected for more than 

three minutes, all text & formats in the display 
will be lost.

A blank 
horizontal line 
appears 
through the 
printed label.

• There may be some dust on the print head. 

Remove the tape cassette and use a dry 
cotton swab to gently wipe the print head with 
an up-and-down motion.

The machine 
has “locked up” 
(i.e., nothing 
happens when a 
key is pressed, 
even though the 
machine is on.)

• Refer to “Resetting the P-touch”.

The power 
turns off when 
you try to print.

• The batteries may be weak. Replace them.
• Check that the batteries are correctly 

inserted.

• A wrong adapter is used; the recommended 

adapter is the AD-24ES/AD-24ESA/AD-
24ESAW/AD-24ESA-01/AD-24ESAW-01.

The tape does 
not feed 
properly or the 
tape gets stuck 
inside the 
machine.

• Check that the end of the tape feeds under 

the tape guides.

• The cutter lever is pressed while printing. Do 

not touch the cutter lever during printing.

All text and 
format settings 
need to be 
cleared to 
create a new 
label.

• Press 

 + 

 and select 

[Text&Format].

• Press  

  /


[Clear] 


/


[Text&Format] 

To change 
language setting.

• Refer to "Initial Settings".
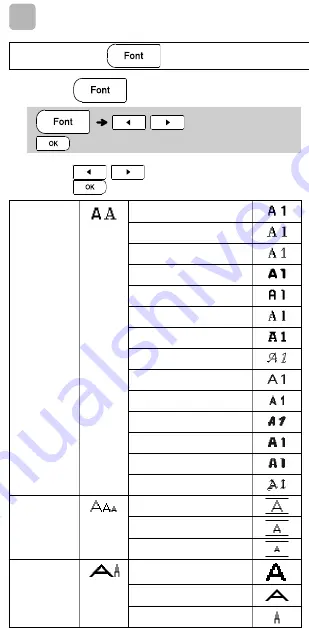
 FORMATTING KEYS

1

Press 

 to change the font settings.

2

Press 

/

 to select the settings and 

press .

NOTE

• To cancel operations, press 

.

• Refer to the Font samples table included in this 

insertion sheet.

• The actual printed font size depends on the tape 

width, number of characters and number of 

input lines. Once characters reach a minimum 

size, the selected font will default to a custom 

font which is based on the Helsinki style. This 

allows labels to be printed using the smallest 

text possible on narrow or multi-line labels.

• After pressing 

, "Accepted" will be 

displayed for approximately 1 second.

4

Font Key 


/

 Select an item 

Font

Helsinki
Brussels
US
Florida
Belgium
San Diego
Los Angeles
Calgary
Atlanta
Adams
Brunei 
Istanbul
Sofia 
Germany

Size

Large
Medium
Small

Width

Normal

× 2
× 1/2

Style

Normal
Bold
Outline
Shadow
Solid
Italic
I+Bold
I+Outline
I+Shadow
Vertical

Alignment

Left
Center
Right
Justify

* Images are for illustrative purposes only.
* Frames with highlighted numbers are only available when using 0.47" (12mm) wide tape cassettes.

56

57

58

59

60

61

62

63

64

65

66

67

68

69

70

71

72

73

74

75

76

77

78

79

80

81

82

83

84

85

86

87

88

89

90

91

92

93

94

95

96

97

98

99

Press 

 to select the frame design. Refer to 

the Frame designs table included in this insertion 

sheet.

NOTE

• To cancel operations, press 

.

• If the message 

 (

) appears on the right 

side of the display when selecting a frame, it 

means that frame is only available when using 

0.47" (12mm) wide tape cassettes.

• You can select the frame design by pressing a 

number key of the Frame designs table 

included in this insertion sheet.

• After pressing 

, "Accepted" will be 

displayed for approximately 1 second.

Press 

 to select various symbols. Refer to 

the table of symbols included in this insertion sheet.

NOTE

• To cancel operations, press 

.

• *1 Once you select symbols, up to 7 recently 

used symbols are added to History.

• If you choose History, you cannot select the 

category.

• You can also select from basic and pictograph 

categories by pressing the shortcut keys 

included in this insertion sheet.

X

Basic

X

Pictograph

Frame Key 


/

/


Select  a 

frame 

Symbol Key 


/


[History*1/Basic/

Pictograph]  

 /


Select 

category 


/

 Choose a 

symbol 

Punctuation

Greek Letter

Mathematics

Number 1

Brackets

Number 2

Arrows

Number 3

Unit

Shape

Fun

Kitchen

Family

Garden

Clothing

DIY

Vehicle

School

Sports

Office

Animal

Signs

Astrology

Datacom/AV

Event/Season

Electrical

Food

 HELPFUL HINTS

You can reset the P-touch labeler when you want to 

initialize the settings, or in the event it not working 

properly. All text, settings and stored files are cleared.

1

Turn off the P-touch labeler, hold down 

 and 

 and then press 

 to turn the 

P-touch labeler back on.

2

First release the power button, and then 

release  

and 

.

The P-touch labeler turns on with the internal 

memory reset.

NOTE

Short Cut

File


Tab


Unit


LCD Contrast


Clear


Language


Helpful Tips

Clear  


Feed


Print Options


Resetting the P-touch

5

Should you encounter any problems with 

your product, please do not return your 

product to the store.

After referring to the User's guide, if you still 

need assistance, contact Brother Customer 

Service at:

Voice: 1-877-BROTHER

Web: www.brother-usa.com

Fax: 1-901-379-1210

If you need to locate a service center, please 

call 1-877-BROTHER or visit us at 

www.brother-usa.com


CAUTION

USING A COMBINATION OF DIFFERENT 

BATTERIES (SUCH AS Ni-MH AND ALKALINE), 

MAY RESULT IN AN EXPLOSION. DISPOSE 

OF USED BATTERIES ACCORDING TO THE 

INSTRUCTIONS.

Battery Recommendations

• Remove the batteries if you do not intend to 

use the P-touch labeler for an extended 

period of time.

• Dispose of the batteries at an appropriate 

collection point, not in the general waste 

stream. In addition, be sure to observe all 

applicable federal, state, and local 

regulations.

• When storing or discarding the batteries, wrap 

it (for example with cellophane tape), to 

prevent it from short-circuiting. (Refer to the 

picture on the lower right)

(Battery insulation example)

1. Cellophane tape
2. Alkaline or Ni-MH 

battery

2

1

Summary of Contents for P-Touch PT-D210

Page 1: ...bel maker uses Brother TZe tapes from 0 13 3 5mm to 0 47 12mm widths TZe tape cassettes are available in many colors and sizes Visit www brother com for a complete list of tapes compatible with your machine Read this manual carefully before starting and keep the manual in a handy place for future reference D0123W001 English User s Guide ...

Page 2: ...andling them with wet hands or spilling beverages on to them Sincelossofeyesightmayresultwhenleakedfluidfrombatteriesgetsintoyoureyes immediately rinse your eyes with a large amount of clean water and then seek medical attention Do not disassemble or modify the P touch labeler AC adapter batteries Do not allow a metal object to contact both the plus and minus ends of a battery Donot usesharpobject...

Page 3: ...our finger inside the P touch labeler when you close the cassette cover Before using Ni MH rechargeable batteries carefully read the instructions for the batteries and battery charger and be sure to use them correctly When using Ni MH rechargeable batteries charge the batteries with a specialized battery charger before using the batteries Depending on the location material and environmental condit...

Page 4: ...ormatsettingsand any text files stored in the memory will be cleared Federal Communications Commission FCC Compliance Notice For USA Only This equipment has been tested and found to comply with the limits for a Class B digital device pursuant to Part 15 of the FCC Rules These limits are designed to provide reasonable protection against harmful interference in a residential installation This equipm...

Page 5: ...cated area at the top end of the machine If a tape cassette is already installed remove it by pulling it straight up Also if batteries are already installed remove them Make sure that the power is turned off when replacing batteries or tape cassettes 1 1 Print head Tape cutter lever Cassette cover ...

Page 6: ...teries HR03 making sure that their poles point in the correct directions Users of alkaline batteries Always replace all six batteries at the same time with brand new ones Users of Ni MH batteries Always replace all six batteries at the same time with fully charged ones 2 ...

Page 7: ...sette making sure that it snaps into place Make sure that the end of the tape feeds under the tape guides Use only Brother TZe tapes with this machine 3 Toothed Wheel Cutter s edge End of tape Tape exit slot Tape guide ...

Page 8: ...C adapter 1 InserttheplugontheadaptercordintotheAC adapter jack on the top end of the machine 2 Insert the plug into the nearest standard electrical outlet For memory back up we recommend using AAA alkaline batteries LR03 or Ni MH batteries HR03 together when using the AC adapter 4 AC adapter jack ...

Page 9: ...ey 12 Power key 13 Menu key 14 Label key 15 Font key 16 Character key 17 Tab key 18 Caps key 19 Shift key 20 File key 21 Tape cutter lever 22 Print key 23 Preview key 24 Frame key 25 Symbol key 26 Template Library key 27 Backspace key 28 Enter key 29 Accent key 30 Space key Pressing the Preview key displays a generated image of the label and may differ from the actual label when printed Label leng...

Page 10: ...etting is inch NOTE The machine automatically turns off if no keys are pressed within five minutes To cancel any operation press After pressing Accepted will be displayed for approximately 1 second Initial Settings Language English Español Français Hrvatski Italiano Magyar Nederlands Norsk Polski Português Portug BR Românã Slovenski Slovenský Suomi Svenska Türkçe Čeština Dansk Deutsch Unit inch mm...

Page 11: ...ightness of the LCD display You can select from five levels of brightness The default setting is 0 To change back to default setting press After pressing Accepted will be displayed for approximately 1 second Contrast LCD Contrast 2 1 0 1 2 ...

Page 12: ...ing from an authorized Brother reseller X Replacing the Cutter Unit 1 Pull out the two sections of the cutter unit green in the direction of the arrows shown in the illustration Accessories Tape Cassettes See the included Supplies and Accessories Guide AC Adapter AD 24ES AD 24ESA AD 24ESAW AD 24ESA 01 AD 24ESAW 01 Cutter Unit TC 4 replacement ...

Page 13: ...2 Install a new cutter unit Push it in until it snaps into place WARNING Do not touch the cutter blade directly with your fingers ...

Page 14: ... Enter key is pressed X Entering Tabs You can also set a tab by pressing A will appear on the screen when a tab is inserted into the text The maximum number of tabs for a label is 80 without text If you enter 1 letter you can set 79 tabs X Changing Tab Length To change setting back to default press The default setting is Auto After pressing Accepted will be displayed for approximately 1 second Ent...

Page 15: ...CD If a specific label length has been selected also appears in the LCD By pressing Auto will be displayed To change setting back to default press After pressing Accepted will be displayed for approximately 1 second X To Clear By pressing the letters will be deleted one by one To delete all text and settings To delete text only NOTE You can also delete all text and settings or text only by pressin...

Page 16: ...t selecting the number of copies You can print up to 9 copies of each label The number of copies can also be specified by pressing a number key To cut the label push in the tape cutter lever on the upper right corner of the machine after the message Please Cut is displayed Please Cut is displayed on the screen for 2 seconds To prevent damage to the tape do not touch the cutter lever while the mess...

Page 17: ...nt copies of a label containing a serial number 0123 0124 and 0125 Select the highest number you wish to be printed when setting the number Mirror Example If you want to Mirror Print J SMITH follow the instructions below after entering J SMITH Use clear tape in Mirror so the labels can be read correctly from the opposite side when attached on glass windows or other transparent surfaces Enter numbe...

Page 18: ... select the number of copies 4 Press Printing will start and then the message Feed OK appears 5 Press to enter more text 6 Clear the text enter the text for the next label and then press 7 When the message Feed OK appearsafter the last label is printed press 8 After the tape is fed press the cutter lever to cut off the chain of labels Printing Labels continued Margin Full Half Narrow Chain Print 1...

Page 19: ...gth from the printed dots to the end of the label Cut along the printed dots with scissors To print more than 1 copy of a label with minimum margin set the margin to Narrow Do not pull the tape since this may damage the tape cassette After pressing Accepted will be displayed for approximately 1 second LCD display Label image Full Half Narrow 2 7 ABC 1 6 ABC 1 0 ABC ...

Page 20: ...nting at a later date A maximum of 80 characters can be saved per file a maximum of 2400 characters can be saved in total memory You can also edit and overwrite the stored labels X Save X Print X Open Saving Label Files Enter Text Save Print Copies Open ...

Page 21: ...tore a label when there is already a label stored to that number a message Overwrite OK will appear Press to save your new label Press to cancel You must type text before starting the save function After pressing Accepted will be displayed for approximately 1 second ...

Page 22: ...sheet XExample 1 Template that includes one repeated graphic There are three additional Text Label templates that allow you to use two different fonts on one label The procedure is similar to the steps in Example 1 however you will be prompted to enter Input Text 2 Text Label Select Category Text Select Design InputText1 Clearthe text and then enter text Print 3 ...

Page 23: ...ps in Example 2 Please see proceedure under Example 2 XExample 4 Template that includes two fonts on two lines The procedure is similar to the steps in Example 2 Please see proceedure under Example 2 Select Category Text Select Design Input Text 1 Clear the text and then enter text Input Text 2 Clear the text and then enter text Print ...

Page 24: ...ng built in templates Refer to the Pattern Label templates table included in this insertion sheet You cannot enter text when using Pattern Label templates Example Pattern Label Select Category Patterns Select Design Set Label Length 1 2 39 0 30 999mm Print ...

Page 25: ...al setting for Label Length mode The initial setting is 3 9 100 mm You cannot use preview feature when using Pattern Label templates XFor Text Label and Pattern Label Templates These templates are only available when using 0 47 12mm wide tape cassettes The templates cannot be edited To exit templates and return to the text input screen do one of following a Press b Press to select Quit and then pr...

Page 26: ...font settings 2 Press to select the settings and press 4 Font Key Select an item Font Helsinki Brussels US Florida Belgium San Diego Los Angeles Calgary Atlanta Adams Brunei Istanbul Sofia Germany Size Large Medium Small Width Normal 2 1 2 ...

Page 27: ...ce characters reach a minimum size the selected font will default to a custom font which is based on the Helsinki style This allows labels to be printed using the smallest text possible on narrow or multi line labels After pressing Accepted will be displayed for approximately 1 second Style Normal Bold Outline Shadow Solid Italic I Bold I Outline I Shadow Vertical Alignment Left Center Right Justi...

Page 28: ...ears on the right side of the display when selecting a frame it means that frame is only available when using 0 47 12mm wide tape cassettes You can select the frame design by pressing a number key of the Frame designs table included in this insertion sheet After pressing Accepted will be displayed for approximately 1 second Frame Key Select a frame ...

Page 29: ...ress 1 Once you select symbols up to 7 recently used symbols are added to History If you choose History you cannot select the category You can also select from basic and pictograph categories by pressing the shortcut keys included in this insertion sheet Symbol Key History 1 Basic Pictograph Select category Choose a symbol ...

Page 30: ... Punctuation Greek Letter Mathematics Number 1 Brackets Number 2 Arrows Number 3 Unit Shape Fun Kitchen Family Garden Clothing DIY Vehicle School Sports Office Animal Signs Astrology Datacom AV Event Season Electrical Food ...

Page 31: ...d stored files are cleared 1 Turn off the P touch labeler hold down and and then press to turn the P touch labeler back on 2 First release the power button and then release and The P touch labeler turns on with the internal memory reset Short Cut File Tab Unit LCD Contrast Clear Language Helpful Tips Clear Feed Print Options Resetting the P touch 5 ...

Page 32: ...ce contact Brother Customer Service at Voice 1 877 BROTHER Web www brother usa com Fax 1 901 379 1210 If you need to locate a service center please call 1 877 BROTHER or visit us at www brother usa com CAUTION USING A COMBINATION OF DIFFERENT BATTERIES SUCH AS Ni MH AND ALKALINE MAY RESULT IN AN EXPLOSION DISPOSE OF USED BATTERIES ACCORDING TO THE INSTRUCTIONS ...

Page 33: ...e collection point not in the general waste stream In addition be sure to observe all applicable federal state and local regulations When storing or discarding the batteries wrap it for example with cellophane tape to prevent it from short circuiting Refer to the picture on the lower right Battery insulation example 1 Cellophane tape 2 Alkaline or Ni MH battery 2 1 ...

Page 34: ...ied to enter a 3rd line by pressing You tried to print or preview two lines of text while 0 13 3 5mm or 0 23 6 mm tape is installed Install larger tape size No Cassette You tried to print feed or preview a label when there is no cassette installed Cutter Pressed Tape cutter lever is pressed in the middle of printing process Text Full The maximum number of characters 80 characters for text 50 chara...

Page 35: ...e display will be lost A blank horizontal line appears through the printed label There may be some dust on the print head Remove the tape cassette and use a dry cotton swab to gently wipe the print head with an up and down motion The machine has locked up i e nothing happens whena key is pressed even though the machine is on Refer to Resetting the P touch The power turns off when you try to print ...

Page 36: ......

Page 37: ......

Page 38: ... Images are for illustrative purposes only Frames with highlighted numbers are only available when using 0 47 12mm wide tape cassettes ...

Page 39: ...56 57 58 59 60 61 62 63 64 65 66 67 68 69 70 71 72 73 74 75 76 77 78 79 80 81 82 83 84 85 86 87 88 89 90 91 92 93 94 95 96 97 98 99 ...

Reviews: