Brother MFC-8420 User Manual Download Page 418

OPTIONAL ACCESSORIES   23 - 9

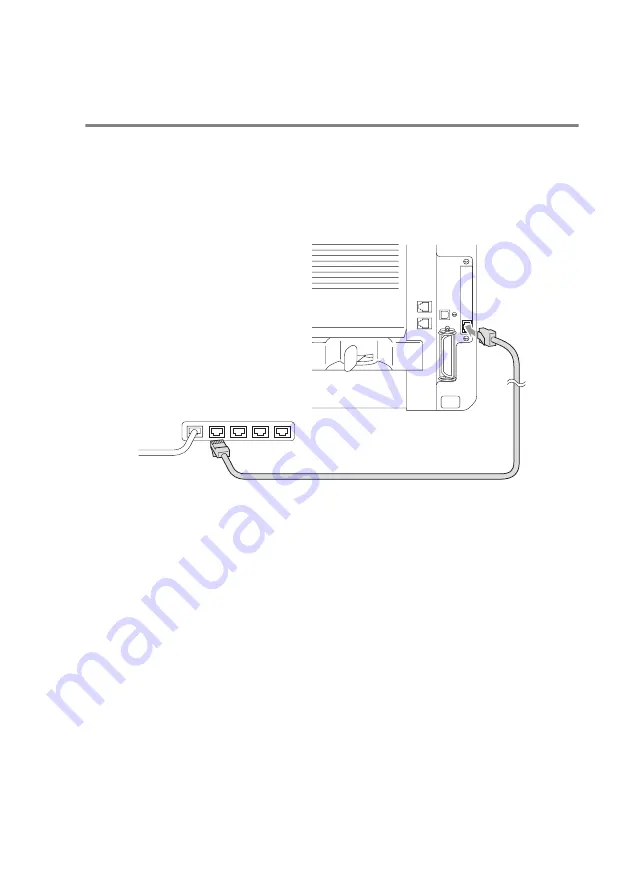
Step 2: Connecting the NC-9100h to an 
Unshielded Twisted Pair 10BASE-T or 
100BASE-TX Ethernet Network

To connect the NC-9100h to a 10BASE-T or 100BASE-TX Network, 
you must have an Unshielded Twist Pair Cable. One side of the cable 
must be connected to a free port on your Ethernet hub and the other 
side must be connected to the 10BASE-T or 100BASE-TX connector 
(an RJ45 Connector) of the NC-9100h.

Verifying successful hardware Installation:

Plug in the AC power cord. After initialization and warm-up (this may 
take several seconds), the machine will come to a Ready state.

LED

No light:

If both of the two LEDs are off, then the print server is not connected 
to the network.

Link/Speed LED is orange: Fast Ethernet

This Link/Speed LED will be orange if the print server is connected 
to a 100BASETX Fast Ethernet network.

Summary of Contents for MFC-8420

Page 1: ...MFC 8420 MFC 8820D USER S GUIDE ...

Page 2: ...d Publication Notice Under the supervision of Brother Industries Ltd this manual has been compiled and published covering the latest product descriptions and specifications The contents of this manual and the specifications of this product are subject to change without notice Brother reserves the right to make changes without notice in the specifications and materials contained herein and shall no...

Page 3: ... the power outlet Do not handle the plug with wet hands Doing this might cause an electrical shock After you use the MFC some internal parts are extremely HOT To prevent injuries be careful not to put your fingers in the area shown in the illustration To prevent injuries be careful not to put your hands on the edge of the MFC under the document cover To prevent injuries be careful not to put your ...

Page 4: ...t location Install equipment with a power cord near a socket outlet that is easily accessible Do not use a telephone in the vicinity of gas leak to report leak Do not use this product near appliances that use water in a wet basement or near a swimming pool There may be a remote risk of electric shock from lightning Caution Lightning and power surges can damage this product We recommend that you us...

Page 5: ...lace near heaters air conditioners water chemicals or refrigerators Do not expose the MFC to direct sunlight excessive heat moisture or dust Do not connect your MFC to electrical outlets controlled by wall switches or automatic timers Disruption of power can wipe out information in the MFC s memory Do not connect your MFC to electrical outlets on the same circuit as large appliances or other Equip...

Page 6: ...ct On and then press Set OR For the next transmission only press or to select Next Fax Only and then press Set 5 For the next fax only press or to select Next Fax On and then press Set 6 Press 1 if you want to choose more settings and the LCD will return to the Setup send menu OR Press 2 to fax 7 Enter the fax number 8 Press Start Receiving faxes Select Receive Mode 1 Press Menu 0 1 2 Press or to ...

Page 7: ... Press Search Speed Dial press and then press the three digit Speed Dial number 4 Press Start Using Search 1 If it is not illuminated in green press Fax 2 Press Search Speed Dial and then enter the first letter of the name you re looking for 3 Press or to search the memory 4 Press Start Making copies Single copy 1 Press Copy to illuminate it in green 2 Place the document face up in the ADF or face...

Page 8: ...uence 1 15 Connections 1 16 Recording outgoing message OGM on an external TAD 1 17 Custom features on your phone line 1 17 2 Paper 2 1 About paper 2 1 Type and size of paper 2 1 Recommended paper 2 1 Choosing acceptable paper 2 2 Paper capacity of the paper trays 2 3 Paper specifications for each paper tray 2 4 How to load paper 2 5 To load paper or other media in the paper tray 2 5 To load paper ...

Page 9: ...the Beeper Volume 4 8 Setting the Speaker Volume 4 9 Setting the Clock Change 4 9 Toner Save 4 9 Sleep Time 4 10 Turning off the Scanner Lamp 4 10 Power Save 4 11 Setting the Tray Use for Copy mode 4 12 Setting the Tray Use for Fax mode 4 13 Setting the LCD Contrast 4 13 Initial Setup depending on Your Country 4 14 Setting Tone or Pulse dialing mode Except for New Zealand 4 14 5 Setup Receive 5 1 ...

Page 10: ... 15 Advantages of Caller ID 5 15 How Does the Caller ID Work 5 16 The Caller ID Appears on the Display When Your Telephone Rings 5 16 The Caller ID is Stored in Your MFC Memory 5 16 Viewing Caller ID List 5 17 Printing Caller ID List 5 17 Telephone Service for New Zealand 5 18 FaxAbility 5 18 How Will the Fax Machine Treat All Other Numbers 5 18 What is the Advantage of Using the FaxAbility Functi...

Page 11: ...ple settings 6 7 Contrast 6 8 Fax Resolution 6 9 Manual and automatic fax Redial 6 9 Dual Access 6 10 Real Time Transmission 6 11 Checking job status 6 12 Canceling a job while scanning the document 6 12 Canceling a scheduled job 6 13 Advanced sending operations 6 14 Composing the electronic Cover Page 6 14 Composing your own comments 6 15 Cover page for the next fax only 6 15 Send a cover page fo...

Page 12: ... Forwarding number 8 1 Setting Fax Storage 8 2 Setting your Remote Access Code 8 3 Remote retrieval 8 4 Using your Remote Access Code 8 4 Remote commands 8 5 Retrieving fax messages 8 6 Changing your Fax Forwarding number 8 6 9 Printing reports 9 1 MFC settings and activity 9 1 Customizing the Transmission Verification Report 9 1 Setting the Journal Period 9 2 Printing reports 9 3 To print a repor...

Page 13: ...t 11 2 Simultaneous printing and faxing 11 3 Two sided printing Duplex Printing 11 3 Automatic Duplex Printing For MFC 8820D 11 3 Manual Duplex Printing 11 4 Face down output tray 11 5 Printing on plain paper 11 5 The manual feed tray For MFC 8420 11 5 The MP tray For MFC 8820D 11 6 Printing on thicker paper and card stock 11 8 The manual feed tray For MFC 8420 11 8 The multi purpose tray MP tray ...

Page 14: ...s tab 12 14 Support tab 12 16 Features in the PS printer driver For Windows 12 17 Ports tab 12 18 Device Settings tab 12 19 Layout tab 12 20 Booklet For MFC 8820D For Windows 2000 XP 12 20 Paper Quality tab 12 21 Advanced Options 12 22 13 How to scan using Windows 13 1 Scanning a document 13 1 TWAIN compliant 13 1 How to access the Scanner 13 2 Scanning a document into the PC 13 3 Scanning a whole...

Page 15: ...xtBridge OCR lets you convert image text into text you can edit 13 22 You can Import items from other applications 13 23 You can Export items in other formats 13 23 Exporting an image file 13 23 How to Uninstall PaperPort and ScanSoft TextBridge 13 24 14 Using the Brother Control Center 14 1 Brother MFL Pro Control Center 14 1 AutoLoad the Brother Control Center 14 2 How to turn off AutoLoad 14 2 ...

Page 16: ...n 14 16 Scanner settings 14 17 Number of copies 14 17 Send a fax 14 18 To access the Send a fax Configurations screen 14 18 Scanner settings 14 18 PC FAX Settings 14 19 15 Using the Windows Based Brother SmartUI Control Center 15 1 Brother SmartUI Control Center 15 1 AutoLoad the Brother Control Center 15 2 How to turn off Auto Load 15 2 Brother Control Center features 15 3 Auto Configuration 15 4...

Page 17: ...mation 17 2 Sending setup 17 3 Outside line access 17 4 Include header 17 4 Address Book file 17 4 User interface 17 5 Simple style 17 5 Facsimile style 17 5 Speed Dial setup 17 6 The Address Book 17 7 Setting up a Member in the Address Book 17 8 Setting up a Group for Broadcasting 17 9 Editing Member information 17 10 Deleting a Member or Group 17 10 Exporting the Address Book 17 10 Importing to ...

Page 18: ... Using the PS driver with your Apple Macintosh 18 6 For Mac OS 8 6 to 9 2 Users 18 7 For Mac OS X users 18 11 Sending a fax from your Macintosh application 18 14 For Mac OS 8 6 9 2 users 18 14 For Mac OS X users 18 16 Drag a vCard from the Mac OS X Address Book application 18 18 Using the Brother TWAIN scanner driver with your Macintosh 18 20 Accessing the scanner 18 20 Scanning an image into your...

Page 19: ... from your Macintosh application 20 7 For Mac OS 8 6 9 2 users 20 7 For Mac OS X users 20 7 21 Important information 21 1 IEC 60825 Specification 21 1 Laser Diode 21 1 Caution 21 1 Important Information for Australia 21 2 Important Safety Instructions 21 2 IMPORTANT For Your Safety 21 4 Disconnect device 21 4 LAN Connection 21 4 ENERGY STAR Compliance Statement 21 4 Important Information for New Z...

Page 20: ...e maintenance 22 24 Cleaning the scanner 22 24 Cleaning the printer 22 25 Cleaning the drum unit 22 26 Replacing the toner cartridge 22 27 How to replace the toner cartridge 22 27 Replacing the drum unit 22 32 Checking the drum life 22 35 Page Counter 22 35 23 Optional accessories 23 1 Memory board 23 1 Installing the optional memory board 23 2 Network LAN board 23 5 Before starting installation 2...

Page 21: ...uct description S 1 General S 1 Print media S 2 Copy S 2 Fax S 3 Scanner S 4 Printer S 5 Interfaces S 5 Computer requirements S 6 Consumable items S 7 Network LAN board NC 9100h S 8 24 Index I 1 25 Remote Retrieval Access card R 1 ...

Page 22: ...and actions To make things clearer and to help you press the correct keys we used special fonts and added some of the messages that will appear in the LCD Introduction Bold Bold typeface identifies specific keys on the MFC control panel Italics Italicized typeface emphasizes an important point or refers you to a related topic Courier New Courier New typeface identifies the messages on the LCD of t...

Page 23: ...Document Support Extension Place the document here to use the ADF unit 7 ADF Document Output Support Flap Unfold to prevent the scanned pages from sliding off the MFC 8 Document Cover Open to place the document on the scanner glass 9 Power Switch Switch it on or off 10 Front Cover Open to install a toner cartridge or drum unit 11 Paper Tray Tray 1 Load paper here 7 ADF Document Output Support Flap...

Page 24: ...per jammed inside the ADF unit 17 Telephone Line Jack Socket Plug the line cord supplied with the machine here 18 USB Interface Connector Connect the USB Cable here 19 Parallel Interface Connector Connect the Parallel Cable here 20 External Telephone Line Jack Socket Not for the UK Plug in the modular plug on the external telephone line here 15 Face up Output Tray Back Output Tray 14 AC Power Conn...

Page 25: ... when using the ADF 23 Scanner Lock Lever Use to lock unlock the scanner when relocating the MFC 24 Document Cover Open to place the document on the scanner glass 25 White Film Clean it for good quality copying and scanning 26 Scanner Glass Place the document to be scanned here 25 White Film 24 Document Cover 21 Document Guidelines 22 Glass Strip 26 Scanner Glass 23 Scanner Lock Lever ...

Page 26: ...INTRODUCTION 1 5 Control panel overview MFC 8420 and MFC 8820D have similar control panel keys ...

Page 27: ...ure Lets you print out data saved in memory by entering your four digit password Job Cancel Clears data from the printer memory 4 Status LED Light Emitting Diode The LED will flash and change color depending on the MFC status 5 5 Line Liquid Crystal Display LCD Displays messages on the screen to help you to set up and use your MFC 6 Mode keys Fax Lets you access Fax mode Copy Lets you access Copy ...

Page 28: ...de line and or to recall the operator or transfer a call to another extension when it is connected to a PABX Resolution Sets the resolution when you send a fax Search Speed Dial Lets you look up numbers that are stored in the dialing memory It also lets you dial stored numbers by pressing and a three digit number Redial Pause Redials the last number you called It also inserts a pause in auto dial ...

Page 29: ... do a numeral search for the names of stored numbers in fax mode 9 Copy keys Temporary settings Enlarge Reduce Lets you reduce or enlarge copies depending upon the ratio you select Contrast Lets you make a copy that is lighter or darker than the document Quality Lets you select the copy quality for your type of document Tray Select You can select which tray you would like to use for the next copy ...

Page 30: ... as a keyboard for entering information into the MFC The key lets you temporarily switch the dialing mode during a telephone call from Pulse to Tone A Stop Exit Stops a fax copy and scan operation or exits from the menu B Start Lets you start sending faxes making copies or scanning ...

Page 31: ...off Green Yellow Red LED is on Green Yellow Red LED is blinking LED MFC status Description Sleep Mode The power switch is off or the MFC is in Sleep mode or Power save mode Green Warming Up The MFC is warming up for printing Green Ready The MFC is ready to print Yellow Receiving Data The MFC is either receiving data from the computer processing data in memory or printing data Yellow Data Remaining...

Page 32: ...page 22 1 Toner empty Replace the toner cartridge with a new one See Replacing the toner cartridge on page 22 27 Paper error Put paper in the tray or clear the paper jam Check the LCDmessage See Troubleshooting and routine maintenance on page 22 1 Scan lock Check that the scanner lock lever is released See Scanner Lock Lever on page 1 4 Others Check the LCDmessage See Troubleshooting and routine m...

Page 33: ...g If your MFC is set to the Fax Only mode it will answer every call automatically with fax receiving tones If the other person hangs up your MFC will continue to send the chirps for about 40 seconds and the LCD continues to show Receiving To cancel receiving press Stop Exit The fax handshake is the time in which the sending machine s CNG tones and the receiving machines chirps overlap This must be...

Page 34: ...ress If the MFC detects errors during fax transmission it resends the pages of the fax that had an error ECM transmissions are only possible between fax machines that both have this feature If they do you may send and receive fax messages that are continuously being checked by the MFC Your MFC must have enough memory for this feature to work ...

Page 35: ...ugh your MFC does not have a handset you can connect a separate telephone or telephone answering device directly to your MFC as shown in the diagram below Whenever this phone or TAD is in use the LCD shows Telephone Extension Telephone External Telephone Example for Australia ...

Page 36: ...playing your outgoing message so your caller can leave you a voice message The TAD must answer within four rings the recommended setting is two rings The MFC cannot hear CNG tones until the TAD has answered the call and with four rings there are only 8 to 10 seconds of CNG tones left for the fax handshake Make sure you carefully follow the instructions in this guide for recording your outgoing mes...

Page 37: ...ure this cord is connected to the TAD at the TAD s telephone line socket and not its telephone socket 3 Set your external TAD to one or two rings The MFC s Ring Delay setting does not apply 4 Record the outgoing message on your external TAD 5 Set the TAD to answer calls 6 Set the Receive Mode to External TAD See Choosing the Receive Mode on page 5 1 Do not connect a TAD elsewhere on the same phone...

Page 38: ...n Code for people sending manual faxes For example After the beep leave a message or send a fax by pressing 51 91 for New Zealand and Start Custom features on your phone line If you have Voice Mail Call Waiting RingMaster an answering service an alarm system or other custom feature on one phone line it may create a problem with the operation of your MFC See Custom features on a single line on page...

Page 39: ...er that is 75 to 90 gsm Use neutral paper Do not use acidic or alkaline paper Use long grain paper Use paper with a moisture content of approximately 5 Paper Tray Type Model name Paper tray Tray 1 MFC 8420 and MFC 8820D Manual feed tray MFC 8420 Multi purpose tray MP tray MFC 8820D Optional lower tray Tray 2 Option for MFC 8420 and MFC 8820D Plain Paper Xerox Premier 80 gsm Xerox Business 80 gsm M...

Page 40: ...r especially for plain paper and transparencies For more information on paper specifications call your nearest authorized sales representative or the place where you purchased your MFC Use labels or transparencies that are designed for use in laser printers For the best print quality we recommend using long grained paper If you are using special paper and the paper has problems feeding from the pa...

Page 41: ...o 406 4 mm Up to 50 sheets 80 gsm Manual feed tray MFC 8420 Width 69 8 to 220 mm Height 116 to 406 4 mm Single sheet Paper tray Tray 1 A4 Letter Legal B5 ISO B5 JIS Executive A5 A6 B6 ISO Up to 250 sheets 80 gsm Optional lower tray Tray 2 A4 Letter Legal B5 ISO B5 JIS Executive A5 B6 ISO Up to 250 sheets 80 gsm Duplex printing A4 Letter Legal ...

Page 42: ...nal Lower tray Plain paper Recycled paper and Transparency 2 Paper weights Multi purpose tray N A 60 to 161 gsm Manual feed tray 60 to 161 gsm N A Paper tray 60 to 105 gsm Optional Lower tray 60 to 105 gsm Paper sizes Multi purpose tray N A Width 69 8 to 220 mm Height 116 to 406 4 mm Manual feed tray Width 69 8 to 220 mm Height 116 to 406 4 mm N A Paper tray A4 Letter Legal B5 ISO B5 JIS Executive...

Page 43: ...ay completely out of the MFC 2 While pressing the paper guide release lever slide the adjusters to fit the paper size Check that the guides are firmly in the slots For Legal size paper press the universal guide release button and pull out the back of the paper tray Universal Guide Release Button ...

Page 44: ... paper stack 5 Put the paper tray firmly back in the MFC and unfold the support flap before you use the MFC When you put paper in the paper tray please remember the following The side to be printed on must be face down Put the leading edge top of the paper in first and push it gently into the tray To copy or receive faxes on Legal size paper unfold the support flap extension too Up to here Support...

Page 45: ...the paper size 2 Using both hands put paper in the manual feed tray until the front edge of the paper touches the paper feed roller Hold the paper in this position until the MFC automatically feeds the paper in for a short distance and then let go of the paper When printing envelopes and labels you should only use the manual feed tray ...

Page 46: ...f the paper in first and push it gently into the tray Make sure that the paper is straight and in the proper position on the manual feed tray If it is not the paper may not be fed properly resulting in a skewed printout or a paper jam Do not put more than one sheet of paper or envelope in the manual feed tray at any one time or it may cause a jam ...

Page 47: ...dia in the multi purpose tray MP tray For MFC 8820D 1 Open the MP tray and lower it gently 2 Pull out and unfold the MP tray support flap When printing envelopes and labels you should only use the multi purpose tray MP tray support flap ...

Page 48: ...on on the MP tray If it is not the paper may not be fed properly resulting in a skewed printout or a paper jam You can place up to 3 envelopes or up to 50 sheets of 80 gsm paper in the MP tray When you put paper in the MP tray please remember the following The side to be printed on must be face up During printing the inside tray rises to feed paper into the MFC Put the leading edge top of the pape...

Page 49: ...f paper you are using This feature is available for A4 Letter or Legal size paper See Setting Duplex printing for Fax mode For MFC 8820D on page 5 13 Duplex N in 1 on page 10 12 and Two sided printing Duplex Printing on page 11 3 1 Load paper in the Paper Tray or Multi purpose Tray 2 Set the Paper Adjustment Lever for Duplex Printing in the back of the MFC to match your paper size 3 Your MFC is no...

Page 50: ...e menu selections and programming options Menu table You can probably program your MFC without the User s Guide But to help you understand the menu selections and options that are found in the MFC programs use the Menu table on page 3 4 Memory Storage If there is a power failure you will not lose your menu settings because they are stored permanently Temporary settings such as Contrast Overseas Mo...

Page 51: ...or Initial Setup menu OR You can scroll more quickly through each menu level by pressing the arrow for the direction you want or Then set an option by pressing Set when that option appears on the LCD Access the menu Go to the next menu level Accept an option Exit the menu by pressing repeatedly Go back to the previous menu level Scroll through the current menu level Go back to the previous menu le...

Page 52: ... next menu level Press or to scroll to your next menu selection Press Set When you finish setting an option the LCD shows Accepted Use to scroll backward if you passed your choices or want to save keystrokes The current setting is always the option with ...

Page 53: ...Multi purpose tray 4 6 2 Tray 1 For MFC 8420 this menu doesn t appear Thin Plain Thick Thicker Transparency Sets the type of paper in paper tray 1 4 6 3 Tray 2 option Thin Plain Thick Thicker Transparency Sets the type of paper in paper tray 2 4 6 3 Paper Size 1 Tray 1 This menu only appears if you have the optional tray 2 A4 Letter Legal Executive A5 A6 B5 B6 Sets the size of paper in paper tray ...

Page 54: ... Low Off Adjusts the volume level of the beeper 4 8 3 Speaker High Med Low Off Adjusts the speaker volume 4 9 5 Clock Change To Summer Time To Winter Time Adjusts the MFC s clock by one hour for summer winter time 4 9 6 Ecology 1 Toner Save On Off Increases life of toner cartridge 4 9 2 Sleep Time 00 99 05Min Conserves power 4 10 3 Power Save On Off Power Save Mode 4 11 The factory settings are sh...

Page 55: ...ts the tray that will be used for fax 4 13 7 LCD Contrast MFC 8420 8 LCD Contrast MFC 8820D 9 LCD Contrast With optional tray 2 Adjusts the contrast of LCD 4 13 2 Fax 1 Setup Receive In Fax mode only 1 Ring Delay 10 09 08 07 06 05 04 03 02 Example for Australia Sets the number of rings before the MFC answers in FAX or FAX TEL mode 5 2 2 F T Ring Time 70 40 30 20 Example for Australia Sets the pseu...

Page 56: ...r off You can personalize these codes 5 9 5 Auto Reduction On Off Reduces the size of incoming faxes 5 5 6 Memory Receive On Off Automatically stores any incoming faxes in its memory if it runs out of paper 5 6 7 Print Density Makes printouts darker or lighter 5 7 8 Polling RX Standard Secure Timer Sets up your MFC to poll another fax machine 5 10 9 Duplex MFC 8820D On Off Receives faxes printed o...

Page 57: ...ayed faxes will be sent 6 20 4 Batch TX On Off Combines delayed faxes to the same fax number at the same time of day into one transmission 6 21 5 Real Time TX Off On Next Fax Only You can send a fax without using the memory 6 11 6 Polled TX Standard Secure Sets up the document on your MFC to be retrieved by another fax machine 6 21 7 Coverpg Setup Next Fax Only On Off Print Sample Automatically se...

Page 58: ...k Dial 1 One Touch Dial Stores One Touch Dial numbers so you can dial by pressing one key and Start 7 1 2 Speed Dial Stores Speed Dial numbers so you can dial by pressing only a few keys and Start 7 3 3 Setup Groups Sets up a Group number for Broadcasting 7 5 4 Report Setting 1 Transmission On On Image Off Off Image Initial setup for Transmission Verification Report and Journal Report 9 1 2 Journa...

Page 59: ...d in the memory 5 7 6 Remaining Jobs Checks which jobs are in the memory or cancels a delayed fax or polling job 6 12 0 Miscellaneous 1 Mem Security Prohibits most functions except receiving faxes into memory 6 23 2 Drum Life You can check the percentage of drum life that remains available 22 35 3 Page Counter Total Copy Print List Fax Lets you check number of total pages the MFC has printed so fa...

Page 60: ...to Auto Selects the Copy resolution for your type of document 10 20 2 Contrast Adjusts the contrast for copies 10 20 4 Printer 1 Emulation Auto HP LaserJet BR Script 3 Selects the Emulation mode 11 18 2 Print Options 1 Internal Font Prints a list of the MFC s internal fonts or current printer settings 11 19 2 Configuration 11 19 3 Reset Printer Returns the MFC to the original factory default setti...

Page 61: ...needs 5 2 2 Date Time Puts the date and time on the LCD and in headings of faxes you send 4 1 3 Station ID Fax Tel Name Program your name fax and telephone number to appear on each page you fax 4 2 4 Tone Pulse Except for New Zealand Tone Pulse Selects the dialing mode 4 14 The factory settings are shown in Bold with to accept to exit Press the Menu numbers ex Press 1 1 for Mode Timer OR to select...

Page 62: ...IP Address 000 255 000 255 000 255 000 255 Enter the IP address 3 Subnet Mask 000 255 000 255 000 255 000 255 Enter the Subnet mask 4 Gateway 000 255 000 255 000 255 000 255 Enter the Gateway address 5 Host Name BRN_XXXXXX Enter the Host name 6 WINS Config Auto Static You can choose the WINS configuration mode 7 WINS Server Primary Secondary Specifies the IP address of the primary or secondary ser...

Page 63: ...mail address 2 SMTP Server 000 255 000 255 000 255 000 255 Enter the SMTP server address 3 POP3 Server 000 255 000 255 000 255 000 255 Enter the POP3 server address 4 Mailbox Name up to 20 characters Enter the mail box name 5 Mailbox Pwd Password Enter the password to login to the POP3 server 3 Setup Mail RX 1 Auto Polling On Off Automatically checks the POP3 server for new messages 2 Poll Frequen...

Page 64: ...Sends notification messages 4 Setup Mail TX 1 Sender Subject Displays the subject that is attached to the Internet Fax data 2 Size Limit On Off Limits the size of E mail documents 3 Notification On Off Sends notification messages 5 Setup Relay 1 Rly Broadcast On Off Relays a document to another fax machine 2 Relay Domain RelayXX Registers the Domain name 3 Relay Report On Off Prints the Relay Broa...

Page 65: ...k On Off Select On to use the MFC on a Macintosh network 4 DLC LLC On Off Select On to use the MFC on a DLC LLC network 5 Net BIOS IP On Off Select On to use the MFC on a Net BIOS IP network 6 Ethernet Auto 100B FD 100B HD 10B FD 10B HD Selects Ethernet link mode 7 Time Zone GMT XX XX Sets the time zone for your country 7 Scan to E Mail PDF JPEG Selects the file type The factory settings are shown...

Page 66: ...y Tray 1 Only Tray 2 Only Auto Select the tray that will be used for copying 4 12 8 Tray Use Fax Tray 1 Only Tray 2 Only Auto Select the tray that will be used for faxing 4 13 Main Menu Submenu Menu Selections Options Descriptions Page 1 General Setup 7 Tray Use Copy Tray 1 Only Tray 2 Only MP Only Auto Select the tray that will be used for copying 4 12 8 Tray Use Fax Tray 1 Only Tray 2 Only Auto ...

Page 67: ...affected 1 Press Menu 0 2 2 Enter the last two digits of the year Press Set 3 Enter two digits for the month Press Set For example enter 09 for September or 10 for October 4 Enter two digits for the day Press Set For example enter 06 for 6th 5 Enter the time in 24 Hour format Press Set For example enter 15 25 for 3 25 P M 6 Press Stop Exit The LCD now shows the date and time whenever the MFC is in...

Page 68: ...e using spaces to aid readability as appropriate As an example if the machine is installed in the United Kingdom and the same line is to be used for both fax and voice calls and your national telephone number is 0161 444 5555 then you must set the fax and telephone number parts of your station ID as 44 161 444 5555 1 Press Menu 0 3 2 Enter your fax number up to 20 digits Press Set 3 Enter your tel...

Page 69: ...e keys for 0 and do not have printed letters because they are used for special characters By pressing the appropriate number key repeatedly you can access the character you want Inserting spaces To enter a space press once between numbers and twice between characters If the Station ID has already been programmed the LCD will ask you to press 1 to make a change or 2 to exit without changing Press K...

Page 70: ...ted Re enter the correct character Repeating letters If you need to enter a character that is on the same key as the previous character press to move the cursor to the right before you press the key again Special characters and symbols Press or 0 and then press or to move the cursor under the special character or symbol you want Then press Set to select it Press for space Press for _ Press 0 for Ä...

Page 71: ... Scan You can change the number of seconds or minutes the MFC takes after the last Copy or Scan operation before it returns to Fax mode If you select Off the MFC stays in the mode you used last 1 Press Menu 1 1 2 Press or to select 0 Sec 30 Secs 1 Min 2 Mins 5 Mins or Off 3 Press Set 11 Mode Timer 0 Sec 30 Secs 1 Min Select Set ...

Page 72: ...FC 8820D 1 Press Menu 1 2 1 to set the paper type for MP Tray OR Press Menu 1 2 2 to set the paper type for Tray 1 OR If you have the optional paper tray press Menu 1 2 3 to set the paper type for Tray 2 2 Press or to select Thin Plain Thick Thicker or Transparency 3 Press Set 4 Press Stop Exit You can select Transparency for Tray 1 and Tray 2 only when A4 Letter or Legal is selected in Menu 1 3 1...

Page 73: ... the page 1 Press Menu 1 3 2 Press or to select A4 Letter Legal Executive A5 A6 B5 or B6 Press Set 3 Press Stop Exit With optional paper tray 1 Press Menu 1 3 1 to set the paper size for Tray 1 OR Press Menu 1 3 2 to set the paper size for Tray 2 2 Press or to select A4 Letter Legal Executive A5 A6 B5 and B6 Press Set 3 Press Stop Exit If you are using the optional paper tray paper size A6 is not ...

Page 74: ...the MFC will ring so you can hear the active setting as the LCD shows it The volume changes with each key press The new setting will stay until you change it again Setting the Beeper Volume You can change the beeper volume The default factory setting is Med When the beeper is on the MFC beeps every time you press a key or make a mistake and after a fax is sent or received 1 Press Menu 1 4 2 2 Pres...

Page 75: ... Press or to select To Summer Time or To Winter Time 3 Press Set 4 Press 1 to change to Winter Time or Summer Time OR Press 2 to exit without changing Toner Save You can conserve toner using this feature When you set Toner Save to On print appears somewhat lighter The default setting is Off 1 Press Menu 1 6 1 2 Press or to select On or Off 3 Press Set 4 Press Stop Exit 14 Volume 3 Speaker Med High...

Page 76: ...stays on for 16 hours before automatically switching off to preserve the life of the lamp You can turn off the scanner lamp manually if you wish by pressing the and keys simultaneously The scanner lamp will remain turned off until the next time you use the scanning feature Turning off the scanner lamp will also reduce the power consumption If you want to turn sleep mode off press Secure and Job Ca...

Page 77: ...f it drops into power save mode in approx 10 minutes automatically In the Power Save Mode you cannot use the fax detect function or remote activation The MFC will not display the date and time in this condition 1 Press Menu 1 6 3 2 Press or to select On or Off 3 Press Set when the screen displays your selection 4 Press Stop Exit 16 Ecology 3 Power Save On Off Select Set ...

Page 78: ...s Menu 1 7 2 Press or to select Tray 1 Only MP Only or Auto OR If you have the optional paper tray Press or to select Tray 1 Only Tray 2 Only MP Only or Auto 3 Press Set 4 Press Stop Exit If your MFC is a MFC 8420 without the optional tray 2 you can skip this setting 1 Copies will automatically be printed from Tray 2 only if the Paper Size setting for Tray 2 is the same as Tray 1 2 When using the ...

Page 79: ... Set 4 Press Stop Exit Setting the LCD Contrast You can change the contrast to help the LCD look lighter or darker 1 MFC 8420 Press Menu 1 7 MFC 8820D Press Menu 1 8 OR If you have the optional tray 2 press Menu 1 9 2 Press to increase the contrast OR Press to decrease the contrast Press Set 3 Press Stop Exit If Auto Reduction is turned on incoming faxes will be printed from the tray that is set f...

Page 80: ...ing mode Except for New Zealand Your machine comes set for Tone dialing service multi frequency If you have Pulse dialing service rotary you need to change the dialing mode 1 Press Menu 0 4 2 Press or to select Pulse or Tone Press Set 3 Press Stop Exit 04 Tone Pulse Tone Pulse Select Set ...

Page 81: ...ne on the same line even if it is on a separate wall socket phone socket on the same line You cannot use the telephone company s Voice Mail in this mode External TAD with an external answering machine The external answering machine TAD automatically answers every call Voice messages are stored on the external TAD Fax messages are printed Use this mode if you have an external answering machine on y...

Page 82: ... See Fax Detect on page 5 4 and Operation from extension telephones on page 5 8 1 If it is not illuminated in green press Fax 2 Press Menu 2 1 1 3 Press or to select how many times the line rings before the MFC answers 02 10 for Australia 01 10 for New Zealand 00 10 for some countries Press Set If you select 00 the line won t ring at all 4 Press Stop Exit If you are changing the Receive Mode while...

Page 83: ...for New Zealand and no other phones on the same line will ring with the special pseudo double ring However you can still answer the call on any extension phone in a separate wall socket phone socket on the same line as the MFC See Operation from extension telephones on page 5 8 1 If it is not illuminated in green press Fax 2 Press Menu 2 1 2 3 Press or to select how long the MFC will ring to alert...

Page 84: ...f means you ll have to activate the MFC yourself by lifting the handset of an external or extension phone and then press Start on the MFC OR by pressing 51 91 for NewZealand if you are not at your MFC See Operation from extension telephones on page 5 8 1 If it is not illuminated in green press Fax 2 Press Menu 2 1 3 3 Use or to select On or Off Press Set 4 Press Stop Exit If this feature is set to...

Page 85: ...lculates the reduction ratio by using the page size of the document and your Paper Size setting Menu 1 3 1 If it is not illuminated in green press Fax 2 Press Menu 2 1 5 3 If you have the optional paper tray 2 press or to select Tray 1 or Tray 2 Press Set 4 Use or to select On or Off Press Set 5 Press Stop Exit If you receive faxes that are split onto two pages turn on this setting 21 Setup Receiv...

Page 86: ...full following with no further incoming fax calls will be automatically answered To print all data put paper in the paper tray If the Memory Receive switch is OFF at this time The current fax reception will continue with the remaining page s being stored in memory subject to available memory Subsequent incoming fax calls will not be automatically answered until fresh paper is put in the paper tray...

Page 87: ...2 5 4 2 Press Start 3 After printing has finished press Stop Exit Setting the Print Density You can adjust print density making your printed pages darker or lighter 1 If it is not illuminated in green press Fax 2 Press Menu 2 1 7 3 Press to make the print darker OR Press to make the print lighter Press Set 4 Press Stop Exit 25 Remote Fax Opt 4 Print Document Press Start 21 Setup Receive 7 Print De...

Page 88: ...you re receiving a manual fax At an extension phone on a separate telephone wall socket phone socket press 51 91 for NewZealand wait for fax receiving tones chirps and then hang up At an external phone connected to the MFC s EXT socket press 51 91 for NewZealand and wait for the phone to be disconnected before you hang up the LCD shows Receiving Your caller will have to press Start to send the fax...

Page 89: ... with some telephone systems The preset Remote Activation Code is 5 1 9 1 for New Zealand The preset Deactivation Code is 5 1 9 1 for New Zealand 1 If it is not illuminated in green press Fax 2 Press Menu 2 1 4 3 Press or to select On or Off Press Set 4 If you want to enter a new Remote Activation Code Press Set 5 If you want to enter a new Deactivation Code Press Set 6 Press Stop Exit If you are ...

Page 90: ...all Secure Polling Secure Polling is a way to keep your documents and others from falling into the wrong hands while the machine is set up for polling You can use Secure Polling only with another Brother fax machine Anyone who polls to receive a fax must enter the polling secure code Setup for Polling Receive Standard Polling Receive is when you call another fax machine to receive a fax from it 1 ...

Page 91: ...ve You can set the MFC to begin Polling Receive at a later time 1 If it is not illuminated in green press Fax 2 Press Menu 2 1 8 3 Press or to select Timer Press Set 4 The screen prompts you to enter the time you want to begin polling 5 Enter the time in 24 hour format you want to begin polling For example enter 21 45 for 9 45 PM 6 Press Set 7 The screen prompts you to enter the fax number you are...

Page 92: ...re enter a four digit number and press Set and then go to Step 5 If you selected Timer enter the time in 24 hour format you want to begin polling and press Set and then go to Step 5 5 Specify the destination fax machines up to 390 which you wish to poll by using Speed Dial Search a Group see Setting up Groups for Broadcasting on page 7 5 or the dial pad You must press Set between each location 6 P...

Page 93: ...both sides of the paper You can use three sizes of paper for this function letter legal and A4 1 If it is not illuminated in green press Fax 2 Press Menu 2 1 9 3 Press or to select On or Off Press Set 4 Press Stop Exit While the Duplex printing for fax is working auto reduction is also On temporarily 21 Setup Receive 9 Duplex On Off Select Set ...

Page 94: ... for receiving faxes After you have set the Distinctive Ring feature to ON the receive mode is set to MANUAL automatically Unless you have a TAD or Voice Mail set up on the Distinctive Ring number MANUAL mode means you must answer all the call yourself You can not change the receive mode to the other mode while the Distinctive Ring is set to on All extension phones ring fax machine is silent Fax m...

Page 95: ...espond quickly to calls you missed because Caller IDs are received and stored in your MFC memory Advantages of Caller ID For Business All businesses profit from a quicker response to customer calls Businesses that provide mail order services money lending services or provide confidential information can protect themselves from false orders or acceptance of false identification At Home Residential ...

Page 96: ...reception The 31st call will cause the oldest ID to be erased The Caller ID information stored in the memory can be used for the following Selecting a Caller ID from the Memory for Call Reply You can scroll through the Caller IDs on the display and select one for your MFC to dial Printing the Caller ID List You can review calls you received by checking the Caller IDs in memory This report will lis...

Page 97: ... Display and press Set If the name was not received it will not be displayed 3 Press or to scroll through the Caller ID memory to select the Caller ID you want to view and press Set The next screen shows the caller s telephone number and the date and time of the call 4 Press or to return to the Caller ID listing OR Press Stop Exit to exit Printing Caller ID List 1 Press Menu 2 0 5 2 Press or to se...

Page 98: ...mes in to your main number all the phones will ring You can set an external answering device TAD to answer calls on the other number s See the chart in the following page What is the Advantage of Using the FaxAbility Function Using FaxAbility is the most efficient way to receive both fax and telephone calls on the same line It is much easier for your callers who dial manually The fax machine will ...

Page 99: ...ckly learn to recognize the ring pattern for faxes so you will not be tempted to answer that number Either you or a telephone answering device can answer the main number s After you have set the FaxAbility feature to ON the receive mode is set to Manual automatically Unless you have a TAD or Voice Mail set up on the FaxAbility number Manual mode means you must answer all the call yourself You can ...

Page 100: ...you have FaxAbility Service but don t have Call Waiting you need do nothing at this stage If you do have Call Waiting as well as FaxAbility set the Call Waiting menu option to On See below 1 Press Menu 2 0 4 The screen displays 2 Press or to set FaxAbility to On or Off If you have FaxAbility service select On 3 Press Set 4 Press or to set Call Waiting to On or Off If you have Call Waiting service ...

Page 101: ... orders or acceptance of false identification At Home Residential customers can protect themselves from unwanted calls How Does the Caller ID Work The Caller ID Appears on the Display When Your Telephone Rings As your telephone rings the display shows you the caller s phone number Once you pick up the handset the caller s ID disappears You will see up to the first 16 characters of the number on th...

Page 102: ...nd press Set The next screen shows the caller s telephone number and the date and time of the call 4 Press or to return to the Caller ID listing OR Press Stop Exit Printing Caller ID List 1 Press Menu 2 0 5 2 Press or to select Print Report 3 Press Set 4 Press Start If you use the Caller ID for Dial back Please be sure that you use appropriate dialing procedures for local and national call Please ...

Page 103: ...ust for receiving faxes You ll need to set Distinctive Ringing to On Setting the Distinctive Ringing 1 Press Menu 2 0 4 2 Press or to select On or Off 3 Press Set 4 Press Stop Exit You can switch it off temporarily then turn it back on When you get a new fax number make sure you reset this function The MFC will answer only calls to the Distinctive Ringing number After you have set the Distinctive ...

Page 104: ...ick up the handset the Caller ID information disappears from the screen but the call information remains stored in the Caller ID memory You will see the first 16 characters of the number or name Out of Area display means call originates outside your Caller ID service area Private Call display means the caller has intentionally blocked transmission of information If both the name and number are rec...

Page 105: ...ect Display and press Set If the name was not received it will not be displayed 3 Press or to scroll through the Caller ID memory to select the Caller ID you want to view and press Set The next screen shows the caller s telephone number and the date and time of the call 4 Press or to return to the Caller ID listing OR Press Stop Exit Printing Caller ID List 1 Press Menu 2 0 5 2 Press or to select ...

Page 106: ...ADF can hold up to 50 pages and feeds each sheet individually Use standard 75 gsm paper and always fan the pages before putting them in the ADF Make sure documents written with ink are completely dry The documents to be faxed must be from 148 to 216 mm wide and 148 to 356 mm long Setup Send DO NOT use paper that is curled wrinkled folded ripped stapled paper clipped pasted or taped DO NOT use card...

Page 107: ...ll and stagger them at an angle Make sure you put the documents face up top edge first in the ADF until you feel them touch the feed roller 4 Adjust the paper guides to fit the width of your documents 5 Dial the fax number Press Start The MFC starts scanning the first page ADF Document Support Extension ADF Document Output Support Flap Document Support The documents are Face Up in the ADF ...

Page 108: ...xit 1 If it is not illuminated in green press Fax Lift the document cover 2 Using the document guidelines on the left center the document face down on the scanner glass 3 Close the document cover 4 Dial the fax number Press Start The MFC starts scanning the first page If the document is a book or is thick do not slam the cover or press on it The documents are Face Down on the Scanner Glass Documen...

Page 109: ...6 6 Place the next page on the scanner glass Press Set The MFC starts scanning Repeat Steps 5 and 6 for each additional page If the memory is full and you are faxing a single page it will be sent in real time If you need to cancel before the fax is sent press Stop Exit Flatbed Fax Next Page 1 Yes 2 No Send Select Set Flatbed Fax Set Next Page Then Press Set ...

Page 110: ...ill have the option to press Start to send the pages scanned so far or to press Stop Exit to cancel the operation Manual transmission Manual transmission lets you hear the dialing ringing and fax receiving tones while sending a fax 1 If it is not illuminated in green press Fax Place the document face up in the ADF or face down on the scanner glass 2 Pick up the handset of the external phone and li...

Page 111: ...ress Start 4 If you are using the scanner glass press 2 or Start Sending a fax at the end of a conversation At the end of a conversation you can send a fax to the other party before you both hang up 1 Ask the other party to wait for fax tones beeps and then to press Start before hanging up 2 If it is not illuminated in green press Fax Place the document face up in the ADF or face down on the scann...

Page 112: ...yed fax timer polling transmission or real time transmission If it is not illuminated in green press Fax before pressing Menu After each setting is accepted the LCD will ask if you want to enter more settings Press 1 to select more settings The LCD will return to the Setup Send menu OR Press 2 if you have finished choosing settings and go to the next step 22 Setup Send Next 1 Yes 2 No Select Set ...

Page 113: ...LCD will return to the Setup Send menu OR Press 2 if you have finished choosing settings for this page and then go to Step 5 5 Enter a fax number 6 Press Start to send the fax from the ADF The MFC starts scanning the first page If you are using the scanner glass go to Step 7 7 To send a single page press 2 or press Start again The MFC starts sending the document OR To send more than one page press...

Page 114: ...he line is busy press Redial Pause and then press Start to try again If you want to make a second call to the last number dialed you can save time by pressing Redial Pause and Start Redial Pause only works if you dialed from the control panel If you are sending a fax automatically and the line is busy the MFC will automatically redial up to three times at five minutes intervals Standard Suitable f...

Page 115: ... scanner glass go to Step 4 4 To send a single page press 2 or press Start again The MFC starts sending the document OR To send more than one page press 1 and go to Step 5 5 Place the next page on the scanner glass Press Set The MFC starts scanning and then returns to Step 4 Repeat Steps 4 and 5 for each additional page To send the next fax go to Step 1 If you get a Out of Memory message while sca...

Page 116: ...ly without waiting for memory transmission You can set Real Time TX to On for all documents or for the next fax only If you want to fax multiple pages use ADF 1 If it is not illuminated in green press Fax Place the document face up in the ADF or face down on the scanner glass 2 Press Menu 2 2 5 3 To change the default setting press or to select On or Off Press Set Go to Step 5 OR For the next fax ...

Page 117: ...till waiting in the memory to be sent If there are no jobs the LCD shows No Jobs Waiting 1 Press Menu 2 6 2 If you have more than one job waiting press or to scroll through the list 3 Press Stop Exit Canceling a job while scanning the document You can cancel a job while you are scanning it into memory by pressing Stop Exit In Real Time Transmission using the scanner glass the auto redial function ...

Page 118: ... appear on the LCD 2 If you have more than two jobs waiting press or to select the job you want to cancel Press Set OR If you only have one job waiting go to Step 3 3 Press 1 to cancel OR Press 2 to exit without canceling To cancel another job go to Step 2 4 Press Stop Exit 26 Remaining Jobs 001 12 34 BROTHER 002 15 00 BIC 003 17 30 ABCDEFG Select Set ...

Page 119: ...he number of pages is left blank You can select a comment to include on your Cover Page 1 Note Off 2 Please Call 3 Urgent 4 Confidential Instead of using one of the preset comments you can enter two personal messages of your own up to 27 characters long Use the chart on page 4 3 for help entering characters See Composing your own comments on page 6 15 5 User Defined 6 User Defined Most of the Setu...

Page 120: ...feature does not work without the Station ID So make sure it has been set See Setting the Station ID on page 4 2 If you only want to send a Cover Page with a particular fax this Cover Page will include the number of pages in your document 1 If it is not illuminated in green press Fax Place the document face up in the ADF or face down on the scanner glass 2 Press Menu 2 2 7 3 When LCD shows Next Fa...

Page 121: ...is feature does not work without the Station ID Please be sure it has been set before continuing See Setting the Station ID on page 4 2 You can set the MFC to send a cover page whenever you send a fax The number of pages in your fax is not included when you use this setting 1 If it is not illuminated in green press Fax 2 Press Menu 2 2 7 3 Press or to select On Press Set 4 If you selected On Press...

Page 122: ...o as many as 390 different numbers However the available memory will vary depending on the types of jobs in the memory and the number of locations used for broadcasting If you broadcast to the maximum numbers available you will not be able to use Dual Access and Delayed fax To include One Touch or Speed Dial numbers and manually dialed numbers in the same broadcast you must press Set between each ...

Page 123: ...isplays the fax number of the other party press Set You will be asked to press the next number 4 Enter the next number Example Speed Dial number 5 When the LCD displays the fax number of the other party press Set 6 Enter another fax number Example Manual dialing using the dial pad 7 Press Start If you are using the scanner glass go to Step 8 8 To send a single page press 2 or press Start again The...

Page 124: ...or Off Press Set 4 Press 1 if you want to choose more settings and the LCD will return to the Setup Send menu OR Press 2 if you have finished choosing settings and then go to Step 5 5 Enter the fax number you re calling 6 Press Start If you are using the scanner glass go to Step 7 7 To send a single page press 2 or press Start again The MFC starts sending the fax OR To send more than one page pres...

Page 125: ...ess 1 if you want to choose more settings and the LCD will return to the Setup Send menu OR Press 2 if you have finished choosing settings and then go to Step 5 5 Enter the fax number 6 Press Start If you are using the scanner glass go to Step 7 7 To send a single page press 2 or press Start again The MFC starts scanning the document OR To send more than one page press 1 and go to Step 8 8 Place t...

Page 126: ...Standard Polled Transmit is when you set up the machine to wait with a document so another fax machine can retrieve it 1 If it is not illuminated in green press Fax Place the document face up in the ADF or face down on the scanner glass 2 Press Menu 2 2 6 3 Press or to select Standard Press Set 4 Press 1 if you want to select additional settings The display returns to the Setup Send menu OR Press ...

Page 127: ... code 1 If it is not illuminated in green press Fax Place the document face up in the ADF or face down on the scanner glass 2 Press Menu 2 2 6 3 Press or to select Secure Press Set 4 Enter a four digit number Press Set 5 Press 1 if you want to select additional settings The display returns to the Setup Send menu OR Press 2 if you finished selecting settings and go to Step 6 6 Press Start The MFC s...

Page 128: ...to continue to schedule Delayed Faxes or Polling jobs However any pre scheduled Delayed Faxes will be sent when you turn Memory Security On so they won t be lost If Fax Storage is On before you turn Memory Security On then Fax Forwarding and Remote Retrieval will continue to work While Memory Security is On the following operations are available Receiving faxes into memory limited by memory capaci...

Page 129: ...t password and press Set 2 Memory Security is automatically turned off and the LCD shows the Date and Time If you forget the Memory Security password please call your Brother dealer for service Security password is very import for operation If you lost a reset procedure must be done by Brother with service charge If there is a power failure the data in the memory will remain for up to 4 days If yo...

Page 130: ...ling on page 7 7 One Touch keys are the 20 keys numbers 01 40 located on the left side of the control panel 1 Press Menu 2 3 1 2 Press the One Touch key where you want to store a number If you have not installed the optional LAN board NC 9100h go to Step 4 OR If you have installed optional LAN board NC 9100h the MFC will ask you if the One Touch key is for a fax telephone number or an e mail addre...

Page 131: ... a 3 5 second pause when the number is dialed and a dash appears on the screen 5 Use the dial pad to enter the name up to 15 characters Press Set You can use the chart on page 4 3 to help you enter letters OR Press Set to store the number without a name 6 Go to Step 2 to store another One Touch number OR Press Stop Exit When you dial an auto dial number the LCD shows the name and number you ve sto...

Page 132: ...9100h go to Step 4 OR If you have installed optional LAN board NC 9100h the MFC will ask you if have the Speed Dial is for a fax telephone number or an e mail address Go to Step 3 3 Press or to select Fax Tel Press Set 4 Enter the phone or fax number up to 20 digits Press Set 5 Use the dial pad to enter the name up to 15 characters Press Set You can use the chart on page 4 3 to help you enter lett...

Page 133: ... number Press Set To erase the whole number or whole name press Clear Back repeatedly until all digits or letters are deleted To erase one digit or letter use or to position the cursor under it and then press Clear Back If you want to insert characters use or to position the cursor where you want to insert them and then type 3 Follow the directions beginning at Step 4 in Storing One Touch Dial num...

Page 134: ... One Touch key or a Speed Dial location Finally you can have up to six small Groups or you can assign up to 339 numbers to one large Group See Storing Speed Dial numbers on page 7 3 and Changing One Touch and Speed Dial numbers on page 7 4 1 Press Menu 2 3 3 2 Decide where you wish to store the Group AND Press a One Touch key OR Press Search Speed Dial and enter the three digit location and then p...

Page 135: ...cation 009 press Search Speed Dial then press 009 on the dial pad The LCD shows 005 009 5 Press Set to accept the numbers for this Group 6 Use the dial pad and the chart on page 4 3 to enter a name for the Group Press Set For example NEW CLIENTS 7 Press Stop Exit You can print a list of all One Touch and Speed Dial numbers See Printing reports on page 9 3 Group numbers will be marked in the column...

Page 136: ...rch Speed Dial 3 Press or To search alphabetically through the names that are stored enter the first letter of the name you re looking for and press or OR Press or To search for numbers numerically press or 4 When the LCD shows the name you want to call Press Start One Touch Dialing 1 If it is not illuminated in green press Fax Place the document face up in the ADF or face down on the scanner glas...

Page 137: ...ing means pressing all of the digits of the phone number Using an external telephone The easiest way to use your external telephone is to pick up the handset and dial the number on the external telephone as you normally would 1 Pick up the handset of the external telephone 2 Dial the number on the external telephone 3 To hang up replace the handset If you try to use a One Touch or Speed Dial locat...

Page 138: ...g the dial pad The combined number will be dialed in the order that you entered it as soon as you press Start See Storing One Touch Dial numbers on page 7 1 For example you can store 555 on One Touch key 03 and 7000 on One Touch key 02 If you press One Touch key 03 One Touch key 02 and Start you will dial 555 7000 To temporarily change a number you can substitute part of the number with manual dia...

Page 139: ...lse Except for New Zealand If you have a Pulse dialing service but need to send Tone signals for example for telephone banking follow the instructions below If you have Touch Tone service you will not need this feature to send tone signals 1 Lift the handset of an external phone 2 Press on the control panel of your MFC Any digits dialed after this will send tone signals 3 When you hang up the MFC ...

Page 140: ...ogrammed and forwards the fax message 1 Press Menu 2 5 1 2 Press or to select On or Off Press Set The LCD will ask you to enter the fax number to which faxes will be forwarded 3 Enter the forwarding number up to 20 digits Press Set 4 Press Stop Exit Remote Fax Options After you have selected Fax Forwarding Fax Storage is set to On automatically 25 Remote Fax Opt 1 Fax Forward On Off Select Set ...

Page 141: ...t If you press 1 all fax data is erased and Fax Storage is turned off If you press 2 faxes are not erased and Fax Storage stays on See Polling on page 5 10 If there are faxes in the memory when you turn Fax Storage OFF the LCD will ask if you want to erase the faxes in the memory After you have selected Fax Forwarding feature Fax Storage is set to On automatically If you bring Fax Forwarding featu...

Page 142: ...ess Menu 2 5 3 2 Enter a three digit code using numbers 0 9 or Press Set The preset cannot be changed 3 Press Stop Exit Do not use the same digits that appear in your Remote Activation Code 51 or Deactivation Code 51 See Operation from extension telephones on page 5 8 You can change your code at any time by entering a new one If you want to make your code inactive press Clear Back in Step 2 to res...

Page 143: ...tely enter your Remote Access Code 3 digits followed by 3 The MFC signals if it has received fax messages 1 long beep Fax messages No beeps No fax messages 4 The MFC gives two short beeps which tells you to enter a command The MFC will hang up if you wait longer than 30 seconds to enter a command The MFC will beep three times if you enter an invalid command 5 Press 90 to reset the MFC when you ve ...

Page 144: ...istered the number Fax Forwarding will be set to On 2 Fax Forwarding 4 Fax Forwarding number 6 Fax Storage ON You can turn Fax Storage to On or Off after you have retrieved or erased all your messages 7 Fax Storage OFF 96 Retrieve a fax 2 Retrieve all faxes Enter the number of a remote fax machine to receive stored fax messages See Retrieving fax messages on page 8 6 3 Erase faxes from the memory ...

Page 145: ...ssages Changing your Fax Forwarding number You can change the default setting of your fax forwarding number from another telephone or fax machine using Touch Tone 1 Dial your fax number 2 When your MFC answers immediately enter your Remote Access Code 3 digits followed by If you hear one long beep you have messages 3 When you hear two short beeps use the dial pad to press 954 4 Wait for the long b...

Page 146: ...or On Image the report will print for every fax you send If you send a lot of faxes to the same place you may need more than the job numbers to know which faxes you must send again Selecting On Image or Off Image will print a section of the fax s first page on the report to help you remember 1 Press Menu 2 4 1 2 Press or to select Off Off Image On or On Image Press Set 3 Press Stop Exit Printing r...

Page 147: ...o begin printing in 24 hour format Press Set For example enter 19 45 for 7 45 PM 4 Press Stop Exit If you select 6 12 24 hours 2 or 7 days the MFC will print the report at the selected time and then erase all jobs from its memory If the MFC s memory becomes full with 200 jobs before the time you selected has passed the MFC will print the Journal early and then erase all jobs from memory If you wan...

Page 148: ...lp List so you can see at a glance how to quickly program your MFC 2 Quick Dial Lists names and numbers stored in the One Touch and Speed Dial memory in numerical order 3 Journal Lists information about the last incoming and outgoing faxes TX means Transmit RX means Receive 4 XMIT Verify Prints a Transmission Verification Report for your last transmission 5 System Setup Lists your settings 6 Order...

Page 149: ...f it is not press Copy to enter Copy mode The default setting is Fax You can change the number of seconds or minutes that the MFC stays in Copy mode after a copy operation See Setting the Mode Timer on page 4 5 The printable area of your MFC begins at approximately 2 mm from the both ends and 3 mm from the top or bottom of the paper Making copies Unprintable area 3mm 2mm Ex A4 Document A4 Paper ...

Page 150: ...ant to use these temporary settings again place the next document in the ADF or on the scanner glass within that time However if you have set the Mode Timer for Copy and Scan modes to 0 or 30 seconds the MFC returns to the default settings after the number of seconds that has been set for Mode Timer See Setting the Mode Timer on page 4 5 and Using the Copy keys Temporary settings on page 10 6 Whil...

Page 151: ... Do NOT pull on the document while copying is in progress Making multiple copies from the ADF 1 Press Copy to illuminate it in green Insert the document face up in the ADF 2 Use the dial pad to enter the number of copies you want up to 99 3 Press Start To stop copying and eject the document press Stop Exit To sort the copies press the Sort key ...

Page 152: ...0 6 1 Press Copy to illuminate it in green Lift the Document Cover 2 Using the document guidelines on the left center the document face down on the scanner glass and close the document cover 3 Using the dial pad enter the number of copies you want up to 99 For example press 3 8 for 38 copies 4 Press Start The MFC will start scanning the document If you want to sort multiple copies use the ADF See ...

Page 153: ...f you first print incoming faxes in the memory to restore the memory to 100 To gain extra memory you can turn off Fax Storage See Setting Fax Storage on page 8 2 OR Print the faxes that are in the memory See Printing a fax from the memory on page 5 7 Then if this error message appears more than once you may wish to consider increasing the memory size For more information on how to increase the mem...

Page 154: ...ange the settings only for the next copy use the Temporary Copy keys You can use different combinations The large LCD shows your current Copy mode settings Temporary Copy keys Duplex N in 1 Example of Copy mode LCD Enlg Red 100 Quality Auto Contrast Tray 1 LTR Press or Start 01 ...

Page 155: ...te it in green Place the document face up in the ADF or face down on the scanner glass 2 Use the dial pad to enter the number of copies you want up to 99 3 Press Enlarge Reduce 4 Press Enlarge Reduce or Press Enlarge Reduce 100 104 EXE LTR 141 A5 A4 200 Auto Custom 25 400 50 70 A4 A5 78 LGL LTR 83 LGL A4 85 LTR EXE 91 Full Page 94 A4 LTR 97 LTR A4 Auto appears only when you place the document in t...

Page 156: ...nd press Set Use the dial pad to enter an enlargement or reduction ratio from 25 to 400 Press Set For example press 5 3 to enter 53 6 Press Start OR Press other temporary copy keys for more settings Special Copy Options 2in1 4in1 or Poster are not available with Enlarge Reduce Auto is not available with the scanner glass ...

Page 157: ...glass 2 Use the dial pad to enter the number of copies you want up to 99 3 Press Quality 4 Press or to choose the type of document Auto Text or Photo Press Set 5 Press Start OR Press other Temporary Copy keys for more settings Sorting copies using the ADF If you want to sort multiple copies use the ADF Pages will be printed in the order 123 123 123 and so on 1 Press Copy to illuminate it in green ...

Page 158: ...t in green Place the document face up in the ADF or face down on the scanner glass 2 Use the dial pad to enter the number of copies you want up to 99 3 Press Contrast 4 Press to make a copy lighter OR Press to make a copy darker Press Set 5 Press Start OR Press other Temporary Copy keys for more settings Press Contrast ...

Page 159: ...t up to 99 3 Press Tray Select 4 Press or to select the tray usage Press Set 5 Press Start OR Press other Temporary Copy keys for more settings For MFC 8420 with the optional paper tray 2 For MFC 8820D with the optional paper tray 2 XXX is the paper size you set in Menu 1 3 Press Tray Select Auto 1 XXX 2 XXX Press Tray Select Auto 1 XXX 2 XXX MP Tray For MFC 8420 the LCD displays the tray use sele...

Page 160: ...ument Finished Layout Press Duplex N in 1 MFC 8820D N in 1 MFC 8420 N in 1 2 in 1 P 2 in 1 L 4 in 1 P 4 in 1 L Duplex 1 in 1 MFC 8820D Portrait1 Portrait2 Single Sided Double Sided Landscape1 Single Sided Double Sided Landscape2 2 1 1 2 2 1 1 2 2 1 1 2 3 4 2 1 1 2 3 4 2 1 1 2 2 1 1 2 1 2 1 2 2 1 1 2 1 2 1 2 2 1 1 2 ...

Page 161: ...yout Press Duplex N in 1 MFC 8820D N in 1 MFC 8420 Duplex 2 in 1 MFC 8820D Portrait1 Portrait2 Landscape1 Landscape2 Duplex 4 in 1 MFC 8820D Portrait1 Portrait2 Landscape1 Landscape2 Poster Off 1 2 3 2 1 2 1 2 1 3 1 3 2 1 2 1 1 3 1 3 2 5 2 1 2 4 1 5 2 1 1 3 2 5 2 1 3 1 4 5 2 1 1 ...

Page 162: ...s or to select 2 in 1 P 2 in 1 L 4 in 1 P or 4 in 1 L Press Set 5 If you are ready to copy go to Step 7 OR Press or to select Quality Contrast or Tray Pres Set 6 Press or to select a new setting Press Set 7 Press Start If you are using the ADF the MFC scans the originals and prints the copies OR If you are using the scanner glass the MFC scans the page Place the next original on the scanner glass ...

Page 163: ...and press Set or press 2 to print the copies P means Portrait and L means Landscape You can also combine the N in 1 and Duplex operations See Duplex 2 in 1 and Duplex 4 in 1 For MFC 8820D on page 10 19 For 2 in 1 P 2 in 1 L 4 in 1 P or 4 in 1 L you can not use the Enlarge Reduce setting ...

Page 164: ...canner glass 1 Place the original face down on the scanner glass 2 Press Duplex N in 1 and or to select Poster Press Set 3 Press Start The MFC starts scanning the original and prints the pages for the poster For poster copies you cannot make more than one copy or use the Enlarge Reduce setting ...

Page 165: ...scape2 OR If you select Portrait1 or Landscape2 go to Step6 Press Set 5 Press or to select Single Sided for the document If you are using the scanner glass or changed the number of copies at Step 2 this option will not appear Press Set 6 Press Start to scan the document If you placed the document in the ADF the MFC starts printing OR If you placed the document on the scanner glass go to Step 7 7 P...

Page 166: ...1 and or to select Duplex 1 in 1 Press Set 3 Press or to select Portrait2 or Landscape1 Press Set 4 Press or to select Double Sided for the document Press Set 5 Press Start 6 Make sure that you have put the documents in the ADF as shown on the LCD and press Start 7 After all the pages of the document have been scanned on one side turn the other side of the document face up in the ADF Press Start 1...

Page 167: ...lect Duplex 2 in 1 or Duplex 4 in 1 Press Set 4 Press or to select Portrait1 Portrait2 Landscape1 or Landscape2 Press Set 5 Press Start to scan the document If you placed the document in the ADF the MFC starts printing OR If you placed the document on the scanner glass go to Step 6 6 Place the next document on the scanner glass Select 1 and press Set or press 1 to copy next page 7 After all the pa...

Page 168: ... 1 2 Press or to select Text Photo or Auto Press Set 3 Press Stop Exit Contrast You can change the contrast to help an image look lighter or darker 1 Press Menu 3 2 2 Press to make lighter OR Press to make darker Press Set 3 Press Stop Exit Submenu Menu Selections Options Factory Settings 1 Quality Text Auto Photo Auto 2 Contrast 31 Quality Auto Text Photo Select Set 32 Contrast Select Set ...

Page 169: ...ible fonts for Microsoft Windows 95 98 98SE Me 2000 Professional XP and Windows NT workstation 4 0 are available on the CD ROM supplied with your MFC You can install them easily into your Windows system using our installer program The driver supports our unique compression mode to enhance printing speed in Windows applications and allows you to set various printer settings including economy printi...

Page 170: ...8420 or MFC 8820D USB Printer as your printer driver from the Print or Print Settings menu in your software application and then click on OK to begin printing 2 Your computer sends a print command and data to the MFC 3 The LED blinks in yellow and the MFC starts to print If your application software does not support your custom paper size select the next largest paper size Then adjust the print ar...

Page 171: ...g For MFC 8820D In this mode the MFC prints on both sides of the A4 Letter or Legal paper automatically 1 Open the Properties dialog box in the printer driver 2 Select Duplex Printing mode in the Advanced tab make sure that Use Duplex Unit has been selected and then click the OK button See Duplex Printing on page 12 6 The printer will print on both sides of the paper automatically When you select ...

Page 172: ... numbered pages on one side of the paper first Then the Windows driver instructs you with a pop up message to reinsert the paper Before reinserting the paper straighten it well or you may get a paper jam Very thin or very thick paper is not recommended We recommend 75 to 90 gsm paper ...

Page 173: ...C 8420 1 Select the Paper Size Media Type Paper Source and other settings in the printer driver Media Type Plain Paper Paper Source Manual 2 Send the print data to the MFC 3 Open the manual feed tray Slide the paper guides to fit the paper size When printing transparencies remove each one from the support flap after it exits the MFC The MFC automatically turns on the Manual Feed mode when you put ...

Page 174: ... The MP tray For MFC 8820D 1 Select the Paper Size Media Type Paper Source and other settings in the printer driver Media Type Plain Paper Paper Source MP Tray 2 Open the MP tray and lower it gently 3 Pull out the MP tray support flap Make sure that the paper is straight and in the proper position on the manual feed tray If it is not the paper may not be fed properly resulting in a skewed printout...

Page 175: ...ure that the paper is straight and in the proper position on the MP tray If it is not the paper may not be fed properly resulting in a skewed printout or a paper jam When you put paper in the MP tray please remember the following The side to be printed on must be face up During printing the inside tray rises to feed paper into the MFC Put the leading edge top of the paper in first and push it gent...

Page 176: ... back of the MFC Use this paper feed and output method when you want to print on thicker 106 161 gsm paper or card stock The manual feed tray For MFC 8420 1 Select the Paper Size Media Type Paper Source and other settings in the printer driver Media Type Thick paper or Thicker paper Paper Source Manual 2 Open the back output tray 3 Open the manual feed tray Slide the paper guides to fit the paper ...

Page 177: ...e Repeat for each page that you want to print 7 When you have finished the print job close the back output tray Caution Remove each sheet immediately after printing Stacking the sheets may cause a paper jam or the paper to curl Make sure that the paper is straight and in the proper position in the manual feed tray If it is not the paper may not be fed properly resulting in a skewed printout or a p...

Page 178: ...P Tray 2 Open the back output tray and then pull out the face up output tray support if necessary 3 Open the MP tray and lower it gently 4 Pull out the MP tray support flap 5 When putting paper in the MP tray make sure it touches the back of the tray Make sure that the paper is straight and in the proper position in the MP tray If it is not the paper may not be fed properly resulting in a skewed p...

Page 179: ...b close the back output tray Caution Remove each sheet immediately after printing Stacking the sheets may cause a paper jam or the paper to curl When you put paper in the MP tray please remember the following During printing the inside tray rises to feed paper into the MFC The side to be printed on must be face up Put the leading edge top of the paper in first and push it gently into the tray ...

Page 180: ... purpose tray 1 Select the Paper Size Media Type Paper Source and other settings in the printer driver Media Type Envelope Env thin or Env thick The MFC automatically turns on the Manual Feed mode when you put paper in the manual feed tray All sides should be properly folded without any wrinkles or creases ...

Page 181: ...pe size If envelopes are creased after they have been printed At the back of the MFC open the back output tray and push down the blue tabs at the left and right hand sides as shown in the figure on the next page When you have finished printing your envelopes close the back output tray to reset the two blue tabs back to their original position ...

Page 182: ... Step 4 for each envelope you want to print 6 Send the print data to the MFC 7 After you finish the print job close the back output tray Make sure the envelope is straight as you insert it in the manual feed tray If it is not the envelope may not be fed properly resulting in a skewed printout or a jam Do not put more than one envelope in the manual feed tray at any one time or it may cause a jam P...

Page 183: ...y 4 Pull out the MP tray support flap If envelopes are creased after they have been printed At the back of the MFC open the back output tray and push down the blue tabs at the left and right hand sides as shown in the figure on the next page When you have finished printing your envelopes close the back output tray to reset the two blue tabs back to their original position ...

Page 184: ...r you finish the print job close the back output tray Make sure that the envelopes are neatly stacked and in the proper position in the MP tray If they are not the envelopes may not be fed properly resulting in a skewed printout or a jam When you put envelopes in the MP tray please remember the following During printing the inside tray rises to feed envelopes into the MFC The side to be printed on...

Page 185: ...from the memory To use this function you need to set your password in the printer driver dialog box See Device Options on page 12 11 1 Press Secure OR The LCD displays No Data if there is no secured data in the memory 2 Press or to select the user name Press Set The LCD displays job selections 3 Press or to select the job Press Set The LCD prompts you to enter your four digit password The Secure K...

Page 186: ...You can change the default emulation mode manually by using the control panel 1 Press Menu 4 1 2 Press or to select Auto HP LaserJet or BR Script 3 Press Set 3 Press Stop Exit If you turn the power switch Off the secured data saved in memory will be cleared After you print the secured data it will be cleared from memory Try this function with your application software or network server If the func...

Page 187: ...Menu 4 2 2 2 Press Start The MFC prints the settings 3 Press Stop Exit Restoring factory default settings You can return the MFC to the original factory settings Fonts and macros in the temporary settings are cleared 1 Press Menu 4 3 2 Press 1 to restore the factory settings OR Press 2 to exit without making a change 3 Press Stop Exit Only the printer settings will be returned to the original fact...

Page 188: ...er settings 1 Select Print from the File menu in your application software 2 Select Brother MFC 8420 or MFC 8820D USB Printer as your printer and click Properties Preference The Printing Preferences 3 dialog box will appear Printer driver settings Windows Only The way you access the printer driver settings depends on your operating system and software applications 3 The screens shown in this secti...

Page 189: ... Basic tab 1 Select the Paper Size Multiple Page Border Line if any and Orientation 2 Select number of Copies and Media Type 3 Select Paper Source First Page and Other Pages Auto Select allows the printer driver to select a suitable tray for Paper Size automatically You can set the paper size for each tray in the Accessories tab See Accessories tab on page 12 14 4 To return to the default settings...

Page 190: ... sheet of paper or enlarging the image size for printing one page on multiple sheets of paper Border Line When printing multiple pages on one sheet with the Multiple Page feature you can select to have a solid border dash border or no border around each page on the sheet Orientation Orientation selects the position of how your document will be printed Portrait or Landscape Ex 4 in 1 Ex 1 in 2 2 pa...

Page 191: ...the next page of the document is printed Media Type You can use the following types of media in your MFC For the best print quality select the type of media that you wish to use Plain Paper Thin Paper Thick Paper Thicker Paper Bond Paper Transparencies Envelopes Env Thick Env Thin When using ordinary plain paper 70 to 95 gsm select Plain Paper When using heavier weight paper envelopes or rough pap...

Page 192: ...owing icons 1 Print Quality 2 Duplex 3 Watermark 4 Page Setting 5 Device Options Print Quality Resolution You can change the resolution as follows HQ 1200 600 dpi 300 dpi To return to the default settings click the Default button When you select Use Duplex Unit HQ1200 is not available 1 2 3 4 5 ...

Page 193: ...mmended the printer automatically prints with the most suitable print settings With the Print Setting set to Manual you can change the Brightness Contrast and Graphics Quality options manually For Windows 2000 XP NT WS 4 0 Check Use Printer Halftone to print using Halftone Check Use System Halftone to print using Halftone of the system To change the setting press Setting If the halftone cannot be ...

Page 194: ...nter driver stops and shows the instructions required to re install the paper When you click OK the odd numbered pages are printed Duplex Type You can select Duplex Type There are six types of duplex directions available for each orientation Flip on Left Edge Flip on Right Edge Flip on Top Edge Flip on Bottom Edge Flip on Top Edge No Reverse Flip on Bottom Edge No Reverse Binding Offset Check the ...

Page 195: ...ave created Check Use Watermark and then select the watermark you want to use In background Check In background to print the watermark image in the background of your document If this feature is not checked then the Watermark will be printed on top of your document In Outline Text Window 2000 Professional XP NT WS 4 0 Only Check In Outline Text if you only want to print an outline of the watermark...

Page 196: ... button and then select Text or Bitmap in the Watermark Style Title You can select the CONFIDENTIAL COPY or DRAFT as the standard title or enter a title you like in the field Watermark Text Enter your Watermark text into the Text Box and then select the Font Size Darkness and Style Watermark Bitmap Enter the file name and location of your bitmap image in the File box or Browse for the file locatio...

Page 197: ...ff if you want to print the document as it appears on your screen Check Fit to Paper Size if your document has an unusual size or if you have only the standard size paper Check the Free box if you want to manually reduce or enlarge the output You can also use the Mirror Print or Reverse Print feature for your page setting ...

Page 198: ...se the control panel of the MFC with the password to print them To send a secured document 1 Select Secure Print from Printer Function and check Secure Print 2 Enter your password user name and job name and click OK 3 You must print the secured documents from the control panel of the MFC See Secure key on page 11 17 To delete a secured document 1 You need to use the control panel of the MFC to del...

Page 199: ... This feature can be set to ON or OFF from the Device Options section Administrator For Windows 95 98 98SE Me Users Only The administrator selection permits the Copy Scaling and Watermark features to be locked and password protected The factory setting is OFF Record your password and keep it in a safe place for future reference If you forget your password these settings can not be accessed ...

Page 200: ...at You can change the Font by clicking the Font button or the Position To include a background with the Date and Time select Opaque When Opaque is selected you can set the Darkness of the Date and Time background by changing the percentage The Date and Time indicated in the selection box represents the format that will be printed The actual Date and Time printed on your document is automatically r...

Page 201: ...ource in the Paper Source Setting list Select the Paper Size from the pull down box and click Update When Auto Select default Paper Source is set in the Basic tab of the printer driver See Basic tab on page 12 2 the printer driver will automatically use the Paper Source Setting to select a tray which matches the Paper Size setting in the printer driver Default Source The Default Source allows you ...

Page 202: ...ional 2nd paper tray the option must be installed in the driver Highlight the model number from the Available Options list and click Add The optional tray will then be listed in the Installed box Paper Source Setting list and the screen illustration will display the 2nd tray ...

Page 203: ...en Brother Solutions Center The Brother Solutions Center is a Web site offering information about your Brother product including FAQs Frequently Asked Questions User Guides Driver Updates and Tips for using your MFC Web Update Web Update checks the Brother web site for updated drivers and automatically downloads and updates the printer driver on your computer Check Setting The Check Setting select...

Page 204: ...pears check PS Printer Driver and then continue following the on screen instructions If you have not previously installed the driver and software insert the CD ROM into the CD ROM drive on your PC and click Install Software Choose MFL Pro Suite and follow the on screen instructions When the Setup Type screen appears select Custom and check the PS Printer Driver Then continue following on screen in...

Page 205: ...12 18 PRINTER DRIVER SETTINGS Ports tab Select the port where your printer is connected or the path to the network printer you are using ...

Page 206: ...PRINTER DRIVER SETTINGS 12 19 Device Settings tab Select the options you installed ...

Page 207: ...Page Order and Pages Per Sheet Booklet For MFC 8820D For Windows 2000 XP You can print a booklet by selecting Booklet from Pages Per Sheet list If you are using Windows NT 4 0 Windows 2000 or XP you can access the Layout tab by clicking Printing Preferences in the General tab of the Brother BR Script3 Properties screen ...

Page 208: ...21 Paper Quality tab Select the Paper Source If you are using Windows NT 4 0 Windows 2000 or XP you can access the Paper Quality tab by clicking Printing Preferences in the General tab of the Brother BR Script3 Properties screen ...

Page 209: ...ing and TrueType Font setting 3 You can change settings by selecting the setting in the Printer Features list Media Type Toner Save BR Script Level If you are using Windows NT 4 0 Windows 2000 or XP you can access the Advanced Options tab by clicking Advanced button in the Layout tab or the Paper Quality tab 1 2 3 ...

Page 210: ...ning These applications include popular programs like Adobe Photoshop Adobe PageMaker CorelDraw and many more How to scan using Windows The scanning operations and drivers will be different depending on your operating system For Windows 95 98 98SE Me 2000 Professional and Windows NT Workstation 4 0 The MFC uses a TWAIN Compliant driver for scanning documents from your applications See Scanning a d...

Page 211: ...3 Select Brother MFC 8820D Brother MFC 8820D USB or Brother MFC 8820D LAN from the Scanner drop down list box 4 Click Scan The Brother MFC 8820D Brother MFC 8820D USB or Brother MFC 8820D LAN Scanner Setup dialog box will appear The instructions for scanning in this Guide are for when you use ScanSoft PaperPort 8 0SE If the MFC is connected via Parallel use Brother MFC 8820D USB use Brother MFC 88...

Page 212: ...st the following settings if required in the Scanner window Image Type Resolution Scan Type Brightness Contrast Document Size See Settings in the Scanner window on page 13 6 3 Click the Start button in the scanner window When scanning is completed click Cancel to return to the PaperPort window After you select a document size you can adjust the scanning area further by clicking the left mouse butt...

Page 213: ... the scanner window to scan the image 1 Place the document face up in the ADF or face down on the scanner glass 2 Select the settings for Image Type Resolution Scan Type Brightness and Contrast as needed 3 In the Brother MFC 8820D Brother MFC 8820D USB or Brother MFC 8820D LAN Scanner Setup dialog box click the PreScan button The entire document will be scanned into the PC and will appear in the S...

Page 214: ...e document face up in the ADF again 6 Click Start This time only the selected area of the document will appear in the PaperPort window or your software application window 7 In the PaperPort window use the options available to refine the image You can enlarge the portion you selected by pressing to check it If you want to select the different portion use to undo the image ...

Page 215: ...ution you can choose and the available colors Image Type Resolution Scan Type Photo Select for scanning photo images 300 x 300 dpi 24 bit color Web Select for attaching the scanned image to web pages 100 x 100 dpi 24 bit color Text Select for scanning text documents 200 x 200 dpi Black White Resolution Black White Gray Error Diffusion 256 color True Gray 24 bit color 100 x 100 dpi Yes Yes Yes 150 ...

Page 216: ...gs It is not available when Black White and Color settings are selected as the Scan Type You can increase or decrease the contrast level by moving the slide bar to the left or right An increase emphasizes dark and light areas of the Image while a decrease reveals more detail in gray areas You can also type a value in the box for the setting Black White Set the Scan Type to Black White for text or ...

Page 217: ...3 x 18 cm APS C 4 x 6 in 10 x 15 cm Custom User adjustable from 0 35 x 0 35 in to 8 5 x 14 in or 8 9 x 8 9 mm to 215 9 x 355 6 mm To scan photographs or business cards select the document size and then place the document face down at the center of scanner glass When scanning photographs or other images for use in a word processor or other graphics application You should try different settings for ...

Page 218: ...r the document You can choose mm or inch as the unit for Width and Height Width shows the width of scanning area Height shows the height of scanning area Data Size shows the approximate data size calculated in a Bitmap format The size will be different for other file formats such as JPEG You can see the actual paper size you selected on the screen ...

Page 219: ...software application that supports WIA or TWAIN scanning How to access the scanner 1 Open your software application to scan a document 2 Select Scan from the File drop down menu or select the Scan button The Scan pane appears in the left panel 3 Select the scanner you are using from the Scanner drop down list box 4 Click Scan The Scan dialog box will appear The instructions for scanning in this Gu...

Page 220: ...like to scan and then crop a portion of the page after pre scanning the document you will need to use the scanner glass Flatbed Scanning a document using the ADF 1 Place the document face up in the ADF automatic document feeder 2 Select the Document Feeder from the Paper source drop down list box A 3 Select the picture type B 4 Select the Paper size from the drop down list box D A B C D ...

Page 221: ...st Resolution and Picture Type from the Advanced Properties Click the OK button after you choose your settings 6 To start scanning your document click the Scan button in the Scan dialog box The scanner resolution you can select is up to 1200 1200 dpi For resolutions greater than 1200dpi use the Brother Scanner Utility See Brother Scanner Utility on page 13 15 ...

Page 222: ...hen you are satisfied with the preview click the Scan button from the scanner window to scan the image 1 Place the document face down on the scanner glass 2 Make sure you selected Flatbed in the Paper source pull down box A 3 Select the picture type B 4 In the Scan dialog box click the Preview button The entire document will be scanned into the PC and will appear in the scanning area Scanning area...

Page 223: ...ft mouse button and dragging it over the area 6 If you require advanced settings click Picture Type from the Adjust the quality of the scanned picture C You can select Brightness Contrast Resolution and Advanced Properties Click the OK button after you choose your settings Scanning area C ...

Page 224: ... to set Legal size as the default size change the setting using this utility You must restart your PC for the new settings to take effect To run the utility You can run the utility by selecting the Scanner Utility located in the Start All Programs Brother Brother MFL Pro Suite menu If you scan the original at resolution of greater than 1200dpi the file size maybe very large Please make sure that y...

Page 225: ...dows based computer and loaded the appropriate Brother Drivers for your version of Windows When you are ready to use Scan make sure the Brother Control Center application is running on your computer For details about how to configure the Brother Control Center buttons to launch the application of your choice using Scan go to the appropriate chapter For Windows 95 98 98SE Me 2000 Professional and W...

Page 226: ...document create a file attachment and launch your E mail application displaying the new message waiting to be addressed Scan to Image You can scan a color picture into your graphics application for viewing and editing You can change the Scan configuration See Scan to Image on page 14 14 For Windows XP See Hardware Section Changing the Scan to button configuration on page 15 5 to 15 11 1 Place the ...

Page 227: ...s Set The MFC will start the scanning process Scan to File You can scan a black and white or a color document into your computer and save it as a file in the folder you choose The file type and specific folder are based on the settings you have chosen in the Scan to File screen of the Brother MFL Pro Control Center See Scan to File on page 14 8 to 14 9 For Windows XP See Hardware Section Changing ...

Page 228: ...ng faxing or filing ScanSoft PaperPort can be accessed through the ScanSoft PaperPort program group See Documentation for ScanSoft PaperPort on the CD ROM The complete ScanSoft PaperPort Users Guide including ScanSoft TextBridge OCR is in the documentation on the CD ROM This chapter is only an introduction to the basic operations When you install MFL Pro Suite ScanSoft PaperPort for Brother and Sc...

Page 229: ...g other applications Non PaperPort items include an icon that indicates the application that was used to create the item a non PaperPort item is represented by a small rectangular thumbnail and not an actual image Page View displays a close up of a single page and you can open a PaperPort item by double clicking on it As long as you have the appropriate application on your computer to display it y...

Page 230: ... and non paperport files appear on the Desktop You can also use Windows Explorer to manage the folders and items shown in Desktop View Quick links to other applications ScanSoft PaperPort automatically recognizes many other applications on your computer and creates a working link to them The Send To Bar at the bottom of the Desktop view shows icons of those linked applications To use a link drag a...

Page 231: ...f the text into text that you can edit with a word processing application PaperPort uses the optical character recognition application ScanSoft TextBridge which comes with PaperPort OR PaperPort can use your prefered OCR application if it is already on your computer You can convert the entire item or by using the Copy Text command you can select only a portion of the text to convert Dragging an it...

Page 232: ...several popular file formats such as BMP JPEG TIFF or self viewing For example to create a file for an Internet Web site export it as a JPEG file Web pages often use JPEG files for displaying images Exporting an image file 1 Select the Save As command from the File pull down menu in the PaperPort window The Save XXXXX as dialog box will be displayed 2 Select the drive and directory where you want ...

Page 233: ...he Add Remove button Select PaperPort 8 0 SE from the list and click the Add Remove button For Windows 2000 Professional Select Start Settings Control Panel and Add Remove Programs Select Brother Extensions for Paperport and click the Change Remove button Select PaperPort 8 0 SE from the list and click the Change button For Windows XP Select Start Control Panel Add or Remove Programs and the Chang...

Page 234: ...sing the Control Center stops the need to manually startup any specific applications The Brother Control Center provides three operations Scan Copy and PC Fax Scan directly to a file E mail word processor or graphic application of your choice Copy PC Faxing using the Brother PC FAX software Using the Brother Control Center For Windows 95 98 98SE Me 2000 Professional and Windows NT WS 4 0 If you ar...

Page 235: ...ff AutoLoad How to turn off AutoLoad 1 Left click the Control Center icon and click Show 2 When the Control Center window appears left click the Configuration Control Center button A dialog box will appear 3 Uncheck the AutoLoad Pop Up check box If the Control Center icon does not appear on your task bar you will have to launch the software Double click the Control Center icon on the desktop or fr...

Page 236: ... example if you are using Outlook as your default E mail application the Control Center will create a link and a scanning application button for Outlook You can change a default application Right click the appropriate Control Center button to display Configurations and then click it Select a different application For example you can change a scan button from MS Word Pad to MS Word by changing the ...

Page 237: ...nto a word processing file You can choose the word processing application such as Word Pad MS Word and so on Scan to Image Allows you to scan an image directly into any graphic viewer editor application You can choose the graphics application such as Microsoft Paint Copy operations Copy Allows you use the PC and any Windows printer driver for enhanced copy operations You can scan the page on the B...

Page 238: ...ess the Scanner Settings window Click the Configuration Control Center icon at the top right of the Brother Control Center screen OR Click the Modify Settings button on any of the Configuration screens Global settings AutoLoad Pop Up Select this checkbox if you want Brother MFL Control Center to load when you turn on your computer ...

Page 239: ...of stored settings You can keep the factory default settings or change them at any time Resolution From the pull down list select the scanning resolution you most often use Color Mode From the pull down list select the color settings you most often use Scan Size From the pull down list select the scan size you most often use Brightness Slide the adjuster from 0 to 100 Contrast Slide the adjuster f...

Page 240: ...screen it means you left clicked a button in the Control Center window without first placing a document in the ADF Place the document in the MFC s ADF and then click OK to go to the Control Center screen If you want to scan the document from the scanner glass please use Scan on the control panel of the MFC ...

Page 241: ... button to view the configuration screen of the Control Center 3 To save your settings click OK OR To go back to the factory default settings click the Restore Defaults button Scanner settings From the pull down list select the scanning mode that is appropriate for the type of file Faxing Filing and Copying Text for OCR Photos Photos High Quality Photos Quick Scan Custom Draft Copy or Fine Copy To...

Page 242: ...ile PaperPort Image Item max PaperPort Self Viewing exe PaperPort Browser Viewable htm PaperPort 5 0 Image Item max PaperPort 4 0 Image Item max PaperPort 3 0 Image Item max Windows Bitmap bmp PC Paintbrush pcx PCX Multi page dcx JPEG jpg TIFF Uncompressed tif TIFF Group 4 tif TIFF Class F tif TIFF Multi page Uncompressed tif TIFF Multi page Group 4 tif TIFF Multi page Class F tif Portable Network...

Page 243: ...fy Settings button to view the configuration screen of the Control Center 3 To save your settings click OK OR To go back to the factory default settings click the Restore Defaults button Scanner settings From the pull down list select the scanning mode that is appropriate for the type of file Faxing Filing and Copying Text for OCR Photos Photos High Quality Photos Quick Scan Custom Draft Copy or F...

Page 244: ...images in the jpg format All documents and image items Converts all items regardless of the program in which the item was created for example converts all Word doc files and JPEG jpg files to the file type PaperPort image items MAX only Converts only PaperPort image items max files PaperPort does not convert other file types such as JPEG images and Word documents File type Identifies the format in...

Page 245: ...the Modify Settings button to view the configuration screen of the Control Center 3 To save your settings click OK OR To go back to the factory default settings click the Restore Defaults button Scanner settings From the pull down list select the scanning mode that is appropriate for the type of file Faxing Filing and Copying Text for OCR Photos Photos High Quality Photos Quick Scan Custom Draft C...

Page 246: ...e documents This option is available only when you have an OCR program other than the one provided with PaperPort PaperPort 8 0 SE uses the same OCR engine that is in ScanSoft s TextBridge Pro Millennium product Click the Settings button to choose how the OCR application will read the pages that you scan into your word processor application The OCR Settings window will appear Select your setting a...

Page 247: ...in the ADF The Brother Control Center screen will pop up 2 Right click the graphic application button and click on Configuration Click the Modify Settings button to view the configuration screen of the Control Center 3 To save your settings click OK OR To go back to the factory default settings click the Restore Defaults button ...

Page 248: ...Copying Text for OCR Photos Photos High Quality Photos Quick Scan Custom Draft Copy or Fine Copy To change any of the settings for this mode click Modify Settings Target Application Application From the pull down list select the application you want to add to this Pop Up screen Click the Custom Link Settings button to set up links for your user defined application ...

Page 249: ... up in the ADF The Brother Control Center screen will pop up 2 Right click the Copy and click on Configuration Click the Modify Settings button to view the configuration screen of the Control Center 3 To save your settings click OK OR To go back to the factory default settings click the Restore Defaults button ...

Page 250: ...g mode that is appropriate for the type of file Draft Copy or Fine Copy To change any of the settings for this mode click Modify Settings Number of copies Copies Enter the number of copies you want to print To change the copy options click the Copy Options button Click OK to save your Copy settings ...

Page 251: ...s button to view the configuration screen of the Control Center 3 To save your settings click OK OR To go back to the factory default settings click the Restore Defaults button Scanner settings From the pull down list select the scanning mode that is appropriate for the type of file Faxing Filing and Copying Text for OCR Photos Photos High Quality Photos Quick Scan Custom Draft Copy or Fine Copy T...

Page 252: ...ptions click the FAX Options button The Brother PC FAX Properties screen appears For Windows 95 98 98SE Me and Windows NT WS 4 0 For Windows 2000 Professional 2 Select the Paper Size and Orientation Portrait or Landscape and click OK To go back to the factory default settings click the Restore Defaults or Default button ...

Page 253: ...tly to a folder on your computer The Brother Control Center provides four categories of operations 1 Scan directly to a file E mail word processor or graphics application of your choice 2 Enhanced copy functions such as Four Two or One on One Copying 3 PC Faxing using the Brother PC Fax software 4 Custom buttons allow you to configure a button to meet your own application requirements In the Task ...

Page 254: ...l appear in the task bar If you don t want the Control Center to load automatically you can turn AutoLoad off How to turn off Auto Load 1 Right click the Control Center icon in the Task Tray and select Show 2 The main SmartUI Control Center window appears Please look at the bottom of the window for a check box labeled AutoLoad Pop up 3 Uncheck the AutoLoad Pop Up option to prevent the SmartUI from...

Page 255: ... you the ability to configure the hardware Scan key on your MFC such as Scan to File The Scan to File feature allows you to scan a document directly to your hard disk and choose the file format and destination folder without having to run any other applications Select which section you want by clicking on the appropriate tab ...

Page 256: ...default E mail application the Control Center automatically will create a link and a scanning application button for Outlook You can change the default application by right clicking on any of the scan buttons in the Control Center and then clicking Configuration Select the Configuration tab and from the Application pull down menu select a different application For example you can change the E mail...

Page 257: ...configuration When the SmartUI Control Center is displayed you can access the Hardware Section window to reconfigure the Scan button on your MFC Click the Hardware Section tab at the top left of the SmartUI Control Center screen See Using the scan key For USB or Parallel interface cable users on page 13 16 ...

Page 258: ...e ability to change the configuration that includes the destination E mail application attachment file and the scanner settings To change the destination E mail application you use the Application pull down list to select the compatible E mail application which is installed on your system If you wish to change the attachment file type click on the Link Preferences button to display a list of file ...

Page 259: ...t click on the Scan to File button and the following screen will appear Select the file type for the saved image by selecting from the Format pull down list You can save the file to the default PaperPort folder so the file appears in PaperPort or you can select another folder directory by clicking the Browse button ...

Page 260: ...ROL CENTER 15 8 Scan to Image To configure the Scan to Image feature left click on the Scan to Image button and the following screen will appear You can change the configuration which includes the destination image format or document application ...

Page 261: ...s of the scan click on the Scan Settings tab You can set the Color Mode to Black White 8 bit Gray or 24 bit Color The resolution can be changed from 100 to 1200 dpi You can define the size of the paper you re using and you can adjust the brightness and contrast of the image before scanning ...

Page 262: ...ER SMARTUI CONTROL CENTER 15 10 Scan to OCR To configure the Scan to OCR feature left click on the Scan to OCR button and the following screen will appear You can change the configuration which includes the destination applications ...

Page 263: ...NTROL CENTER You have the option to send your scan as a different file type You can select the application from the File Type window according to your needs You have the option to choose your OCR setting from Single column output to Auto orient page ...

Page 264: ...ed for the most frequently used applications The Scan section contains four buttons for Scan to File Scan to E mail Scan to Word Processor and Scan to Image applications The Copy section contains four buttons for N to 1 copying The Fax section button is for sending faxes using the Brother PC FAX application and the Custom section contains three buttons with which you can assign your own function 1...

Page 265: ...Pad MS Word Word Perfect or whichever word processing program is installed on your computer 4 Scan to Graphic Application Default MS Paint enables you to scan a page directly into any graphic viewer editor application You can select the destination application such as MS Paint Corel PhotoPaint Adobe PhotoShop or any kind of image editor application you already have installed on your computer Copy ...

Page 266: ...d automatically send the image as a fax from the PC using the Brother PC FAX software Custom Scan to File These buttons have been pre programmed for the Scan to File feature You can change the configuration of each of these buttons to meet your specific requirements by right clicking on a button and following the configuration menus ...

Page 267: ... scan an image and save it in a specific file type to any directory on your hard disk This allows you to easily archive your paper documents To configure the file type and save to directory right click on the Scan to File button and click Configuration The Scan Action tab is set to File and should not be changed ...

Page 268: ...by selecting from the Format pull down list You can save the file to the default PaperPort folder so the file appears in PaperPort or you can select another folder directory by clicking the Browse button You can change the default setting by selecting the Other Folder button and then clicking Browse and selecting the folder in which you wish to save your files ...

Page 269: ...mail application To change the default E mail application or attachment file type right click on the E mail button and select Configuration The Scan Action tab is set to E mail and should not be changed To change the E mail application click on the Configuration tab From the Application pull down list select your preferred E mail application ...

Page 270: ...UI CONTROL CENTER 15 18 To change the file type of the attachment click the Link Preferences button to set up links Check the Convert attachments to specified file type box and then select the appropriate file type from the pull down list ...

Page 271: ...achments that are PaperPort MAX files Combine items into single file if possible Click this check box if you want to combine all the attachments into one file With this box unchecked each scanned page will be saved in its own individual file File type Select from the pull down list the type of file you want the scanned images to be saved in PaperPort Image Item max PaperPort Browser Viewable htm P...

Page 272: ...WS BASED BROTHER SMARTUI CONTROL CENTER 15 20 Scanner settings You have the ability to change the scanner settings used to create the file attachments Click on the Scan Settings tab and select the appropriate settings ...

Page 273: ...ple Word Pad instead of Word and file type You can also choose another OCR software package besides the TextBridge OCR which is built into PaperPort To configure Scan to OCR right click on the WordPad button and select Configuration The Scan Action tab is set to OCR and should not be changed To change the word processing application click on the Configuration Tab You can select the destination wor...

Page 274: ... CONTROL CENTER 15 22 To change the program link preferences click the Link Preferences button File Type From the pull down list select the file format you want to use for documents OCR Select the OCR application from the OCR pull down list ...

Page 275: ... Graphics Application allows you to scan an image so you can edit the image To change the default graphics application right click on the button and select Configuration The Scan Action tab is set to Application and should not be changed To change the configuration of the destination application click on the Configuration Tab ...

Page 276: ...he appropriate application from the Application pull down list To change the other configuration options click the Link Preferences button This option enables you to reduce image to screen resolution 96dpi show a warning if the item has annotations update the original item if sent item is modified if needed ...

Page 277: ... as the default printer including non Brother printers Before you can use the Copy buttons you must first configure the printer driver by right clicking on a Copy button and selecting Configuration In the Scan Settings window you can select the color mode resolution paper size brightness and contrast settings to be used To finish the Copy button configuration you must set the printer driver Click ...

Page 278: ...OL CENTER 15 26 Select the number of Pages Per Sheet from the Scaling selections As an example to configure the section Copy button to copy two pages to one you must select 2 in 1 You must configure each of the copy buttons before they can be used ...

Page 279: ...y Windows Application to send a Fax as simply as printing a document The Brother SmartUI automatically configures the Fax button to use the Brother PC FAX driver no user configuration is required The Scan Action tab is set to Application and should not be changed To change the PC FAX settings click the Link Preferences button found in the Configuration tab ...

Page 280: ... settings click on the Setup button Select the Paper Size Paper Source If you need more customized setup click on the Options button Select the Paper Size Orientation Portrait or Landscape and Resolution 200x200 dpi or 200x100 dpi and click OK To return to the factory default settings click the Default button ...

Page 281: ...to any directory on local or network hard disk You can also select the file format to be used OCR Scanned documents will be converted to editable text files If you have a third party OCR software package installed on your PC you can select it The default OCR software is TextBridge which is built into PaperPort 8 0 SE You can also select the destination word processor and file format for the editab...

Page 282: ...lick on the Configuration Tab Depending upon which Scan Type button you selected you will see a different Configuration Tab list of settings Application Select the destination application program from the pull down list Click on Link Preferences to set the Send to options You can select the application from the scroll menu on the left ...

Page 283: ... CENTER File Select the file format from the Format pull down list You can either send the file to the default PaperPort directory or select your own destination directory by selecting Other Folder Use the Browse button to select the destination directory ...

Page 284: ...list Click on Link Preferences and select the destination Application from the scroll menu on the left Select the File Type from the File Type pull down list You can also choose another OCR application from the OCR pull down list if another is installed on you system Scansoft TextBridge is installed as part of the PaperPort 8 0 SE application ...

Page 285: ...ARTUI CONTROL CENTER E mail Select the destination E mail application program from the pull down list Click on the Link Preferences button to configure the Send To E mail options You can select the File type and Quick Send E mail address list ...

Page 286: ...I CONTROL CENTER 15 34 3 Select Scan Settings You can select the scanner settings from each of the Scan Type options for the Custom buttons You have the option to select Color Mode Resolution Paper Size and Brightness and Contrast settings ...

Page 287: ...OK button When you click OK the process of uploading the data to the MFC begins The MFC Remote Setup program is closed if an error message is displayed enter the correct data again and then click OK Cancel button The Cancel button clears your changes and exits the MFC Remote Setup application without uploading any data to the MFC Using MFC Remote Setup For Windows You can t use the MFC Remote Setu...

Page 288: ... MFC Remote Setup changes until you click the Apply button to upload the new data to the MFC Then you can click the Print button to get an up to date printout Export button Click the Export button to save your current settings to a file Import button Click the Import button to read the settings from your saved file into the MFC Remote Setup screen You can use the Export and Import buttons to save ...

Page 289: ...over page note All you have to do is set up the receiving parties as Members or Groups in your PC FAX Address Book Then you can use the Address Book Search feature to quickly find them to address your fax Using Brother PC FAX software For Windows PC FAX is available in Black White only If you are using Windows XP Windows NT 4 0 or Windows 2000 Professional we recommend that you are logged on with ...

Page 290: ...then select PC FAX Setup The Brother PC FAX Setup dialog box will appear 2 You must enter this information to create the Fax Header and Cover Page 3 Click OK to save the User Information You can access the User Information from the FAX Sending dialog box by clicking See Sending a file as a PC FAX using the Facsimile style on page 17 16 ...

Page 291: ...creen below The include header option sends an additional page of information along with fax or E mail data which contains user and subject information The user has the choice of two user interfaces Simple style or Facsimile style To change the user interface select the interface setting you want Simple style or Facsimile style ...

Page 292: ...r example if you must dial 9 to get an outside line in your office Include header To add header information to the top of the fax pages you send check the Include header box Address Book file You can select more than one database file to use with the Address Book To select you must enter the path and file name of the database file OR Use the Browse button to find the database to select ...

Page 293: ...17 5 USING BROTHER PC FAX SOFTWARE User interface In the Sending tab select user interface You can choose the Simple Style or the Facsimile Style Simple style Facsimile style ...

Page 294: ...er interface You can register a Member or Group on each of the ten Speed Dial buttons To register an address in a Speed Dial button 1 Click the Speed Dial button you want to program 2 Click the Member or Group you want to store on the Speed Dial button 3 Click Add to save it To clear a Speed Dial button 1 Click the Speed Dial button you want to clear 2 Click Clear to erase it ...

Page 295: ...17 7 USING BROTHER PC FAX SOFTWARE The Address Book From the Start menu select Programs Brother Brother MFL Pro Suite and then click PC FAX Address Book The Brother Address Book dialog box will appear ...

Page 296: ... you can add edit and delete stored information of Members and Groups 1 In the Address Book dialog box click the icon to add a Member The Brother Address Book Member Setup dialog box will appear 2 In the Member Setup dialog box type the Member s information Name is a required field Click OK to save the information ...

Page 297: ...er Address Book dialog box click the icon to create a Group The Group Setup dialog box appears 2 Type the name of the new Group in the Group Name field 3 In the Available Names box select each Member to be included in the Group and then click Add Members you add to the Group will be added to the Group Members box 4 After all the members you want have been added click OK ...

Page 298: ...to an ASCII text file csv Or if you wish you can select and create a Vcard that will be attached to that Member s outgoing E mail A Vcard is an electronic business card that contains the sender s contact information To export the whole current Address book 1 From the Address Book select File point to Export and then click Text OR Click Vcard and go to Step 5 2 From the Available Items column selec...

Page 299: ...OFTWARE 3 If you are exporting to an ASCII file select the Divide Character Tab or Comma This selects between a Tab or Comma to separate the data fields 4 Select OK to save the data 5 Type the name of the file and then select Save ...

Page 300: ...ddress Book select File point to Import and then click Text OR Click Vcard and go to Step 5 2 From the Available Items column select the data fields you want to Import and click Add 3 Select the Divide Character Tab or Comma based on the file format you are importing 4 To import the data click OK From the Available Items list select the fields in the same order they are listed in the Import text f...

Page 301: ...17 13 USING BROTHER PC FAX SOFTWARE 5 Type the name of the file and then select Open If you selected a text file in Step 1 the Files of type will be Text file csv ...

Page 302: ...14 Setting up a Cover Page From the PC FAX dialog box click To access the PC Fax Cover page setup screen See Sending a file as a PC FAX using the Facsimile style on page 17 16 The Brother PC FAX Cover Page Setup dialog box will appear ...

Page 303: ...nsert a bitmap file such as your company logo in the cover page Use the browse button to select the BMP file and then select the alignment style Count cover page When the Count Cover Page box is checked the Cover Page will be included in the page numbering When this box is not checked the Cover Page will not be included If you are sending a fax to more than one recipient the recipient information ...

Page 304: ...sing the Facsimile style 1 Create a file in Word Excel Paint Draw or any other application on your PC 2 From the File menu select Print The Print dialog box will appear 3 Select Brother PC FAX as your printer and then click OK The Fax Sending dialog box will appear ...

Page 305: ...ck the Cover Page icon to enter or edit the Cover Page information 6 Click Start to send the fax Redial If you want to redial a number click Redial to scroll through the last five fax numbers and then click Start Sending a file as a PC FAX using the Simple style 1 Create a file in Word Excel Paint Draw or any other application on your PC 2 From the File menu select Print The Print dialog box will ...

Page 306: ...e the Address Book to select destination fax numbers by clicking the To button If you made a mistake entering a number click the Clear button to delete all the entries 5 To send a Cover Page and note click the Cover Page On check box 6 When you are ready to send your fax click the Send icon 7 If you wish to cancel the fax click the Cancel icon You can also click the icon to create or edit a cover ...

Page 307: ...t PC FAX Receiving The PC FAX icon will appear on your PC Task bar for this Windows session Setting up your PC 1 Right click the PC FAX icon on your PC Task Bar and then click PC Fax RX Setup 2 The PC Fax RX Setup dialog box will appear 3 In Ring Delay select the number of rings before you want your PC to answer Incoming calls 4 In Save file to use the Browse button if you want to change the path ...

Page 308: ...indows select the Add to Startup folder check box Viewing new PC FAX messages Each time you start to receive a PC FAX the icon will flash blue and red Once the fax has been received the icon will remain red The red icon will change to green once the received fax has been received 1 Run PaperPort 2 Open the Fax Received folder 3 Double click any of the new faxes to open and view them The title of y...

Page 309: ... faxes please install the appropriate Windows XP driver Windows XP In box driver or Brother Windows XP driver After the driver is installed refer to the following information to configure your Windows XP PC for Fax receiving 1 To activate Fax receiving click Set up faxing in the Printer Tasks menu 2 The FAX services will be installed on your PC ...

Page 310: ...ks menu 4 Select the Start All Programs Accessories Communications Fax Fax Console 5 The Fax Configuration Wizard starts Click Next If you have not configured your fax connection the following screen will be displayed Enter your details ensuring you specify the outside line access number if necessary and click OK Select the My location button if it is not selected and then click OK ...

Page 311: ...der information and then click Next 7 Select Brother MFC 8420 or MFC 8820D in the Please select the fax device pull down list Click to select Enable Receive check box Specify the number of rings before your MFC will attempt to answer the fax Click Next ...

Page 312: ...USING BROTHER PC FAX SOFTWARE 17 24 8 Enter the Transmitting Subscriber Identification TSID and then click Next 9 Enter the Called Subscriber Identification CSID and then click Next ...

Page 313: ...nd then click Next 11 Click Finish The PC FAX installation is now complete When PC FAX Receiving is active you cannot run the Remote Setup utility To use Remote Setup check off Enable Receive in Step 7 For information on how to use PC FAX Sending and Receiving please refer to Help in the Fax Console ...

Page 314: ...ick Fax Console to open the Fax Console In the left pane expand the Fax folder if it is not already expanded The Fax folder contains the following folders The Incoming folder contains faxes that are currently being received The Inbox folder contains faxes that have been received The Outbox folder contains faxes that are scheduled to be sent The Sent Items folder contains faxes that have been succe...

Page 315: ...lease visit at http solutions brother com Using your MFC with a Macintosh Before you can connect the MFC to your Macintosh you must buy a USB cable that is not longer than 1 8 metres Do not connect the MFC to a USB port on a key board or a non powered USB hub Some descriptions in this chapter are based on the MFC 8820D These descriptions also apply to the MFC 8420 Feature Mac OS Mac OS X 8 6 9 X 1...

Page 316: ... from the Apple menu 2 Click the Brother Laser icon On the right side of the Chooser window click the printer you want to print to Close the Chooser To print a document 1 From the application software such as Presto PageManager click File menu and select Page Setup You can change the settings for Paper Size Orientation and Scaling and then click OK ...

Page 317: ...eManager click File menu and select Print Click Print to start printing If you want to change Copies Pages Resolution Paper Source and Media Type select your settings before clicking Print Device Options allows you to select Duplex Automatic Duplex is only available with the MFC 8820D ...

Page 318: ... software such as Presto PageManager click the File menu and select Page Setup Make sure MFC 8420 and MFC 8820D is selected in the Format for pop up menu You can change the settings for Paper Size Orientation and Scaling then click OK 2 From application software such as Presto PageManager click File menu and select Print Click Print to start printing ...

Page 319: ... YOUR MFC WITH A MACINTOSH Specific settings Set the Media Type Resolution and other settings Press Copies Pages to select settings you want to change Duplex Automatic Duplex is only available with the MFC 8820D ...

Page 320: ... a Network see the NC 9100h Network User s Guide on CD ROM To use the PS driver with a USB cable you need to set the Emulation to BR Script 3 Menu 4 1 before connecting the USB cable See Setting the Emulation Selection on page 11 18 The PS driver does not support the following functions HQ 1200 Secure Print PC Fax Sending ...

Page 321: ...For Mac OS 8 6 to 9 04 Users Open the Apple Extras folder Open the Apple LaserWriter Software folder For Mac OS 9 1 to 9 2 Users Open the Applications Mac OS 9 folder Open the Utilities folder The screens are based on Mac OS 9 04 2 Open the Desktop Printer Utility icon ...

Page 322: ...USING YOUR MFC WITH A MACINTOSH 18 8 3 Select Printer USB and then click OK 4 Click Change in the PostScript Printer Description PPD file Select Brother MFC 8820D and then click Select ...

Page 323: ...18 9 USING YOUR MFC WITH A MACINTOSH 5 Click Change in the USB Printer Selection Select Brother MFC 8820D and then click OK 6 Click Create ...

Page 324: ...UR MFC WITH A MACINTOSH 18 10 7 Enter your MFC name MFC 8820D and then click Save 8 Select Quit from the File menu 9 Click the MFC 8820D icon on the Desktop 10 Select Set Default Printer from the Printing menu ...

Page 325: ...ble and your Macintosh is Mac OS X only one printer driver for an MFC can be registered in Print Center If a Brother Native Driver MFC 8420 8820D is already listed in Printer list you will need to delete it and then install the PS driver To use the PS driver with a USB cable you need to set the Emulation to BR Script 3 Menu 4 1 before connecting the USB cable See Setting the Emulation Selection on...

Page 326: ...USING YOUR MFC WITH A MACINTOSH 18 12 3 Open the Print Center icon 4 Click Add Printer 5 Select USB ...

Page 327: ...18 13 USING YOUR MFC WITH A MACINTOSH 6 Select MFC 8820D and then click Add 7 Select Quit Printer Center from the Print Center menu ...

Page 328: ...e following 1 Create a document in a Macintosh application 2 To send a fax select Print from the File menu The Printer dialog box will appear When Printer is selected the top button shows Print and the Address button is grayed 3 From the Output pull down menu select Facsimile When Facsimile is selected the top button changes to Send Fax and the Address button will be available ...

Page 329: ...x shows the Destination Fax Numbers as you select them 5 To address the fax type a fax number in the Input Fax Number box 6 When you are finished addressing your fax click Send Fax Click OK to go to the Send Fax dialog box To select and only send certain pages of the document click OK to go to the Print dialog box If you click Send Fax without addressing your fax the following error message will a...

Page 330: ...ers You can send a fax directly from a Macintosh application by doing the following 1 Create a document in a Macintosh application 2 To send a fax select Print from the File menu The Printer dialog box will appear 3 Select Send Fax from the pull down menu ...

Page 331: ... Output pull down menu 5 To address the fax type a fax number in the Input Fax Number box and the click Print If you want to send a fax to more than one number click Add after entering the first fax number The destination fax numbers will be listed in the dialog box ...

Page 332: ... 18 Drag a vCard from the Mac OS X Address Book application 1 Click Address Book button 2 Drag a vCard from the Mac OS X Address Book application to the Destination Fax Numbers filed When you are finished addressing your fax click Print ...

Page 333: ...fax or home fax from the Stored Fax Numbers pull down list only the fax number stored in the Mac OS X Address Book for the selected category will be used If the fax number is stored in only one of the Mac OS X Address Book categories the number will be retrieved no matter which category you have selected work or home ...

Page 334: ... time you use the Brother TWAIN driver MFL Pro P2500 set it as the default by choosing Select Source or the other menu name to select the device Afterwards for each document you scan choose Acquire Image or Scan The scanner setup dialog box will appear Mac OS X Scanning is supported in Mac OS X 10 2 1 or greater The screen shown in this section are from Mac OS 9 The screen on your Macintosh may va...

Page 335: ...ning the document Scanning a whole page 1 Place the document face up in the ADF or face down on the scanner glass 2 Adjust the following settings if needed in the Scanner Setup dialog box Resolution Color Type Scanning Area Brightness Contrast 3 Click Start When scanning has finished the image will appear in your graphics application ...

Page 336: ...document face up in the ADF or face down on the scanner glass 2 Click PreScan The whole image will be scanned into your Macintosh and will appear in the Scanning Area of the Scanner dialog box 3 To scan a portion of the prescanned image click and drag the mouse to crop it 4 Insert document in the ADF if you are using ADF 5 Make your adjustments to the settings for Resolution Color Type Gray Scale ...

Page 337: ...MFC WITH A MACINTOSH Settings in the Scanner window Image Resolution From the Resolution pop up menu choose the scanning resolution Higher resolutions use more memory and transfer time but produce a finer scanned image ...

Page 338: ...ck dots instead of the true gray dots in a specific matrix instead of true gray dots True Gray is used for documents with photographic images or graphics This mode is more exact because it uses up to 256 shades of gray It requires the most memory and takes the longest transfer time Colors Choose either 8 bit Color which scans up to 8 bit Color or 24 bit color which scans up to 16 8 million colors ...

Page 339: ... adjust the scanning area Click and hold the mouse button as you drag the mouse to crop the image Width Enter the width of the custom size Height Enter the height of the custom size Business Card Size To scan business cards select the Business Card size 90 x 60 mm and place the business card at the center of scanner glass When you are scanning photographs or other images to use in a word processor...

Page 340: ... image is too light set a lower Brightness level and scan the image again If the image is too dark set a higher Brightness level and scan the image again Contrast You can only adjust the Contrast level when you have selected one of the Gray Scale settings it is not available when you have selected Black White as the selected Color Type Increasing the Contrast level by dragging the slide bar to the...

Page 341: ... that you install Presto PageManager To install Presto PageManager see the Quick Setup Guide Highlights OCR In one step scan an image recognize the text and edit it with a word processor Scan Buttons Scan documents and open them with a designated program in one step Image Editing Enhance crop and rotate images or open them with an image editing program of your choice Annotation Add removable notes...

Page 342: ...r greater CD ROM drive Hard disk drive with at least 120 MB of free disk space Recommended 8 bit Color or higher video adapter Eudora Mail or Outlook Express electronic mail software Technical Support Company name NewSoft Technology Corp E mail Address support newsoft com tw in English or Chinese ...

Page 343: ...splayed on your computer screen If you change the settings you can upload them directly to the MFC OK This starts the process of uploading the data to the MFC and exiting the remote setup program If an error message is displayed enter the correct data again Click OK Cancel This exits the remote setup application without uploading the data to the MFC Apply This uploads the data to the MFC but does ...

Page 344: ... selected items on the MFC You can not print the data until it is uploaded to the MFC Click Apply to upload the new data to the MFC and click Print Export This command saves the current configuration settings to a file Import This command reads the settings from a file ...

Page 345: ...stering your PC with the MFC If you need to change the MFC that was registered to your PC during the installation of MFL Pro see the Quick Setup Guide on page 38 follow the steps below 1 For Windows 98 Me 2000 From the Start menu select Control Panel Scanners and Cameras and then right click Scanner Device icon and select Properties to view the Network Scanner Properties dialog box For Windows XP ...

Page 346: ...ight click Scanner Device icon and select properties to view the Network Scanner Properties dialog box 2 Click the Network Setting tab in the dialog box and select a method to specify the MFC as a Network scanner for your PC ...

Page 347: ...e MFC in the IP Address field Click Apply and then OK Specify your MFC by Name Enter the MFC Node name in the Node Name field Click Apply and then OK Search from a list of available device Click Browse and select the appropriate device you want to use Click OK Click Apply and then OK ...

Page 348: ...is your PC Name You can enter a name if you like 4 You can avoid receiving unwanted documents by setting a 4 digit PIN Number Enter your PIN Number in the PIN Number and Retype PIN Number field To send data to a PC protected by a PIN Number the LCD prompts to enter the PIN Number before the document can be scanned and sent to the MFC See Using the Scan key on page 19 5 to 19 10 ...

Page 349: ...n For Windows 98 98SE Me 2000 See Scan to E mail on page 14 10 to 14 11 For Windows XP See Hardware Section Changing the Scan to button configuration on page 15 5 to 15 9 1 Place the document face up in the ADF or face down on the scanner glass 2 Press Scan 3 Press or to select Scan to E Mail Press Set 4 Press or to select PC Press Set OR If there is not other selection go to Step 5 For Network Sc...

Page 350: ...d it directly to an E mail address from the MFC Your document is sent as an E mail attachment in a TIFF format for Black and White or you can choose PDF or JPEG for color 1 Place the document face up in the ADF or face down on the scanner glass 2 Press Scan 3 Press or to select Scan to E Mail Press Set 4 Press or to select E mail Server Press Set OR If there is not other selection go to Step 5 5 P...

Page 351: ...W 200 100 dpi in Step 6 go to Step 8 OR If you select Color 150 dpi Color 300 dpi or Color 600 dpi in Step 6 go to Step 7 7 Press or to select PDF or JPEG Press Set 8 The LCD prompts you to enter an address Enter the destination E mail address from the dial pad or use the One Touch key or Speed Dial key 9 Press Start The MFC will start the scanning process ...

Page 352: ...5 10 1 Place the document face up in the ADF or face down on the scanner glass 2 Press Scan 3 Press or to select Scan to Image Press Set 4 Press or to select a destination you want to send Press Set If the LCD prompts you to enter a PIN Number enter the 4 digit PIN Number for the destination PC on the control panel Press Set The MFC will start the scanning process For Network Scanning the Brother ...

Page 353: ... the Scan to button configuration on page 15 5 to 15 11 1 Place the document face up in the ADF or face down on the scanner glass 2 Press Scan 3 Press or to select Scan to OCR Press Set 4 Press or to select a destination you want to send Press Set If the LCD prompts you to enter a PIN Number enter the 4 digit PIN Number for the destination PC on the control panel Press Set The MFC will start the s...

Page 354: ...F or face down on the scanner glass 2 Press Scan 3 Press or to select Scan to File Press Set 4 Press or to select a destination you want to send Press Set If the LCD prompts you to enter a PIN Number enter the 4 digit PIN Number for the destination PC on the control panel Press Set The MFC will start the scanning process For Network Scanning the Brother Control Center SmartUI selections are used o...

Page 355: ...ettings if you use Scan to E mail E mail server See Using Brother PC FAX software on page 17 1 Note The items described in this chapter are specific items relating to the Network version of PC FAX software that is installed from the Optional network applications on the CD ROM supplied with your MFC Brother Network PC FAX can be configured through PC FAX Setup Sending tab Brother Network PC FAX sof...

Page 356: ...ding tab Brother PC FAX Setup 1 Access the Sending Tab from the PC FAX dialog box by clicking OR From the Start menu select All programs Brother Brother MFL Pro Suite and then select PC FAX Setup 2 Check Enable box This software can be used in a network environment and with a locally connected machine It is important that when used in a network environment the Network PC Fax is set to enable ...

Page 357: ...e is required field You can also enter an E mail contact address and MFC address for the address book member 3 To send to this contact it is necessary to specify which is the preferred method of sending a document to this contact by checking the Fax E mail or MFC E mail Address box next to the contact 4 Click the OK button to save the member s information To use the MFC for Network PC FAX see Usin...

Page 358: ...essary to download the Brother Network Print Software from the Brother Solution Center at http solutions brother com Select Network Applications for optional NC 9100h Print Fax Server then select Network Print Software Follow the screen prompts you will prompted for the IP address of the NC 9100h If in any doubt contact your Network Administrator To check select Start Settings and Printers Highlig...

Page 359: ...Brother Network Fax to use this previously installed port If you have multiple Brother LPR ports please ensure that you select the correct port address If in any doubt please contact your Network Administrator If the installer screen does not appear automatically select Start Run and type X setup exe X should be the drive letter of your CD ROM drive on your PC ...

Page 360: ...other Network PC FAX you can either enter the E mail address in the To field or in the display for Facsimile Style using the PC keyboard or select the member from the Address Book The member must have E mail selected as the chosen destination for that member 3 To send an Internet Fax from Brother Network PC FAX you can either enter the Internet Fax address in the To field or in the display for Fac...

Page 361: ...ation You can send a fax directly from your Macintosh application using the following steps For Mac OS 8 6 9 2 users 1 Follow the steps in the Quick Setup Guide 2 Follow the steps on pages 18 14 For Mac OS X users 1 Follow the steps in the Quick Setup Guide 2 Follow the steps on page 18 16 ...

Page 362: ...which emits invisible laser radiation in the Scanner Unit The Scanner Unit should not be opened under any circumstances Laser Diode Wave length 760 810 nm Output 5 mW max Laser Class Class 3B Caution Use of controls adjustments or performance of procedures other than those specified in this manual may result in hazardous radiation exposure Important information CLASS 1 LASER PRODUCT APPAREIL À LAS...

Page 363: ...ther similar surface This product should never be placed near or over a radiator or heater This product should not be placed in a built in installation unless proper ventilation is provided 7 This product should be operated from the type of power source indicated on the label If you are not sure of the type of power available consult with your dealer or local power company 8 This product is equipp...

Page 364: ... line sockets and refer servicing to qualified Service Personnel under the following conditions When the power cord is damaged or frayed If liquid has been spilled into the product If the product has been exposed to rain or water If the product does not operate normally when the operating instructions are followed Adjust only those controls that are covered by the operating instructions Improper a...

Page 365: ...ot imply that the power is grounded and that the installation is completely safe For your safety if in any doubt about the effective grounding of the power consult a qualified electrician Disconnect device This machine must be installed near a power outlet which is easily accessible In case of emergencies you must disconnect the power cord from the power outlet in order to shut off power completel...

Page 366: ... any product is compatible with all of Telecom s network services 6 This equipment does not fully meet Telecom s impedance requirements Performance limitations may occur when used in conjunction with some parts of the network Telecom will accept no responsibility should difficulties arise in such circumstances 7 If a charge for local calls is acceptable the Dial Button should not be used for local...

Page 367: ...damage to the product 15 Slots and openings in the cabinet and the back or bottom are provided for ventilation to ensure reliable operation of the product and to protect it from overheating these openings must not be blocked or covered The openings should never be blocked by placing the product on a bed sofa rug or other similar surface This product should never be placed near or over a radiator o...

Page 368: ...rain or water If the product does not operate normally when the operating instructions are followed Adjust only those controls that are covered by the operating instructions Improper adjustment of other controls may result in damage and will often require extensive work by a qualified technician to restore the product to normal operation If the product has been dropped or the cabinet has been dama...

Page 369: ...e with Telecom s Specifications There shall be no more than 10 call attempts to the same number within any 30 minute period for any single manual call initiation and The equipment shall go on hook for a period of not less than 30 seconds between the end of one attempt and the beginning of the next attempt 30 Some parameters required for compliance with Telecom s Telepermit requirements are depende...

Page 370: ...t imply that the power is grounded and that the installation is completely safe For your safety if in any doubt about the effective grounding of the power consult a qualified electrician Disconnect device This machine must be installed near a power outlet which is easily accessible In case of emergencies you must disconnect the power cord from the power outlet in order to shut off power completely...

Page 371: ...ear or on a radiator or heater This product should never be placed in a built in installation unless proper ventilation is provided 8 This product should be operated from the type of power source indicated on the label If you are not sure of the type of power available consult with your dealer or local power company 9 This product is equipped with a 2 wire grounding type plug or a 3 wire grounding...

Page 372: ... for your convenience or you may contact the Brother Dealer for Service 16 Unplug this product from the wall outlet and refer servicing to Authorized Service Personnel under the following conditions If the power cord is damaged or frayed If the product has been spilled by liquid If the product has been exposed to rain or water If the product does not operate normally when the operating instruction...

Page 373: ... any damages including consequential caused by reliance on the materials presented including but not limited to typographical and other errors relating to the publication For protection against the risk of electrical shock always disconnect all cables from the wall outlet before servicing modifying or installing the equipment This equipment may not be used on coin service lines provided by the tel...

Page 374: ...ntries Macintosh QuickDraw iMac and iBook are trademarks or registered trademarks of Apple Computer Inc Postscript and Postscript Level 3 are registered trademarks or trademarks of Adobe Systems Incorporated PaperPort and TextBridge are registered trademarks of ScanSoft Inc Presto PageManager is a registered trademark of NewSoft Technology Corporation Each company whose software title is mentioned...

Page 375: ...nd of its life Use the drum unit until you have a print quality problem then replace the drum unit with a new one The drum counter was not reset 1 Open the front cover and then press Clear Back 2 Press 1 to reset Check Original The documents were not inserted or fed properly or document scanned from ADF was longer than about 90cm See Document jams on page 22 5 Check Paper Check Paper 1 Check Paper...

Page 376: ...oling Down and Wait for a while You must wait 20 minutes for it to cool Cover Open Pls Close Cover The front cover was not completely closed Close the front cover for the drum unit Disconnected The other party or other party s fax machine terminated the call Try to transmit or receive again DX Lever Error The paper adjustment lever for duplex printing is not correctly set for the paper size Set th...

Page 377: ... Out of Memory message on page 10 5 Copy operation in process Press Stop Exit and wait until the other operations in process finish and then try again OR Clear the data in the memory See Out of Memory message on page 10 5 OR Add an optional memory See Memory board on page 23 1 Printing operation in process Reduce print resolution See Print Quality on page 12 5 OR Clear the data in the memory See O...

Page 378: ...urn to the date and time prompt it will display Machine Error XX Then contact your Brother dealer for service Toner Empty Toner cartridge is not installed OR Toner is used up and printing is not possible Reinstall the toner cartridge OR Replace the toner cartridge with a new one See Replacing the toner cartridge on page 22 27 Toner Low If the LCD shows Toner Low you can still print But the toner i...

Page 379: ...hat is not jammed 2 Lift the ADF cover 3 Pull the jammed document out to the right 4 Close the ADF cover 5 Press Stop Exit Document is jammed inside the ADF unit 1 Take out any paper from the ADF that is not jammed 2 Lift the document cover 3 Pull the jammed document out to the right 4 Close the document cover 5 Press Stop Exit OR 1 Take the ADF support out of the ADF unit 2 Pull the jammed docume...

Page 380: ...ows If the jammed paper is removed completely by using the information in the following steps you can install the paper tray first and then close the front cover and the MFC will resume printing automatically If a paper jam occurs when using the optional lower tray unit check for correct installation of the upper paper tray Always remove all paper from the paper tray and straighten the stack when ...

Page 381: ...per up and out of the MFC 3 Press the cover release button and then open the front cover 4 Pull out the drum unit assembly Pull the jammed paper up and out of the MFC If you cannot remove the drum unit assembly easily at this time do not use extra force Instead pull the edge of the jammed paper from the paper tray ...

Page 382: ...the following diagram 5 Open the back output tray Pull the jammed paper out of the fuser unit If the paper jam can be cleared go to Step 7 If you have to pull the paper toward the back of the MFC the fuser may get dirty with toner powder and it may scatter on the next printouts Print a few copies of the test page until the scattering of toner stops ...

Page 383: ...rnal parts of the MFC are extremely HOT Wait for the MFC to cool down before you touch the internal parts of the MFC 6 Open the jam clear cover fuser cover Pull the jammed paper out of the fuser unit 7 Close the jam clear cover Close the back output tray HOT Back view Jam Clear Cover Fuser Cover ...

Page 384: ...unit assembly Take out the jammed paper if there is any inside the drum unit 9 Put the drum unit assembly back in the MFC 10 Put the paper tray in the MFC 11 Close the front cover Paper is jammed in the duplex tray For MFC 8820D 1 Pull the duplex tray and paper tray out of the MFC 2 Pull the jammed paper out of the MFC ...

Page 385: ...he MFC The Jam Duplex message appears if you remove a sheet of paper from the Face Down Output Tray after only one side has printed If the Paper Adjustment Lever for Duplex Printing is not set correctly for the paper size paper jams may occur and the printing will be out of position on the page ...

Page 386: ...ntinues call your dealer for service Horizontal streaks lines are missing You may get a fax with horizontal streaks or with missing lines Usually this is caused by a poor telephone connection Ask the other party to send the fax again Received faxes appear as split or blank pages If the received data is divided and printed on two pages or if you get an additional blank page your Paper Size setting ...

Page 387: ...et certain voices or music on the line as a calling fax machine and respond with fax receiving tones Deactivate the fax by pressing Stop Exit Try avoiding this problem by turning Fax Detect to OFF See Fax Detect on page 5 4 Sending a Fax Call to the MFC If you answered at the MFC press Start and hang up immediately If you answered on an external or extension phone enter your Remote Activation Code...

Page 388: ... document and try again Reduce the graphic quality or the number of font sizes within your application software My headers or footers appear when I view my document on the screen but do not appear when I print them Most laser printers have a restricted area that will not accept print Usually these are the first two lines and last two lines leaves 62 printable lines Adjust the top and bottom margin...

Page 389: ...The Scan key on the MFC s control panel will not work unless you restart your PC with the MFC connected To turn it back on Double click tool WarnON REG from the supplied CD ROM Paper Handling Difficulties The MFC does not load paper The LCD shows Check Paper or Paper Jam Check to see if the Check Paper or Paper Jam message appears on the LCD If it is empty load a new stack of paper into the paper ...

Page 390: ...ce See Setting the Paper Type on page 4 6 and Media Type on page 12 4 Printouts are too light Set Toner Save mode to off in the Advance tab in the printer driver See Toner Save Mode on page 12 6 Network Difficulties I cannot print over the Network Make sure that your MFC is powered on and is On Line and in Ready mode Press the Test switch Then the current settings of the NC 9100h are printed Verif...

Page 391: ...22 32 Ghost Make sure you use paper that meets our specifications Rough surfaced paper or thick print media may cause this problem Make sure that you choose the appropriate media type in the printer driver See About paper on page 2 1 Try using a new drum unit See Replacing the drum unit on page 22 32 Toner specks Make sure that you use paper that meets our specifications Rough surfaced paper may c...

Page 392: ...r by hand while looking at the surface of the OPC drum Caution Be careful not to touch the photosensitive drum with your fingers 3 When you have located the mark on the drum that matches the print sample wipe the surface of the OPC drum with a cotton swab until the dust or paper powder on the surface comes off Caution Do not try to clean the surface of the photosensitive drum with a sharp object s...

Page 393: ...nit on page 22 32 Black lines down the page Printed pages have toner stains down the page Clean the primary corona wire of the drum unit Make sure the primary corona wire cleaner is at the home position The drum unit may be damaged Install a new drum unit See Replacing the drum unit on page 22 32 The toner cartridge may be damaged Put in a new toner cartridge See Replacing the toner cartridge on p...

Page 394: ...the paper tray Try printing using the straight through output path See How to load paper on page 2 5 Wrinkles or creases Make sure that paper is loaded properly Check the paper type and quality See About paper on page 2 1 Try printing using the straight through output path See How to load paper on page 2 5 Turn over the stack of paper in the tray or try rotating the paper 180 in the input tray The...

Page 395: ...ur warranty 1 Turn the MFC power switch off 2 Unplug the MFC from the telephone wall socket 3 Unplug the MFC from the AC outlet Lock the Scanner Lock 4 Push the Scanner Lock Lever up to lock the scanner This lever is located on the left of the scanner glass Caution Damage caused to your MFC by failure to lock the scanner before moving and shipping may void your warranty 5 Open the front cover Scan...

Page 396: ...idge installed in the drum unit 7 Place the drum unit and toner cartridge assembly into the plastic bag and seal the bag 8 Close the front cover Fold down the face down output tray flap Remove the telephone line cord 9 Wrap the MFC in the plastic bag and place it in the original carton with the original packing material ...

Page 397: ...BLESHOOTING AND ROUTINE MAINTENANCE 10 Pack the drum unit and toner cartridge assembly telephone line cord AC cord and printed materials in the original carton as shown below 11 Close the carton and tape it shut ...

Page 398: ...aintenance Cleaning the scanner Turn the MFC power switch off and lift the document cover Clean the scanner glass and glass strip with dry cloth and the white film with isopropyl alcohol on a lint free cloth White Film Document Cover Glass strip White film ...

Page 399: ...nger The drum unit contains toner so handle it carefully If toner scatters and your hands or clothes get dirty immediately wipe or wash it off with cold water 1 Turn the MFC power switch off and open the front cover 2 Remove the drum unit and toner cartridge assembly WARNING Just after you have used the MFC some internal parts of the machine are extremely HOT When you open the front cover of the M...

Page 400: ...ing toner 1 Clean the primary corona wire inside the drum unit by gently sliding the blue tab from right to left several times 2 Return the blue tab and snap it into the Home position Caution If the blue tab is not at Home position printed pages may have vertical stripes 3 Reinstall the drum unit and toner cartridge assembly into the MFC See Replacing the drum unit on page 22 32 4 Close the front ...

Page 401: ...hics Discard the used toner cartridge according to local regulations keeping it separate from domestic waste Be sure to seal the toner cartridge tightly so toner powder does not spill out of the cartridge If you have questions call your local waste disposal office We recommend that you clean the MFC when you replace the toner cartridge How to replace the toner cartridge WARNING Just after you use ...

Page 402: ...he front cover and pull out the drum unit Caution Place the drum unit on a drop cloth or large piece of disposable paper to avoid spilling and scattering the toner To prevent damage to the MFC from static electricity do not touch the electrodes shown below ...

Page 403: ...Brother multifunction machines are designed to work with toner of a particular specification and work to a level of optimum performance when used with genuine Brother toner cartridges Brother cannot guarantee this optimum performance if toner or toner cartridges of other specifications are used Brother does not therefore recommend the use of cartridges other than genuine Brother cartridges with th...

Page 404: ...om side to side five or six times to distribute the toner evenly inside the cartridge 5 Remove the protective cover 6 Insert the new toner cartridge in the drum unit until it clicks into place If you put it in properly the lock lever will lift automatically Toner Cartridge Drum Unit ...

Page 405: ... drum unit by gently sliding the blue tab from right to left several times Return the blue tab to the Home position before reinstalling the drum unit and toner cartridge assembly 8 Reinstall the drum unit and toner cartridge assembly and close the front cover Corona Wire Tab Home Position ...

Page 406: ...en the drum unit should be replaced You should clean the MFC when you replace the drum unit See Cleaning the drum unit on page 22 26 Caution When removing the drum unit handle it carefully because it contains toner If toner scatters and your hands or clothes get dirty immediately wipe or wash with cold water WARNING Just after you have used the MFC some internal parts of the MFC are extremely HOT ...

Page 407: ... Press the cover release button and then open the front cover 2 Remove the old drum unit and toner cartridge assembly Place it on a drop cloth or disposable paper to avoid scattering toner Caution To prevent damage to the printer from static electricity do not touch the electrodes shown below ...

Page 408: ...um unit See Replacing the toner cartridge on page 22 27 6 Reinstall the new drum unit keeping the front cover open 7 Press Clear Back 8 Press 1 and when the LCD shows Accepted and close the front cover Caution If toner scatters and your hands or clothes get dirty immediately wipe off or wash with cold water Discard the used drum unit according to local regulations keeping it separate from domestic...

Page 409: ...umber of total pages copy pages print pages and List Fax total fax print total list print pages that your MFC has printed 1 Press Menu 2 0 3 2 The LCD shows number of pages for Total and Copy Press to see Print and List Fax 3 Press Stop Exit Even if the remaining drum life is 0 you may continue to use the drum unit until you have a print quality problem 20 Miscellaneous 2 Drum Life Remaining 100 2...

Page 410: ... MFC 8420 32 MB Standard Memory 32MB TECHWORKS 12457 0001 MFC 8820D 32 MB Standard Memory 64MB TECHWORKS 12458 0001 128MB TECHWORKS 12459 0001 In general the DIMM must have the following specifications Type 100 pin and 32 bit output CAS Lantency 2 or 3 Clock Frequency 100MHz or more Capacity 32 64 128MB Height 35mm or less Parity NONE DRAM Type SDRAM 4 Bank Some DIMMs might not work with this MFC ...

Page 411: ...ning off the power Before installing the optional memory board make sure there are no faxes in the memory 1 Disconnect the telephone line cord turn the MFC power switch off unplug the MFC power cord from the AC outlet and then disconnect the interface cable WARNING Turn the MFC power switch off before installing or removing the memory board ...

Page 412: ...icity Do not touch the memory chips or the board surface Wear an antistatic wrist strap when you install or remove the board If you do not have an antistatic wrist strap frequently touch the bare metal on the printer 4 Hold the DIMM with your fingers on the side edges and your thumb on the back edge Line up the notches on the DIMM with the DIMM slot Check that the locks on each side of the DIMM sl...

Page 413: ...nect any additional interface cables that you removed 10 Reconnect the power cable and then turn on the MFC power switch WARNING If the Status LED turns Red for a Service Error please call your dealer or Brother authorized service center To check that you have installed the DIMM correctly print the printer settings by using the selection in the driver and check the printout to make sure it shows t...

Page 414: ...e the Internet FAX Network Scanner Network Printer and Network Management operations WARNING DO NOT touch the surface of the main board within 15 minutes after turning off the power For more details about how to configure the Network board please see the NC 9100h Network User s Guide on the CD ROM supplied with the MFC NC 9100h Print Fax Server ...

Page 415: ...ounding mat if possible If you do not have an anti static wrist strap touch the bare metal surface on the back of the machine before handling the NC 9100h Avoid moving around the work area in order to eliminate static charge build up If possible do not work on a carpeted area Do not flex the board and do not touch the components on the card Tools Required Phillips Screwdriver Step 1 Hardware insta...

Page 416: ...urn the MFC power switch off before installing or removing the NC 9100h board 2 Remove the side cover Loosen the two screws and then remove the metal shield plate 3 Loosen the two screws and then remove the metal cover plate Cover Plate ...

Page 417: ...two screws 5 Put the metal shield plate back on and secure it with the two screws 6 Put the side cover back on 7 Reconnect the telephone line cord 8 Reconnect any additional interface cables that you removed 9 Reconnect the power cable and then turn on the MFC power switch 10 Press the Test switch and print a network configuration page See TEST SWITCH on page 23 10 ...

Page 418: ... other side must be connected to the 10BASE T or 100BASE TX connector an RJ45 Connector of the NC 9100h Verifying successful hardware Installation Plug in the AC power cord After initialization and warm up this may take several seconds the machine will come to a Ready state LED No light If both of the two LEDs are off then the print server is not connected to the network Link Speed LED is orange F...

Page 419: ... the print server is receiving or transmitting data TEST SWITCH Short push Prints the network configuration page Long push more than 5 seconds Reset the network configuration back to the factory default settings If there is a valid connection to the network the LED will blink orange or green To set up the MFC on the Network see the NC 9100h Network User s Guide on the CD ROM LED LED Ethernet RJ 45...

Page 420: ...accessory LT 5000 to use as a third paper source Tray 2 holds up to 250 sheets of 80 gsm paper Paper Tray 2 Holds approx 250 sheets of 80 gsm Basis Weight 60 to 105 gsm Moisture Content 4 to 6 by weight We Recommend Xerox 4200 DP 80 gsm Cut sheet Hammermill Laser Paper 90 gsm ...

Page 421: ...ake an error Broadcasting The ability to send the same fax message to more than one location Caller ID A service purchased from the Telephone Company that lets you see the number or name of the party calling you CNG tones The special tones beeps sent by fax machines during automatic transmission to tell the receiving machine that they are from a fax machine Coding Method Method of coding the infor...

Page 422: ... Telephone Company that provides another phone number on an existing phone line The Brother fax machine uses the new number to simulate a dedicated fax line Drum Unit A printing device for the MFC Dual Access Your MFC can scan outgoing faxes or scheduled jobs into memory at the same time it is sending a fax or receiving or printing an incoming fax ECM Error Correction Mode Detects errors during fa...

Page 423: ...d Dial numbers that are stored as a Speed Dial number for Broadcasting Help list A printout of the complete Menu that you can use to program your MFC when you do not have the User s Guide with you Journal Lists information about the last 200 incoming and outgoing faxes TX means Transmit RX means Receive Journal Period The preprogrammed time period between automatically printed Journal Reports You ...

Page 424: ...s varying shades of gray for the best representation of photographs Polling The process of a fax machine calling another fax machine to retrieve waiting fax messages Pulse A form of rotary dialing on a telephone line Quick Dial List A listing of names and numbers stored in Speed Dial memory in numerical order Real Time Transmission When memory is full you can send faxes in real time Remaining jobs...

Page 425: ...rint and line art System Setup List A printed report that shows the current settings of the MFC TAD telephone answering device You can connect an external TAD to the EXT socket of the MFC Temporary Settings You can select certain options for each fax transmission and copy without changing the default settings Tone A form of dialing on the telephone line used for Touch Tone telephones Toner cartrid...

Page 426: ...GLOSSARY G 6 Xmit Report Transmission Verification Report A listing for each transmission that shows its date time and number ...

Page 427: ...m Multi Purpose Tray 50 Sheets 80 gsm MFC 8820D only Manual Feed Tray Single sheet 80 gsm MFC 8420 only Printer Type Laser Print Method Electrophotography by semiconductor laser beam scanning LCD Liquid Crystal Display 22 characters 5 lines Warm up Max 18 seconds at 23 C Power Source 220 240V AC 50 60Hz Power Consumption Average Operating Copying 440W or less 25 C Peak Sleep Standby 1090W or less ...

Page 428: ...ails see Paper specifications for each paper tray on page 2 4 Maximum paper tray capacity Approx 250 sheets of 80 gsm plain paper Maximum multi purpose tray capacity Approx 50 sheets of 80 gsm plain paper MFC 8820D only Manual Feed Tray Multi Purpose Tray Paper size Width 69 8 220 0 mm Hight 116 0 406 4 mm Weight 60 161 gsm Paper Output Up to 150 sheets of plain paper Face down print delivery to t...

Page 429: ...0 20 2 Speed Dial 300 stations Automatic Redial 3 times at 5 minute intervals Auto Answer 2 3 4 5 6 7 8 9 or 10 rings for Australia 1 2 3 4 5 6 7 8 9 or 10 rings for New Zealand 0 1 2 3 4 5 6 7 8 9 or 10 rings for some countries Communication Source Public switched telephone network Memory Transmission Up to 600 1 500 2 pages Out of Paper Reception Up to 600 1 500 2 pages 1 Pages refers to the Bro...

Page 430: ...00 2 400 dpi optical Maximum 1200 x 1200 dpi scanning with Windows XP resolution up to 9600 x 9600 dpi can be selected by using the Brother scanner utility Document Size ADF Width 148 mm to 216 mm ADF Height 148 mm to 356 mm Scanner Glass Width Max 216 mm Scanner Glass Height Max 356 mm Scanning Width 212 mm Gray Scale 256 levels Scanning directly to a networked PC is available with Windows 98 98S...

Page 431: ...lity Normal printing mode Economy printing mode saves toner usage Print Speed Up to 16 pages minute A4 size when loading paper from paper tray Duplex Printing Up to 8 5 pages minute MFC 8820D only 8 5 sides per minute 4 25 sheets per minute First Print Up to 12 seconds using A4 size paper in paper tray Interface Recommended Cable Parallel A bi directional shielded parallel cable that is IEEE 1284 ...

Page 432: ...233MHz 180 MB Apple Macintosh Operating System Mac OS 8 6 9 2 Printing Scanning and PC FAX Send Only All base models meet minimum Requirements 32 MB 64 MB 50 MB 200 MB Mac OS X 10 1 10 2 1 or greater Printing Scanning 2 PC FAX Send and Remote Setup Only 128 MB 160 MB NOTE USB is not supported under Windows 95 or Windows NT WS 4 0 All registered trademarks referenced herein are the property of thei...

Page 433: ... 6 500 pages when printing letter size or A4 paper at 5 print coverage Toner life expectancy will vary depending upon the type of average print job Drum Unit Life Expectancy Up to 20 000 pages drum unit DR 7000 There are many factors that determine the actual drum life such as temperature humidity type of paper toner you use and number of pages per print job ...

Page 434: ...or Windows 95 98 Me NT 4 0 2000 XP Novell NetWare 3 X 4 X 5 X Mac OS 8 6 9 2 X 10 0 10 2 1 or Greater Ethernet 10 100 BASE TX Auto Negotiation TCP IP IPX SPX AppleTalk DLC LLC RARP BOOTP DHCP APIPA NetBIOS WINS LPR LPD Port9100 SMTP POP3 SMB NetBIOS IP IPP SSDP Rendezvous FTP MIBII as well as Brother private MIB TELNET SNMP HTTP TFTP Included Utilities BRAdmin Professional and Web Based Management...

Page 435: ...TAD 1 15 external telephone 1 14 Control panel overview 1 5 Copy contrast 10 20 default settings changing 10 20 Duplex N in 1 10 12 Enlarge Reduce 10 7 enter Copy mode 10 1 keys 10 6 multiple 10 4 paper 2 1 Quality type of document 10 9 scanner glass 10 4 single 10 3 10 4 Sort ADF only 10 9 temporary settings 10 2 10 6 Tray Select 10 11 tray use 4 12 using ADF 10 3 Cover page composing 6 14 custom...

Page 436: ...ne 1 14 F Fax codes Remote Access Code 8 3 Remote Activation Code 5 8 Remote Deactivation Code 5 8 Fax Detect 5 4 Fax Forwarding changing remotely 8 5 8 6 Fax Storage 8 2 printing from 5 7 turning on 8 2 Fax stand alone receiving 5 1 difficulty 22 12 duplex printing 5 13 forwarding 8 5 reducing to fit on paper 5 5 retrieving from a remote site 8 6 ring delay setting 5 2 sending at end of conversat...

Page 437: ...ity 6 23 Memory Storage 3 1 Menu table 3 1 Multi purpose tray MP tray 2 1 O OCR changing setting 15 11 One Touch numbers storing 7 1 P Page Counter 22 35 Paper S 2 capacity 2 3 document size 6 1 jam 22 5 Size 4 7 PaperPort accessing 13 2 exporting 13 23 importing 13 23 PC FAX For Windows 17 1 receiving 17 19 sending address book 17 7 cover page 17 14 facsimile style 17 16 group 17 9 setting up 17 ...

Page 438: ...ion Verification 9 1 Resolution fax standard Fine superFine Photo S 3 print S 5 Scan 13 6 S 4 setting for next fax 6 9 Ring Delay setting 5 2 S Safety Instructions ii Scanner Lamp 4 10 Scanner Lock 22 21 Scanning into PC 13 3 ScanSoft PaperPort 13 19 Scansoft TextBridge OCR 13 22 Search for stored numbers 7 7 Setup Date and Time 4 1 Station ID fax header 4 2 Shipping the machine 22 21 Sockets EXT ...

Page 439: ...r cartridge replacing 22 27 Tray use setting copy 4 12 fax 4 13 Troubleshooting 22 1 error messages on LCD 22 1 if you are having difficulty incoming calls 22 13 paper handling 22 15 phone line difficulties 22 12 printer difficulties 22 14 printing or receiving faxes 22 12 V Volume setting 4 8 beeper 4 8 ring 4 8 speaker 4 9 ...

Page 440: ...te Access Code 1 Dial your fax number from a telephone or fax machine using touch tone When your MFC answers immediately enter your Remote Access Code 3 digits followed by Your MFC signals the kinds of messages it received 1 long beep Fax messages No beeps No messages After 2 short beeps enter a command Press 9 0 to reset your MFC when you finish Hang up 2 3 4 5 6 1 4 Press 9 7 1 1 long beep Fax m...

Page 441: ... A F AX Press 9 6 then to Retrieve all faxes press 2 then enter the number of remote fax machine followed by After the beep hang up and wait Erase all fax messages press 3 Changing Remote Access Code 1 2 Enter a three digit number from 000 to 999 The cannot be changed 3 Press Set 4 Press Stop Exit Remote Commands C HANGE F AX F ORWARDING S ETTING Press 9 5 then to Turn feature Off press 1 Select F...

Page 442: ...This machine is approved for use in the country of purchase only local Brother companies or their dealers will only support machines purchased in their own countries ARL ASA NZ Version A ...

Reviews: