background image

ANNEXE 

———————————————————————————————————————————————————————————

41

f

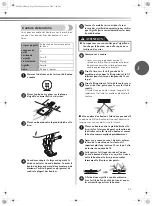
Enlevez le crochet en saisissant sa tige 
centrale et en la tirant.

a

Anneau de retenue

b

Crochet

c

Tige centrale du crochet

g

Utilisez une brosse pour enlever les peluches 
et le fil qui s’accumulent dans l’anneau de 
retenue, le crochet, l’entraînement et la 
coursière.

a

Anneau de retenue

b

Entraînement

c

Coursière

h

Utilisez un chiffon enduit d’huile pour essuyer 
la coursière de navette afin d’éliminer les 
peluches.

i

Ôtez les peluches du crochet de navette 
comme décrit pour l’étape 

h

.

j

Réassemblez le crochet et l’anneau de 
retenue, puis remettez les leviers de blocage 
dans leur position initiale.

a

Anneau de retenue

b

Crochet

c

Levier de blocage

k

Fixez le boîtier de canette, le pied-de-biche et 
l’aiguille avant d’utiliser la machine.

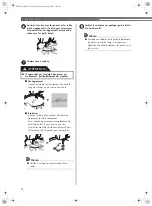
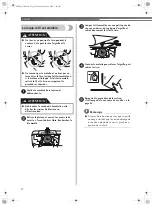
Nettoyage des griffes 
d’entraînement

a

Mettez la machine hors tension et 
débranchez-la.

b

Soulevez l’aiguille et le pied-de-biche, puis 
enlevez-les.

c

Retirez le plateau et ouvrez le couvercle de 
navette à l’avant du bras libre.

d

Desserrez les vis à l’aide d’une pièce de 
monnaie ou d’un tournevis pour enlever la 
plaque d’aiguille.

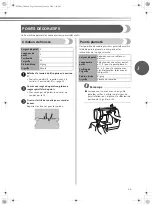
e

À l’aide d’une brosse, enlevez les peluches de 
la partie supérieure des griffes d’entraînement 
et de la coursière de navette.

f

Fixez la plaque d’aiguille à l’aide d’une pièce 
de monnaie ou d’un tournevis.

Veillez à débrancher la machine avant de la 
nettoyer. Sinon, vous pourriez recevoir une 
décharge électrique ou vous blesser.

ATTENTION

LS2000_FR.book  Page 41  Monday, June 28, 2010  3:20 PM

Summary of Contents for LS-2000

Page 1: ......

Page 2: ...g machine and foot controller free from the accumulation of lint dust and loose cloth 5 Never drop or insert any object into any openings 6 Do not use this machine outdoors 7 Do not operate this machine where aerosol spray products are being used or where oxygen is being administered 8 To disconnect turn the main switch to the symbol O position which represents off then remove plug from outlet 9 D...

Page 3: ...dle or other parts to assure correct installation For repair or adjustment In the event a malfunction occurs or adjustment is required first follow the troubleshooting table in the back of the operation manual to inspect and adjust the machine yourself If the problem persists please consult your local authorized Brother dealer For additional product information and updates visit our web site at ww...

Page 4: ...HE NEEDLE 15 Needle precautions 15 Selecting the needle depending on the thread and fabric types 15 Checking the needle 16 Replacing the needle 16 Sewing with a twin needle Option 18 REPLACING THE PRESSER FOOT 19 Replacing the presser foot 19 Removing the presser foot holder 20 2 SEWING BASICS 21 SEWING 21 General sewing procedure 21 Stitch width knob 22 Stitch length knob 22 Needle position selec...

Page 5: ...ION 33 APPLIQUÉ MONOGRAMMING AND EMBROIDERING 34 Appliqués 34 Monogramming and embroidering 34 DECORATIVE STITCHING 36 Gathering 36 Satin stitches 36 Attaching the lace 37 Cording 37 4 APPENDIX 38 MAINTENANCE 38 Oiling 38 Changing the bulb 38 Cleaning the machine surface 39 Cleaning the shuttle race 39 Cleaning the feed dogs 40 Bobbin case tension adjustment 41 TROUBLESHOOTING 42 When the thread i...

Page 6: ...ead k Handwheel Use the handwheel to manually raise and lower the needle l Main power sewing light switch page 8 Use this switch to turn on and off the main power and sewing light m Foot controller jack Insert the foot controller plug into the foot controller jack which also supplies power to this machine n Thread cutter page 23 Pass the threads through the thread cutter to cut them o Presser foot...

Page 7: ...le plate The needle plate is marked with guides for sewing straight seams f Shuttle hook g Shuttle cover Open the shuttle cover to set the bobbin h Bobbin case i Needle j Needle bar thread guide k Needle clamp screw Use the needle clamp screw to hold the needle in place Flat bed attachment The accessories are stored in a compartment inside the flat bed attachment a Lift the bottom of the flat bed ...

Page 8: ...er foot holder is available through your authorized dealer Part code 132730 122 A replacement for the factory installed presser foot is available through your authorized dealer Part number 138135 122 OPTIONAL ACCESSORIES 1 2 3 4 90 14 needle No Part Name Part Code No Part Name Part Code U S A Canada Others U S A Canada Others 1 Zipper foot I X59370 021 3 Bobbin SA156 U S A Canada SABOBBIN U S A on...

Page 9: ...n the machine does not operate correctly due to a bad connection or a disconnection During electrical storms Do not use extension cords or multi plug adapters with many other appliances plugged in to them Fire or electric shock may result Do not touch the plug with wet hands Electric shock may result When unplugging the machine always turn off the main power first Always grasp the plug to remove i...

Page 10: ...ou press the foot controller down lightly the machine will run at a low speed When you press harder the machine s speed will increase When you take your foot off the foot controller the machine will stop You should make sure that nothing is placed on the foot controller when the machine is not in use Steadying the machine If the sewing machine has been placed on an uneven surface turn the rubber c...

Page 11: ...shaft b Groove of the bobbin e Turn on the sewing machine f While holding the end of the thread gently press the foot controller to wind the thread around the bobbin a few times Then stop the machine Only use bobbins part code SA156 SABOBBIN SFB XA5539 151 that have been designed for this sewing machine Using other bobbins may cause damage to the machine We designed the bobbin that comes with this...

Page 12: ...read completely and the bobbin is wound when the thread runs low it may tangle around the bobbin and cause the needle to break Winding the bobbin improperly may cause the thread tension to loosen breaking the needle and resulting in injury a Wound evenly b Wound poorly CAUTION CAUTION 1 2 Winding the bobbin improperly may cause the thread tension to loosen breaking the needle and resulting in inju...

Page 13: ...until it enters the delivery eye under the tension spring a Tension spring f Hold the bobbin case by the latch fully insert the bobbin case into the shuttle race and then release the latch Make sure the bobbin case finger fits into the notch at the top of the shuttle race a Bobbin case finger b Notch g Close the shuttle cover Make sure you set the bobbin so the thread unrolls in the right directio...

Page 14: ... the handwheel before threading the sewing machine c Pull up the spool pin as far as possible and then put a spool of thread on this pin d Feed the upper thread through both thread guides the rear one first then the front one e Pull the thread down and around the upper tension control dial from the right to the left so the thread picks up the thread check spring a Upper tension control dial b Thre...

Page 15: ... the thread take up lever is lowered the upper thread cannot be wrapped around the thread take up lever Make sure you raise the presser foot lever and the thread take up lever before you feed the upper thread If you incorrectly feed the thread you may cause sewing problems Drawing up the lower thread a Lightly hold the end of the upper thread a Upper thread b While holding the end of the upper thr...

Page 16: ... 90 14 to 100 16 needle with transparent nylon threads regardless of the fabric being sewn A 75 11 needle is already installed when the sewing machine is purchased Only use home sewing machine needles Use of any other needle may bend the needle or damage the machine Never use bent needles Bent needles can easily break possibly resulting in injury Sewing fabrics Needle sizes Thread sizes Very thin ...

Page 17: ...be straight according to the instructions in Checking the needle a Turn off the sewing machine b Raise the needle to its highest position by turning the handwheel toward you counterclockwise c Lower the presser foot lever a Presser foot lever The appropriate fabric thread and needle combinations are shown in the table on the previous page If the combination of the fabric thread and needle is not c...

Page 18: ...mp screw Do not apply strong force when loosening or tightening the needle clamp screw otherwise certain parts of the sewing machine may be damaged e With the flat side of the needle toward the rear of the machine insert the needle until it touches the needle stopper a Needle stopper f While holding the needle with your left hand use the coin to tighten the needle clamp screw by turning it clockwi...

Page 19: ... up lever The path for threading the machine to the thread take up lever is the same as for normally threading the machine for a single needle See page 13 for more details f Thread the right needle from front to back Do not pass the thread behind the needle bar thread guide a Left needle thread passes through the needle bar thread guide b Right needle thread passes in front of the needle bar threa...

Page 20: ...ead a Presser foot holder b Shank c Pin f Slowly lower the presser foot lever so that the presser foot pin snaps into the shank in the presser foot holder a Presser foot lever X The presser foot is attached Always turn off the power before you change the presser foot If you leave the power on and step on the controller the machine will start and you may be injured Always use the correct presser fo...

Page 21: ...ils refer to Replacing the presser foot page 19 b Use a coin to loosen the presser foot holder screw a Coin b Presser foot holder c Presser foot holder screw Attaching the presser foot holder a Align the presser foot holder with the lower left side of the presser bar a Presser foot holder b Presser bar b Hold the presser foot holder in place with your right hand and then tighten the screw using a ...

Page 22: ...ent needles can easily break possibly resulting in injuries Make sure that the needle does not strike basting pins otherwise the needle may break or bend CAUTION 1 Turn on the machine Turn on the sewing machine For details on turning on the machine refer to Power supply page 8 2 Select the stitch Select the stitch appropriate for the area to be sewn For details on selecting a stitch refer to Stitc...

Page 23: ...close zigzag stitch which can be used in making buttonholes and decorative stitches The position needed for making the Satin Stitch may need to be adjusted according to the fabric and thread being used To determine the correct knob position first test the length settings on a fabric scrap a Stitch length knob b Shorter c Longer Needle position selector By shifting this lever to L left M middle or ...

Page 24: ... the starting point of the stitching f Lower the presser foot lever a Presser foot lever g Slowly press down on the foot controller X The machine starts sewing h Take your foot off the foot controller X The machine stops sewing i Raise the needle to its highest position by turning the handwheel toward you counterclockwise j Raise the presser foot lever k Pull the fabric to the left side of the mac...

Page 25: ... loose In this case refer to Upper threading page 13 and rethread Solution Increase the tension by turning the upper tension control dial to a higher number Bobbin tension is too loose Loops may appear on the surface of the fabric when sewing thin fabric with thin thread Solution Reduce the tension by turning the upper tension control dial to a lower number If the problem persists increase the ten...

Page 26: ...c If the needle was raised lower the needle by turning the handwheel toward you counterclockwise b Raise the presser foot lever and then turn the fabric Turn the fabric using the needle as a pivot c Lower the presser foot lever and continue sewing Sewing curves Stop sewing and then slightly change the sewing direction to sew around the curve When sewing along a curve while using a zigzag stitch se...

Page 27: ... sewing tear off any excess paper a Stabilizer material or paper Sewing stretch fabrics First baste the pieces of fabric together and then sew without stretching the fabric a Basting Using a free arm style Free arm sewing is convenient for sewing tubular and hard to reach areas To change your machine to the free arm style lift the bottom of the flat bed attachment toward you and then pull the flat...

Page 28: ...itch The Satin Stitch can be used for making buttonholes and decorative stitches or edging Note It is recommended that a test sample be made on a fabric scrap before sewing on your project Basic stitching Straight stitches are used for sewing plain seams a Baste or pin together the fabric pieces b Lower the needle into the fabric at the beginning of the stitching c Start sewing For details refer t...

Page 29: ... color as the fabric b Fold back the fabric to the desired location of the hem a Then fold the edge of the fabric b Leave a 6 mm 1 4 overlap at the edge c Sew 5 6 stitches on the fold using the R needle position a straight stitch 0 width and stitch length of 3 4 Quickly set the width to 2 3 sew 1 stitch and set the width back to 0 Repeat d When the fabric is unfolded you will have a Blind Stitch h...

Page 30: ...oward you d Stop sewing when the portion to be darned is filled with parallel stitching Over edge stitch The Overlock Stitch is used to prevent the edge of the fabric from fraying Place the edge of the fabric under the presser foot so the needle enters the fabric when the left side of the zigzag stitch is sewn and misses the edge of the fabric with the right side of the stitch Sew with this needle...

Page 31: ...ise if necessary Step C Final Bar Tack a Set the stitch width to 5 b Sew 3 6 stitches c Stop the machine when the needle is in the fabric on the left side of the stitch position C Turn the handwheel counterclockwise if necessary Step D Left Row a Lift the presser foot b Turn the fabric 180 degrees using the needle as an axis and set the stitch width to 0 This will move the fabric slightly Lower th...

Page 32: ...needle is in the fabric and at the right side of the stitches position C Step D Right Row a Set the needle position at R stitch width at 2 and stitch length at F b Sew until the needle reaches the other bar tack c Stop the machine when the needle is in the fabric and at the right side of the stitches position D Step E Securing Buttonhole Stitch a To secure stitching set the stitch width to 0 Turn ...

Page 33: ...e end of the stitching to the wrong side of the fabric and then tie it with the bobbin thread Use scissors to cut the upper thread and the bobbin thread at the beginning of the stitching Button fitting with thread shank The thread shank of a button is often needed when sewing on heavier fabric a Place a button between the presser foot and the fabric adjust the stitch width according to the distanc...

Page 34: ...e notch located either on the left or right side of the zipper foot c Sew from the bottom of the zipper toward the top on both sides The needle should be positioned on the zipper side of the foot for best results d To sew the opposite side of the zipper release the foot by pressing the button located at the back of the presser foot fit the zipper foot on the other side of the zipper and continue s...

Page 35: ...h the presser foot and presser foot holder assembly b Draw the lettering for monogramming or design for embroidering on the surface of the fabric c Put the fabric in the embroidery hoop with the surface of the fabric facing up inside the well d Place the project under the needle and lower the presser bar e Draw up the lower thread through the project at the starting position by turning the handwhe...

Page 36: ...g the outline of the design by moving the hoop slowly Then sew to completely fill in the design with stitches by alternately sewing from the outline of the design to the inside and from the inside to the outline Memo Be sure to keep the stitches close together h Secure with a few straight stitches at the end of the design Memo When the hoop is moved quickly the stitches are longer When the hoop is...

Page 37: ...itch Needle position M L R For twin needle sewing always set at M Presser foot Zigzag Needle Single or Twin Needle Needle position Pattern sewn Adjustment of the stitch width Single needle L Repeatedly move the stitch width knob at an even speed from 0 to 5 then from 5 to 0 while depressing the foot control at an even speed NOTE For twin needle sewing repeatedly move the stitch width knob from 0 t...

Page 38: ...h knob so the needle will just clear both sides of the cording b Place the cord on the fabric in the position where it will be sewn c Lower the presser foot making sure the cord is centered and sew using the zigzag stitch Guide the cord by hand along the path which you wish to attach it Stitch width 0 Stitch length 2 4 Needle position M Presser foot Zigzag Needle Single Stitch width Set according ...

Page 39: ...achine oil is available at your local sewing machine dealer or service center Do not apply too much oil as it may soil the thread and fabric Changing the bulb a Turn off the machine and unplug it b Loosen the face plate screw c Remove the face plate from the machine Note Hold the face plate securely while removing or attaching it Turn off the main power switch and unplug the machine before you cha...

Page 40: ...plug it b Raise the needle and the presser foot and then remove the presser foot and the needle c Remove the flat bed attachment and open the shuttle cover at the front of the free arm d Remove the bobbin case by pulling its latch toward you and pulling it out from the shuttle race a Bobbin case latch e Slide the latch levers out from the retaining ring to remove it a Retaining ring b Latch lever ...

Page 41: ...nto position a Retaining ring b Hook c Latch lever k Attach the bobbin case the presser foot and the needle before using the machine Cleaning the feed dogs a Turn off the machine and unplug it b Raise the needle and the presser foot and then remove the presser foot and the needle c Remove the flat bed attachment and open the shuttle cover at the front of the free arm d Remove the needle plate by u...

Page 42: ...o loose In this case turn the screw clockwise being careful not to over tighten the screw approximately 30 45 degrees to increase bobbin tension After you adjust the bobbin thread adjust the upper thread to match the bobbin thread a Screw Bobbin tension is too tight Loops appear on the wrong side of the fabric Solution Increase the tension by turning the upper tension control dial to a higher numb...

Page 43: ...to sew Attach the presser foot that is correct for the type of stitch that you want to sew page 29 30 31 33 34 The upper thread tension is too tight Loosen the upper thread tension page 24 You are pulling the fabric too much Lightly guide the fabric The area around the hole in the nee dle plate is scratched Replace the needle plate Contact your retailer or the nearest authorized service center The...

Page 44: ...been designed for this machine Incorrect bobbins will not work properly Only use a bobbin that has been designed for this machine page 10 Bobbin is set incorrectly Reset the bobbin thread correctly page 11 The thread is tangled on the wrong side of the fabric The upper thread was not threaded correctly Correct the upper threading page 13 The thread ten sion is incorrect You have not threaded the u...

Page 45: ...shuttle race page 39 You have not threaded the upper thread properly Correct the upper threading page 13 The bobbin case is scratched Replace the bobbin case Contact your retailer or the nearest authorized service center You have not used bobbin that has been designed for this machine Incorrect bobbins will not work properly Only use a bobbin that has been designed for this machine page 10 Insuffi...

Page 46: ...the fabric e Perform steps of Cleaning the shuttle race on page 39 Note If machine runs but needle does not move look to be sure bobbin winding shaft is moved to the left into the sewing position Do not pull or push fabric while stitching It may bend the needle causing it to break Do not turn the handwheel and pull the fabric by force when the thread is entangled or the motor is locked If the thre...

Page 47: ...needle position selector 22 O oiling 38 P presser foot 6 19 presser foot holder 6 20 presser foot lever 5 13 pre tension disk 10 R relative chart of sewing fabrics needles and threads 15 reverse sewing lever 23 S sewing machine needles 15 shuttle hook removal 40 shuttle race cleaning 40 spool pin 10 13 stitch length knob 5 22 stitch width knob 5 22 straight stitch 27 stretch fabrics 26 T thick fab...

Page 48: ...LS2000_EN book Page 47 Thursday June 11 2009 11 11 AM ...

Page 49: ...utions brother com pour obtenir les coordonnées du service après vente et consulter la Foire aux questions FAQ APPRENEZ À CONNAÎTRE VOTRE MACHINE À COUDRE NOTIONS ÉLÉMENTAIRES DE COUTURE ANNEXE POINTS COURANTS LS2000_FR book Page 1 Monday June 28 2010 3 20 PM ...

Page 50: ...cumuler dans les ouvertures de ventilation de la machine et de la pédale 5 N insérez ni ne laissez tomber aucun objet dans les ouvertures 6 N utilisez pas cette machine à l extérieur 7 Ne faites pas fonctionner la machine en cas d utilisation d aérosols pulvérisations ou d administration d oxygène 8 Pour débrancher la machine mettez l interrupteur principal en position O arrêt puis retirez la fich...

Page 51: ...u remplacement ou de l installation de tout assemblage des pieds de biche de l aiguille ou de toute autre pièce Lors de réparations ou de réglages Lors d un mauvais fonctionnement ou d un réglage suivez en premier le tableau de dépannage à l arrière du manuel d instruction pour inspecter et régler la machine vous même Si le problème persiste consultez votre revendeur Brother local agréé Pour plus ...

Page 52: ...élection de l aiguille en fonction des types de fil et de tissu 15 Vérification de l aiguille 16 Remplacement de l aiguille 16 Comment coudre avec une aiguille jumelée option 18 REMPLACEMENT DU PIED DE BICHE 19 Remplacement du pied de biche 19 Retrait du support de pied de biche 20 2 NOTIONS ÉLÉMENTAIRES DE COUTURE 21 COUTURE 21 Procédure de couture générale 21 Bouton de largeur de point 22 Bouton...

Page 53: ... 34 Appliqués 34 Monogrammes et broderies 34 POINTS DÉCORATIFS 36 Création de fronces 36 Points plumetis 36 Couture de dentelle 38 Pose d une ganse 38 4 ANNEXE 39 MAINTENANCE 39 Application d huile 39 Remplacement de l ampoule 39 Nettoyage de la surface de la machine 40 Nettoyage de la coursière de navette 40 Nettoyage des griffes d entraînement 41 Réglage de la tension du boîtier de canette 42 DÉ...

Page 54: ... l utiliser comme fil inférieur k Molette La molette permet de relever ou d abaisser l aiguille manuellement l Interrupteur d alimentation principal de la lampe page 8 Cet interrupteur permet d activer et de désactiver l alimentation principale et la lampe de couture m Prise de la pédale Insérez la fiche de la pédale dans la prise appropriée qui alimente également cette machine n Coupe fil page 23...

Page 55: ...utures droites sont marqués sur la plaque d aiguille f Crochet de navette g Couvercle de navette Ouvrez le couvercle de navette pour placer la canette h Boîtier de canette i Aiguille j Guide fil de la barre d aiguille k Vis du support d aiguille Utilisez la vis du support d aiguille pour maintenir l aiguille en place Plateau Les accessoires sont rangés dans un compartiment à l intérieur du plateau...

Page 56: ...biche d origine auprès de votre revendeur agréé réf 138135 122 ACCESSOIRES EN OPTION 1 2 3 4 Aiguille 90 14 N Nom de la pièce Réf N Nom de la pièce Réf États Unis Canada Autres États Unis Canada Autres 1 Pied pour fermetures à glissière I X59370 021 3 Canette SA156 États Unis Canada SABOBBIN États Unis uniquement XA5539 151 2 Plaque à repriser XA3442 121 4 Jeu d aiguilles XE7064 001 1 2 N Nom de l...

Page 57: ... connexion ou d un débranchement Pendant un orage N utilisez pas de rallonge ni d adaptateurs multiples pour brancher cette machine avec d autres appareils Vous risqueriez de vous électrocuter ou de provoquer un incendie Ne touchez pas la fiche si vous avez les mains mouillées Vous risqueriez de vous électrocuter Lorsque vous débranchez la machine veillez à la mettre d abord hors tension Pour la d...

Page 58: ...ez vous assurer que rien n est placé sur la pédale lorsque la machine n est pas utilisée Stabilisation de la machine Si la machine à coudre a été placée sur une surface qui n est pas plane tournez la cale en caoutchouc située dans le coin avant droit de la plaque de base pour régler sa hauteur jusqu à ce que la machine soit stable Lorsque vous connectez la pédale veillez à mettre la machine à coud...

Page 59: ...oudre sous tension f Tout en tenant l extrémité du fil appuyez légèrement sur la pédale pour enrouler le fil de quelques tours autour de la canette Puis arrêtez la machine Utilisez exclusivement des canettes réf SA156 SABOBBIN SFB XA5539 151 conçues pour cette machine à coudre L utilisation de n importe quelle autre canette pourrait endommager la machine Nous avons conçu la canette qui est fournie...

Page 60: ...reste peu de fil celui ci pourrait s emmêler autour de la canette et entraîner la cassure de l aiguille Rembobiner la canette de manière incorrecte peut entraîner le relâchement de la tension du fil ce qui pourrait casser l aiguille et vous blesser a Bobinée régulièrement b Bobinée incorrectement ATTENTION ATTENTION 1 2 Rembobiner la canette de manière incorrecte peut entraîner le relâchement de l...

Page 61: ...sion a Ressort de tension f Tout en tenant le boîtier de la canette par le bouton d ouverture insérez le complètement dans la coursière de navette puis relâchez le bouton d ouverture Veillez à ce que la languette du boîtier de canette s introduise dans l encoche en haut de la coursière de navette a Languette du boîtier de canette b Encoche g Fermez le couvercle de navette Veillez à placer la canet...

Page 62: ... la machine à coudre c Tirez au maximum sur le porte bobine puis mettez y une bobine de fil d Alimentez le fil supérieur via les deux guide fils en commençant pas celui de derrière et en passant ensuite à celui de devant e Tirez le fil vers le bas et enroulez le autour du sélecteur de tension supérieure de la droite vers la gauche afin qu il attrape le ressort contrôleur de fil a Sélecteur de tens...

Page 63: ...ible d enrouler le fil supérieur autour du levier compensateur du fil Veillez à soulever le levier du pied de biche et le levier compensateur du fil avant d alimenter le fil supérieur Si vous alimentez le fil incorrectement vous pourrez rencontrer des problèmes de couture Comment faire sortir le fil inférieur a Tenez légèrement l extrémité du fil supérieur a Fil supérieur b Tout en maintenant l ex...

Page 64: ... nylon transparent quel que soit le type de tissu Une aiguille 75 11 est installée lorsque vous achetez la machine à coudre N utilisez que des aiguilles à coudre pour machine à usage domestique N utilisez pas d autre aiguille elle risquerait de se tordre ou la machine pourrait être endommagée N utilisez jamais d aiguilles tordues Elles peuvent facilement casser et vous blesser Tissus Calibres d ai...

Page 65: ...ttez la machine à coudre hors tension b Mettez l aiguille dans sa position la plus haute en tournant la molette vers vous dans le sens inverse des aiguilles d une montre c Abaissez le levier du pied de biche a Levier du pied de biche Les combinaisons tissu fil aiguille appropriées figurent dans le tableau de la page précédente Si la combinaison n est pas correcte l aiguille risque de se tordre ou ...

Page 66: ...as lorsque vous serrez ou desserrez la vis du support d aiguille sinon certaines pièces de la machine à coudre risquent d être endommagées e Le côté plat de l aiguille orienté vers l arrière de la machine insérez l aiguille jusqu à ce qu elle touche la butée a Butée f Tout en tenant l aiguille de la main gauche utilisez la pièce de monnaie pour serrer la vis du support d aiguille en la tournant da...

Page 67: ...hine jusqu au levier compensateur du fil est le même que pour enfiler normalement la machine avec une aiguille simple Consultez la page 13 pour avoir plus de détails f Enfilez l aiguille droite de l avant vers l arrière Ne faites pas passer le fil derrière le guide fil de la barre d aiguille a Le fil de l aiguille gauche passe à travers le guide fil de la barre d aiguille b Le fil de l aiguille dr...

Page 68: ...e être lue a Support du pied de biche b Talon c Crochet Mettez toujours la machine hors tension avant de changer le pied de biche Si vous laissez la machine sous tension et que vous appuyez accidentellement sur la pédale la machine démarrera et vous pourrez vous blesser Utilisez toujours le pied de biche correct pour le modèle de point que vous avez choisi Si vous utilisez le pied de biche incorre...

Page 69: ...lus de détails reportez vous à la section Remplacement du pied de biche page 19 b À l aide d une pièce de monnaie desserrez la vis du support de pied de biche a Pièce de monnaie b Support du pied de biche c Vis du support de pied de biche Fixation du support de pied de biche a Alignez le support avec la partie inférieure gauche de la barre du pied de biche a Support du pied de biche b Barre du pie...

Page 70: ...e touche pas d épingles de faufilage sinon elle risque de casser ou de se tordre ATTENTION 1 Mettez la machine sous tension Mettez la machine à coudre sous tension Pour plus de détails sur la mise sous tension de la machine reportez vous à la section Prise d alimentation électrique page 8 p 2 Sélectionnez le point Sélectionnez le point approprié pour la zone à coudre Pour plus de détails sur la sé...

Page 71: ...oratifs Il sera peut être nécessaire de régler la position permettant d effectuer un point plumetis en fonction du tissu et du fil utilisés Pour déterminer la position correcte du bouton faites tout d abord un essai avec les réglages de longueur sur une chute de tissu a Bouton de longueur de point b Plus court c Plus long Sélecteur de position de l aiguille En déplaçant ce levier vers la gauche L ...

Page 72: ...aissez le levier du pied de biche a Levier du pied de biche g Appuyez doucement sur la pédale X La machine commence à coudre h Retirez le pied de la pédale X La machine s arrête de coudre i Mettez l aiguille dans sa position la plus haute en tournant la molette vers vous dans le sens inverse des aiguilles d une montre j Relevez le levier du pied de biche k Tirez le tissu vers le côté gauche de la ...

Page 73: ... reportez vous à la section Enfilage supérieur page 13 et enfilez de nouveau Solution Augmentez la tension en tournant le sélecteur de tension supérieure sur un numéro plus élevé La tension de la canette est insuffisante Des boucles risquent d apparaître sur la surface du tissu lorsque vous cousez des tissus fins avec du fil fin Solution Réduisez la tension en tournant le sélecteur de tension supé...

Page 74: ... le sens inverse des aiguilles d une montre b Relevez le levier du pied de biche puis tournez le tissu Tournez le tissu en utilisant l aiguille comme pivot c Abaissez le levier du pied de biche et continuez à coudre Couture de lignes courbes Arrêtez de coudre puis modifiez légèrement le sens de couture pour coudre le long de la ligne courbe Si vous cousez le long d une ligne courbe en utilisant un...

Page 75: ...e terminé déchirez l excédent de papier a Papier ou matériau stabilisateur Couture de tissus élastiques Faufilez ensemble les morceaux de tissus puis cousez sans étirer le tissu a Faufilage Comment utiliser un mode bras libre La couture avec bras libre est commode pour coudre des pièces tubulaires ou des endroits difficiles à atteindre Pour mettre votre machine en mode bras libre soulevez le bas d...

Page 76: ... pour réaliser des boutonnières et des points décoratifs ou des bordures Remarque Nous vous recommandons de faire un essai sur une chute de tissu avant de commencer votre projet de couture Points simples Vous pouvez utiliser des points droits pour les coutures standard a Faufilez ou épinglez ensemble les pièces de tissu b Abaissez l aiguille dans le tissu au début de la couture Largeur de point 1 ...

Page 77: ...rieur doivent avoir la même couleur que le tissu b Repliez le tissu sur l endroit souhaité de l ourlet a Puis repliez le bord du tissu b Laissez une superposition de 6 mm 1 4 po au bord c Cousez 5 ou 6 points sur le pli avec l aiguille en position R un point droit 0 de largeur et d une longueur de point de 3 ou 4 Réglez rapidement la largeur sur 2 ou 3 cousez un point puis remettez la largeur sur ...

Page 78: ...ie à repriser est remplie de points parallèles Point de surjet Le point de surjet permet d éviter que le bord du tissu ne s effiloche Placez le bord du tissu sous le pied de biche de façon à ce que l aiguille traverse le tissu lorsque le côté gauche du point zigzag est cousu et évite le bord du tissu pour le côté droit du point Cousez avec l aiguille le long du bord du tissu Largeur de point 0 Lon...

Page 79: ...re Étape C point d arrêt final a Réglez la largeur de point sur 5 b Cousez 3 à 6 points c Arrêtez la machine lorsque l aiguille est dans le tissu sur le côté gauche du point position C Si nécessaire tournez la molette dans le sens inverse des aiguilles d une montre Étape D rangée gauche a Soulevez le pied de biche b Tournez le tissu de 180 degrés en utilisant l aiguille comme axe et réglez la larg...

Page 80: ...int d arrêt final a Réglez la largeur de point sur 5 et la longueur de point sur 0 b Cousez 3 à 4 points c Arrêtez la machine lorsque l aiguille est dans le tissu sur le côté droit des points position C Étape D rangée droite a Réglez la position de l aiguille sur R la largeur de point sur 2 et la longueur de point sur F b Cousez jusqu à ce que l aiguille atteigne l autre point d arrêt c Arrêtez la...

Page 81: ...puis nouez le avec le fil de la canette A l aide d une paire de ciseaux coupez le fil supérieur et le fil de la canette au début de la couture Mise en place d un bouton à l aide d une queue de fil La queue de fil d un bouton est souvent nécessaire lorsque vous cousez des tissus plus lourds a Placez un bouton entre le pied de biche et le tissu réglez la largeur de point en fonction de la distance e...

Page 82: ... sur le côté droit du pied pour fermetures à glissière c Cousez la fermeture à glissière de bas en haut des deux côtés Pour obtenir les meilleurs résultats il faut positionner l aiguille du côté fermeture à glissière du pied de biche d Pour coudre l autre côté de la fermeture à glissière relâchez le pied de biche en appuyant sur le bouton situé à l arrière du pied de biche montez le pied pour ferm...

Page 83: ... monogrammes ou le dessin pour les broderies sur la surface du tissu c Placez le tissu dans le cadre de broderie la surface du tissu vers le haut à l intérieur du tambour à broder d Placez le projet sous l aiguille et abaissez la barre du pied de biche e Faites sortir le fil inférieur au point de départ du projet en tournant la molette vers vous dans le sens inverse des aiguilles d une montre puis...

Page 84: ...tement Puis cousez pour remplir complètement le motif de points Pour ce faire cousez alternativement de l extérieur du motif vers l intérieur et de l intérieur vers l extérieur Mémo Veillez à ce que les points soient bien serrés h Arrêtez la couture avec quelques points droits à la fin du motif Mémo Lorsque vous déplacez le cadre rapidement les points sont plus longs Lorsque vous déplacez le cadre...

Page 85: ...usieurs points décoratifs à l aide de points plumetis en respectant les instructions de la page suivante Remarque Lorsque vous cousez avec une aiguille jumelée veillez à utiliser une largeur de point inférieure à 3 et placez le sélecteur de position de l aiguille sur M Largeur de point 0 Longueur de point 4 Position de l aiguille M Pied de biche Zigzag Aiguille Simple Largeur de point Reportez vou...

Page 86: ...de 5 à 0 plus lentement que pour la forme ci dessus afin de réaliser des motifs ronds tout en appuyant sur la pédale de commande de façon constante REMARQUE pour la couture avec aiguille jumelée déplacez plusieurs fois le bouton de largeur de point de 0 à 3 puis de 3 à 0 M R Aiguille jumelée M Aiguille simple L Déplacez lentement et à plusieurs reprises le bouton de largeur de point de 0 à 5 puis ...

Page 87: ... deux extrémités de la ganse b Placez le cordonnet sur le tissu dans la position dans laquelle il sera cousu c Abaissez le pied de biche en vous assurant que le cordonnet est centré et cousez à l aide d un point zigzag Guidez le cordonnet à la main suivant la trajectoire sur laquelle il doit être cousu Largeur de point 0 Longueur de point 2 4 Position de l aiguille M Pied de biche Zigzag Aiguille ...

Page 88: ...ne à coudre ou de votre centre de service Ne mettez pas trop d huile cela risque de salir le fil et le tissu Remplacement de l ampoule a Mettez la machine hors tension et débranchez la b Desserrez la vis de la plaque avant c Enlevez la plaque avant de la machine Remarque Tenez fermement la plaque avant lorsque vous l enlevez ou la fixez Mettez l interrupteur principal dans la position arrêt et déb...

Page 89: ... c Retirez le plateau et ouvrez le couvercle de navette à l avant du bras libre d Enlevez le boîtier de canette en tirant le bouton d ouverture vers vous et en l enlevant de la coursière de navette a Bouton d ouverture du boîtier de la canette e Faites glisser les leviers de blocage hors de l anneau de retenue pour les enlever a Anneau de retenue b Levier de blocage Débranchez le cordon d alimenta...

Page 90: ...Crochet c Levier de blocage k Fixez le boîtier de canette le pied de biche et l aiguille avant d utiliser la machine Nettoyage des griffes d entraînement a Mettez la machine hors tension et débranchez la b Soulevez l aiguille et le pied de biche puis enlevez les c Retirez le plateau et ouvrez le couvercle de navette à l avant du bras libre d Desserrez les vis à l aide d une pièce de monnaie ou d u...

Page 91: ...dans le sens des aiguilles d une montre pour augmenter la tension de la canette Ne la serrez pas excessivement Après avoir réglé le fil de la canette ajustez le fil supérieur pour que son réglage corresponde à celui du fil de la canette a Vis La tension de la canette est trop élevée Des boucles apparaissent sur l envers du tissu Solution Augmentez la tension en tournant le sélecteur de tension sup...

Page 92: ...lle est desserrée Utilisez une pièce de monnaie ou un tournevis pour bien serrer la vis page 17 L aiguille est tordue ou émoussée Remplacez l aiguille page 16 Vous n avez pas utilisé la combinaison tissu fil aiguille appropriée Choisissez un fil et une aiguille qui sont appropriés au type de tissu page 15 Le pied de biche que vous utilisez n est pas approprié au type de point que vous voulez coudr...

Page 93: ...biche Contactez votre revendeur ou le centre de dépannage agréé le plus proche Le boîtier de la canette est rayé ou présente une bavure Remplacez le boîtier de la canette Contactez votre revendeur ou le centre de dépannage agréé le plus proche Vous avez utilisé une canette qui n a pas été conçue pour cette machine Les canettes incorrectes ne fonctionneront pas correctement Utilisez uniquement une ...

Page 94: ...us n avez pas monté la canette correctement Enfilez correctement le fil supérieur et rembobinez correctement le fil de la canette page 11 13 Vous n avez pas monté la bobine correctement Montez la bobine correctement Vous n avez pas utilisé la combinaison tissu fil aiguille appropriée Choisissez un fil et une aiguille qui sont appropriés au type de tissu page 15 L aiguille est tordue ou émoussée Re...

Page 95: ...page 39 Le point n est pas cousu correctement Le pied de biche que vous utilisez n est pas correct pour ce type de point Utilisez le pied de biche approprié au type de point que vous voulez coudre page 28 30 32 33 34 La tension du fil n est pas correcte Réglez la tension du fil supérieur page 24 Le fil est emmêlé par exemple dans la coursière de navette Retirez le fil emmêlé Si le fil est emmêlé d...

Page 96: ...ière de navette à la page 40 Remarque Si la machine fonctionne sans que l aiguille ne bouge vérifiez que l axe de bobinage de la canette a été déplacé vers la gauche en position de couture Ne tirez ni ne poussez le tissu pendant la couture Cela peut tordre l aiguille et la casser Ne tournez pas la molette et ne tirez pas en forçant sur le tissu lorsque le fil est emmêlé ou si le moteur est bloqué ...

Page 97: ...tation principal 8 L levier de couture en marche arrière 23 levier du pied de biche 5 13 M mode bras libre 26 molette 5 monogrammes 34 N nettoyage 40 nettoyage de la coursière de navette 41 P pédale 23 pièces principales 5 pied pour fermetures à glissière 33 pied de biche 6 19 plaque d aiguille 6 41 plateau 6 26 point droit 27 points invisibles 28 points simples 27 points zigzag 25 27 34 porte bob...

Page 98: ...H4_cover_FR fm Page 49 Monday June 28 2010 6 53 PM ...

Page 99: ...H4_cover_FR fm Page 49 Monday June 28 2010 6 53 PM ...

Page 100: ...English French 885 403 XE9040 001 Printed in China LS2000_FR book Page 49 Monday June 28 2010 3 20 PM ...

Reviews: