APPENDIX
—————————————————————————————————————————————————————
41
Bobbin case tension
adjustment
The bobbin thread tension has already been adjusted
at the factory for general use. For most sewing
applications, no adjustment is needed.
When sewing with thin thread on thin fabrics, the
thread tension may not be adjusted adequately with
the upper tension control dial. Therefore, the thread
tension must be adjusted according to the procedure
described below.
Note
●
Remember to return the screw to its original
setting before starting your next project.
■
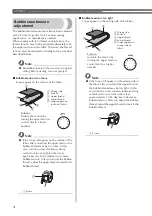
Bobbin tension is too loose
Loops appear on the surface of the fabric.
Solution
Reduce the tension by
turning the upper tension-
control dial to a lower
number.
Note
●
If the loops still appear on the surface of the
fabric after you adjust the upper tension, the
bobbin thread may be too loose. In this
case, turn the screw clockwise, being
careful not to over-tighten the screw,
approximately 30-45 degrees to increase
bobbin tension. After you adjust the bobbin
thread, adjust the upper thread to match the
bobbin thread.
a
Screw
■
Bobbin tension is too tight
Loops appear on the wrong side of the fabric.
Solution
Increase the tension by
turning the upper tension-
control dial to a higher
number.
Note
●
If the loops still appear on the wrong side of
the fabric after you adjust the upper tension,
the bobbin thread may be too tight. In this
case, turn the screw counterclockwise being
careful not to over-loosen the screw,
approximately 30-45 degrees to decrease
bobbin tension. After you adjust the bobbin
thread, adjust the upper thread to match the
bobbin thread.
a
Screw
1
2
3
4
5
a
Wrong side
b
Surface
c
Upper thread
d
Lower thread
e
Loops appear on
surface of fabric
1
2
3
4
5
a
Wrong side
b
Surface
c
Upper thread
d
Lower thread
e
Loops appear on
wrong side of
fabric

