


4-7
Confidential
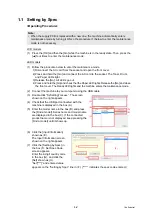
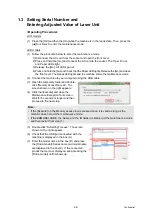
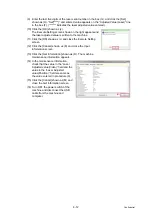
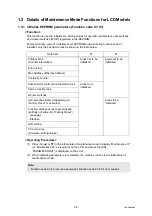
(8) Click the [Input information]
shown as (E).
The Input Information screen
shown on the right appears.
(9) Click the [Serial No.] in the
box (F). The Serial No. screen
appears.
(10) Enter the serial number (15
digits) of the machine in the
box (J) and click the [Set]
shown as (K).
“Set[***************]” and
entered value appears on the
“Serial No.” line in the box (F).
(“***************” indicates the
Serial No. entered.)
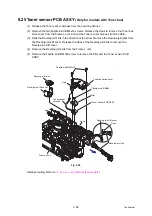
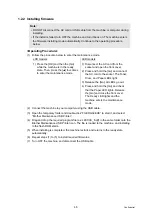
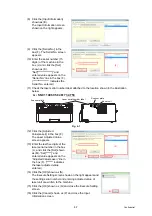
(11) Check the laser serial number label attached to the location shown in the illustration
below.
Ex.)
SN011406058461734753
Fig. 4-1
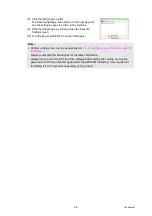
(12) Click the [Adjusted
Value(Laser)] in the box (F).
The Laser Adjusted Value
screen appears.
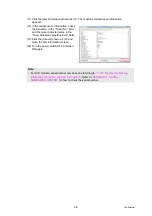
(13) Enter the last five digits of the
laser serial number in the box
(L), and click the [Set] shown
as (M). “Set[*****]” and
entered value appears on the
“Adjusted Value(Laser)” line in
the box (F). (“*****” indicates
the laser adjusted value
entered.)
(14) Click the [OK] shown as (N).
The Execute Setting screen shown on the right appears and
the setting serial number and entering adjusted value of
laser unit are written to the machine.
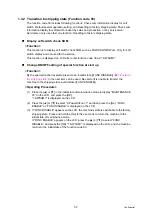
(15) Click the [OK] shown as (Q) and close the Execute Setting
screen.
(16) Click the [Cancel] shown as (P) and close the Input
Information screen.
(J)
(K)
(F)
Laser unit
Laser serial number label
Scanner plate
Scanner plate
(N)
(P)
(L)
(M)
(F)
(Q)


