background image

Warning

To Use the Printer Safely

Warning

Note

Hint

User's Guide 

Network 
User's Guide

Indicates warnings that 
must be observed to 
prevent possible 
personal injury.

Indicates cautions that 
must be observed to use 
the printer properly or 
prevent damage to the 
printer.

Indicates notes and 
useful tips to remember 
when using the printer.

Indicates reference to the 
User's Guide or Network 
User's Guide which is on 
the CD-ROM we have 
supplied.

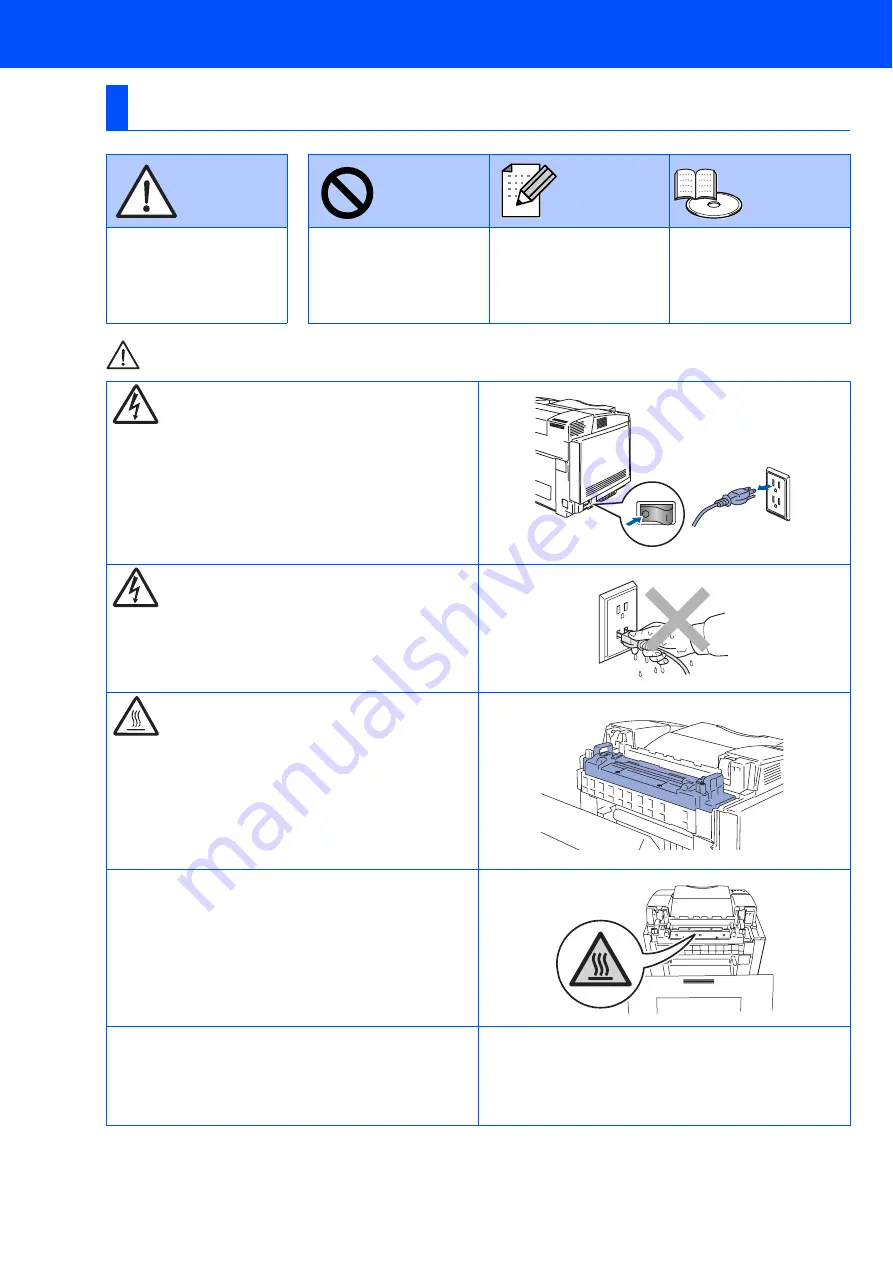
There are high voltage electrodes inside the printer. 
Before replacing internal parts, cleaning the printer or 
clearing a paper jam, make sure you have turned OFF 
the power switch and unplugged the AC power cord 
from the AC power outlet/socket.

Do not handle the plug or AC power cord with wet 
hands. This constitutes an electric shock hazard.

The fusing unit becomes extremely hot during 
operation. Wait until it has cooled down sufficiently 
before replacing consumable items.

The fusing unit is marked with a caution label. Please 
do NOT take off or damage the label.

This printer is heavy and weighs approximately 30.5 kg 
(67.3 lb). To prevent injuries when moving or lifting this 
printer, make sure to use at least two people.

Safety Precautions

Summary of Contents for HL-2700CN Series

Page 1: ... com Keep this Quick Setup Guide and the supplied CD ROM in a convenient place for quick and easy reference at all times Setup is Complete Step 1 Setting Up Your Printer Step 2 Installing the Driver USB page 16 Parallel page 18 Network Mac OS 8 6 9 2 page 29 Mac OS X 10 1 10 2 page 30 Peer to Peer LPR NetBIOS page 20 Network Shared Printer page 22 Mac OS X 10 1 10 2 page 27 Mac OS 8 6 9 2 page 24 ...

Page 2: ...nter Before replacing internal parts cleaning the printer or clearing a paper jam make sure you have turned OFF the power switch and unplugged the AC power cord from the AC power outlet socket Do not handle the plug or AC power cord with wet hands This constitutes an electric shock hazard The fusing unit becomes extremely hot during operation Wait until it has cooled down sufficiently before repla...

Page 3: ...r Brother Peer to Peer Network Printer Users LPR NetBIOS 20 For Network Shared Printer Users 22 For USB Interface Cable Users 24 For Mac OS 8 6 to 9 2 Users 24 For Mac OS X 10 1 10 2 Users 27 For Network Interface Cable Users 29 For Mac OS 8 6 to 9 2 Users 29 For Mac OS X 10 1 10 2 Users 30 For Administrators Installing BRAdmin Professional utility Windows users only 32 Web BRAdmin Windows Users O...

Page 4: ... Compliance Statement For Canada This Class B digital apparatus complies with Canadian ICES 003 Cet appareil numérique de la classe B est conforme à la norme NMB 003 du Canada Radio interference 220 240 volt model only This printer follows EN55022 CISPR Publication 22 Class B Before you use this product make sure that you use a double shielded interface cable with twisted pair conductors and that ...

Page 5: ...C 60825 IMPORTANT For Your Safety To ensure safe operation the supplied three pin plug must be inserted only into a standard three pin power outlet that is properly grounded through the normal household wiring Extension cords used with this printer must be three pin plug type and correctly wired to provide proper grounding Incorrectly wired extension cords may cause personal injury and equipment d...

Page 6: ... User s Guide Quick Setup Guide OPC Belt Cartridge AC Power Cord Toner Cartridges Black Cyan Magenta and Yellow 1 Repacking Kit 2 Parts Paper Jam Locator Label 3 The interface cable is not a standard accessory Buy the appropriate interface cable for the interface you intend to use Parallel USB or Network It s recommended to use a parallel or USB interface cable that is not longer than 6 feet 2 0 m...

Page 7: ...tructure 3 Go Button Exit from the control panel menu reprint settings clear error messages and sleep mode Pause continue printing LEDs 4 Status LED Green On Ready to print Printing Sleeping Data remains in the printer buffer when DATA EXISTS is shown on the LCD Blinking Receiving or processing data Off The printer power is off The printer is off line 5 Alarm LED Red On There is an error in the pr...

Page 8: ...your printers read the FAQs and troubleshooting tips or learn about printer solutions 2 Install Software Installs the printer driver and utilities 3 Documentation View the printer s User s Guide and Network User s Guide in PDF format Viewer included 4 Maintenance Tutorial Instructional movie for printer maintenance 5 On Line Registration Register your product on line 6 Color PDF Print Samples View...

Page 9: ...tective parts 2 Open the front cover 3 Remove the protective part 4 Take out all the toner cartridges from the printer 5 Carefully pull the red protective paper out of the printer 6 Rock the toner cartridge 3 to 4 times 1 Install the Toner Cartridges Front cover Go to the next page Step 1 Setting Up Your Printer Windows USB Windows Parallel Windows Network Macintosh USB Macintosh Network For Admin...

Page 10: ... the cartridge color label to the corresponding label on the printer 9 Repeat steps 5 through 7 for the remaining toner cartridges 0 Close the front cover 1 Open the back cover 2 Pull out the tension release pins from both sides of the fusing unit 3 Close the back cover REMOVE tape Protective cover K Y M C K Y M C 2 Remove the tension release pins of the Fusing Unit Step 1 ...

Page 11: ...guides with the flat side facing you 4 Lock the belt cartridge lock levers Close the top cover 3 Install the OPC Belt Cartridge Top cover Protective sheet Belt tension release pin OPC belt cartridge Belt cartridge lock levers Go to the next page Setting Up Your Printer Windows USB Windows Parallel Windows Network Macintosh USB Macintosh Network For Administrators Installing the Driver ...

Page 12: ...it the paper size Check that the guides are firmly in the slots 3 Fan the stack of paper well to avoid paper jams and misfeeds 4 Put paper in the paper tray Check that the paper is flat in the tray and below the maximum paper mark 5 Put the paper tray firmly back in the printer 4 Load Paper in the Paper Tray Paper guide Paper guide Up to here Step 1 ...

Page 13: ...on 3 After the printer has finished warming up the READY message appears 4 Press the Go button The printer prints a test page Check that the test page has printed correctly 5 Print a Test Page NETWORK READY HL 2700CN Job Cancel Alarm Go Menu K C M Y Back Set NETWORK READY HL 2700CN Job Cancel Alarm Go Menu K C M Y Back Set Go to the next page Setting Up Your Printer Windows USB Windows Parallel Wi...

Page 14: ...ayed Press the Set button 2 Press the Set button again 3 Press the or button to select your language Press the Set button to accept 6 Setting Your Language on the Control Panel MENU SETUP SETUP LANGUAGE LANGUAGE ENGLISH Go to the next page to install the driver Step 1 ...

Page 15: ... Quick Setup Guide are based on Mac OS X 10 1 For USB Interface Cable Users Go to page 14 For Parallel Interface Cable Users Go to page 16 For Network Interface Cable Users Brother Peer to Peer Network Printer Users LPR NetBIOS Go to page 18 Network Shared Printer Users Go to page 20 For USB Interface Cable Users Mac OS 8 6 to 9 2 Users Go to page 24 Mac OS X 10 1 10 2 Users Go to page 27 For Netw...

Page 16: ...screen instructions 3 Click Install Software icon on the menu screen 4 Click Printer Driver 5 Click the Next button Follow the on screen instructions 6 Select Standard Installation and then click the Next button For USB Interface Cable Users If the Found New Hardware Wizard appears on your PC click the Cancel button CANCEL If you want to install the PS driver select Custom and then follow the on s...

Page 17: ...sers Setup is now complete For Windows 2000 XP users Go to 2 Setting your Printer as the Default Printer 2 Setting your Printer as the Default Printer For Windows 2000 XP Users Only 1 Click Start and then Printers and Faxes 2 Select the Brother HL 2700CN series icon 3 From the File menu select Set as Default printer Setup is now complete If you want to register your product on line check On Line R...

Page 18: ... Turn on the printer s power switch 4 Insert the CD ROM into your CD ROM drive The opening screen will appear automatically Follow the on screen instructions 5 Click Install Software icon on the menu screen 6 Click Printer Driver 7 Click the Next button Follow the on screen instructions For Parallel Interface Cable Users If the Found New Hardware Wizard appears on your PC click the Cancel button C...

Page 19: ...k the Finish button Setup is now complete If you want to install the PS driver select Custom and then follow the on screen instructions When the Select Components screen appears check PS Printer Driver and then continue following the on screen instructions If you want to register your product on line check On Line Registration Setting Up Your Printer Windows Parallel For Administrators Installing ...

Page 20: ...ctions 5 Click Install Software on the menu screen 6 Click Printer Driver 7 Click the Next button Follow the on screen instructions For Network Interface Cable Users For Brother Peer to Peer Network Printer Users LPR NetBIOS If you are going to connect the printer to your network we recommended that you contact your system administrator prior to installation Before installation if you are using Pe...

Page 21: ...nd then click the Next button For NetBIOS Users Select your printer and NetBIOS and then click the Next button B Click the Finish button For Windows NT 4 0 and Windows 2000 XP users Setup is now complete For Windows 95 98 Me users After your PC has restarted setup will be complete If you want to install the PS driver select Custom and then follow the on screen instructions When the Select Componen...

Page 22: ...printer s power switch 4 Insert the CD ROM into your CD ROM drive The opening screen will appear automatically Follow the on screen instructions 5 Click Install Software on the menu screen 6 Click Printer Driver 7 Click the Next button Follow the on screen instructions For Network Interface Cable Users For Network Shared Printer Users If you are going to connect the printer to your network we reco...

Page 23: ... complete If you want to install the PS driver select Custom and then follow the on screen instructions When the Select Components screen appears check PS Printer Driver and then continue following the on screen instructions Contact your Administrator about the printer s queue If you want to register your product on line check On Line Registration Setting Up Your Printer Installing the Driver Wind...

Page 24: ... and then connect it to the printer 3 Insert the CD ROM into your CD ROM drive Open the Mac OS 9 folder 4 Open your language folder 5 Double click the BR Script PPD installer icon Follow the on screen instructions 6 Open the Macintosh HD icon For USB Interface Cable Users For Mac OS 8 6 to 9 2 Users Do not connect the USB cable to the keyboard USB Port or a non powered USB Hub Step 2 ...

Page 25: ...ktop Printer Utility icon 9 Select Printer USB and then click the OK button 0 Click the Change button in PostScriptTM Printer Description PPD File Select Brother HL 2700CN series and then click the Select button A Click the Change button in the USB Printer Selection Select HL 2700CN series and then click the OK button B Click the Create button Continue to the next page Setting Up Your Printer Maci...

Page 26: ... name HL 2700CN series and then click the Save button D Select Quit from the File menu E Click the HL 2700CN series icon on the Desktop F From the Printing menu select Set Default Printer Setup is now complete For USB Interface Cable Users Step 2 ...

Page 27: ... Here OS X icon Follow the instructions on the screen 4 Click Install Software on the menu screen Follow the on screen instructions 5 From the Go menu select Applications 6 Open the Utilities folder 7 Open the Print Center icon For USB Interface Cable Users For Mac OS X 10 1 10 2 Users Do not connect the USB cable to the keyboard USB Port or to a non powered USB Hub Continue to the next page 2S Fo...

Page 28: ...Driver 8 Click the Add Printer button 9 Select USB 0 Select HL 2700CN series and then click the Add button A From the Print Center menu select Quit Print Center Setup is now complete For USB Interface Cable Users Step 2 ...

Page 29: ...Script PPD Installer icon to install the PPD file Follow the on screen instructions 6 From the Apple menu open the Chooser 7 Click the LaserWriter 8 1 icon and then select BRN_xxxxxx_P1_AT 2 Click the Create button Close the Chooser 1 If the Apple LaserWriter 8 Driver is not already installed on your system you can download it from http www apple com 2 xxxxxx are the last six digits of the Etherne...

Page 30: ...ree port on your hub 3 Turn on the printer s power switch 4 Insert the CD ROM into the CD ROM drive Double click the Start Here OS X icon Follow the instructions on the screen 5 Click Install Software on the menu screen Follow the on screen instructions 6 From the Go menu select Applications 7 Open the Utilities folder 8 Open the Print Center icon For Network Interface Cable Users For Mac OS X 10 ...

Page 31: ... then click the Add button 1 xxxxxx are the last six digits of the Ethernet address B From the Print Center menu select Quit Print Center Setup is now complete For Network Interface Cable Users Network User s Guide Chapter 7 Setting Up Your Printer Macintosh Network For Administrators ...

Page 32: ...en 3 Click For Administrators 4 Click BRAdmin Professional Brother has also developed Web BRAdmin an enterprise network software utility that enables the management of Brother and other SNMP compliant devices in larger LAN WAN environments This software is Web server based and requires the installation of Microsoft s Internet Information Server and Sun s Java client software To learn more about th...

Page 33: ...ws users only Setting Up Your Printer Windows USB Windows Parallel Windows Network Macintosh USB Macintosh Network For Administrators Installing the Driver You can reset all the print server settings including the password back to factory defaults For steps on how to reset the print server see Chapter 3 Network factory default setting on page 3 22 of the User s Guide Factory Default Setting User s...

Page 34: ...f Apple Computer Inc HP HP UX JetDirect and JetAdmin are trademarks of Hewlett Packard Company UNIX is a trademark of UNIX Systems Laboratories Adobe PostScript and PostScript3TM are trademarks of Adobe Systems Incorporated Netware is a trademark of Novell Inc ENERGY STAR is a U S registered mark All other brand and product names mentioned in this Quick Setup Guide are registered Compilation and P...

Page 35: ...s The Duplex unit is an optional device that allows you to print on both sides of a page CompactFlash Card SO DIMM Memory Font Package BS 3000 The printer accepts a CompactFlash card for saving macros print jobs fonts and print logs You can expand the memory up to a total of 576 MB by installing 144 pin SO DIMM memory modules The optional font package BS 3000 is the CD ROM you need for installing ...

Page 36: ... 2003 Brother Industries Ltd 1998 2003 TROY Group Inc 1983 2003 PACIFIC SOFTWORKS INC ALL RIGHTS RESERVED LM04780012 Printed in Japan ...

Reviews: