


Winding/Installing the Bobbin
23
1
7
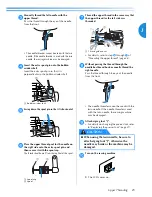
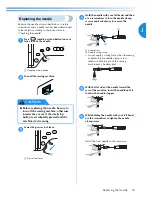
While lightly holding down the bobbin with
your right hand as shown, guide the thread
through the slit (
1
and
2
).
• At this time, check that the bobbin easily
rotates counterclockwise.
Then, pull the thread toward you to cut it with
the cutter (
3
).
1
Slit
2
Cutter (Cut the thread with the cutter.)
8
Reattach the bobbin cover.
Insert the tab in the lower-left corner of the
bobbin cover, and then lightly press down on
the right side.
X
The lower threading is finished.
Next, thread the upper thread. Continue with
the procedure in “Upper Threading” (on the
next page).
Memo
●
You can begin sewing without pulling up
the bobbin thread. If you wish to pull up the
bobbin thread before starting to sew, pull
up the thread according to the procedure in
“Pulling up the bobbin thread” (page 31).
2
1
Summary of Contents for 885-S61
Page 50: ...GETTING READY 44 ...
Page 72: ...SEWING BASICS 66 ...
Page 152: ...APPENDIX 146 Z zipper stitching 85 89 ...
Page 153: ......
Page 154: ......
Page 155: ......


