background image

73

3

————————————————————————————————————————————————————————————————————————————————————————————————————————————————————————

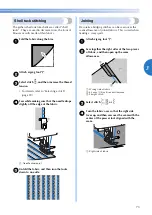
Shell tuck stitching

The gathers that look like shells are called “shell 
tucks”. They are used to decorate trims, the front of 
blouses or cuffs made of thin fabrics.

a

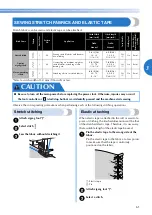
Fold the fabric along the bias.

b

Attach zigzag foot “J”.

c

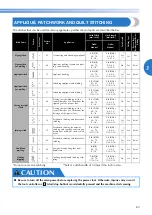
Select stitch 

, and then increase the thread 

tension.

• For details, refer to “Selecting a stitch” 

(page 39).

d

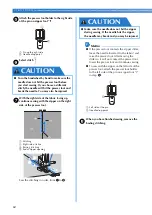
Sew while making sure that the needle drops 
slightly off the edge of the fabric.

a

Needle drop point

e

Unfold the fabric, and then iron the tucks 
down to one side.

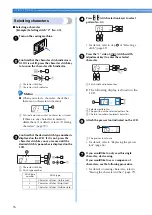
Joining

Decorative bridging stitches can be sewn over the 
seam allowance of joined fabrics. This is used when 
making a crazy quilt.

a

Attach zigzag foot “J”.

b

Sew together the right sides of the two pieces 
of fabric, and then open up the seam 
allowances.

a

Wrong side of fabric

b

6.5 mm (1/4 inch) seam allowance 

c

Straight stitch

c

Select stitch 

 or 

.

d

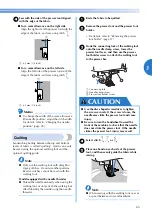
Turn the fabric over so that the right side 
faces up, and then sew over the seam with the 
center of the presser foot aligned with the 
seam.

a

Right side of fabric

1

1

1

2

3

Summary of Contents for 885-E42

Page 1: ...ES SEWING BASICS KNOWING YOUR SEWING MACHINE Operation Manual Product Code 885 E42 E43 Sewing Machine Be sure to read this document before using the machine We recommend that you keep this document nearby for future reference ...

Page 2: ......

Page 3: ...achine should be connected to an AC power source within the range indicated on the rating label Do not connect it to a DC power source or inverter If you are not sure what kind of power source you have contact a qualified electrician This machine is approved for use in the country of purchase only 4 Never operate this machine if it has a damaged cord or plug if it is not working properly if it has...

Page 4: ...use the needle to break Do not push or pull the fabric when sewing and follow careful instruction when freehand stitching so that you do not deflect the needle and cause it to break 7 This machine is not a toy Your close attention is necessary when the machine is used by or near children The plastic bag that this machine was supplied in should be kept out of the reach of children or disposed of Ne...

Page 5: ... be supervised to ensure that they do not play with the appliance FOR USERS IN EUROPEAN COUNTRIES This appliance can be used by children aged from 8 years and above and persons with reduced physical sensory or mental capabilities or lack of experience and knowledge if they have been given supervision or instruction concerning use of the appliance in a safe way and understand the hazards involved C...

Page 6: ...HREADING THE MACHINE 17 Winding the bobbin 17 Lower threading 22 Upper threading 25 Drawing up the lower thread 30 REPLACING THE NEEDLE 31 Needle precautions 31 Needle types and their uses 31 Checking the needle 32 Replacing the needle 32 Sewing with the twin needle 34 REPLACING THE PRESSER FOOT 36 Replacing the presser foot 36 Removing the presser foot holder 37 2 SEWING BASICS 38 SEWING 38 Gener...

Page 7: ...or models equipped with character stitches 75 Sewing beautiful patterns 75 Selecting characters 76 Checking characters 79 Deleting characters 79 Sewing the character stitches 79 ADJUSTING STITCHES for models equipped with character stitches 80 4 APPENDIX 82 STITCH SETTINGS 82 Utility stitches 82 Satin stitches 89 Mirror image stitches 90 Character stitches 93 MAINTENANCE 95 Restrictions on oiling ...

Page 8: ...beginning of sewing thick fabrics page 45 aBlack button 1 2 3 4 5 6 7 8 9 10 75 11 1 needle 90 14 1 needle 100 16 1 needle 11 12 90 14 1 needle 13 14 15 16 17 18 19 No Part Name Part Code Americas Others 1 Zigzag foot J on machine XZ5134 001 2 Buttonhole foot A XC2691 033 3 Overcasting foot G XC3098 031 4 Monogramming foot N XD0810 031 5 Zipper foot I X59370 021 6 Blind stitch foot R XE2650 001 7 ...

Page 9: ...ide the flat bed attachment Open the compartment as shown in the figure below a Flat bed attachment b Storage compartment Note Store the accessories in the compartment when they are not used 1 2 3 4 5 No Part Name Part Code Americas Others 1 Walking foot SA140 F033N XC2214 052 2 Quilting foot SA129 F005N XC1948 052 3 1 4 inch quilting foot SA125 F001N XC1944 052 4 Quilting guide SA132 F016N XC2215...

Page 10: ...odel i Spool pin page 11 17 and 25 This holds the spool of thread j Handwheel This is used to manually raise and lower the needle k Air vent This vent allows the air surrounding the motor to circulate Do not cover the air vent while the sewing machine is being used l Main power and sewing light switch page 14 You can turn the main power and sewing light switch on and off m Jack socket connector pa...

Page 11: ...gh the needle bar thread guide m Presser foot lever Raise and lower the presser foot lever to raise and lower the presser foot n Needle clamp screw Use the needle clamp screw to hold the needle in place Operation buttons The operation buttons help you to easily perform various basic sewing machine operations The operation buttons differ depending on the sewing machine model a Reverse reinforcement...

Page 12: ...ess the side to reduce the stitch length press the side to increase the stitch length d Stitch width adjustment key Press this key to adjust the stitch width Press the side to reduce the stitch width press the side to increase the stitch width Keys and indicators e Utility stitch key Press this key to select the desired type of utility stitches Press this key once or more until the desired stitch ...

Page 13: ... spool cap position it with the rounded side toward the spool pin Storing the spool pin When placing the cover on the sewing machine before storing or if the spool pin will not be used return the spool pin to its storage position Remove the spool from the spool pin and then fold up the spool pin as shown in the illustration until it snaps into place to secure it Do not grab the bar to raise the sp...

Page 14: ...back of the machine as shown a Hole b Tab b Push the spool pin down until it locks into place Flip chart You can check the pattern numbers of the stitches using the flip chart on the machine Hold the notch with your finger to flip the chart For models equipped with a flip chart on the top panel For models equipped with a flip chart on the front panel a Notch 1 1 ...

Page 15: ... a bad connection or a disconnection During electrical storms Use only the power cord included with this machine Do not use extension cords or multi plug adapters with many other appliances plugged in to them Fire or electric shock may result Do not touch the plug with wet hands Electric shock may result When unplugging the machine always turn off the main power first Always grasp the plug to remo...

Page 16: ...f the plug does not fit fully in the outlet reverse the plug If it still does not fit contact a qualified electrician to install the proper outlet Do not modify the plug in any way Foot controller Insert the foot controller plug into its jack socket on the rear side of the sewing machine a Foot controller jack socket When you press the foot controller down lightly the machine will run at a low spe...

Page 17: ...ine After turning on the sewing machine release the side of stitch selection key X The needle stop position changes to the raised position Memo Perform the same operation to change the needle stop position to the lowered position Changing the initial needle position Normally the straight stitch left needle position is automatically selected when the sewing machine is turned on The machine can be s...

Page 18: ...changed so that the machine does not beep a Turn off the sewing machine b Hold down the side of stitch width adjustment key and turn on the sewing machine After turning on the sewing machine release the side of stitch width adjustment key X The machine is now set so that it will not beep Memo Perform the same operation to change the setting so that machine beeps ...

Page 19: ...damage to the machine We designed the bobbin that comes with this machine If you use bobbins from other models the machine will not work properly Only use the bobbin that comes with this machine or bobbins of the same type part code SA156 SFB XA5539 151 a Bobbin winding thread guide b Bobbin winder shaft c Bobbin CAUTION Actual size This model Other models 11 5 mm 7 16 inch Do not grab the bar to ...

Page 20: ...pool cross wound thread c Space e While holding the spool with your right hand and then pass the thread under the thread guide a Thread guide f Pass the thread under the thread guide cover from the back to the front Hold the thread with your right hand so that there is no slack in the thread that is pulled out and then pass the thread under the thread guide cover with your left hand a Thread guide...

Page 21: ... machine j While holding the end of the thread gently press the foot controller or press start stop button for models equipped with the start stop button to wind the thread around the bobbin a few times Then stop the machine Note If the sewing machine is to be operated using the foot controller connect the foot controller before turning on the machine When the foot controller is plugged in the sta...

Page 22: ...the handwheel is turned after winding the thread around the bobbin the machine will make a clicking sound this is not a malfunction The needle bar does not move when you slide the bobbin winding shaft to the right For models equipped with the fast bobbin winding system a Place the bobbin on the bobbin winder shaft so that the spring on the shaft fits into the notch in the bobbin a Notch b Bobbin w...

Page 23: ...ur foot off the foot controller or press start stop button for models equipped with the start stop button j Cut the thread slide the bobbin winder shaft to the left and then remove the bobbin from the shaft k Slide the sewing speed controller back to its original position for models equipped with the sewing speed controller Memo When the sewing machine is started or the handwheel is turned after w...

Page 24: ...direction shown by the arrow Winding the bobbin improperly may cause the thread tension to loosen breaking the needle and resulting in injury a Wound evenly b Wound poorly The bobbin was designed specifically for this sewing machine If bobbins from other models are used the machine will not operate correctly Use only the enclosed bobbin or bobbins of the same type part code SA156 SFB XA5539 151 Ma...

Page 25: ...ng the bobbin thread is indicated by marks on the needle plate cover Be sure to thread the machine as indicated a Raise the needle to its highest position by turning the handwheel toward you counterclockwise or press needle position button for models equipped with the needle position button and raise the presser foot lever b Turn off the sewing machine c Slide the button and open the cover a Cover...

Page 26: ...f the thread is not correctly inserted through the tension adjusting spring of the bobbin case it may cause incorrect thread tension page 43 a Tension adjusting spring f Replace the bobbin cover Put the left tab in place see arrow a and then press lightly on the right side see arrow b until the cover clicks into place Memo You can begin sewing immediately without drawing up the bobbin thread If yo...

Page 27: ... the needle is not correctly raised the sewing machine can not be threaded Be sure to turn the handwheel so that the mark on the wheel points up before threading the sewing machine When threading the upper thread carefully follow the instructions If the upper threading is not correct the thread may become tangled or the needle may bend or break Never use a thread weight of 20 or lower Use the need...

Page 28: ...ight so that the spool is moved to the right end of the spool pin Do not grab the bar to raise the spool pin otherwise the spool pin may bend or break Be sure to raise the spool pin before use If the spool of thread is in the wrong place or is set incorrectly the thread may tangle on the spool pin and cause the needle to break CAUTION CAUTION If the spool or the spool cap is not positioned correct...

Page 29: ...e thread with your right hand so that there is no slack in the thread that is pulled out and then pass the thread under the thread guide cover with your left hand a Thread guide cover j Feed the upper thread as shown in the illustration below k Make sure you guide the thread through the thread take up lever from right to left as shown in the illustration below a Thread take up lever Memo If the ne...

Page 30: ...ure in Upper threading to thread the machine to the needle bar thread guide b Lower the presser foot lever c While lowering the needle threader lever hook the thread onto the guide a Needle holder b Needle threader lever c Guide Make sure you turn the power off while threading the machine without using the needle threader for models equipped with the needle threader If you accidentally step on the...

Page 31: ... loop of the thread passed through the eye of the needle toward the rear of the machine a Loop of thread h Raise the presser foot lever a Presser foot lever i Pass the end of the thread through the presser foot and then pull out about 5 cm 2 inches of thread toward the rear of the machine a 5 cm 2 inches Note If you incorrectly feed the thread you may cause sewing problems Be careful not to pull o...

Page 32: ... about 10 cm 4 inches of both threads and pull them toward the back of the machine under the presser foot a Upper thread b Lower thread For models equipped with the quick set bobbin You can begin sewing immediately without drawing up the bobbin thread When sewing gathers or darts you can draw up the lower thread by hand so that some thread will be left over Before you draw up the lower thread put ...

Page 33: ...the needle number the thicker the needle Only use home sewing machine needles Use of any other needle may bend the needle or damage the machine Never use bent needles Bent needles can easily break possibly resulting in injury Fabric Type Application Thread Size of Needle Type Size Medium weight fabrics Broadcloth Cotton thread 60 90 75 11 90 14 Taffeta Synthetic thread Flannel Gabardine Silk threa...

Page 34: ...is bent Do not use a bent needle a Flat surface Replacing the needle Replace the needle as described below Use the disc shaped screwdriver and a needle that has been determined to be straight according to the instructions in Checking the needle a Raise the needle by turning the handwheel toward you counterclockwise so that the mark on the wheel points up With models equipped with needle position b...

Page 35: ... the needle clamp screw otherwise certain parts of the sewing machine may be damaged e With the flat side of the needle toward the rear of the machine insert the needle until it touches the needle stopper a Needle stopper f While holding the needle with your left hand use the disc shaped screwdriver to tighten the needle clamp screw by turning it clockwise Install the twin needle in the same way B...

Page 36: ... pin onto the end of the bobbin winder shaft e Install the thread spool and thread the upper thread Memo When setting the thread spool set it so that the thread winds off from the front of the spool a Twin needle b Extra spool pin Use only twin needles that have been made for this machine part code 131096 121 Other needles could break and damage the machine Do not sew with bent needles The needle ...

Page 37: ...S page 82 k Start sewing For details on starting to sew refer to Starting to sew page 41 X Two lines of stitching are sewn parallel to each other Note When using the twin needle the stitches may become bunched together depending on the types of thread and fabric that are used If this occurs increase the stitch length For details on adjusting the stitch length refer to Adjusting the stitch length a...

Page 38: ... presser foot type J A etc is positioned to be read a Presser foot holder b Shank c Pin Note The presser foot to be used with each stitch appears in the LCD To select a stitch refer to Selecting a stitch page 39 Always turn off the power before you change the presser foot If you leave the power on and step on the controller the machine will start and you may be injured Always use the correct press...

Page 39: ...g the presser foot page 36 b Use the disc shaped screwdriver to loosen the presser foot holder screw a Disc shaped screwdriver b Presser foot holder c Presser foot holder screw Attaching the presser foot holder a Align the presser foot holder with the lower left side of the presser bar a Presser foot holder b Presser bar b Hold the presser foot holder in place with your right hand and then tighten...

Page 40: ...nt needles can easily break possibly resulting in injuries Make sure that the needle does not strike basting pins otherwise the needle may break or bend 1 Turn on the machine Turn on the sewing machine For details on turning on the machine refer to Power supply page 14 2 Select the stitch Select the stitch appropriate for the area to be sewn For details on selecting a stitch refer to Selecting a s...

Page 41: ...umber d Press stitch selection keys The number of the selected stitch is displayed Press the or side of to increase or reduce the number by one Pressing on the right changes the digit on the right and pressing on the left changes the digit on the left X The stitch is selected Memo The pattern numbers of the stitches are displayed on the machine e Attach the presser foot indicated in the LCD a Pres...

Page 42: ...h b Stitch width adjustment key c Narrow d Wide Note When the stitch length or stitch width is changed from the standard setting around or disappears from the LCD When the stitch length or stitch width is reset back to the standard setting reappears around or in the LCD After adjusting the stitch width slowly turn the handwheel toward you counterclockwise and check that the needle does not touch t...

Page 43: ...ead and the fabric with your left hand turn the handwheel toward you counterclockwise with your right hand to lower the needle to the starting point of the stitching e Lower the presser foot lever a Presser foot lever f On models equipped with a sewing speed controller slide the sewing speed controller to the left or right to adjust the sewing speed Refer to Sewing speed controller for models equi...

Page 44: ...o cut them a Thread cutter Memo When the foot controller is plugged in start stop button cannot be used to start sewing for models equipped with the start stop button When sewing is stopped the needle remains lowered in the fabric The machine can be set so that the needle will stay up when sewing is stopped For details on setting the machine so that the needles stay up when sewing is stopped refer...

Page 45: ...mo When you finish sewing remove the bobbin cover and then make sure that the thread is shown as below If the thread is not shown as below the thread is not inserted through the tension adjusting spring of the bobbin case correctly Reinsert the thread correctly For details refer to page 22 23 Upper tension is too loose Loops appear on the wrong side of the fabric Note If the upper thread was incor...

Page 46: ... reaches a corner stop the sewing machine Leave the needle lowered in the fabric If the needle was raised lower the needle either by turning the handwheel toward you counterclockwise or by pressing needle position button once for models equipped with the needle position button b Raise the presser foot lever and then turn the fabric Turn the fabric using the needle as a pivot c Lower the presser fo...

Page 47: ... seam is sewn the presser foot will return to its original angle Sewing hook and loop fastener tape Note Before start sewing baste together the fabric and the hook and loop fastener tape Make sure that the needle passes through the hook and loop fastener tape by turning the handwheel and lower the needle into the hook and loop fastener tape before sewing And then sew the edge of the hook and loop ...

Page 48: ...al or paper Sewing stretch fabrics First baste the pieces of fabric together and then sew without stretching the fabric a Basting Stitching cylindrical pieces Removing the flat bed attachment makes it easier to sew cylindrical pieces such as cuffs and pant legs or hard to reach areas a Pull the flat bed attachment to the left to release it a Flat bed attachment X With the flat bed attachment remov...

Page 49: ...rics attaching elastic darning etc 5 0 3 16 1 5 7 0 1 16 1 4 1 0 1 16 0 2 4 0 1 64 3 16 Yes J No Reinf Overcasting stitch G 07 Overcasting on thin or medium weight fabrics 3 5 1 8 2 5 5 0 3 32 3 16 2 0 1 16 1 0 4 0 1 16 3 16 No No Reinf G 08 Overcasting on thick fabrics 5 0 3 16 2 5 5 0 3 32 3 16 2 5 3 32 1 0 4 0 1 16 3 16 No No Reinf G 09 Overcasting on thick fabrics and decorative stitching 5 0 ...

Page 50: ...d Slowly turn the handwheel toward you counterclockwise and check that the needle does not touch the presser foot e Sew with the edge of the fabric against the presser foot guide a Needle drop point After adjusting the stitch width slowly turn the handwheel toward you counterclockwise and check that the needle does not touch the presser foot If the needle hits the presser foot the needle may bend ...

Page 51: ...f the stitch width adjustment key moves the needle to the left a Stitch width b Stitch width adjustment key c Left needle position d Right needle position Stitch Name Pattern Presser Foot Pattern No Application Stitch Width mm inch Stitch Length mm inch Twin Needle Walking Foot Reverse Rev Reinforcement Reinf Stitching Auto Manual Auto Manual Straight Left J 00 Basic stitching sewing gathers or pi...

Page 52: ... or pants a Wrong side of fabric b Right side of fabric c Edge of fabric d Bottom side b Fold the fabric along the desired edge of the hem and press Stitch Name Pattern Presser Foot Pattern No Application Stitch Width mm inch Stitch Length mm inch Twin Needle Walking Foot Reverse Rev Reinforcement Reinf Stitching Auto Manual Auto Manual Blind hem stitch R 13 Blind hem stitching on medium weight fa...

Page 53: ...er the presser foot lever a Wrong side of fabric b Fold of hem c Guide k Adjust the stitch width until the needle slightly catches the fold of the hem a Needle drop point When you change the needle drop point raise the needle and then change the stitch width Stitch width a Thick fabric b Normal fabric a Wrong side of fabric b Right side of fabric c Edge of fabric d Desired edge of hem e 5 mm 3 16 ...

Page 54: ...s not catch the hem fold adjust the stitch width so that the needle slightly catches the fold by pressing the side of the stitch width adjustment key Thick fabric Normal fabric For details on changing the stitch width refer to Selecting a stitch page 39 l Sew with the fold of the hem against the presser foot guide m Remove the basting stitching and turn the fabric right side up a Wrong side of fab...

Page 55: ... 15 64 1 0 1 16 0 5 2 0 1 32 1 16 No No Auto Reinf A 40 Buttonholes for stretch fabrics 6 0 15 64 3 0 6 0 1 8 15 64 1 5 1 16 1 0 3 0 1 16 1 8 No No Auto Reinf A 41 Bound buttonholes 5 0 3 16 0 0 6 0 0 15 64 2 0 1 16 0 2 4 0 1 64 3 16 No No Auto Reinf A 42 Keyhole buttonholes for thick or furry fabrics 7 0 1 4 3 0 7 0 1 8 1 4 0 5 1 32 0 3 1 0 1 64 1 16 No No Auto Reinf A 43 Keyhole buttonholes for ...

Page 56: ... is set If the button does not fit in the button guide plate Add together the diameter and thickness of the button and then set the button guide plate to the calculated length The distance between the markings on the presser foot scale is 5 mm 3 16 inch a Presser foot scale b Length of buttonhole Diameter thickness of button c 5 mm 3 16 inch Example For a button with a diameter of 15 mm 9 16 inch ...

Page 57: ...l down the buttonhole lever as far as possible a Buttonhole lever The buttonhole lever is positioned behind the bracket on the buttonhole foot a Buttonhole lever b Bracket h Gently hold the end of the upper thread in your left hand and then start sewing Note If thick seams are being sewn and the fabric does not feed sew with the coarser longer stitch X Once sewing is completed the machine automati...

Page 58: ...stretch fabrics use a gimp thread a Hook the gimp thread onto the part of buttonhole foot A shown in the illustration so that it fits into the grooves and then loosely tie it b Attach buttonhole foot A c Select a stitch or d Adjust the stitch width to the thickness of the gimp thread e Lower the presser foot lever and the buttonhole lever and then start sewing f When sewing is finished gently pull...

Page 59: ...e machine X The feed dogs are lowered c Attach presser foot M a Button fitting foot M d Place a button between the presser foot and the fabric When attaching four hole buttons first sew the two holes closest to you Then slide the button so that the needle goes into the two holes toward the rear of the sewing machine and then sew them in the same way e Select a stitch With models not provided with ...

Page 60: ...ll the upper thread at the end of the stitching to the wrong side of the fabric and then tie it with the bobbin thread Use scissors to cut the upper thread and the bobbin thread at the beginning of the stitching k When you are finished attaching the button slide the feed dog position lever to to the left as seen from the front of the machine and turn the handwheel to raise the dogs Normally the fe...

Page 61: ...sic stitching on page 49 d Open the seam allowance press it from the wrong side of the fabric with an iron align the center of the zipper with the stitching and then baste the zipper in place a Wrong side of fabric b Wrong side of fabric c Basting stitching d Zipper Stitch Name Pattern Presser Foot Pattern No Application Stitch Width mm inch Stitch Length mm inch Twin Needle Walking Foot Reverse R...

Page 62: ...ving the slider so it will not contact the presser foot lower the presser foot and continue sewing To sew with the zipper on the left side of the presser foot attach the presser foot holder to the left side of the pin on zipper foot I in step e a Left side of the pin b Needle drop point h When you have finished sewing remove the basting stitching Turn the handwheel by hand to make sure the needle ...

Page 63: ...ly positioned on the fabric a Elastic tape b Pin b Attach zigzag foot J c Select a stitch Stitch Name Pattern Presser Foot Pattern No Application Stitch Width mm inch Stitch Length mm inch Twin Needle Walking Foot Reverse Rev Reinforcement Reinf Stitching Auto Manual Auto Manual Stretch stitch J 04 Sewing stretch fabrics and decora tive stitching 1 0 1 16 1 0 3 0 1 16 1 8 2 5 3 32 1 0 4 0 1 16 3 1...

Page 64: ... is the same length as the fabric While pulling the fabric behind the presser foot with your left hand pull the fabric at the pin nearest the front of the presser foot with your right hand When sewing be sure that the needle does not touch any pins otherwise the needle may bend or break CAUTION ...

Page 65: ...titch J 46 Piecing straight stitching with a seam allowance of 6 5mm from the right edge of the presser foot 5 5 7 32 0 0 7 0 0 1 4 2 0 1 16 0 2 5 0 1 64 3 16 No Yes Reinf J 47 Piecing straight stitching with a seam allowance of 6 5mm from the left edge of the presser foot 1 5 1 16 0 0 7 0 0 1 4 2 0 1 16 0 2 5 0 1 64 3 16 No Yes Reinf Joining stitch J 18 Patchwork stitching and decorative stitchin...

Page 66: ...e b Sew the two pieces of fabric together so the pattern spans both pieces Piecing Sewing together two pieces of fabric is called piecing The fabric pieces should be cut with a 6 5 mm 1 4 inch seam allowance Sew a piecing straight stitch 6 5 mm 1 4 inch from either the right side or the left side of the presser foot a Baste or pin along the seam allowance of the fabric that you wish to piece toget...

Page 67: ...threader Thread the needle manually when using the walking foot or only attach the walking foot after threading the needle using the needle threader a Baste the fabric to be quilted b Remove the presser foot and the presser foot holder For details refer to Removing the presser foot holder page 37 c Hook the connecting fork of the walking foot onto the needle clamp screw lower the presser foot leve...

Page 68: ...eed dog position lever so that the fabric can be moved freely in any direction The optional quilting foot is needed for free motion quilting Note Models equipped with a needle threader Thread the needle manually when using the quilting foot or only attach the quilting foot after threading the needle using the needle threader a Remove the presser foot and the presser foot holder For details refer t...

Page 69: ...d dogs are lowered e Turn on the sewing machine and then select a stitch f Use both hands to hold the fabric taut then move the fabric to follow the pattern Reinforcement stitches are sewn at the beginning and end of sewing a Pattern g After sewing is finished slide the feed dog position lever to to the left as seen from the front of the machine and turn the handwheel to raise the dogs Normally th...

Page 70: ...e markings on the presser foot scale is 5 mm 3 16 inch a Presser foot scale b Length of bar tack c 5 mm 3 16 inch A bar tack with a maximum length of about 28 mm 1 1 8 inches can be sewn b Attach buttonhole foot A c Select stitch Stitch Name Pattern Presser Foot Pattern No Application Stitch Width mm inch Stitch Length mm inch Twin Needle Walking Foot Reverse Rev Reinforcement Reinf Stitching Auto...

Page 71: ... Pull down the buttonhole lever as far as possible a Buttonhole lever The buttonhole lever is positioned behind the bracket on the buttonhole foot a Buttonhole lever b Bracket f Gently hold the end of the upper thread in your left hand and then start sewing X Once sewing is completed the machine automatically sews reinforcement stitches then stops g Raise the needle and the presser foot lever remo...

Page 72: ...ing 5 0 3 16 0 0 7 0 0 1 4 1 6 1 16 1 0 4 0 1 16 3 16 Yes J No Reinf Satin scallop stitch N 17 Scallop stitching 5 0 3 16 2 5 7 0 3 32 1 4 0 5 1 32 0 1 1 0 1 64 1 16 Yes J No Reinf Decorative stitch J 25 Decorative stitching 4 0 3 16 0 0 7 0 0 1 4 3 0 1 8 2 0 4 0 1 16 3 16 No No Reinf J 26 Decorative stitching 4 0 3 16 0 0 7 0 0 1 4 2 5 3 32 1 0 4 0 1 16 3 16 Yes J No Reinf J 27 Decorative stitchi...

Page 73: ...he center of the two pieces of fabric g After sewing is finished remove the paper Decorative stitch N 34 Decorative hemming on thin medium weight and plain weave fabrics heirloom stitching etc 5 0 3 16 1 5 7 0 1 16 1 4 2 0 1 16 1 5 4 0 1 16 3 16 No No Reinf N 35 Decorative stitching smocking stitching heirloom stitching etc 6 0 15 64 1 5 7 0 1 16 1 4 1 6 1 16 1 0 4 0 1 16 3 16 No No Reinf N 36 Dec...

Page 74: ...e stitch created by stitching or embroidering over gathers is called smocking It is used to decorate the front of blouses or cuffs The smocking stitch adds texture and elasticity to fabric a Attach zigzag foot J b Select the straight stitch and then adjust the stitch length to 4 0 mm 3 16 inch and loosen the thread tension For details refer to Selecting a stitch page 39 and Thread tension page 43 ...

Page 75: ...abric a Needle drop point e Unfold the fabric and then iron the tucks down to one side Joining Decorative bridging stitches can be sewn over the seam allowance of joined fabrics This is used when making a crazy quilt a Attach zigzag foot J b Sew together the right sides of the two pieces of fabric and then open up the seam allowances a Wrong side of fabric b 6 5 mm 1 4 inch seam allowance c Straig...

Page 76: ...monogramming foot N c Select stitch or d Start sewing The needle threader cannot be used with the wing needle otherwise the sewing machine may be damaged Manually pass the thread through the eye of the needle from the front to the back For details refer to Upper threading page 25 Select a stitch width of 6 0 mm 15 64 inch or less otherwise the needle may bend or break After adjusting the stitch wi...

Page 77: ... or bunched stitches may occur when satin stitches are sewn be sure to affix stabilizer material to the fabric Needles and threads When sewing thin mediumweight or stretch fabrics use the ball point needle When sewing thick fabrics use a 90 14 home sewing machine needle In addition 50 to 60 thread should be used Trial sewing Depending on the type and thickness of the fabric being sewn and whether ...

Page 78: ...ayed on the LCD a Character stitch key b Stitch type number d Press stitch selection keys to select pattern No 03 For details refer to step d of Selecting a stitch page 39 e Press the side of stitch width adjustment key to enter the selected character a Stitch width adjustment key X The following display is shown on the LCD a Selected pattern No b The position of the selected pattern No c The tota...

Page 79: ...djustment key d Repeat steps b and c to add M No 13 and E No 05 Memo To enter a space select _ No 30 e When you have finished combining characters check the entered characters and their order For details on checking characters refer to Checking characters page 79 Memo A new character can only be added next to the last character You cannot insert a new character between characters or before the fir...

Page 80: ... target stitch type number is displayed on the LCD a Character stitch key b Stitch type number d Add new characters by following the procedure described in Combining characters page 77 X New characters are added next to the last character of the combination Making a new combination of characters after sewing Memo When you have finished sewing the pattern No of the first character in the current co...

Page 81: ...ion a Stitch width adjustment key X The last character will be deleted Memo Repeat step a to delete more characters You can only delete the last character in a combination Sewing the character stitches All character stitches are sewn with monogramming foot N a Select a character stitch For details refer to Selecting characters page 76 b Attach monogramming foot N For details refer to Replacing the...

Page 82: ...he character stitches page 79 A Correctly sewn with proper spaces between characters B Bunched or shapeless There is no space between characters C Overstretched The stitch 0 has a gap If the pattern you sewed does not look like A use the following steps to adjust the stitches d Select No 59 for making adjustments X The LCD goes into the stitch adjustment mode The total number of combined character...

Page 83: ...de If the stitch pattern still comes out poorly adjust the stitch again Adjust the stitch until the stitch pattern comes out correctly g After you have finished adjusting the pattern press the stitch category selection key three times X The display returns to the normal character stitching mode ...

Page 84: ...ing and sewing gathers or pintucks etc 3 5 1 8 0 0 7 0 0 1 4 2 5 3 32 0 2 5 0 1 64 3 16 Yes J Yes Rev Triple stretch stitch J 03 Attaching sleeves sewing inseams sewing stretch fabrics and decorative stitching 0 0 0 0 0 7 0 0 1 4 2 5 3 32 1 5 4 0 1 16 3 16 Yes J No Reinf Stretch stitch J 04 Sewing stretch fabrics and decorative stitching 1 0 1 16 1 0 3 0 1 16 1 8 2 5 3 32 1 0 4 0 1 16 3 16 Yes J N...

Page 85: ...ng overcasting on both pieces of fabrics such as with tricot 5 0 3 16 2 5 7 0 3 32 1 4 2 5 3 32 1 0 4 0 1 16 3 16 Yes J No Reinf J 20 Patchwork stitching and decorative stitching 5 0 3 16 0 0 7 0 0 1 4 1 2 1 16 0 2 4 0 1 64 3 16 Yes J No Reinf Smocking stitch J 21 Smocking stitching and decorative stitching 5 0 3 16 0 0 7 0 0 1 4 1 6 1 16 1 0 4 0 1 16 3 16 Yes J No Reinf Fagoting stitch J 22 Fagot...

Page 86: ... 1 4 1 6 1 16 1 0 4 0 1 16 3 16 No No Reinf Buttonhole stitch A 37 Horizontal buttonholes on thin and medium weight fabrics 5 0 3 16 3 0 5 0 1 8 3 16 0 5 1 32 0 2 1 0 1 64 1 16 No No Auto Reinf A 38 Secured buttonholes for fabrics that have backings 5 0 3 16 3 0 5 0 1 8 3 16 0 5 1 32 0 2 1 0 1 64 1 16 No No Auto Reinf A 39 Buttonholes for stretch or knit fabrics 6 0 15 64 3 0 6 0 1 8 15 64 1 0 1 1...

Page 87: ... No Reinf Decorative stitch N 53 Decorative stitching smocking stitching heirloom stitching etc 2 5 3 32 0 0 7 0 0 1 4 2 5 3 32 0 2 4 0 1 64 3 16 No No Reinf N 54 For decoration etc 3 0 1 8 0 0 7 0 0 1 4 1 0 1 16 0 2 4 0 1 64 3 16 No No Reinf N 55 For decoration etc 5 0 3 16 0 0 7 0 0 1 4 2 0 1 16 0 2 4 0 1 64 3 16 No No Reinf N 56 For decoration etc 4 0 3 16 0 0 7 0 0 1 4 1 6 1 16 0 2 4 0 1 64 3 ...

Page 88: ...tc 7 0 1 4 0 0 7 0 0 1 4 2 0 1 16 0 2 4 0 1 64 3 16 No No Reinf N 73 For decoration etc 7 0 1 4 0 0 7 0 0 1 4 1 6 1 16 0 2 4 0 1 64 3 16 No No Reinf N 74 For decoration etc 7 0 1 4 0 0 7 0 0 1 4 2 5 3 32 0 2 4 0 1 64 3 16 No No Reinf N 75 For decoration etc 7 0 1 4 0 0 7 0 0 1 4 2 0 1 16 0 2 4 0 1 64 3 16 No No Reinf N 76 For decoration etc 5 0 3 16 0 0 7 0 0 1 4 2 0 1 16 0 2 4 0 1 64 3 16 No No R...

Page 89: ...0 2 4 0 1 64 3 16 No No Reinf N 86 For decoration etc 6 0 15 64 0 0 7 0 0 1 4 1 4 1 16 0 2 4 0 1 64 3 16 No No Reinf N 87 For decoration etc 6 0 15 64 0 0 7 0 0 1 4 1 4 1 16 0 2 4 0 1 64 3 16 No No Reinf N 88 For decoration etc 6 0 15 64 0 0 7 0 0 1 4 1 4 1 16 0 2 4 0 1 64 3 16 No No Reinf N 89 For decoration etc 6 0 15 64 0 0 7 0 0 1 4 1 4 1 16 0 2 4 0 1 64 3 16 No No Reinf N 90 For decoration et...

Page 90: ... 4 1 64 1 64 No No Reinf N 96 For decoration etc 0 3 1 64 0 2 0 4 1 64 1 64 No No Reinf N 97 For decoration etc 0 3 1 64 0 2 0 4 1 64 1 64 No No Reinf N 98 For decoration etc 0 3 1 64 0 2 0 4 1 64 1 64 No No Reinf N 99 For decoration etc 0 3 1 64 0 2 0 4 1 64 1 64 No No Reinf Stitch Name Pattern Presser Foot Pattern No Application Stitch Width mm inch Stitch Length mm inch Twin Needle Walking Foot...

Page 91: ...erse Reinforcement Stitching Reinforcement Pattern Length Icon definition Select a stitch width of 5 0 mm 3 16 inch or less Pattern Length Pattern No Pattern 00 01 02 03 04 05 06 07 08 09 10 11 12 13 14 15 16 17 18 19 20 21 22 23 24 25 26 27 28 29 30 31 32 33 34 35 36 37 38 39 40 41 42 43 44 45 46 47 48 49 50 51 52 53 54 55 56 57 58 59 60 61 62 63 64 65 66 67 68 69 70 71 72 73 74 75 76 77 78 79 Sh...

Page 92: ...Reinf Shell tuck stitch J 05 Shell tuck stitching 4 0 3 16 0 0 7 0 0 1 4 2 5 3 32 0 2 4 0 1 64 3 16 Yes J No Reinf Satin scallop stitch N 06 Scallop stitching 5 0 3 16 2 5 7 0 3 32 1 4 0 5 1 32 0 1 1 0 1 64 1 16 Yes J No Reinf Decorative stitch J 07 Decorative stitching 5 5 7 32 0 0 7 0 0 1 4 1 6 1 16 1 0 4 0 1 16 3 16 Yes J No Reinf N 08 Lace sewing decorative hemming heirloom stitching etc 3 5 1...

Page 93: ...1 4 2 0 1 16 0 2 4 0 1 64 3 16 No No Reinf N 22 For decoration etc 7 0 1 4 0 0 7 0 0 1 4 2 5 3 32 0 2 4 0 1 64 3 16 No No Reinf N 23 For decoration etc 7 0 1 4 0 0 7 0 0 1 4 1 6 1 16 0 2 4 0 1 64 3 16 No No Reinf N 24 For decoration etc 6 0 15 64 0 0 7 0 0 1 4 1 4 1 16 0 2 4 0 1 64 3 16 No No Reinf N 25 For decoration etc No No Reinf N 26 For decoration etc 0 3 1 64 0 2 0 4 1 64 1 64 No No Reinf N...

Page 94: ...1 16 Twin Needle Yes J Walking Foot No Reverse Reinforcement Stitching Reinforcement Pattern Length Icon definition Select a stitch width of 5 0 mm 3 16 inch or less Pattern Length Stitch Name Satin stitches Pattern No Pattern 30 31 32 33 34 35 36 37 38 39 40 41 42 43 44 45 46 47 48 49 50 51 52 53 54 55 56 57 58 59 60 61 62 63 64 65 66 67 68 69 Shorter Longer Standard ...

Page 95: ...8 19 20 21 22 23 24 25 26 27 28 29 30 31 32 33 34 35 36 37 38 39 40 41 42 43 44 45 46 47 48 49 50 51 52 53 54 55 Stitch Type Presser Foot Pattern No Twin Needle Stitch Width Stitch Length Character stitches Script font N 01 02 03 04 05 06 07 08 09 10 No 11 12 13 14 15 16 17 18 19 20 21 22 23 24 25 26 27 28 29 30 31 32 33 34 35 36 37 38 39 40 41 42 43 44 45 46 47 48 49 50 51 52 53 54 55 ...

Page 96: ... No Twin Needle Stitch Width Stitch Length Character stitches Outline style N 01 02 03 04 05 06 07 08 09 10 No 11 12 13 14 15 16 17 18 19 20 21 22 23 24 25 26 27 28 29 30 31 32 33 34 35 36 37 38 39 40 41 42 43 44 45 46 47 48 49 50 51 52 53 54 55 ...

Page 97: ...tremely dusty or oily environments Note In order to extend the life of this machine periodically turn it on and use it Storing this machine for an extended period of time without using it may reduce its efficiency Cleaning the machine surface If the surface of the machine is dirty lightly soak a cloth in neutral detergent squeeze it out firmly and then wipe the surface of the machine After cleanin...

Page 98: ...bobbin case aligns with the z mark on the machine Align the S and z marks a S mark b z mark c Bobbin case Make sure that the indicated points are aligned before installing the bobbin case Never use a bobbin case that is scratched otherwise the upper thread may become tangled the needle may break or sewing performance may suffer For a new bobbin case part code XE7560 001 contact your nearest author...

Page 99: ...hine i From the front slide the needle plate cover back into position a Needle plate cover If the needle plate cover is not flush with the surface of the machine as shown below remove the needle plate cover step d and then install it again steps h and i Sewing while the needle plate cover is not flush with the surface of the machine may cause the needle plate cover to come off of the machine resul...

Page 100: ...justed a Lower side of fabric b Lower thread visible from upper side of fabric c Upper thread d Upper side of fabric e Lower thread Cause Incorrect lower threading If the lower thread is incorrectly threaded instead of the appropriate tension being applied to the lower thread it is pulled through the fabric when the upper thread is pulled up For this reason the thread is visible from the upper sid...

Page 101: ...ng sewing a rattling noise is made and sewing cannot continue Looking under the fabric there is tangled thread in the bobbin case Cause Incorrect upper threading If the upper thread is incorrectly threaded the upper thread passed through the fabric cannot be firmly pulled up and the upper thread becomes tangled in the bobbin case causing a rattling noise Remedy check details Remove the tangled thr...

Page 102: ...quipped with the needle position button once or twice to raise the needle a Mark b Needle position button f Pull some thread off the spool and then pass the thread under the thread guide a Thread guide g Pass the thread under the thread guide cover from the back to the front Hold the thread with your right hand so that there is no slack in the thread that is pulled out and then pass the thread und...

Page 103: ...curely hooked on the thread take up lever j Put the thread behind the needle bar thread guide above the needle The thread can easily be passed behind the needle bar thread guide by holding the thread in your left hand then feeding the thread with your right hand a Needle bar thread guide k Thread the needle according to steps m and n in Upper threading page 28 or steps b through i in Using the nee...

Page 104: ... the thread tension will not be adjusted correctly causing wrinkles in the fabric or skipped stitches Refer to Needle types and their uses page 31 to check that a needle and thread appropriate for the fabric are being used Cause 3 An appropriate setting on the upper tension control dial is not selected Turn the upper tension control dial to select an appropriate thread tension The appropriate thre...

Page 105: ...the needle out of the fabric and then remove the needle Refer to Replacing the needle page 32 d Remove the presser foot and presser foot holder Refer to Replacing the presser foot page 36 and Removing the presser foot holder page 37 e Lift up the fabric and cut the threads below it If the fabric can be removed remove it Continue with the following steps to clean the race f Remove the needle plate ...

Page 106: ...d the feed dogs m Turn the handwheel to raise the feed dogs n Align the two screw holes in the needle plate with the two holes at the needle plate mounting base and then fit the needle plate onto the machine o Lightly finger tighten the screw on the right side of the needle plate Then use the disc shaped screwdriver to firmly tighten the screw on the left side Finally firmly tighten the screw on t...

Page 107: ...nd Replacing the needle page 32 Note After completing this procedure continue with the following procedure in Checking machine operations to check that the machine is operating correctly Memo Since the needle may have been damaged when the fabric was caught in the machine we recommend replacing it with a new one Never use a bobbin case that is scratched otherwise the upper thread may become tangle...

Page 108: ...anging the settings refer to Adjusting the stitch length and width page 40 e Slowly turn the handwheel toward you counterclockwise and check that the needle bar and feed dogs operate correctly If the needle or feed dogs contact the needle plate the machine may be malfunctioning therefore contact your nearest authorized service center f Turn off the machine and then install the bobbin and presser f...

Page 109: ...gled thread on wrong side of fabric page 99 c Remove the upper thread from the machine d Turn the handwheel toward you counterclockwise to check if the handwheel moves smoothly e Remove the needle plate cover and then remove the bobbin and bobbin case f Insert the bobbin case so that the S mark on the bobbin case aligns with the z mark on the machine Refer to Cleaning the race page 95 g Attach the...

Page 110: ...Cleaning the race page 95 i If the needle is bent replace it with a new one Refer to Replacing the needle page 32 j Turn on the machine and then press the needle position button to raise the needle Refer to Upper threading page 25 k Thread the machine correctly For details on threading the machine refer to Upper threading page 25 Symptom 3 The needle breaks or the needle bends and thus hits the ne...

Page 111: ...that the speed will be fast page 21 The thread that was pulled out was not wound onto the bobbin correctly For models equipped with the fast bobbin winding system Wind the thread that was pulled off round the bobbin five or six times clockwise page 20 The thread does not pass through the eye of the nee dle For models equipped with the needle threader lever You have not moved the needle holder to i...

Page 112: ...e spool or spool cap page 26 The upper thread was not threaded correctly Correct the upper threading page 25 The needle is incorrectly installed Correctly install the needle page 32 The needle clamp screw is loose Use the disc shaped screwdriver to firmly tighten the screw page 33 The needle is bent or blunt Replace the needle page 32 You have not used the right combination of fabric thread and ne...

Page 113: ...ve not used a bobbin that has been designed for this machine Incorrect bobbins will not work properly Only use a bobbin that has been designed for this machine page 17 The lower thread is tangled or breaks You have not wound the bobbin thread properly Wind the bobbin thread properly page 17 The bobbin is scratched or does not turn smoothly Replace the bobbin The thread is tangled Remove the tangle...

Page 114: ...e Contact your retailer or the nearest authorized service center You have not used bobbin that has been designed for this machine Incorrect bobbins will not work properly Only use a bobbin that has been designed for this machine page 17 The fabric does not feed The feed dogs are lowered Slide the feed dog position lever to page 57 67 The stitch is too fine Lengthen the stitch length page 40 You ha...

Page 115: ...thread tension is incorrect Adjust the tension of the upper thread page 43 102 You have not used a bobbin that has been designed for this machine Incorrect bobbins will not work properly Only use a bobbin that has been designed for this machine page 17 Bobbin is set incorrectly Reset the bobbin thread correctly page 22 23 The thread is tangled on the wrong side of the fabric You have not threaded ...

Page 116: ...resser foot lever before continuing the operation A stitch other than the buttonhole or bar tack stitch was selected and the foot controller was pressed or the start stop button was pressed if the foot controller is not connected while the buttonhole lever is lowered Raise the buttonhole lever before continuing the operation The buttonhole or bar tack stitch was selected and the foot controller wa...

Page 117: ... hook and loop fastener 45 J joining 73 joining stitch 63 70 M main parts 8 main power switch 14 monogramming 72 74 N needle 31 needle bar thread guide 9 28 needle clamp screw 9 33 needle plate 9 needle plate cover 9 95 needle position 49 needle position button 9 needle threader 9 28 O openings 68 operation beep 16 114 operation buttons 9 operation panel 10 optional accessories 7 overcasting stitc...

Page 118: ...2 thread tension 43 trial sewing 44 triple stretch stitch 49 troubleshooting 98 twin needle 33 34 U upper tension control dial 8 43 102 upper threading 25 utility stitch indicator 10 39 utility stitch key 39 78 W walking foot 65 wing needle 74 Z zigzag stitch 44 47 63 zipper foot 59 zipper insertion 59 ...

Page 119: ......

Page 120: ...English 885 E42 E43 Printed in China XG2315 001 Please visit us at http support brother com where you can get product support and answers to frequently asked questions FAQs ...

Reviews: