background image

Step 1

Insert a cam screw 

(B)

 into each hole on both side 

panels 

(2 & 3)

 the as shown in the diagram.

B x 10

Step 2

Insert a steel dowel 

(C)

 into each corner hole on the top 

panel 

(1)

 and bottom panel 

(4)

 as shown, making sure 

they all sit facing the correct direction.

C x 8

Summary of Contents for Elizabeth Narrow

Page 1: ...ASSEMBLY GUIDE Elizabeth Narrow Bookcase v1 0 ...

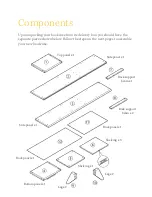
Page 2: ...ve the separate pieces shown below Follow the steps on the next pages to assemble your new bookcase Side panel x 1 Top panel x 1 Bottom panel x 1 Back panel x 1 Shelving x 3 Shelving x 1 Leg x 2 Leg x 2 Back panel x 1 Back support beam x 2 Back support beam x 1 Side panel x 1 ...

Page 3: ...x 1 6mm L x 4 Spec Ø8 4 x 2mm M x 4 Spec M8 x 13mm N x 1 Spec O x 36 Spec Ø3 5 x 15mm F x 16 Spec Ø8 x 30 G x 12 Spec H x 1 Spec M4 I x 4 Spec M8 x 12 x 30mm J x 4 Spec M8 x 60 D x 8 Spec Ø8 x 8 5mm E x 2 Spec Ø7 x 50mm A x 10 Spec Ø15 x 13 5mm B x 10 Spec Ø7 x 44 5mm C x 8 Spec Ø7 x 49 5mm ...

Page 4: ...nto each hole on both side panels 2 3 the as shown in the diagram B x 10 Step 2 Insert a steel dowel C into each corner hole on the top panel 1 and bottom panel 4 as shown making sure they all sit facing the correct direction C x 8 ...

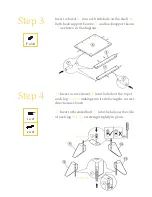
Page 5: ...am 7 as shown in the diagram F x 16 Step 4 4 1 Insert a cross dowel I into the hole at the top of each leg 9 10 making sure it sits facing the correct direction as shown 4 2 Insert a threaded bolt J into the hole on the side of each leg 9 10 screwing it tightly in place I x 4 J x 4 I J J Step 4 1 Step 4 2 ...

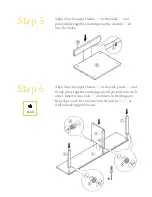
Page 6: ...e the dowels F fit into the holes Step 6 Align a back support beam 8 to the side panel 2 and firmly press together making sure all parts fit into each other Insert a cam lock A as shown in the diagram Repeat process for the structure formed in Step 5 as well as back support beam 7 A x 5 ...

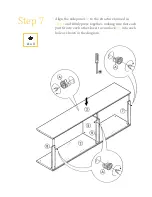
Page 7: ...Step 7 Align the side panel 3 to the structure formed in Step 6 and firmly press together making sure that each part fit into each other Insert a cam lock A into each hole as shown in the diagram A x 5 ...

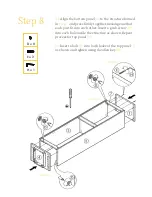
Page 8: ...ther making sure that each part fit into each other Insert a grub screw D into each hole inside the structure as shown Repeat process for top panel 1 8 2 Insert a bolt E into both holes of the top panel 1 as shown and tighten using the allen key H Step 8 1 Step 8 1 Step 8 2 D x 8 E x 2 H x 1 ...

Page 9: ...Step 9 Align back panel 11 to its corresponding place on the structure and secure in place with screws O Repeat for the back panel 12 O x 36 O ...

Page 10: ...sure the threaded bold J protruding from the leg fits into the hole in the frame Fit a flat washer K to the bolt J followed by a lock washer L and a nut M using the spanner N to tighten the nut in place Repeat for the remaining legs 9 10 K x 4 L x 4 M x 4 N x 1 J K L M N ...

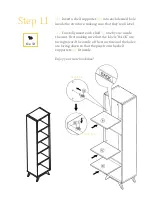
Page 11: ... they re all level 11 2 Carefully insert each shelf 6 one by one inside the unit First making sure that the labels BACK are facing toward the inside of the structure and the holes are facing down so that the pins from the shelf supporters G fit inside Enjoy your new bookcase G x 12 Step 11 1 Step 11 2 ...

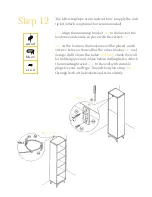
Page 12: ...ace with the screws cc 12 2 At the location the bookcase will be placed mark out two holes on the wall for the other bracket aa and using a drill to form the holes Warning check the wall for hidden pipes and cables before drilling holes Attach the mounting bracket aa to the wall with suitable plugs for your wall type Thread the nylon strap bb through both of the backets and secure firmly Step 12 1...

Reviews: