8
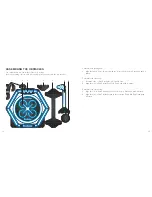
CONTROLLER
9
SYNCHRONIZE THE DRONE WITH THE CONTROLLER
1 .
Ensure that the battery has been fully charged (see Page 7) .
2 .
Insert the battery into the battery compartment on the underside of the drone and
plug the battery's charging terminal into the drone .
3 .
Place the drone on a flat surface .
4 .
Press the controller's left control stick downward .
5 .
Slide the controller's ON/OFF switch to the ON position .
6 .
Very slowly, move the left control stick to its upper limit . You will hear a tone .
7 .
Move the left control stick down slowly . When the left control stick returns to its
starting position in the lower section, you will hear another tone and the LED lights
stop flashing . The controller and drone are now synchronized .
SET YOUR SPEED
The drone has three speed settings . While learning to use the drone, it is advisable to
start by using the slowest speed setting .
To check and change the speed, press the Speed Selector on the controller .
• If you hear two tones, the drone is in slow speed .
• If you hear three tones the drone is in intermediate speed .
• If you hear a continuous series of tone the drone is in fast speed .
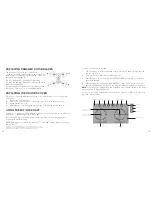
1 .
Speed Selector
2 .
Power LED
3 .
Left Control Stick
4 .
Left/Right Rotate Trim
5 .
Return Home Button
6 .
Headless Mode Button
7 .
Forward/Backward Trim
8 . Left/Right Trim
9 . Right Control Stick
10 . Camera LED
11 . Camera Button
12 . Smartphone Holder
3
2
1
12
11
10
9
5
4
6
38
7
Summary of Contents for 324463
Page 13: ...22 23 NOTES NOTES...


