background image

14

Water Temperature 

Button and Indicators

Nozzle Position Buttons

Water Pressure and

Dry Temperature

Buttons and Indicators

Seat Temperature

Button and Indicators

 9

 8

   7

 6

Eco Mode Button

and Indicator

Power Indicator

Auto Mode Button

Night Light Button

and Indicator

  10

  11

 12

  13

 1

 3

 4

 2

Massage Button

Stop Button

Front Wash /

Move Button

Rear Wash /

Move Button

Warm Air Dry Button

 5

OPERATING THE SWASH 

SE400 Control Panel

Summary of Contents for SE400

Page 1: ...OWNER S MANUAL Swash SE400 Advanced Bidet Toilet Seats SE400 EW SE400 RW ...

Page 2: ...2 Attach Proof of Purchase to This Page Adjunte prueba de compra a esta página Joindre une preuve d achat à cette page ...

Page 3: ...MATION Product Features Product Dimensions Product Parts 09 09 10 11 13 PRODUCT INSTALLATION Installation Parts Before Installation Swash Installation External Bidet Filter Installation 14 14 16 18 OPERATING THE SWASH SE400 Control Panel Using the SE400 Special Mode Operations TECHNICAL INFO 19 PRODUCT SPECIFICATIONS 20 20 20 21 21 MAINTENANCE Seat Cleaning Removal Nozzle Cleaning Cleaning the Mes...

Page 4: ...r cord repeatedly Unplug the product before cleaning repairing inspecting or replacing parts Remove any dust or water from the power plug prior to plugging in Do not plug the product into an electrical outlet or power strip that is being used by too many other products Use an electrical outlet adequate for the wattage of the product rated for a minimum of 15 amps If the power cord is damaged do no...

Page 5: ...mage Do not use the product in locations exposed to excessive moisture and do not splash water onto the product While cleaning the bathroom pull the power plug out of the electrical outlet and exercise caution to ensure that water or cleaning supplies do not splash onto the bidet Failure to do so may result in electric shock or fire If foreign material enters the product pull the power plug out of...

Page 6: ...ion or instruction concerning the use of the appliance by a person responsible for their safety Children should be supervised to ensure that they do not play with the appliance Never operate this product if it has a damaged cord or plug if it is not working properly if it has been dropped or damaged or dropped into water Contact the Brondell Service Center for examination and repair Keep the cord ...

Page 7: ... cord immediately Test Reset Grounding Pin IMPROPER USE OF THE GROUNDING PLUG CAN RESULT IN A RISK OF ELECTRIC SHOCK If repair or replacement of the cord or plug is necessary do not connect the grounding wire to either flat blade terminal The wire with green insulation either with or without a yellow stripe is the grounding wire Check with a qualified electrician if the grounding instructions are ...

Page 8: ...to provide a pulsating cleaning spray Warm Air Dryer Includes adjustable temperature with five levels for a hands free experience and toilet paper reduction even elimination PRODUCT INFORMATION Product Features Nozzle Oscillation The Move function provides a massaging oscillating cleanse during the wash cycle ensuring a thorough and comfortable wash Auto Function Activates a preset for a rear wash...

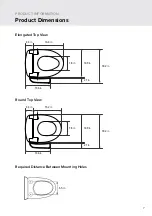
Page 9: ...ired Distance Between Mounting Holes 18 2 in 18 2 in 14 9 in 14 9 in 7 8 in 7 8 in 2 7 in 2 7 in 16 4 in 15 2 in 13 6 in 13 6 in 4 3 in 4 3 in Elongated Top View Round Top View PRODUCT INFORMATION Product Dimensions ...

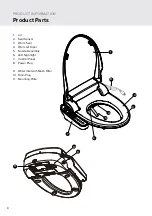
Page 10: ...nsor 3 Warm Seat 4 Warm Air Dryer 5 Nozzle Assembly 6 LED Nightlight 7 Control Panel 8 Power Plug 9 Water Inlet with Mesh Filter 10 Drain Plug 11 Mounting Plate 9 10 11 8 7 6 1 5 4 2 3 PRODUCT INFORMATION Product Parts ...

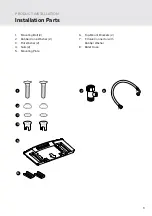
Page 11: ...nting Bolt 2 2 Rubber Cone Washer 2 3 Flat Washer 2 4 Nuts 2 5 Mounting Plate 6 Top Mount Brackets 2 7 T Valve Connector with Rubber Washer 8 Bidet Hose PRODUCT INSTALLATION Installation Parts 1 5 2 3 6 4 8 7 ...

Page 12: ...mbing connections which makes a standard Swash installation difficult or impossible For this we recommend using our Alternate Swash Bidet Seat T Valve found on brondell com CHECK WATER SUPPLY LINE Check the line that connects the toilet tank to the water shut off valve If it is a rigid pipe you may need to purchase a flexible hose to replace it before installing the Swash The length of the hose an...

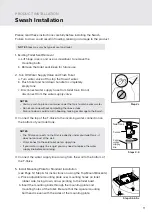
Page 13: ...cing down arrow pointing to the toilet bowl b Insert the mounting bolts through the mounting plate and mounting holes of the toilet Be sure that the square mounting bolt head is even with the sides of the mounting plate PRODUCT INSTALLATION Swash Installation Please read these instructions carefully before installing the Swash Failure to do so could result in flooding leaking or damage to the prod...

Page 14: ...onto the bidet seat 8 Attach the Swash to the Mounting Plate a Set the Swash flat on the toilet bowl in front of the mounting plate and slide seat onto plate until it is secure b If the seat appears too short or too long for the toilet adjust the mounting plate accordingly To adjust the mounting plate loosen the nuts underneath the toilet and slide seat forward or backwards as needed Once the seat...

Page 15: ...f their bidet seat by purchasing and installing an external inline water filter to be used with the Swash The bidet filter should be changed every six months and can be purchased online at brondell com 11 Plug the Power Cord into an Electrical Outlet a If the Power Indicator is not illuminated press any button on the control panel PRODUCT INSTALLATION Swash Installation External Bidet Filter Insta...

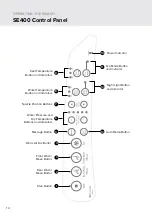
Page 16: ...and Indicators Seat Temperature Button and Indicators 9 8 7 6 Eco Mode Button and Indicator Power Indicator Auto Mode Button Night Light Button and Indicator 10 11 12 13 1 3 4 2 Massage Button Stop Button Front Wash Move Button Rear Wash Move Button Warm Air Dry Button 5 OPERATING THE SWASH SE400 Control Panel ...

Page 17: ...ward during a wash cycle Between uses the nozzles will revert back to the middle position 8 Water Temperature Button and Indicators Press and release the Water Temp button to adjust the outgoing water temperature to one of four settings LO 93 2 F MED 98 6 F HI 104 F and OFF Settings will be saved for the next use 9 Seat Temperature Button and Indicators Press and release the Seat Temp button to ad...

Page 18: ... Wash or Front Wash button on the control panel one time to initiate a wash The nozzle will self clean extend into the toilet bowl spray for two minutes turn off automatically retract and self clean once again 1 Pressing the Rear or Front button a second time while the wash is running will cause the nozzle to oscillate forward and backward providing a wider range of wash spray Press again to cance...

Page 19: ...op the dryer before the two minutes has elapsed press Stop Auto Mode Pressing the Auto Mode button will initiate a one minute Rear Wash with the following parameters preset Seat Temperature set to Medium Nozzle Oscillation Move on Water Pressure set to Level 3 Water Temperature set to Medium After the wash cycle is over Auto Mode will initiate a one minute Warm Air Dry cycle on Level 2 Eco Mode In...

Page 20: ... worked press the Dry button If the Warm Air Dryer comes on without anyone sitting on the seat you have successfully overridden the Seat Sensor 4 You can resume using the seat as normal 5 To reactivate the Seat Sensor repeat Steps 1 3 Activating Deactivating Silent Mode By default the Swash will beep to confirm commands from the control panel Follow the steps below to silence the beeping sounds 1 ...

Page 21: ...4 F 104 F Mesh Filter 0 43 in x 0 6 in diameter WARM WATER WASHING DEVICE Rear Wash Maximum 95 L min automatic nozzle self cleaning Front Wash Maximum 95 L min automatic nozzle self cleaning Standard Time Rear Wash 2 minutes Front Wash 2 minutes Water Pressure Control 5 Levels Water Temperature Control 4 Levels Off incoming water temperature Low 93 2 F Medium 98 6 F High 104 F Heater Power Consump...

Page 22: ...s the Stop button Step 1 NOTE Be cautious of leaving home and beauty products in contact with the bidet seat the result of which can be irreversible discoloration Most stains can be removed using a 1 1 mix of rubbing alcohol and water and a soft cloth or towel However some permanent stains are the result of substances left on the seat while the seat heater was activated Be cautious of home and bea...

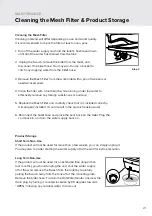
Page 23: ...r months you should unplug the unit shut the water supply off at the wall remove the Swash from the toilet by forcefully pulling the Swash away from the tank off of the mounting plate Remove the bidet hose To drain the Hot Water Heater unscrew the drain plug by turning it counterclockwise by 90 degrees towards OPEN allowing any residual water to drain out MAINTENANCE Cleaning the Mesh Filter Produ...

Page 24: ...det seat is not working 1 Bidet not plugged in 2 No power to Swash 3 The incoming water is too hot 4 Not activating Seat Sensor 1 Make sure the bidet is plugged in 2 Check and reset GFCI outlet 3 Ensure that the bidet seat is connected to the cold water supply 4a Adjust sitting position to fully cover the Seat Sensor 4b Override the Seat Sensor Product shuts off during use 1 Washing time exceeded ...

Page 25: ...ure that the Seat temperature setting is on Bidet wash feature does not work or fails to spray 1 Body sensor does not detect that you are sitting on the Swash 1a Adjust sitting position to fully cover the Body Sensor see Page 8 1b Override the body sensor refer to Special Mode Operation section on Page 18 to unlock the body Seat Sensor Water wash spray not heated 1 Water temperature set to off 2 R...

Page 26: ...at side down with lip pointing up towards the toilet tank connection and firmly tighten the connector 2 Make sure that the bidet hose is correctly connected and tight Check any rubber washers and do not over tighten 3 Check if there is anything between the mesh filter and bidet Remove clean and reinstall mesh filter Check if the filter is damaged see maintenance section 4 Check the water tank plug...

Page 27: ...ire earthquake floods etc Damage or loss resulting from sediments or foreign matter contained in a water system Damage or loss resulting from negligent or improper installation including installation of a unit in a harsh or hazardous environment Damage or loss resulting from removal improper repair modification of the product or improper maintenance including damage caused by chlorine or chlorine ...

Page 28: ...MANUFACTURED BY Brondell Inc Made in Korea Please retain receipt records for any warranty claims ...

Reviews: