
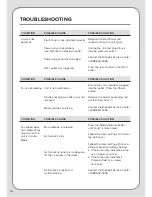

12
MAINTENANCE (cont.)
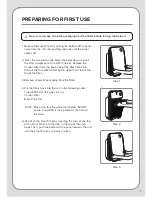
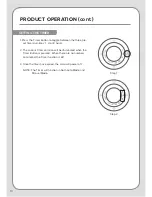
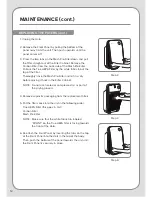
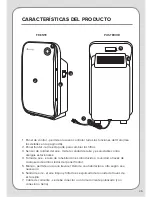
1. Unplug the Halo.
2. Remove the Front Panel by pulling the bottom of the
panel away from the unit. Then push upwards until the
panel comes off.
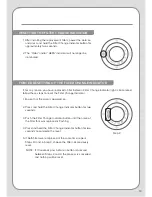
REPLACING THE FILTERS (cont.)
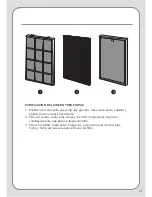
3. Press the two tabs on the Mesh Pre-Filter down and pull
the filter straight out of the Filter Cabinet. Remove the
Carbon Filter from the back side of the Mesh Pre-Filter.
Pull out the True HEPA Filter by the white fabric tab at the
top of the filter.
Thoroughly rinse the Mesh Pre-Filter and let it air dry
before placing it back in the Filter Cabinet.
NOTE: Do not use heated or compressed air as part of
the drying process.
4. Remove all plastic packaging from the replacement filters.
6. Re-attach the Front Panel by inserting the tabs on the top
of the Front Panel into the slots in the top of the body.
Then, push the bottom of the panel towards the unit until
the Front Panel is securely in place.
5. Put the filters back into the unit in the following order:
True HEPA Filter (this goes in first)
Carbon Filter
Mesh Pre-Filter
NOTE: Make sure that the white fabric tab labeled
“FRONT” on the True HEPA filter is facing towards
the front of the Halo.
Step 2
Step 3
Step 6
Summary of Contents for Halo PH10-B
Page 1: ...OWNER S MANUAL Halo PH10 B True HEPA Air Purifier ...
Page 2: ......
Page 22: ...MANUAL DEL USUARIO Purificador de aire True HEPA Halo PH10 B ...
Page 23: ...21 ...
Page 43: ...MANUEL DE L UTILISATEUR Purificateur d air True HEPA Halo PH10 B ...
Page 44: ...42 ...
Page 64: ......


