


Página 8
MODELOS 744L • 744RL • 744RNL
1100709D
12. Instale la bombilla.
(Bombilla no incluida con el
modelo 744L.)
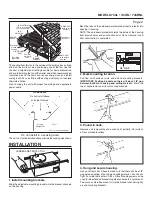
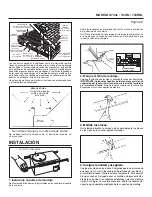
MATERIAL
ACABADO
DE TECHO
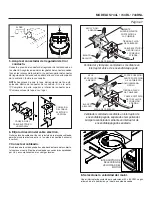
COLLARÍN
DE LA
CUBIERTA
ORIFICIO
DE HOLGURA
9. Termine el techo.
Corte una abertura en el techo terminado para el collarín de
la cubierta.
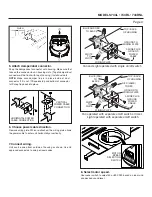
RESORTES
ANILLO/DEFLECTOR
SOPORTE DE
LA LÁMPARA
PRECAUCIÓN: Gire la bombilla para instalarla
o quitarla.
PRECAUCIÓN - RIESGO DE INCENDIO:
LÁMPARA MÁXIMO DE 75 VATIOS
Use únicamente lámparas R30, BR30, PAR30L, o PAR30LN
(máximo de 75 vatios).
Para sitios expuestos a agua (tinas o duchas): use
únicamente la lámpara PAR30L o PAR30LN (máximo de 75
vatios).
No utilice ningún otro tipo de lámpara.
No instale una lámpara identificado para el uso solamente
en lumbreras incluidas.
!
11. Acople el anillo / deflector a la cubierta.
Utilice un lápiz para insertar un extremo de cada resorte en los
agujeros que están en el soporte de la lámpara. Centre el anillo/
deflector en la abertura del cielo raso.
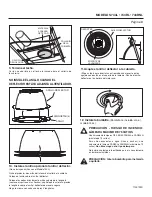
10. Instale el anillo opcional al anillo / deflector.
(No se incluyen anillos con el Modelo 744L.)
Quite el protector de cartón del interior del collar de la cubierta.
Coloque el anillo sobre el anillo / deflector.
Coloque los dedos directamente arriba y abajo de la lengüeta
(como se muestra con las flechas) y apriete para sujetar a presión
la lengüeta sobre el anillo / deflector de manera segura.
Haga lo mismo con cada una de las 4 lengüetas.
SPRINGS
TRIM RING / BAFFLE
LAMP
BRACKET
Securely attach optional trim ring.
TRIM RING / BAFFLE
TABS (4)
TRIM RING
Place trim ring
over trim ring / baffle.
Reverse Step 1 to
re-install trim ring / baffle
into housing.
DEV-10141
Use a pencil to unhook
springs and remove
trim ring / baffle
from housing.
1
2
Place fingers directly
above and below tab
(as shown with arrows).
Squeeze to snap tab
securely to
trim ring / baffle.
Repeat for each of the
4 tab locations.
3
4
ANILLO/DEFLECTOR
LENGÜETAS (4)
ANILLO
NO INSTALE EL ANILLO CUANDO EL
DEFLECTOR ESTÁ YA ADJUNTA AL VENTILADOR.


