Page
1
of
4
INSTALLATION MANUAL
–
Mounting Accessories for Leica
™
BLK-247
Pendant/Wall Mount w/ Solar Shroud, Pole Mount, Corner Mount
WARNING: Before beginning installation of this product, carefully review the
safeguards and precautions found on page 2 of this manual.
Unpacking
Unpack carefully. This equipment should be handled with care. If an
item appears to have been damaged in shipment, replace it properly
in its carton and notify the shipper. If any items are missing, notify
Broadsight Systems, Inc. The shipping carton is the safest container
in which the unit may be transported. Save it for possible future use.
Service
If the unit ever needs repair service, the customer should contact
Broadsight Systems, Inc. for a return materials authorization (RMA)
and shipping instructions.
Care and Maintenance
Perform routine maintenance to keep the unit dust free. Clean the
viewing window with a mild detergent and water using a soft cloth, or
Kimwipe
™
brand Delicate Task wipes.
Model Designation
BLK-247MKB
Wall and Pendant Mount Kit w/ Sun Shroud For
Leica
™
BLK-247; Black
BLK-247PMB
Pole Mount for use w/ BLK-247MKB; Black
BLK-247CMB
Corner Mount for use w/ BLK-247MKB; Black
Description
These mounting accessories allow the Leica
™
BLK-247 to be installed
outdoors in wall mount, pendant mount, corner mount, and pole
mount applications. A sunshield is included with the wall/pendant
mount kit to shade the BLK-247 in hot environments.
Hardware Kit
–
BLK-247MKB
3 x M5 x 10mm
” Button Head Cap Screw, Stainless Steel
Hardware Kit
–
BLK-247PMB
2 x Strap Kit, Stainless Steel
Hardware Kit
–
BLK-247CMB
4x ¼-20 x
½”
Button Head Cap Screw, Stainless Steel
4x
¼”
Lock Washer
4x
¼”
Flat Washer
Tools Required
3mm Allen wrench or hex bit
4mm Allen wrench or hex bit
Teflon thread sealant tape (Pendant mount only)
Loctite
™
242 Threadlocker
Appropriate tools for customer-supplied fasteners for anchoring to
installation surface (-MKB and -CMB)
Certification
Installation should be performed by a licensed professional and
conform to the National Electrical Code (NEC) and any applicable
local codes.
Installation
1.
Remove mounts and BLK-247 from packaging.
2.
Remove mounting ring (see Figure 1) from BLK-247 per
instructions included with that unit.
3.
Note the desired orientation of the BLK-247 with respect to
exhaust direction. This is critical for long-term operation of the
unit. Refer to the manual included with the BLK-247
4.
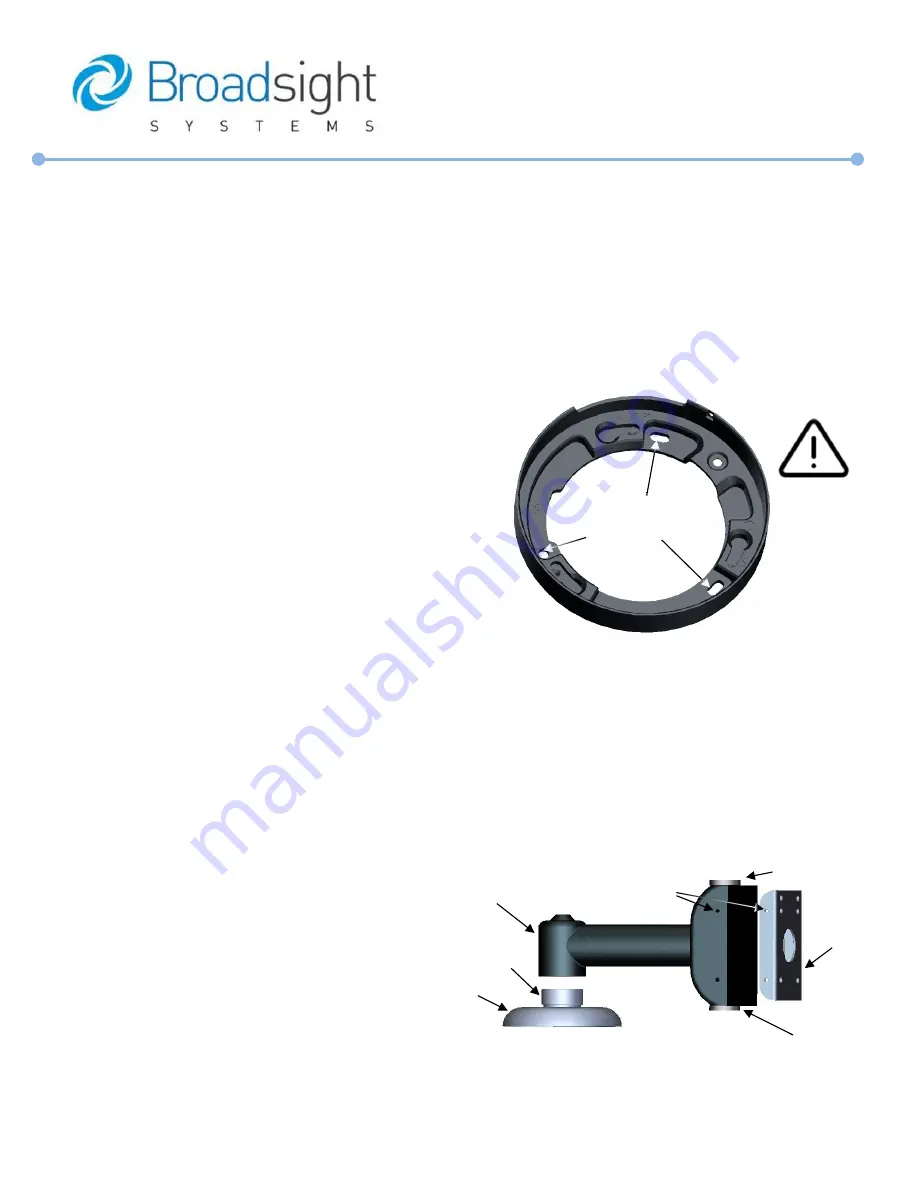
Align the three holes indicated in Figure 1 with the desired holes
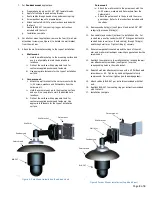
in the pendant cap (see Figure 2). Note the pendant cap can be
rotated (loosened) up to 60° without compromising its seals to
achieve the desired angle.
5.
Align solar shroud (optional) between pendant cap and
mounting ring.
6.
Apply Loctite
™
242 Threadlocker to the M5 screws from the
hardware kit then use them to attach the mounting ring to the
pendant cap.
Figure 2 - BLK247MKB Wall Mount
***** Instructions Continue on Page 3 *****
Broadsight Systems, Inc.
1023 Corporate Park Dr.
Mebane, NC 27302
www.broadsightsystems.com
Align these (3) holes with
pendant cap threads
Figure 1 - BLK-247 Mounting Ring
CAUTION
:
Orientation of
exhaust port is
critical
–
refer to
BLK-247 manual.
Pendant
Cap
Wall Arm
Wall
Bracket
Conduit Plug
(3/4
”
NPT)
Conduit Plug (3/4
”
NPT)
Wall Arm
Attachment
Screws (4)
1.25
”
NPT
Male Thread


