


ENGLISH
OPERATION MANUAL
BRITEQ
®
7/65
BT-36L1
Led Display
Display on: display is always on.
Display off: display is off when not used.
Press the MENU button until the display shows
.
Press the ENTER button, the display starts blinking.
Use DOWN and UP buttons to select
(display always on) or
(display off when not used).
Once the mode has been selected, press the ENTER button to save it.
(or automatically return to the main functions without any change after 8 seconds)
To go back to the functions without any change press the MENU button again.
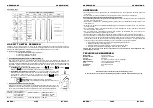
At50 At51 At52
Self-Test
Used to activate the 3 internal “self-test” programs which show all possibilities of the unit.
Press the MENU button until
At50 At51
or
At52
is shown on the display.
At50
is a full automatic test program
At51
and
At52
are test programs where you can manually set different parameters for movement,
movement speed and color.
Press the ENTER button to start the internal self-test program.
To go back to the functions press the MENU button.
Master Mode
Used to activate another test program where you can manually set all the parameters of the unit.
Press the MENU button until
is shown on the display.
Press the ENTER button, the display starts blinking.
Use DOWN and UP buttons to select
Once a mode is selected, press the ENTER button: the display starts blinking to indicate that you can set a
value between 000 and 255.
Note:
when no buttons are pressed for 8 seconds, the test program aborts automatically.
Fixture Hours
Used to show the number of working hours of the unit.
Press the MENU button until
is blinking on the display.
Press the ENTER button to show the number of working hours in the display.
To go back to the functions press the MENU button.
Software version
Used to show the software version that is installed in the unit
Press the MENU button until
is blinking on the display.
Press the ENTER button to show the software version on the display.
To go back to the functions press the MENU button.
Reset
Used to force a reset of the unit.
Press the MENU button until
is blinking on the display.
Press the ENTER to reset all channels to their standard position.
To go back to the functions press the MENU button.
Please also check the chapter about the DMX-channel configuration of the unit to find out how you can force
a reset by DMX.
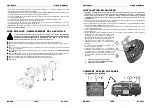
Home Position Adjust
Used to adjust the home position of these functions: Pan, Tilt, B-red, B-green, B-blue
Press MENU button shortly to enter the main menu (“Addr” on the display)
Now press the ENTER button for at least 5 seconds to go into offset mode.
Use DOWN and UP buttons to select the function that you want to adjust
ENGLISH
OPERATION MANUAL
BRITEQ
®
8/65
BT-36L1
Press the ENTER button, the display starts blinking.
Use DOWN and UP buttons to adjust the home position
Press the ENTER button to confirm your setting (or automatically return to the main functions without any
change after 8 seconds)
To go back to the functions without any change press the MENU button again.
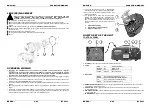
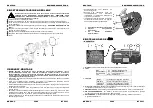
HOW TO CONNECT THE UNIT BY DMX
The DMX-protocol is a widely used high speed signal to control intelligent light equipment. You
need to “daisy chain” your DMX controller and all the connected light effects with a good
quality XLR M/F balanced cable. To prevent strange behavior of the light effects, due to
interferences, you must use a 90
Ω
to 120
Ω
terminator at the end of the chain. Never use Y-
splitter cables, this simply won’t work!
Each light effect in the chain must have its proper starting address so it knows which commands from the
controller it has to decode.
HOW TO SET THE THE RIGHT STARTING ADDRESS:
Refer to the previous chapter (DMX-512 address setting) to learn how to set the starting address on this unit.
The starting address of each unit is very important. Unfortunately it is impossible to tell you in this user
manual which starting addresses you have to use because this completely depends on the controller you will
use… So please refer to the user manual of your DMX-controller to find out which starting addresses you
must set.
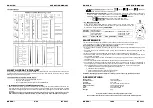
DMX-CONFIGURATION OF BT-36L1:
8 channel modus


